A cushion is an element of an engine support that serves to secure the engine to the car body. The support is a rubber-metal structure consisting of a steel body and a thick rubber pad.
The main role of the pillow is to dampen vibration coming from the motor.
On VAZ 2110 cars, eight-valve engines are attached to the body by 3 supports (two side and rear), and sixteen-valve engines are attached to 4 (two side, lower front and upper front).
Replacing engine mounts on a 16-valve VAZ-2112 with your own hands: remove from the support
An engine mount is a special support that is designed to secure the engine to the car body. It is a structure made of a steel body and a rubber (rubber - approx.) cushion placed in it. Its main purpose is to minimize vibration on the car body coming from the engine.
The video shows the detailed process of replacing engine mounts on a VAZ 2110-2112.
Step-by-step replacement process
Depending on which support has failed, we replace it.
Right pillow
In order to unscrew the engine mount on the right side, we perform the following procedure:
- Remove the top nut on the cushion.
- Then two bolts that secure it to the bracket.
- Next, under the wheel arch, remove the bolts securing them to the side member.
- Remove the old element and install the new one in the reverse order of removal.
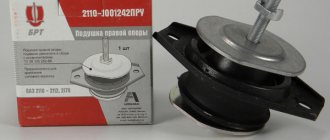
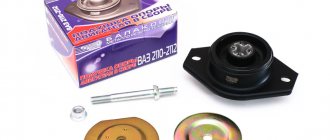
New right engine mount
Left pillow
- As in the case with the right pillow, remove the upper nut.
- Then unscrew the two bolts on the sides and remove the pillow.
- Remove the bottom washer from the stud.
- Install the new pillow in the reverse order.
Lower front airbag
- Using a wrench, unscrew the two bolts one by one.
- The sequence doesn't matter. Carry out dismantling depending on your convenience.
- We dismantle the old pillow and install a new one.
- If the inspection holes do not line up during installation, the engine must be raised slightly. You can use a jack for this.
Upper front airbag
This is what the new upper engine mount looks like
If the bolt does not come off, you can use WD-40.
We replace the old pillow with a new one.
Installing a new pillow
Please note that during this work, it is strictly forbidden to dismantle all the cushions at once, since in this case, the engine will simply have nothing to support it. Replacement should be done strictly one by one, starting with one of the four supports. Also, for the most reliable fixation, you can put wooden supports or a jack under the engine.
Malfunctions
You can tell that the engine mounts are out of order by the increase in vibrations emanating from the engine to the body. When it operates in a stable mode, and the body begins to vibrate and rattle, transmitting everything to the pedals, instrument panel and steering wheel, you can be sure that the engine mounts are faulty.
Also, wear of the pillows is often observed when starting the engine and turning it off. So, if there is a lot of wear, a noise may be heard about the contact of engine elements and the metal supports of the cushion.
Functionality check
Before you start replacing pillows, you should make sure the old ones are working. Because it may not be necessary to change them all at once.
First of all, with the engine running, inspect the condition of the airbags:
- For the presence of cracks.
- To maintain elasticity.
- Check for play in connections.
If such reasons are not observed on a certain pillow, then it does not require replacement. And if they are found, then there is no point in delaying replacement, since constant vibration can not only significantly reduce the comfort of driving a car, but also lead to negative consequences in the operation of the engine and gearbox.
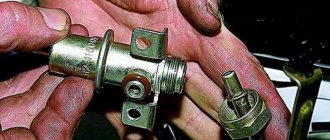
The lever is loose: do-it-yourself repair
To determine why the handle is loose, it must be removed. The work is carried out according to the following scheme:
- The lever holds the housing, so it must be removed, but the lever must remain in place. This operation is performed using the key at “13”;
We pull the casing, it is not secured by anything
Lever removal diagram
Reasons for failure
Among all the reasons for the failure of engine mounts, the most basic can be identified:
- Spent life of engine mounts due to mechanical impact.
- Wear of rubber elements due to constant changes in ambient temperatures.
Before you go to the store, you should determine whether it is worth changing only the cushions or the entire support assembly. Depending on the condition of the metal supports and the absence of damage on it, you can replace only its rubberized component.
- The price of a set of pillows for a 16-valve VAZ-2112 is about 1,500 rubles, and the assembled supports are 3,000 rubles.
- Work on replacing pillows in car services varies within 500 rubles per piece, however, we believe that this is a waste of money, and we suggest that you carry out this work yourself, since no special skills are required for this.
Source
Malfunctions and solutions
Some defects can be eliminated with your own hands, but to do this you need to learn to determine which defect is interfering with the normal operation of the gearbox. The main faults are listed below:
- The lever is loose. The cause may be worn-out gearbox and motor cushions. Also, other parts may be the “culprits”. Below are instructions for replacing the cushions and lever.
- Noise in the VAZ 2110 gearbox when switching. There may be several reasons: parts are worn out, poor lubricant is used or its level has dropped below the minimum, or water may have gotten into the working fluid. In the case of worn parts, only replacement will help. As for the lubricant, its quality and the presence of water in it can be checked with a dipstick.
- The gears are switched off randomly. This defect appears when parts wear out - an inspection is necessary to determine the cause of the spontaneous shutdown. The malfunction also appears due to incorrect operation of the drives that need to be adjusted.
Replacing engine mounts on VAZ 2110, VAZ 2111, VAZ 2112
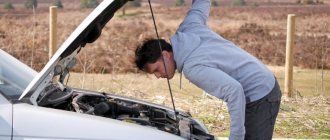
Welcome! Engine mounts - thanks to them, the vibration that the engine emits is not transmitted to the car body (It is damped due to the rubber from which the mounts are made), thus, if the car’s engine shakes, then these vibrations are not particularly transmitted to the body thanks to the mounts, except for this When driving over bumps, the engine standing on supports (cushions) does not knock much, but again softly springs and these vibrations are damped with the help of the material from which the cushions are made (rubber).
Note! To replace all engine mounts or just one, you will need to stock up on the same set of tools, namely: A set of wrenches, a set of spanners and a wrench with spanner heads, and in addition to all this, you will need a jack and a long flat board !
Summary:
Where are the engine mounts located? There are only three of them in 8-valve engines and four in 16-valve engines, while two airbags on both engines are in the same place, these are the lower left and lower right, they attach the engine to the car body from the very bottom, we immediately say that everything We will not be able to show them to you, but will only verbally tell you their approximate location; you will become more familiar with the replacement of each pillow as you read this article.
When do you need to change engine mounts? If the vibration on the body that the engine gives increases and when inspecting it (When it is running) it shakes, then you can think about replacing the engine mounts with new ones, they can be changed either individually or all together (At your discretion and according to the condition you need to look , if the pillow is in excellent condition, then it may not be necessary to change it) and besides, by visually looking at them, you can already understand by their condition whether they need replacing or not, to make this easier, you need to do the following operation, take a jack and a small but not small board that will cover the entire oil pan, then place this board on the jack and begin to lift it up (They should rest on the pallet) and as soon as the engine rises (it will no longer lie on the cushions) , proceed to inspect the cushions, if it suddenly turns out that the cushions do not need to be replaced, then before lowering the engine, we recommend that you lubricate them with some kind of protective compound and only then lower the jack along with the motor, by the way, when the motor is holding the jack, check for play between the pillow plates and the engine frame, if it turns out that there is play, then eliminate it by tightening the pillow mounting nuts and it is possible that the engine shaking will stop after the operation.
Lada 2112 ᵀᴴᴱ ᴼᴿᴵᴳᴵᴺᴬᴸ › Logbook › Additional engine support for VAZ 2112 16kl
You need to visit a car store, buy the necessary spare parts: 2 assembled pillows (choose from the Volzhsky Rubber Plant or Balakovo); 2 bolts M12x75; 4 washers dia. 12 mm; 2 nuts - 12 mm with nylon insert; 2 bolts M10x25; 6 wide washers - 10 mm; 2 engraving washers - 10 mm; 1 VAZ-2108 timing case bushing. Many owners have dozens of 16kW cars.
engine encounter a knocking noise in the gearbox area, which appears when accelerating the car or when driving on a rough road. Let's talk about the causes of knocking and methods of dealing with it. A strange rattling noise comes from underneath the car and sounds like a knocking noise in the gearbox. There is a knocking sound in the gearbox during vibration (acceleration, driving over bumps). In 2nd and 4th gear the knock is stronger, in 1st, 3rd and 5th it is less. At the service station they shrug their shoulders or point out that the gearbox is broken, as if something has broken inside it. I didn’t want to disassemble the VAZ 2110-2112 gearbox to eliminate this knocking noise. At one service station, I finally came across a knowledgeable person who pointed out the cause of the rattling, it turns out that it was the rocker hitting the transverse rod. And all because the gearbox sagged, because... the distance between the gearbox rocker and the transverse rod should be greater than it was when knocking.
The easiest way to eliminate gearbox rattling, or rather the knocking of rods, is to put a rubber hose on the gearbox rocker. This way the impacts will be softened and there will be no knocking noise during acceleration. It’s cheap and cheerful, but it’s better to eliminate the cause than to deal with its consequences.
So, since the VAZ 2110-2112 gearbox is sagging, then you need to find the cause of the sagging. The first thing you need to check is the nut on the left gearbox mount; often this nut gets unscrewed and the engine sags, and with it the gearbox.
If the nut is tightened, then you need to replace the engine and gearbox mounts. New mounts will raise the gearbox by about 5mm. (depending on the wear of the old engine and gearbox cushions).
If this is not enough and the knocking continues, then you can try to pull the engine forward a little, and an additional VAZ 2110-2112 engine support will help to do this. Then, during acceleration and braking, the internal combustion engine will swing back and forth less. The price of an additional engine mounting rod is about 1 thousand rubles. Such yellow iron for VAZ 2110-2112 is offered by TechnoMaster.
Or install an additional gearbox cushion. The fact is that initially the factory did not install this box support on 16kL engines, but there are mounts in the body for it. It is important when installing the cushion to leave a gap (place washers) between the rubber seal and the cushion body, otherwise transmission vibrations may transfer to the car body.
Why dozens of 16kL engines don’t install this additional gearbox support from the factory is not clear, but installing it helps secure the gearbox more rigidly, thereby preventing the gearbox link from tapping on the rod. The price of a 2110 rear BRT gearbox cushion with a bracket is about 450 rubles. Article: 2110-1001286/50
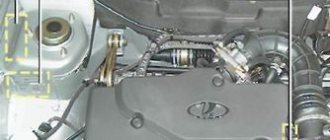
at the same time I’m changing the lower guitar))) Replacing the front lower engine mount of a VAZ 2112
How to replace engine mounts on a VAZ 2110-VAZ 2112?
Note! In this article we will talk exclusively about 8-valve cars, if you are looking for information about 16-valve engines, then go to another article called: “Replacing the pillows on the engine of a Lada Priora car,” in fact, the pillows in these two engines are not particularly different , it’s just that in 16-valve cars, additional cushions were added and one rear engine cushion was removed, despite this, the left and right engine cushions are present in both 16-valve cars and 8-valve cars, but information on replacing these two cushions is only posted in this article, so if you start with them, then do not follow the links, but simply continue reading this article on replacement!
Replacing the left engine mount:
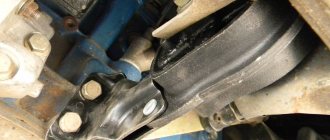
First, crawl under the car and place a support under the gearbox itself that will rest on the jack (This board can be and in no case do not lift the box with a jack alone, it may be damaged or if your jack has a flat surface and you are sure that it will not damage the gearbox body, you can try to lift the gearbox without any support), then lift the jack a little at a time (it’s best to use a hydraulic one, it’s unlikely to fall off, but you just need to secure it well) and behind the gearbox, a little the engine itself will rise, when this is done, unscrew the nut securing the engine to the cushion (Indicated by the red arrow) and carefully lower the jack so that the rod comes out of the cushion, as soon as the operation is completed, unscrew the two bolts that secure the cushion (Indicated by blue arrows) and completely remove it from the car, install a new and metal support on it, which you also removed from the old cushion, then lift the engine again by the box and tighten the nut that secures the engine rod to the cushion, but only before that, be sure to tighten the bolts securing the cushion to the body.
Replacing the right engine mount:
The replacement is carried out as with the left cushion, namely, a jack is placed (Indicated by a red arrow), but not under the gearbox, but under the engine crankcase (Indicated by a blue arrow) and after which it lifts the engine and the nut that secures the power unit to the cushion is unscrewed (see small photo, it just shows unscrewing this nut), then the two bolts securing the airbag itself are unscrewed (indicated by green arrows) and it can already be removed from the car.
Note! This cushion is placed on the bracket, if suddenly it is bent or if you just want to change it, then unscrew the three bolts securing this bracket to the body spar and then remove it, by the way, before starting this operation, remove the generator belt, as To do this, read the article: “Replacing the alternator belt on a car”, point 1 you need!
Replacing the rear engine mount:
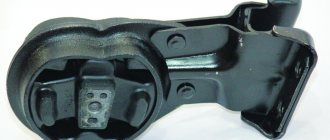
This cushion is the easiest to get to and, as a rule, if you have a good tool, it can be quickly removed, and this is how it is removed: first, a jack is placed under the gearbox and it lifts it a little, then two nuts are unscrewed (They are not visible in the photo below, the pillow itself is indicated by a blue arrow and the knob is indicated by a red one, with the help of which one of the nuts is unscrewed) which secure the pillow to the body and two more nuts of bolts that secure the pillow through the bracket to the box (These nuts are indicated by green arrows in the small photo) and you can remove an old pillow, together with a bracket from the power unit.
Note! Pillows in the store can be sold either assembled with a bracket or without it, if you suddenly bought just such a pillow, then be sure to remove the bracket for it from the old one, they are fastened together with just one bolt (Indicated by the red arrow), by unscrewing it, the bracket can be separated from the pillow (We recommend clamping the bracket in a vice, this will make it much more convenient to unscrew the bolt)!
Additional video: To roughly understand the entire process of replacing engine mounts on cars of the tenth family, you can read the article and watch the video below with visual instructions.
Source
Detailed instructions for disassembling and repairing the VAZ 2110 engine:
2. Remove the clutch from the engine.
3. Remove the tension roller, camshaft drive belt and spacer washer, which is installed under the tension roller.
4. Remove the toothed pulley from the camshaft.
5. We unscrew four bolts, three of which attach the water pump. Unscrew the fastening nut on the rear cover of the camshaft drive belt and remove the cover.
6. To remove the water pump, insert a screwdriver between the block and the flange of the pump housing and thus move it from its seat. After completing these operations, remove the water pump.
7. Remove the head from the cylinder block.
8. Unscrew the bolts (there are 16 of them) securing the oil sump, then remove it together with the gasket.
9. Unscrew the bolts (there are 3 of them) securing the oil receiver and remove it. Please note that there are spring washers under the bolt heads.
11. Then rotate the crankshaft so that the piston that is being removed hits BDC (bottom dead center). It is necessary to unscrew the two fastening nuts to remove the connecting rod cover.
12. Now remove the connecting rod cover. In cases where it is difficult to dismantle the cover, you can first remove it with light blows of a hammer. It may be that the cylinder number on the cap will not be visible, in which case the cap should be marked with the cylinder number.
13
Using the handle of a hammer, push the connecting rod inside the cylinder, then carefully remove the piston and connecting rod from the cylinder. During the process, you need to make sure that the lower head of the connecting rod does not touch the cylinder mirror, since this can damage it
We remove the remaining pistons in the same way.
14. If you need to remove the piston from the connecting rod, then mark it with the cylinder number so as not to confuse them when installing them. There should also be a cylinder number on the connecting rod: if it is not visible, then we mark the connecting rod as well.
16. Unscrew the bolts (there are 6 of them), remove the crankshaft rear oil seal holder and the gasket. Remember that there are spring washers under the bolt heads.
17. Remove the toothed pulley from the crankshaft. If the key does not fit tightly in the groove of the shaft elbows, be sure to remove it so that it does not get lost.
18. Unscrew the six bolts, under the heads of which there are spring washers, and remove the oil pump and gasket.
19. We unscrew the mounting bolts on the five covers (each with 2 bolts) of the main bearings.
20. Remove the covers.
21. Remove the crankshaft of the VAZ 2110 car.
22. We remove the crankshaft thrust half-rings on the middle support.
23. If you do not plan to replace the liners, then as you remove them, remove them from the block beds and from the main bearing caps.
24. On the non-working side we mark the liners relative to the beds and covers.
25. If there is a need to remove the engine mounts and generator brackets, unscrew the bolts (3 pieces) securing them and remove the water pump supply pipe by unscrewing its fastening.
26. Remove the piston rings using a special puller. If there is no such device, then remove the rings from the piston by carefully releasing the ring locks.
27. Remove the oil scraper ring expansion spring from the auto engine piston.
28. Remove the retaining rings that hold the piston pin on both sides of the piston. There are recesses in the piston bosses for easy removal of the rings.
29. Using a suitable mandrel, push the pin out of the piston, then remove the piston from the connecting rod.
30. Remove the liners from the connecting rod and its cover. If they remain on the crankshaft, remove them from the shaft. If replacement of the liners is not required, then as they are removed, we mark them with respect to the numbers of the covers and connecting rods.
This completes the process of disassembling the VAZ 2110 engine. Good luck with the completion of the renovation.
Replacing engine mounts on VAZ-2110, 2111, 2112
A cushion is an element of an engine support that serves to secure the engine to the car body.
The support is a rubber-metal structure consisting of a steel body and a thick rubber pad. The main role of the pillow is to dampen vibration coming from the motor.
On VAZ 2110 cars, eight-valve engines are attached to the body by 3 supports (two side and rear), and sixteen-valve engines are attached to 4 (two side, lower front and upper front).
Airbag malfunctions
You can tell that the airbags have become unusable by the amount of engine vibration. If it operates in normal mode, and the body begins to rattle, transmitting vibration to the steering rack, pedal block, and instrument panel, you can be sure that the reason for this is the wear of the pillows.
The greatest vibration is usually observed when the engine starts, as well as when it is turned off. When the rubber cushions are completely worn out, a knocking noise may appear caused by the contact of the engine elements and its supports.
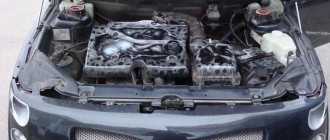
To be more convincing, start the engine, open the hood and visually inspect the engine mounts and the cushions themselves. Place your palm on the motor and feel how much it vibrates.
The causes of failure of engine mounts can be:
- deformation due to spent life, mechanical or temperature effects;
- loss of elasticity due to “aging” of rubber and temperature changes;
- delamination or cracking caused by exposure to chemically active liquids.
Do I need to change
There are no recommendations for replacing pillows depending on their service life, but once you determine that they are faulty, you should not delay replacing them. Vibration processes can not only worsen the comfort of the driver and passengers, but also lead to destructive processes in the engine or gearbox itself.
Having decided to repair the engine mounting elements, you need to decide whether you will change the cushions themselves or the mounts assemblies. In principle, if the metal support itself is not damaged, it can be left, replacing only the pillow.
The price of a set of pillows for a VAZ 2110 costs around 1,300 rubles. The cost of a complete set of supports is about 2,500 rubles.
For the work of replacing engine mounts or mounts at a service station, you will be charged at least 300 rubles for each.
For eight-valve engines
- Prepare the car for repair: place it on a flat surface, place stops under the rear wheels, remove the engine protection.
- Unscrew the generator belt tensioner bolt and remove the belt (key 13).
- Place the jack under the engine, place a thick wooden beam or board under its upper part. Raise the engine to remove the load on its mounts.
- Unscrew the nut of the central fastening of the right pillow (15 wrench).
- Unscrew the bolts securing the pillow to the bracket (key 13).
- From the bottom side of the right arch, unscrew the 3 bolts securing the bracket to the spar (17 key).
- Remove the bracket and replace the old cushion with a new one.
- Carry out installation in reverse order.
- Move the jack under the gearbox and lift it up.
- Unscrew the nut of the central fastening of the left pillow (15 wrench).
- Unscrew the two bolts securing the support and remove it (key 13).
- Replace it and reassemble the structure in reverse order.
- Unscrew the two 17 nuts securing the cushion to the body, and then two more nuts securing it to the gearbox (removal and replacement of the rear support is carried out from the bottom of the car).
- Remove the rear support.
- Unscrew the nut securing the pillow to the bracket (19mm wrench). Remove the old pillow and install a new one.
- Install the rear support in reverse order.
For sixteen-valve engines
Removing and replacing side airbags is done in the same way as for 8-valve engines.
Work to replace the front lower airbag is carried out from underneath the machine.
- Unscrew the bolt securing the front lower support rod to the front suspension cross member (15 wrench).
- Unscrew the nut of the bolt fixing the support to the engine bracket (2 wrenches x 15). Remove the bolt.
- Remove the support, replace the pillow or the entire structure.
- Carry out installation in reverse order.
- In the engine compartment, unscrew the bolt securing the upper front support to the body, holding its nut with your hand (17 wrench).
- Remove the bolt and nut.
- Unscrew the bolt securing the front upper support to the engine bracket (15mm wrench). Remove the bolt and nut.
- Remove the support, replace the pillow or the entire structure.
- Install it in reverse order.
Design and purpose of tens engine mounts
Over the years, vast practical experience has been accumulated on the topic of how to change engine mounts on a VAZ 2110, and videos of repair processes can also be found in abundance. However, few people pay attention to the features of the part. And, it must be said, it is in vain, because such knowledge will help to accurately determine the source of vibration and purchase the necessary spare part for repair.
The main purpose of the engine support is to reduce the level of vibration transmitted from the power unit to the car body. The rubber-metal structure consists of a steel base with a thick rubber cushion. The device has proven itself well, since it is quite reliable and is worth the money.
The eight-valve Lada 2110 engines are attached to the body at three points: right, left and rear. The side supports connect the body to the engine block through through holes. The rear support is attached with two bolts to the gearbox, and two nuts to the body. The importance of this damper part is very significant - it prevents longitudinal vibrations of the internal combustion engine during braking and acceleration.
When should you change the power unit mounts on a VAZ 2110: signs and reasons
Before you change the engine mounts of a VAZ 2110 car and watch a video of this process, you need to study the signs that indicate a breakdown of the rubber-metal mounts. The main symptoms characterizing problems with damper units:
- Vibrations transmitted to the steering wheel and pedal unit when idling.
- Extraneous noise in the cabin when moving on an uneven surface.
- A characteristic knocking sound in the engine compartment during acceleration and braking.
When drawing conclusions after your observations, you should not confuse vibrations on the steering wheel during braking, which are associated with defects in the brake discs or pads. To be more convincing, you need to open the hood and inspect the power unit supports. If you place your palm on a running internal combustion engine, you can feel changes in its operation.
Many years of experience in operating the Lada 2110 allows us to assert that the reasons for the failure of damper cushions are the following factors:
- Deformation phenomena on the rubber support due to mechanical and temperature influences, as well as due to exhausted service life.
- Cracking and delamination of rubber from exposure to chemically active components.
- Loss of elasticity caused by temperature changes.
Premature failure of the damper support can be caused by the owner’s excessive enthusiasm for such extreme techniques as sudden starts and emergency braking. Suspension parts are already subject to serious stress while driving, and a sporty driving style further increases the risk of their failure.
Additional support
In order to reduce engine movement in the longitudinal direction, an additional support (suspension rod) can be installed. They are mainly purchased in online stores. An additional support is installed on all types of VAZ 2110, but it has its own characteristics.
For an 8-valve model, you also need a special bracket that is used to carry the ignition module. Those who installed such a bar claim that when the car starts moving, the engine does not wobble, the cushions do not wear out as much, and the lower hose does not come off the radiator (which is what dozens of people “suffer from”).
Opinions differ regarding the decrease/increase in vibrations.
- Other
- Engine
- Steering
- Electrical equipment
- Transmission
- Brake system
- Suspension
- Tuning
- VAZ 2110 Other
- Engine
- Steering
- Electrical equipment
- Transmission
- Brake system
- Suspension
- Tuning
- Electrical equipment
- Steering
- Video publications
- VAZ tuning photo stream
- Operation and repair manuals
We repair competently: how to change the damper mounts of a VAZ 2110 engine and video of work processes
Replacing bearings is, of course, more troublesome than adjusting the clutch . but if you have the skills and a minimum set of tools, it is quite feasible without the help of car service specialists. To work, you will need a jack and a set of wrenches; you also need to take WD-40 fluid in advance - it is possible that the connecting elements are covered with rust. To perform a cycle of work, you need an inspection hole or a lift.
Replacing the right damper support
Before changing the right engine mount of a VAZ 2110 car following the video example, you should install wheel chocks and also disconnect the negative terminal from the battery. The further process is carried out according to the following scheme:
- Loosen the generator fasteners with a 13mm wrench and remove the belt drive.
- Loosen the tensioner bolt.
- Jack up the right side of the car.
- Using a 15mm wrench, unscrew the nut securing the support.
- Using a 13mm wrench, unscrew the two bolts securing the support to the bracket.
- Using a 17mm socket, unscrew the three bolts securing the bracket to the right side member.
- Remove the bracket and install the new support in the reverse order.
Replacing the left damper support
The procedure for changing the engine damper on the left side of the car is performed in the following order:
- Remove the car crankcase protection.
- Place a jack under the car in the area of the gearbox, place a wooden beam and lift the car, removing the load from the support.
- Using a 15mm socket and a wrench, unscrew the support pin fasteners.
- Release the support stop.
- Lower the jack slightly to freely remove the support pin.
- Using a 13mm socket, remove the fasteners of the engine support to the body.
- Pull the support towards the motor.
- Remove the lower support stop and install the new part in the reverse order.
- Remove the engine crankcase protection.
- Using a 17mm socket, unscrew the two nuts securing the support to the car body.
- Using two 19mm wrenches, unscrew the two bolts securing the gearbox and remove the support.
- Clamp the removed bracket in a vice and use a 19mm wrench to unscrew the bolt securing the support.
- Remove the bolt and install a new rubber support in the bracket.
- Assembly of the unit is performed in the reverse order while maintaining the perpendicularity of the mating planes.
Replacing the rear damper mount
Reading how to change the rear engine mounts on a VAZ 2110 and watching the video is half the battle. It is important to strictly adhere to the order of repair work:
Based on practical experience, it can be argued that the process of replacing the damper supports of the power unit on the “ten” is not particularly difficult. Usually, after repair, vibrations disappear, but if everything remains unchanged, then the solution to the problem may lie in a different plane. It makes sense then to look for a problem in the suspension or in the CV joint components.
Source
How the engine is mounted in a VAZ2110 car
The engine of a VAZ 2110 car is mounted in the car in the engine compartment. The supports are three elastic elements. The right support is attached to the engine bracket, and the left and rear supports are attached to the gearbox housing brackets. The last two supports are similar in design.
How to replace the right engine mount of a VAZ 2110 car
So:
- The top nut securing the engine mount is unscrewed.
- The two bolts holding the element to the bracket are unscrewed.
- The bolts that connect the bracket to the side member are unscrewed under the wheel arch.
- The bracket for the right engine mount of a VAZ 21103 is pulled out of the car.
- The old cushion is replaced and a new one is installed in the reverse order of disassembly.
How to replace the left engine mount of a VAZ 2110 car:
As in the first case, the upper nut fixing the pillow is unscrewed. But the engine on this side needs to be lowered.
Engine Mount Replacement Guide
- The engine is lowered onto the prepared support.
- The upper washer of the pillow is pulled out.
- The bolts securing the element are unscrewed.
- The left cushion under the VAZ 2110 engine is removed.
- The lower washer is removed along with the pin.
- The left engine mount of the VAZ 21102 is replaced with a new one, and assembly is performed in the reverse order.
- Using a socket, the nut that secures the rear cushion to the body is unscrewed.
- The mount of the engine mount on the VAZ 2110 to the gearbox is unscrewed.
- The pillow is removable.
How to replace the rear airbag of a VAZ 2110 car
Removing the rear cushion of a VAZ 2110
The rear airbags can be equipped with or without a bracket. The part is a one-piece cast element, which has all the necessary holes for mounting the pillow. To increase reliability and rigidity, ribs are located on the inside of the bracket. The upper motor mount bracket is an intermediate link between the engine support pad and the flexible rod. With its help, you can change the angle of fixation to the body and strengthen the fastener design.
So:
- Installation of the new part is carried out in the reverse order.
- The assembly of the unit is performed in reverse of its disassembly.
To correctly replace VAZ 2110 engine mounts, you can watch the video.
Tuning engine mounts for VAZ 2110
A fairly affordable tuning element with which you can make the engine mount more rigid is to replace the factory standard mount with an element with a more rigid body and a rubber support part. This device allows you to:
- Reduce engine movement as much as possible when braking, abruptly starting the car, or hitting bumps.
- Increase the service life of the exhaust system and drive wheel drives.
- Protect against self-switching gears.
- A bright tuning part will be installed under the hood.
Tuning part for VAZ 2110 engine mount
To increase engine rigidity, you can install a fourth support for the car’s power unit. It connects the cross member of the front suspension of the VAZ 2110 car and the clutch housing. Such a device can be installed both for mounting an 8-valve and 16-valve engine. When installing an additional support, you need to find another place for the ignition module and purchase a new bracket. The general view of the device is shown in the photo.
General view of additional support elements for VAZ 2110
Additional engine support SVS for VAZ 2110 2112,2170 2172
Installation instructions include:
How to fix the engine of a VAZ 2110 8 valves
- Removal of spark plug armored wires.
- The wire connectors from the car's ignition module are disconnected.
- The fastening to the cylinder block and clutch housing of the ignition module is turned out.
- The last three nuts securing the module are unscrewed, which is then removed.
- A new fastener is screwed in and the ignition module is installed in a different place.
- The fourth support bracket is screwed onto the front suspension cross member.
- A bolt is inserted into the hole in the terminal clamp, a nut is installed and tightened two turns.
- The lower head of the rod is placed in the support fixation eye.
- A bolt of the appropriate size is inserted into the hole of the eye and the cushion, and the nut is tightened.
- The size of the rod is adjusted until the hole in the clutch housing matches the hole on the upper head.
- Another bolt is inserted.
Installation of the fourth engine mount VAZ 2110
- The clutch housing shield and the rod head are attached through a spacer sleeve on the support.
- All bolts are tightened.
- When installing another mount for the ignition module, bolts are screwed into the threaded hole on the cylinder block.
- The bottom and top of the bracket are attached, all bolts are tightened.
When installing the fourth support, the price of the engine mounts will increase, but the reliability of mounting the engine of the VAZ 2110 will also increase.