Today tuning is especially popular. Many European and American car owners, as a rule, turn to specialists in this regard. The same cannot be said about Russian car enthusiasts. They are used to doing everything with their own hands. So to speak, we do and learn. In particular, the most common auto-tuning is the installation of disc brakes instead of outdated drum brakes. And here, for greater efficiency, it is necessary to additionally install a hydraulic handbrake. Despite the fact that such a design can be easily found in a car store, many motorists wonder whether it is possible to create it themselves. This post will tell you how to make a device with your own hands.
Why do you need a hydraulic handbrake?
The argument about stretching the cable of a mechanical handbrake is a strong argument, but not the only one or even the main one. This tuning is preferred by lovers of sports driving, since the hydraulic parking brake allows you to brake the rear wheels, and with unequal effectiveness. Under normal conditions, such actions are possible only with remarkable driving skills, and even then not on all cars. Note that with such a radical modification of the car’s brake system, the regulator must be installed between the main brake cylinder and the hydraulic handbrake - only in this case will you be able to redistribute the braking force, which is accentuated on the rear axle shaft, over a fairly large range, while the power of the front brakes will also increase. But remember that, according to the rules for operating vehicles, unauthorized intervention to change the standard design of the brake system is unacceptable if this is not approved by the car manufacturer.
Advantages and disadvantages of GR
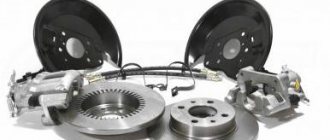
We have already noted that usually a hydraulic handbrake is installed when the drum brakes on the rear axle are replaced with disc-type devices. Before we talk about the pros and cons of hydraulic CT, let's talk about what the use of disc brakes gives:
- Drum brakes are subject to high heat, which leads to a decrease in stability over time. Disc mechanisms are cooled much more efficiently, so their characteristics are practically not subject to age-related changes - and this is considered one of the main advantages of brakes of this type;
- the second advantage emerges from the first - this is a reduction in the braking distance due to the higher efficiency of disc mechanisms. And increasing traffic safety is a very powerful argument given the ever-increasing density of traffic flow and speed on suburban highways;
- Structurally, disc brakes are more compact and noticeably lighter than their drum counterparts.
But the slightest distortion during installation of the system - and the uniform distribution of the braking force applied to the rear/front axles or rear wheels will be disrupted. This is the main disadvantage that accompanies the installation of disc brakes. The solution to this problem is to install a dual-circuit system, with each circuit involving the connection of the right and left wheels of both axles. The main thing is that the regulator is located in front of the hydraulic handbrake drive, but after the main TC. Only in this case can the advanced braking system operate optimally.
Now let's look at how important the role of the hydraulic hand brake is in this. In fact, if we limit ourselves to only replacing drum brakes with disc brakes, without installing a hydraulic handbrake and a dual-circuit system, in order for the braking efficiency to be at least as good, additional circuits will need to be connected to the rear suspension. In addition, additional calipers will need to be mounted on both sides of the rear suspension. It is clear that such tuning is very burdensome in terms of money, time and effort spent. However, everything is much simpler if you install a hydraulic handbrake instead. This will allow:
- ideally distribute braking force on the rear axle;
- noticeable effort of rear brake power;
- the same thing will happen with the front brakes, since the lines will be schematically shifted to the vacuum booster.
However, there are also disadvantages. The main one is a noticeable reduction in braking intensity if for some reason the front circuit fails. Most importantly, a complete failure of the brake system will not occur. This is certainly very important.
It is worth noting that the hydraulic parking brake performs its immediate functions almost flawlessly, holding the car in place on slopes with no less gradient than its mechanical counterpart.
Parking brake device
The main element that activates the brakes is the cable. The cable is better when it consists of a large number of thin veins with a diameter of 0.01 mm. These thin steel wires are twisted and twisted into one rope. If the cable consists of one wire, then its reliability is less, since it is a single-core cable that is easy to break. The cable material is high-strength steel.
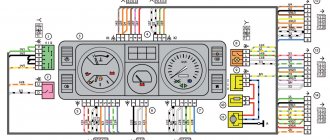
The diagrams show the design of a mechanical parking brake of the mechanical type.
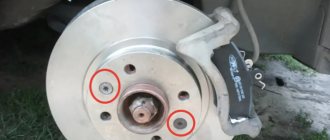
Mechanical type parking brake system drive: 1 – lever fixation button; 2 – parking brake drive lever; 3 – protective cover; 4 – traction; 5 – cable equalizer; 6 – adjusting nut; 7 – lock nut; 8 – cable; 9 – cable sheath Design of the rear wheel drum brake mechanism: 1 – hub fastening nut; 2 – wheel hub; 3 – lower tension spring of the pads; 4 – brake pad; 5 – guide spring; 6 – wheel cylinder; 7 – upper tension spring; 8 – expansion bar; 9 – finger of the parking brake drive lever; 10 – parking brake drive lever; 11 – brake shield
According to the manufacturing technology, the cables are hardened and lubricated in order to minimize the friction force that occurs in the cable casing.
In the last article, I discussed how to replace brake pads with your own hands. Look.
On the outside, the cable is wrapped in metal wire and covered with a polymer material (rubberized plastic). At the ends, the cable shell has special steel shells and sleeves that are pressed into place.
1 — lever; 2 — button; 3 — thrust spring; 4 — latch rod; 5 — cover; 6 — front cable; 7 — rear cable guide; 8 — spacer sleeve; 9 — tension spring; 10 — spacer bar; 11 — lever for manual drive of brake pads; 12 - rear cable.
Working principle of manual mechanical brake with drum brakes
- The driver raises the brake handle until a certain click is heard. If the cable is tightened, then perhaps you can only put it on the first latch with more force. If it is too weak, then even at the last latch the brake pads will not secure the wheels 100%.
- The rod pulls the main cable, and it pulls the secondary cables through the mounting bracket.
- The lever that is located inside the brake drum begins to turn and the spacer bar equally moves the pads apart, as a result of which the pad linings are pressed against the drum and do not allow it to rotate.
- When the driver lowers the handbrake, the cables are loosened, the springs in the drums return the spacer and the lever (the one in the drum), the pads are compressed and no longer act with their linings on the drum.
On cars with disc rear brakes, the principle of operation of a mechanical handbrake is approximately the same. The cable pulls a lever, which in turn compresses the brake disc. The lever on disc brakes is mounted behind the hub and on the outside.
Operating principle of the electronic handbrake
- The truck driver presses the handbrake button, the electronic unit receives the command.
- The controller includes 2 electric motors with gearboxes that are installed on the rear wheels.
- Electric motors compress the brake pads around the disc. The sensor determines how hard to compress the pads. If the brake pads are worn down, the pads compress with greater force.
- To disable the electromechanical handbrake, just press the button.
Adjusting the brake regulator gazelle
Full description and reviews about Mitsubishi Lancer 9
Good day, dear car enthusiasts! When it comes to car brakes, you automatically want to start the material with banal, but always relevant words: The brake system of a car is your safety. Can not argue.
The serviceability of the brake system is especially important today, when there are powerful, high-speed cars on the roads.
And in order for the brake system to conscientiously cope with the tasks facing it, it requires constant maintenance.
This includes: systematic checking of the brake fluid level, diagnostics of brake system pipelines, and adjustment of both disc and drum brakes.
When is it necessary to adjust your car brakes?
Brake adjustment can be divided into full adjustment and current adjustment. A complete brake adjustment involves disassembling the brake mechanism for replacement or adjustment.
Partial brake adjustment is usually done on your own in the garage.
The main focus here is how the rear brake pressure regulator works.
It is especially important to adjust the pressure regulator of the rear brakes after tuning the brake system. Those
if you have replaced drum brakes with disc brakes
Those. if you have replaced drum brakes with disc brakes.
Brake adjustment is carried out when replacing brake pads or replacing a brake disc. And, as a rule, these operations are performed simultaneously, then the brakes are adjusted immediately.
To adjust disc brakes, and brakes in general on various models of foreign cars, there is, first of all, the Operation and Repair Instructions for your car.
Traditional brake adjustments include:
- adjusting the brake drive (brake pedal travel);
- adjustment of the brake mechanisms (the gap between the brake disc and the brake pads), in addition, the rear brake adjuster must be checked and adjusted;
- adjusting the parking brake (handbrake).
Important! Before adjusting the front brakes, it is necessary to check that the bearings are adjusted correctly. And if you have disc brakes installed at the rear, then check the condition of the adjustment of the rear wheel bearings
Adjusting the brake drive (pedal free play)
This is carried out in order to ensure the required clearance between the pusher and the piston of the master cylinder. The free play step of the pedal needs to be clarified in the manual, because... it can be different and depend on the type of brake system of your car.
The drive is adjusted by changing the length of the pusher, screwing it onto the connecting rod. Having achieved the desired length of free play of the pedal, the locknut is tightened and you must once again check that the free play corresponds to the parameters specified in the manual.
Now about the unpleasant, about the shortcomings, that is, the disadvantages of this scheme:
1. If the “right front - left front” circuit fails, braking efficiency will be significantly reduced;
Agree, there are not so many shortcomings, and besides, they exist always and everywhere, but if you clearly measure the force using the handbrake handle of the car, braking is carried out very effectively and this fact has been personally verified in practice. However, a true lover of do-it-yourself tuning will never miss the chance to retrofit your car with a hydraulic handbrake , making it more advanced, as well as an excellent opportunity to gain invaluable experience and a lot of pleasure from the result.
What can a hydraulic handbrake do?
Using this design of the handbrake, you can completely block the rear wheels in order to warm up the tires on the front axle. This will prove useful for racing enthusiasts. Ordinary drivers will find the lock useful in reducing the chance of skidding when turning on wet roads. The device is installed near the handbrake lever so that it can be easily accessed. If the regulator is installed correctly, the force on the rear brake will be distributed smoothly, and the efficiency of the front will increase.
Adjustment
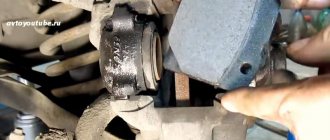
All manipulations are performed in the position when the handbrake is “off” (the lever is fixed in the lowest position). To access the brake mechanism, remove the plastic plugs located on the brake shield. It is enough to pry them off with a screwdriver;
Then the eccentric nut is loosened (no more than 2 turns). Further actions consist of moving the brake pads apart - to a position at which the drum is braked, after which the bolt is turned in the opposite direction, as a result of which the brake pads move in the opposite direction. The movement is carried out until the drum begins to rotate; The process is monitored through inspection windows located in the lower part of the brake shield; At the end of the operation, the eccentric nut is tightened with reasonable force
It is important to prevent the eccentric from turning; The brake mechanism is adjusted in a similar way on the other side of the car, after which the plastic plugs are installed in place.
Communities › VAZ: Repair and Modification › Blog › Do-it-yourself HA and hydraulic handbrake
I want to tell you how I installed the HTD and handbrake
Since ready-made kits with a cable are expensive and our cat is crying for money, we decide to do everything ourselves
I just had the standard calipers on the front become free (calipers from 2112 with perforated discs were installed on the front)
plans for washers + camber plates and all sorts of little things were purchased for them
plus you will need a bunch of new brake pipes and 2 tees (in my case)
Some tubes can be selected according to length, while others will have to be cut and re-rolled
(it’s better to ask Google how to do this)
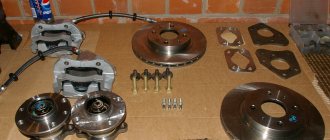
First of all I installed the brakes themselves
combining this procedure with replacing bearings and installing wheel studs
Also, in order to put the brake disc on the rear hub, you need to grind off the step at the hub
I gave the hubs to a turner, but I saw how they did it with a grinder))
the next thing that was done was the handbrake
since there are no cables now, you need a hydraulic handbrake
buying ready-made ones was strangled by a toad since the cost of such a handbrake is a penny
look at the photo of the finished product and make your own)
for this you will need
— standard handbrake handle
— Clutch Master Cylinder 2106
here's a little advice
take either PELENGA or ATE since they already have threads cut from the factory
take the metal and set it to rectangles
fold and weld adding gussets
taste
Next we make holes for the handle and cylinder and weld the studs to secure them
I advise you to install the cylinder with the outlets straight up to facilitate bleeding of the brakes later
collect, color to taste
You can weld a mount for the regulator nearby
(I won’t advise you to do the same thing as the regulator from the sorcerer 2108, since its operation is not entirely correct!)
Wilwood regulator
I ordered adapters for the pipes from a turner, simply giving him the cylinder and brake pipe
Now you can start connecting
I’ll make a reservation that I have a VUT from a VAZ 21214 and a GTZ from a Lada Kalina 2-circuit
it differs from the usual 2108 in its larger size and, as a result, performance
if you have a 4-circuit GTZ
in the cabin you get this web of tubes
the tee is placed immediately under the bottom on the street side
and then according to the standard scheme through standard hoses to the beam
the regular sorcerer can be thrown out, you can set it up ((
Now we fill the brake fluid and first pump the rear with the pedal, then pump the rear with the handbrake (without touching the pedal, pump up the handbrake and hold while your partner unscrews the fitting on the caliper) while pumping, the regulator is completely open!
then pump the front
check all connections for leaks
we get into the car and go on an empty road to adjust the regulator so that when braking sharply the rear does not skid
Perhaps in a couple of days you will have to repeat the procedure for bleeding the brakes since it is difficult to expel all air bubbles from the system at one time
Installation of hydraulic handbrake VAZ 2107
After installing Rear Disc Brakes (RDB) on VAZ family cars, the problem of improper distribution of braking forces along the axles arises. How to solve this problem and why it is needed.
There are many reasons for installing an HTD, but I will outline only a few that define them:
- stable characteristics of disc brakes when heated;
- better cooling of brake discs;
- high braking efficiency reduces braking distance;
- smaller weight and size;
- response time is reduced;
- about 70% of the car’s kinetic energy is absorbed by the front brakes; rear disc brakes reduce the load on the front discs;
We can conclude that disc brakes have significant advantages over drum brakes. The main ones are stability of operation, better cooling and cleaning conditions, higher efficiency, lower weight and size.
So, the decision has been made, the front brakes have been modified, the rear discs have been installed, it’s time to make it all work correctly and be sure to install a hydraulic parking brake system in the circuit.
On the website https://www.project-t3.kiev.ua/ you can find many design options for correctly setting up a converted brake system. Throwing aside everything from installing imported and expensive regulators to simply reducing the working surface of the rear pad to 25% or 50%, a 2-axis option was adopted - the “left front - right front” and “left rear - right rear” contours "using a regulator from a VAZ 2101 and a hydraulic handbrake drive based on the clutch master cylinder from a Honda Prelud. The scheme has long been tested and works.
We had a whole week to spare and for now it was decided to slowly “hang around” in traffic jams in order to get used to the behavior of the car when braking and to give the rear brake mechanisms a chance to get used to it. On the appointed day, almost simultaneously, having parked our V8s near the local car market, we bought everything we needed and went to the technical base, which turned out to be outside the city. I won’t describe that other eight, but we were driving very fast. I just tried not to fall behind, diligently “clacking the short box.” Once, before a turn that was unexpected for me, as a result of sharp braking, the car turned sideways and I was once again convinced that my intentions were not in vain and, moreover, very correct, and as if they had read my thoughts, they confirmed this to me again, a little later directly demonstrating, when moving from the asphalt onto the ground, what I was driving for - controlled side slip and the correct operation of the entire braking system.
The regulator is the head of everything
In our scheme, the regulator plays almost the most important role, but subject to proper placement in the NEW brake circuit of the car
Therefore, please note that the REGULATOR MUST BE POSITIONED STRICTLY AFTER THE BRAKE MAIN CYLINDER BUT BEFORE THE HYDRAULIC HANDBRAKE ACTUATOR. Otherwise the brakes will not work properly.
I would like to note that car enthusiasts who do not like the 2-axis version of the braking system may not use it, but for this they will have to significantly complicate the entire braking circuit of the car. Firstly, draw additional contours to the rear wheels, and secondly, hang two calipers on each side on slightly different shaped plates for attaching the rear calipers, i.e. only 4 calipers. I advise you not to look for adventure. Nothing terrible will happen, but you can easily be left without a car for several weeks, and don’t forget about the unsprung masses and their role in the behavior of the car.
I will outline the “pros” and “cons” of the 2-circuit brake option:
Hydraulic hand brake kit
In automobile stores you can purchase a hydraulic handbrake kit. You can install it yourself, but you will need a few additional elements:
- Copper washers for brake mechanisms, 10 pcs.
- Metal tubes in the amount of 5 pcs. To save a little, you can purchase a complete set for Gazelle cars.
- Plugs.
- Twists.
- Brake hoses for VAZ-2101-2107.
- Tee for the brake system.
- Plastic clamps, 50 pcs.
- Brake regulator for VAZ cars of any model.
- GTZ for VAZ-2101. If this is not the case, then you can use any other cylinder.
In addition to all this, you will need brake fluid for subsequent refilling of the system. After all, the modification includes inserting an additional circuit into the brake lines.
Installation method No. 1
According to experts, there are two ways to install a hydraulic handbrake on a VAZ. The simplest and most accessible involves performing the following manipulations:
- Another brake cylinder must be installed in the engine compartment. The clutch master cylinder from a VAZ-2101 is ideal.
- Remove the brake fluid expansion tank.
- You will need to make a small adapter yourself. Cut the thread and install the washer (it should have a thread for the fitting).
You begin assembling the entire system from the original GTZ to the clutch cylinder, then to the regulator, handbrake, and rear brake circuit. To connect all the components together, use tubes from the Gazelle car. Just choose those that fit in size. The tubes are fastened to the places where the handbrake cable was fixed.
How to install a hydraulic handbrake on a rear wheel drive car?
In most cases, the need to equip VAZ family cars with a hydraulic handbrake appears after their owners install rear disc brakes on the cars. The main problem in this case is the correct distribution of braking force between all axles.
Installing disc brakes in the rear of the car has several positive aspects. Firstly, disc brakes are more stable when heated, and secondly, they cool more efficiently.
As a result, by reducing the braking distance, the car begins to brake better.
How the hydraulic handbrake worksAdvantages and disadvantages of the systemInstalling a hydraulic handbrakeRe-equipment of circuitsRouting the brake line to the interiorInstalling the parking brake handleRouting the line to the rear calipersTightening and bleeding the brake system
How does a hydraulic handbrake work?
A hydraulic hand brake can be purchased ready-made or assembled with your own hands. If you decide to take the second path, then information about the design of this device will come in handy.
To begin with, it should be noted that a regular handbrake is a clutch master cylinder, which is included in the line to the rear wheels. When it is in the off position, brake fluid is supplied directly to the rear wheels, and when the driver turns it on, he himself begins to brake them. True, a brake force regulator is also required here.
The operating principle of a hydraulic handbrake is not much more complicated. Only one tube should go to the rear wheels, which will split into two wheels only near the bridge itself.
Since neither ABS nor a vehicle load force regulator are usually installed, you will also need a manual regulator (mounted in front of the handbrake).
If you ignore this component, then with the slightest pressure on the brake pedal, the rear of the car will over-braking and almost immediately skid, which is extremely dangerous for all passengers in the car.
The clutch cylinder and regulator can be taken from classic models, but the main thing is that these are original parts and not fakes, of which there are quite a lot on the modern market.
Advice
If you want to be able to also block the front wheels, you can achieve this using the same handbrake, which will switch in the other direction. To do this you will need another clutch cylinder (no need for a second adjuster).
Some car owners are interested in the question of the effort applied to the hydraulic handbrake on a VAZ, but the answer depends on you. That is, if the car owner installs a long lever, then moving it will be much easier (even though the stroke is large), while a short part will require more effort from you.
Interesting fact! The most exported car of the VAZ group is model 2121 or Niva. Its export part to Europe is the most significant, not to mention the fact that this particular car is the only vehicle supplied to Japan. Thus, out of 1.8 million cars produced over more than 30 years, over 500,000 were exported.
Advantages and disadvantages of the system
Of course, installing a hydraulic handbrake on a VAZ cannot have only positive or only negative characteristics. Therefore, among the advantages of such a scheme are:
equal forces on the left and right wheels of the vehicle; redistribution of force on the rear wheels in wider aisles (despite the fact that the regulator could perform this function before, it only applied to one wheel, which was determined by the features of the device); increased power of the front brakes thanks to the transfer of their lines closer to the vacuum amplifier.
As for the disadvantages of installing a hydraulic handbrake, the main one is a sharp drop in braking efficiency when the “left front - right front” circuit fails.
Important! Of course, there are always disadvantages, but with a clear dosage of force using the handbrake handle, the car will stop quite effectively. According to information from various forums, this has already been verified by more than one car owner.
Installing a hydraulic handbrake
If you have already figured out what a hydraulic handbrake is and know what it is needed for, then before moving on to its actual installation (of course, provided that it is really necessary), you will have to partially disassemble the car interior. This will make it more convenient for you to lay the brake lines, since now their place will be in the cabin.
Conversion of circuits
note
At the initial stage of installation, you should change the working diagram of the diagonal brake system to its axial version (front and rear axle).
To do this, in the engine compartment, on the master brake cylinder, you need to turn off the circuit of the rear left wheel, then turn off the circuit of the front right wheel and connect it to the circuit of the rear right wheel (now the former one).
At the same time, from the contour of the former right front wheel, you can begin the “construction” of the rear disc brake line.
Note! If it is difficult for you to understand all the circuit layouts, then you can use a diagram of a car (a specific VAZ model), which is freely available on the Internet.
Laying the brake line to the interior
Having successfully completed the first stage, you can begin to lay the brake line into the vehicle interior. To do this, you need to take the brake pipe and insert it into the car through the technical hole intended for the speedometer drive cable.
In this case, the tube must be bent in such a way that when further connected to the brake master cylinder, it does not touch the elements of the engine compartment. Using a pre-prepared “twist”, the line must be extended with another metal brake pipe.
A regulator will later be installed at the connection point.
Installing the parking brake handle
The parking brake handle itself and all the accessories are mounted in their original place. It is necessary to connect the brake pipe through which the fluid is supplied to the inlet located on the handbrake cylinder, and from the outlet lead the tube through a tunnel to the rear of the car body.
Routing the line to the rear calipers
Inside the body, above the rear beam, there are three technological holes.
Using a drill, the middle one needs to be expanded to a suitable diameter and first insert the brake hose into it, and then thread the rubber ring (just like on the front strut).
Before installation, the ring must be cut on one side, after which, having fixed the brake hose, there is no longer any fear that it will rub against the body.
Important
The brake hose must be connected to the brake line, and then a tee must be connected to it (under the car). With this part it becomes possible to connect the two remaining brake pipes. The entire structure is fixed with plastic clamps and sealed with calipers.
Tightening and bleeding the brake system
Once you have tightened all contact points in the brake system, you can add brake fluid. Bleeding must be done first in the rear circuit, then in the right front wheel and lastly in the left front wheel.
Did you know? The first car of the VAZ group (model 2101 or “Kopeyka”) went on sale on September 9, 1970.
The next stage is routing the line to the rear calipers.
The wiring is carried out using internal technological holes above the rear beam.
Next, you will have to modify the hole using a drill, using a countersink, drill it to the desired diameter, and then insert the brake hose into the hole.
Now carefully insert the rubber ring, having first cut it on one side according to the principle of the front pillar.
Lay the brake hose into the resulting cut. This protection will help prevent cuts or abrasions on the body. The hose should be connected to the brake line.
Using a bolt under the car, screw a tee through the hole to the brake hose through copper washers. Connect the two remaining brake pipes to it on both sides. Using plastic clamps, secure the structure and seal the new brake system with calipers.
How to remove the handbrake cable
To dismantle the old handbrake you will need to perform several steps:
- Place the car on an overpass, inspection hole or lift. It all depends on what amenities you have. If there are no such amenities, then it is better not to even start doing the work.
- Raise the rear of the car with a jack, having previously installed stops under the front wheels.
- Install supports under the rear beam.
- Since the hydraulic handbrake can also be installed with drum brakes, the design does not need to be changed much. Remove the wheels and drums from the rear axle.
- To avoid interference, remove the resonator and muffler.
- Remove the equalizer from the rod.
- Dismantle the cable by removing it from the blocks on both wheels.
- Now you need to perform several manipulations inside the car. Open access to the handbrake lever and unscrew the fasteners. Then remove it completely from its seat.
Now you can begin installing the new system; to do this, you can use one of two popular methods.
Installation method No. 2
First you need to do a few manipulations under the hood:
- Unscrew the tube that goes to the left brake mechanism and put a plug on it.
- Unscrew the tube going to the front right wheel. Install it in the hole intended for the right rear brake mechanism.
Before starting work, be sure to drain all liquid. Try to do everything carefully so as not to damage the hydraulic mechanisms. Try not to let the liquid come into contact with the metal, as it will corrode it. Further actions:
- Install a new handbrake between the seats.
- Install the bolt instead of the regulator pendulum. Screw it to the bottom of the body. It is recommended to temporarily remove the front seats so that they do not interfere and do not get dirty during work.
- A tube is laid from the engine compartment along the bottom to the new handbrake.
- You lay pipes from the regulator along the bottom of the cabin.
- Select the tube sizes and install them on the rear axle.
- Attach a flexible hose to the rear beam on the bracket.
- Be sure to install a rubber ring so that the hose does not rub during operation. To make it easier to put on, cut this ring.
- Connect the hose to the tubes. To secure metal tubes, use plastic zip ties.
Purpose
Replace the handbrake on a VAZ 2110
A hydraulic manual system is a modification to a vehicle to improve braking performance. It is intended for emergency, smooth braking of the rear of the car. Installing a regulator will allow you to adjust the braking force, which prevents the rear drums from locking.
Note. A hydraulic handbrake with a regulator is used when cornering on wet asphalt to prevent the rear from skidding. You can also completely lock the rear wheels to warm up the front tires.
Note: the regulator must be mounted in front of the handbrake lever, the brake master cylinder must be located under the hood.
Replacing the handbrake of a VAZ 2110
A properly installed adjuster should smoothly distribute force to the rear brake pads, while the front brake pads will produce more power. Automotive stores sell ready-to-install hydraulic hand brake assemblies. Durable steel cylinder mounting brackets, aluminum handle. They can be installed on any passenger vehicle. Vertical handbrake assemblies are also sold. To carry out the work you must additionally purchase:
- copper washers - 10 pieces;
- metal brake pipes – 5 pieces (you can use a set of brake pipes from a Gazelle);
- stub;
- twist;
- brake hose from classics;
- brake tee;
- plastic clamps – 50 pieces;
- brake regulator VAZ;
- clutch master cylinder from VAZ-2101;
- brake fluid.
Feel
At first, everything was somehow unusual - pedal travel, force, braking, calculation of force, and so on... I was very pleased that now the parking brake was not “dead”, as it was before, now by pulling it, it was possible to adjust the force, thus stopping the “eight” in various ways, as they say in their own way. The hydraulic handbrake perfectly fulfills its direct duty - it holds the car in place on an incline. Since that day, I “forgot” what overbraking is, braking is carried out very intelligently and the wheels of the rear axle, in the event of emergency braking, are blocked a little later than the front ones. I haven’t done any “somersaults” or tricks with the new braking system yet, it’s a little scary, I’m not used to it yet, and besides, the experts advised not to take risks yet, but just get used to the new braking system and its operation.
That's all for me, I hope that my story in detail will be useful for someone, and someone, following my example, will install a VAZ hydraulic parking brake for themselves. I look forward to your comments and thoughts regarding the above.
How to check the handbrake
Before you begin the rather labor-intensive work of tightening the handbrake, you need to check whether this is really necessary. You can diagnose the parking brake using a special stand in the service center.
The easiest way to check the handbrake is to lift one of the rear wheels of the car, put the car on the handbrake and try to manually turn the wheel. If the wheel spins, it means that the parking brake is not working properly and most likely requires adjustment or replacement of the cable.
There is another way to check the car’s handbrake, but it is more “cruel” in relation to the car’s brake pads and other elements of the braking system. The method is to put the car on the handbrake, then engage first gear and press the gas pedal to the floor. If the handbrake holds the car well, it will jerk slightly and immediately stall.
Completion of work using the second method
When carrying out repairs, try not to allow the hose to become twisted. This may cause damage and fluid leakage. First you need to tighten the edge on which the thread is external. Then the edge with the internal thread is tightened. How to make a hydraulic handbrake yourself? The final stage looks like this:
- Fix the position of the new system, check the tightness of all threaded connections.
- Fill the expansion tank with brake fluid.
- Bleed the system according to the scheme from the far cylinder to the near one. Add fluid to the reservoir in a timely manner. Otherwise, pumping will need to be done again.
- Check the functionality of the brake system. Are the calipers pressed out normally?
Afterwards, assemble all the disassembled components and replace the wheels. Before your first ride, make sure the brakes work properly. If there are problems, fix them immediately. When driving for the first time, do not accelerate to high speed so that you can at least stop the car with the engine. All of the above methods are suitable for installing a hydraulic handbrake with your own hands on a VAZ of any model, as well as on cars from other manufacturers (including foreign ones).
Preparatory work
Before starting tuning, you need to get rid of the old, imperfect system. To do this, the mechanical drive is completely dismantled. Please note that after installing the hydraulic handbrake, the operation pattern of the caliper drive will completely change. If by default the mechanisms worked in pairs, which are located on wheels located diagonally, then after the modification the circuit will turn out to be axial (rear and front). But before installing the hydraulic handbrake, you need to remove the old one.
Cost of tuning
Now is the time to draw up a detailed estimate for the spare parts used during tuning of the brake system. The price of all components may vary, depending on whether you are purchasing new or used. Approximate cost:
- Hydraulic brake assembly - cost about 2,700 rubles. You can also find cheap Chinese copies, but decide for yourself whether you should trust them. The quality of such products is very often low.
- Regulator – 400-500 rubles.
- Brake pipes for a Gazelle car – 300-400 rubles.
- Clutch cylinder (main) for classics - about 450-500 rubles.
- And small consumables - copper washers, plastic clamps, VAZ-2101 brake hose, fluid - you will spend about 500-600 rubles on everything.
By conservative standards, the cost of tuning will cost about 5,000 rubles. If this is too much for you, then abandon this idea and simply install a new handbrake cable instead of the stretched old one. Before starting work, it is recommended that you familiarize yourself with the advice of specialists and communicate with those who have already done similar work. They will be able to give you a lot of practical advice regarding improving the brake system on a particular car.
FakeHeader
Comments 6
There is an opinion that when using a hydraulic handbrake for a long time, the pressure in the system drops and the handbrake does not work. For example, if you leave your car overnight with only the handbrake, in the morning you may notice that it has rolled a little! Is it so? Haven't you checked?
Or write, does the tube go from the GTZ to the sorcerer? If yes, then my question is not relevant
The scheme of operation and interaction of the brakes and handbrake is not entirely clear. At first glance, everything is clear, but why does a tube go from the hydraulic handbrake cylinder to the sorcerer, and this is not the input on the sorcerer, but the output, which, according to the factory diagram, goes to the rear brake cylinder. And secondly, how will the handbrake work if for its intended purpose, the fitting , which in the figure goes to the sorcerer, is intended for the entry and not the exit of fluid, because when you press the clutch on a VAZ 2101, the liquid pushes the right output on the cylinder towards the working cylinder? And it turns out that it is powered from the GTZ, although it should go to the sorcerer
Although the number of tuning companies per 1000 cars in Western countries significantly exceeds the Russian average, in terms of the number of home-grown Kulibins we confidently hold the palm. A European or American car owner, if it comes to improving the design of his car, in 95% of cases he will turn to the nearest car service center. Many of our car enthusiasts would prefer to work on modifying their cars themselves. In particular, installing disc brakes instead of outdated drum brakes is a tuning that is very popular. But such a modification will be even more effective if the system is equipped with a hydraulic handbrake. And although these components can be found in car dealerships and equipped with them on almost any model, many car owners prefer to independently manufacture and install this component of the advanced braking system.
Possible fines
Motorists are naturally afraid of fines for not using the handbrake on their car. And a traffic police officer can bring administrative liability for this.
The Code of Administrative Offenses actually has Article 12.5. Only here some cunning traffic police officers rely on the second part of this article, which prescribes the punishment for driving a vehicle with a faulty brake system. This threatens with a fine of 500 rubles and detention of the car.
In fact, this article is about the handbrake. Only the document clearly states that the parking brake is an exception. That is, according to 12.5 Part 2, you can only be punished for a malfunction of the brake system, but not for problems with the handbrake.
The first part of Article 12.5 of the Code of Administrative Offenses is relevant. Here we are talking about the same 500 ruble fine. But it is important that the employee does not have the right to detain the vehicle.
The traffic police inspector does not have the right to stop the car to check the serviceability of the handbrake. Stopping is allowed only if there are visually noticeable faults.
If you have been issued a fine, then you have the opportunity to pay not 500, but 250 rubles. This penalty is included in the list of items that are eligible for a 50% discount if paid within 20 days after the ruling is issued. Just wait until your receipt appears in the traffic police database.
Sources
- https://cartore.ru/85-regulirovka-stoyanochnogo-ruchnogo-tormoza-svoimi-rukami.html
- https://autostuk.ru/tros-ruchnogo-tormoza-zamena-regulirovka.html
- https://uremont.com/publications/articles/regulirovka-trosov-stoyanochnogo-tormoza-central-nym-natyazheniem
- https://marshal.ru/articles/prichiny-po-kotorym-ploho-rabotaet-ruchnoy-tormoz-v-avtomobile
- https://okeydrive.ru/kak-podtyanut-ruchnik/
- https://motorltd.ru/kak-podtyanut-ruchnik-svoimi-silami/
- https://neauto.ru/pochemu-na-avtomobile-ne-derzhit-ruchnik-i-chto-delat-v-takoj-situacii/
[collapse]
Do you need rear disc brakes?
The answer is ambiguous, since disc brakes have clear advantages over drum brakes. If you are already tuning the system, then do not be lazy and install discs on the rear axle. Their advantages are even in the smallest details - replacing pads is much easier than on drum pads (and the cost of the set is lower). Wheels from the 2109 model are ideal for the rear wheels of front-wheel drive VAZ cars. There are minimal alterations, everything becomes as if it were “original.” But if your budget for tuning is limited, then you can use a standard system. Drum brakes work relatively well, and the use of hydraulics will forever eliminate the need to tighten the cable. And the car will stand normally on any slope without rolling down.
Cable drive design
Guide to self-replacement of brake hoses of a VAZ 2107 car
The handbrake device of this type, installed on the vast majority of passenger cars, is simple and provides for autonomous activation, independent of the main system. How standard service brakes function:
- The driver pressing the pedal in the cabin sets the piston of the main hydraulic cylinder in motion.
- Under the influence of the piston, pressure is created in tubes with incompressible fluid laid to all wheels.
- Transmitted to the working cylinder of the wheel, fluid pressure pushes the pistons of the drum or disc brake. In the first case, the pads are moved apart and the force of friction stops the rotation of the drum. In the second, they tightly compress the spinning disk.
For parking braking, the handbrake uses standard elements - pads, but moves them apart with its own mechanical drive, consisting of the following parts:
- the above-mentioned lever in the cabin, equipped with a locking mechanism in different positions and a push-button unlocking device;
- the main cable connected to the lever and ending with a mounting bracket or an arcuate guide;
- secondary cables connected to the main one and connected to the brake levers of the rear wheels;
- cable adjustment mechanisms (spacers, nuts and springs), suspension brackets to the underbody;
- spacers between the pads.
The rod system is usually hidden under the bottom in the recess of the central tunnel. Cable drives are equipped with protective covers that prevent corrosion. How does a mechanical handbrake work:
- The driver lifts a handle in the cabin, which automatically locks into the selected position.
- The traction moves the main cable forward, and it carries the secondary drives along with it through a mounting bracket.
- A lever inside the drum mechanism rotates and pushes the upper ends of the shoes apart. The automatic regulation function is taken over by the spacer bar.
- When the driver removes the car from the handbrake, the springs inside the drums tilt the lever back and the pads move. At the same time, the spring pulls the cable drive back to its original position.
The parking brake described above locks the drum wheels mounted on the rear axle. On cars equipped with brake discs, the same principle works: a cable pulls a lever, which causes the pads to compress. The only difference is the location and shape of the lever - on disc brakes it is placed outside, behind the hub.