Removing and installing low beam lamps Priora
When replacing low beam lamps, the battery does not need to be removed (in the photo report the battery is removed for clarity):
- Remove the rubber cover, which is located closer to the car fender.
- Disconnect the block with wires from the low beam lamp.
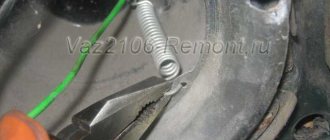
- Press down on the spring clamp of the lamp and disengage it from the reflector hooks.
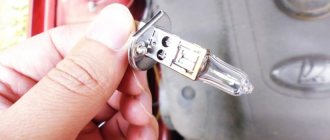
- Remove the low beam lamp H7.
Installing a new headlight lamp is carried out in the reverse order.
Which model to choose
The range of light bulbs suitable for the VAZ-2170 car is quite large. At the moment, halogen lamps are in great demand. But to make the right choice, it is worth studying the main characteristics of all three types of lamps.
Halogen
- Brightness up to 1,550 lm;
- Service life up to 1,500 hours;
- Power 50-60 W;
- Color range 4,000 – 7,000 K;
- The price is about 700 rubles per pair. Domestic lamps are cheaper;
- High penetrating ability when driving in rain, fog, snow.
LED
- Brightness up to 2,000 lm;
- Service life up to 50,000 hours;
- Power 18 W;
- Color range 3,000 K;
- The price starts from 2,000 rubles per pair;
- Low penetrating ability of the light flux, which complicates visibility when driving in bad weather;
- Requires installation of a large reflector and cooling system;
- It is impossible to replace (install) yourself.
Xenon
- Brightness up to 3,300 lm;
- Service life up to 3,000 hours;
- Power 35 W;
- Color range 4,000 – 8,000 K;
- Price from 2,000 rubles per pair;
- Low penetrating power of light flux;
- Installation of ignition units is required;
- Ignition occurs gradually, so there is a delay in turning on the low beam.
Based on the main characteristics, it is impossible to unambiguously answer the question
“which lamps are better”
. The choice will depend on the personal preferences of the car owner, financial capabilities and region of residence. Particular attention should be paid to the weather conditions in which the car is operated.
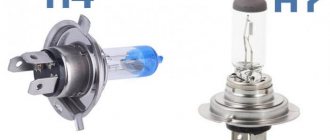
N 7 is suitable for both Priora and West
Removing and installing Priora high beam lamps
It is more convenient to replace lamps with the battery removed:
- Remove the protective rubber cover from the headlight housing.
- Disconnect the block with wires from the lamp.
- Unclench the ends of the spring clamp and remove them from engagement with the reflector hooks. We remove the clamp from the lamp.
- Remove the high beam lamp H1 from the headlight housing.
Installing a new lamp is carried out in the reverse order.
The best manufacturers
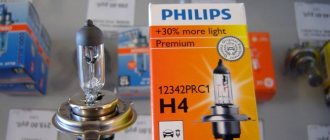
If you decide to use alternative optics, manufacturers Osram, Koito and Philips are considered the most reliable according to drivers' recommendations. The main advantage of the products of these brands is their long service life. The marking of the optics suitable in this case is H7.
Since these are the manufacturers that car owners try to choose, the market is filled with numerous fakes that cost several times less. There are no visually incriminating differences to be found, and sellers often surprise you with their incompetence or even brazenly guarantee you that the products are original.
A car enthusiast must be able to independently find the differences between the original and the fake, and for this a series of tests have been developed.
As part of the testing, it was determined that counterfeits costing 50 rubles. lamps can be signed by any brand, but their operation is not only ineffective, but also dangerous for the safety of the vehicle.
Let's look at the pros and cons of individual manufacturers using specific examples of optics:
- OSRAM H7. Products of this brand are counterfeited with enviable frequency. The original will fully comply with the standards.
- Philips is the standard best option for those cases where the headlight is correctly adjusted.
- H7 MEGAPOWER+30%! - the least preferred option due to a number of disadvantages: the luminous flux is not standardized, the quality of the base leaves much to be desired, and the light spot also does not meet the state standard. In addition, there is no certification according to European standards - only Russian. The use of such products is not excluded, but it cannot be permanent and long-lasting.
Removal and installation of Priora side lamps
To replace the side light bulb you need:
- Remove the lamp socket.
- Remove the W5W size lamp from the socket.
We install a new lamp in the reverse order.
Removing and installing Priora turn signal lamps
To replace the turn signal lamps you will need a Phillips screwdriver.
- Unscrew 3 screws A and self-tapping screw B securing the headlight trim using a Phillips screwdriver, and remove it.
- Turn the lamp socket counterclockwise.
- Remove the bulb socket from the headlight housing.
- Press the lamp and then turn it counterclockwise until it stops, remove the PY21W lamp from the socket.
We install the new lamp in the reverse order. By the way, the P21W lamp has colorless glass; installing it instead of PY21W is not allowed.
Priora electrical system design
To begin with, I would like to note one point. To connect all electrical equipment in the Priora family, the designers used a single-wire circuit. All negative terminals - both sources of electrical energy and its consumers - are connected to ground. The function of the second wire is assigned directly to the metal body of the car. At the same time, a multi-wire circuit is already used in the electrical circuits involved in the engine control process. They are connected to ground through the ECU - electronic control unit.
To switch the main circuits of the Priora, a combined ignition switch is used. On the instrument panel console overlay the designers placed:
- rear window heating on/off button;
- emergency signal;
- heater fan operating mode switch.
The steering column unit contains control levers for the windshield wiper and turn switch, which is also responsible for the operating mode of the headlights.
It should be noted that high-power electrical energy consumers are switched on through electromagnetic relays.
Removing and installing the side turn signal Priora and replacing lamps
- Move the side turn signal towards the front of the vehicle.
- Remove the pointer from the hole.
- Turn the cartridge counterclockwise and remove it from the indicator body.
- Remove the W5W turn signal lamp.
Installing a new lamp is carried out in the reverse order. We install the side turn signal housing in the reverse order.
Turn
The turn signal signal is located the highest (in relation to the hood), and to remove it you don’t even have to wrap your hand under the hood.
- Remove three screws and a self-tapping screw from the plastic cover, pry it up with a flat-head screwdriver and remove it;
- Turn the cartridge strictly counterclockwise;
- Remove the cartridge;
- It is easy to press down on the lamp and rotate it counterclockwise until it begins to fall out of the socket.
When choosing a turn signal PY21W (Voltage 21 W), you should be careful - a lamp with a similar marking - P21W - will not have orange, but colorless glass, and will not be suitable as a turn signal.
Removing and installing lamps in the rear headlights of Priora
To replace the lamps in the rear light, you need to unscrew the nuts securing it; you do not need to disconnect the block with wires.
- Unfold the flap of the upholstery inside the trunk.
- Unscrew the 3 plastic nuts securing the taillight.
- Turn the side light and brake light bulb socket counterclockwise.
- Remove the socket together with the lamp from the headlight housing.
- Press the lamp, then turn it counterclockwise all the way, remove the lamp from the socket.
- Side light and brake signal lamp (P21/4W) Priors - combined, has 2 protrusions, which are located at different levels. When installing the lamp, its protrusions must fit into the corresponding grooves of the socket.
Replacement of the remaining taillight lamps is carried out in the same way.
There are some peculiarities when installing cartridges. Each lamp socket, in addition to the wire with a black mass, is connected to other wires of different colors. In order not to confuse the lamp sockets when installing them, the corresponding wire colors are indicated on the headlight housing (except for the side light lamp socket and brake signal). For example, on the body of the lantern
- Next to the fog light bulb socket there is a "red" inscription that corresponds to the red wire of the bulb socket.
- next to the turn signal lamp socket there is the inscription “blue”,
- next to the reversing light socket - “green”.
By the way, do you know that you can install angel eyes in the headlights of the Lada Priora.
How to install angel eyes
Angel eyes Lada Priora with DRL controller. Angel eyes on the Priora are LEDs that are installed inside the front unit, along the perimeter of the lenses and in the rear light. To do this you need to purchase:
- Electric wire of moon-white color. Type SH; diameter 2.6 mm;
- Receiver (Operating voltage – 12 Volts).
After everything is ready, you can begin active actions:
- Raise the hood, remove the battery (this will make it easier to work).
- Dismantle the block, remove the substrates.
- First secure the wires in place with tape (lightly) or clothespins - this is done to fix their position. Then fix them with epoxy resin.
- Wait for the resin to dry, secure the substrates and seal all the gaps with sealant so that the glass does not fog up. We carry out the installation.
Replacing lamps
Below we describe in detail the entire process of replacing lamps on cars, depending on the year of manufacture.
To replace the lamps on the left headlight of a car, it is recommended to remove the battery for convenience.
The lamps installed in the Priora headlights are halogen; when replacing, be careful and do not touch the lamp base with your bare hands.
Replacement in the headlight until 2013.
Turn signal
We start the process with the car's turn signal. To do this, turn the socket counterclockwise and remove it along with the lamp.
To remove the lamp from the socket, you need to press on it and turn it counterclockwise until it stops, then remove it.
Install a new lamp in the reverse order.
Low beam
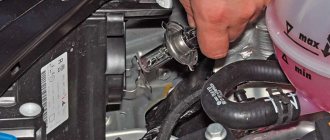
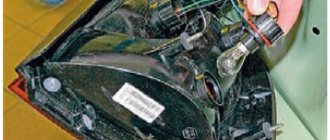
Remove the rubber cover, which is located near the fender of the car. Then remove the connector from the lamp.
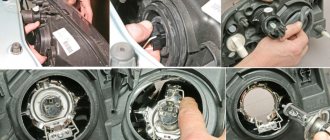
Next, you need to dismantle the lamp itself. To do this, press on the metal spring and disengage it as shown in the picture. Then remove the H7 low beam lamp from its seat.
Manufacturers of lamps for VAZ 2114
Since lamps with an H4 socket are used in headlights of many models from different manufacturers, all manufacturers of car lamps produce such lamps. Among them are the following companies:
- A world-famous Dutch company, known for its low prices and good quality products;
- A German company with a long history and rich technological experience;
- Narva. This is another manufacturer from Germany, known for the quality and durability of its products;
- Bosh. Another German company that does not need any special introduction;
- Company based in Hong Kong and Germany. Produces a wide range of reliable lighting equipment.
The above list can be continued for a long time. Today, a big name of a manufacturer is not a guarantee of high quality and reliability. There are a lot of fakes on the market, which are not only cheap, but also completely inconsistent with the original. Therefore, it is better to make a choice based not on the name, but on the characteristics of the light bulbs.
How to change a light bulb on a Priora
Welcome! Lamps - in fact, in a car they are needed only to illuminate something, for example, to illuminate the road, to illuminate the interior, etc., but not all lamps last forever, and especially if you take the light bulbs that are in the headlights (Especially the low beam lamp ), then they constantly burn out and have to be replaced with new ones from time to time, but what to do if you just bought a car and don’t know how to change the headlight bulb in it, that’s why this article was written in which everything was described in detail .
Note! In order to replace light bulbs, you will need to stock up on: Be sure to wear clean gloves, this is only necessary so as not to stain the lamp, because when you touch the glass bulb of a halogen lamp with your hand, after a very short time it will first begin to shine poorly and eventually eventually it will go out, so it is not advisable to touch the glass bulbs of the lamps, but if you do accidentally take it, then use a rag moistened with alcohol to clean the greasy fingerprints from the glass bulb!
Something else, namely, replacing lamps in a car should only happen when the battery is de-energized, so in order to de-energize it, take with you also a small wrench with which you remove the minus terminal from the battery! (If you don’t know how to remove the terminal, then see all the details in the article: “Replacing the battery”, point 1)
Summary:
Where are all the bulbs in the headlight? In order to answer this question, you will first need to study a little the design of the headlight, for example, let’s take a headlight removed and disassembled from the Priora and look at it and thereby you will understand where which light bulbs are located, for example, the low beam lamp is on the outside and is also indicated in the photo with a red arrow, and the high beam light bulb is indicated by a blue arrow and, as you already understand, it is located in the inside of the car, but besides these two there are a couple more lamps, namely the turn signal lamp (Indicated by a green arrow) and another light bulb which few people know, a side light lamp that is designed to show the dimensions of the car in the dark, and it is built in next to the high beam lamp and is indicated by a white arrow.
When do you need to change headlight bulbs? Accordingly, they change when they burn out, so if you notice that the light at night (or during the day if this concerns the low beam headlights and turn signals) has begun to poorly illuminate the road, then you can already think about replacing the lamp with a new one, but when you buy a new lamp, be sure to inspect it from all sides, and especially inspect the glass bulb; if there is even a small through crack in it, then this lamp will not work for a long time 100%; after 3 minutes have passed, most likely the lamp will burn out and therefore you will have to change it to new.
Preventive measures
Let's return to the issue of longer service life of light bulbs. Do not forget that in Priora the light is provided by halogens, whose bulbs have an extremely negative attitude towards dust and especially grease. Recommendations to take them only by the base are fair, but this makes installation very difficult. The best way to change light bulbs is to wear a clean cotton glove. Rubber ones are no good, they leave sticky fingerprints on the glass, which is no better than your bare hand.
If you touched the flask
, wipe it with a soft cloth soaked in alcohol. If you ignore the procedure, you will at least get darkening in the places where the lamp comes into contact with the skin. In the worst case, it will burn out in a week.
How to replace all the lamps in the headlight on a VAZ 2170-VAZ 2172?
Replacing the high beam lamp:
In order to change this lamp, you will need to first disconnect the battery and then get to the back of the headlight, and when you are there, at the beginning of the operation, remove the cover that covers the high beam lamp with your hand (Let us remind you that the lamp is located closer to the center of the car and thus, it can be considered an internal lamp), after the cover is removed (see photo 1) you will see a wire connector (Indicated by a blue arrow in photo 2) which is connected to the lamp terminal (Red arrow), so by pressing the latch which holds this connector, disconnect it from the lamp output, and then remove the spring clip from engagement with the hook (see photo 3) and ultimately remove the lamp itself from the hole in the headlight (see photo 4).
Note! The high beam bulb is installed in its place in the reverse order of removal, but just be careful not to touch the glass bulb of the lamp with your hand!
Replacing the low beam lamp:
To replace this lamp, you will need to do all the same operations that are carried out with the high beam lamp, that is, first look on the back side where the low beam lamp is located (It is located on the outside and further from the center of the car, unlike the high beam lamp ), so when you understand where the light bulb is, use your hand from the back of the headlight to first remove the rubber cover (It is round in shape and its removal is shown in photo 1) which covers the lamp, and when the cover is removed, disconnect the wire connector (Indicated by the red arrow on photo 2) from the lamp output (Indicated by a blue arrow), then remove the spring metal clamp that prevents the lamp from wobbling and falling from the two metal hooks with which it engages (see photo 3) and then move this clamp to the side, and when the latch no longer interferes, remove the low beam bulb from the headlight in which it is located (see photo 4).
Note! Install the new lamp in its place in the reverse order of removal, but when installing, hold the lamp terminal with your hands and not the glass part!
Replacing the side light bulb:
This lamp is located, as mentioned earlier, next to the high beam lamp, so to replace it you will first need to remove the rubber cover from the high beam lamp (How to do this, see above where replacing the high beam lamp is described, everything is described in detail there), and after removal, pull the socket and remove it together with the side lamp from the headlight (photo 1), then, holding the socket in your hand, grab the lamp itself and pull it, thereby it will come out and be removed from the socket (see photo 2).
Replacing the turn signal lamp:
This light bulb differs from all others in the way it is made, that is, it is not halogen but just an ordinary base lamp, it is also marked “PY21W”, it does not burn out very often since we do not always use the turn signal, but only in some cases (When turning, when parking for a long time, we turn on the emergency lights), but in order to replace it you will need to stock up on a screwdriver and use it to unscrew the four screws that secure the headlight trim (see photo 1) and then remove it (see photo 2), and when the trim will be removed and nothing will prevent replacement, find the place where the lamp itself is located and then grab it with your hand and turn its socket counterclockwise (see photo 3), and then pull the socket to remove the lamp completely from the hole in the headlight , and when the lamp is removed, grab the glass part of it with your hand and turn it counterclockwise and thereby remove it from the socket in which it is located (see photo 4).
How to choose a good lamp?
When going to the store, the question often arises: “What kind of light bulb is there for the lower light in the Priora?” The fact is that not all sellers know from memory the name of consumable parts in a particular car. To purchase a suitable light bulb, it is best to remove the burnt-out part in advance and provide it to the seller as a sample.
Also, before going for a lamp, it would be a good idea to write down the VIN number or take with you a plastic certificate of registration of the vehicle, this will allow you to choose the right part.
The low beam bulb in the Priora is responsible not only for illuminating the road surface at night, but also for road safety in general. An incorrectly selected part will blind oncoming drivers and create an emergency situation on the road. A counterfeit light element does not always meet the stated characteristics and can melt the headlight or burn out at the most inopportune moment.
When choosing, you should give preference only to well-known manufacturers:
The branded low beam bulb in the Priora will not harm the design of the headlight and will work for the entire stated period. Many manufacturers provide a one-year warranty on the performance of the part.
Priora replacement lamp dimensions
Replacing lamps in a Lada-Priora headlight
Depending on the manufacturer, two types of headlights are used on the Lada Priora. In order to change the lamp in the left headlight, you must first remove the battery.
Procedure for replacing low or high beam lamps:
- remove cover 2;
- disconnect the wire block 7 from the failed lamp;
- remove the antennae 6 of the spring clamp from the grooves;
- remove the lamp;
- Replace the lamp and install it in reverse order. In this case, you should hold a working lamp only by the base and under no circumstances touch its glass part.
The procedure for replacing the side light lamp in the headlight:
- remove cover 1;
- remove the side light lamp socket from the seat in the reflector 5 by the wires;
- remove the lamp from the socket;
- replace the lamp and install it in the reverse order, fix the lamp socket in the reflector socket, applying force to the socket body.
The procedure for replacing the turn signal lamp in the headlight:
- remove the headlight housing by unscrewing the three fastening screws;
- turn the socket with lamp 3 counterclockwise and remove it from the seat of the headlamp housing;
- remove the lamp from the socket by turning it counterclockwise;
- Replace the lamp and install it in reverse order.
Replacing lamps in the rear light of a Lada Priora
The procedure for replacing the lamp in the rear light:
- bend back the trunk trim, providing access to wing nuts 1 for securing the rear light;
- unscrew the 3 wing nuts and slide the rear light out of its seat;
- turn the lamp socket to be replaced counterclockwise and remove it from the seat;
- remove the lamp from the socket by turning it counterclockwise;
- Replace the lamp and install it in reverse order.
Replacing the lamp in the side turn signal of Lada Priora
In order to replace a failed side turn signal lamp, it must first be removed. The side turn signal lamp 1 is held in its socket by a spring latch and a latch. It is necessary to move the lamp in the direction of vehicle movement and disengage the latch. Turning socket 3 counterclockwise, remove it together with the lamp from the flashlight body and pull lamp 2 towards you. Replace the lamp and reinstall the lamp in the reverse order.
Replacing the license plate lamp of Lada-Priora
To gain access to the license plate light lamp socket, you need to open the trunk lid and turn the socket with lamp 3 clockwise through the holes in the inner panel of the trunk lid, without disconnecting the wiring harness block, and remove the socket from the lamp housing and pull out lamp 2 to myself.
To replace the lamp in light 1 in a Lada Priora in a hatchback body, you need to remove the tailgate trim, which is attached with buttons. After this, you should do the same steps as described above.
Replacing a lamp in the interior lighting of a Lada-Priora
To replace the lamp in the dome light, it must be removed from the roof trim container body. The lampshade is held by a metal spring latch 4 in the socket of the container body. To remove the lampshade, you need to insert a flat-tip screwdriver into the groove on the right side of the lampshade (passenger's side) and carefully turn the lampshade towards you, after which you should press contact 3 and remove lamp 2, replace the lamp and install the hooks 1 of the lampshade into the socket on the left, after Then press the right side of the lampshade until it locks.
Replacing the lamp in the trunk and glove compartment lighting of a Lada Priora
To replace lamp 2 in trunk light 1, remove the light from the bracket. To do this, install a flat-head screwdriver in groove 3 on the right side of the lampshade and carefully press the lampshade down. The lampshade is held in the bracket by a spring latch. Replace the lamp, install the lampshade hook on the left in the bracket, then press the right side of the lampshade until it locks.
To replace lamp 3 in the glove box lamp 1, remove the lamp from the socket by inserting a flat screwdriver into groove 2 on the right side of the lamp and gently press the lamp down. The lamp is held by a spring latch 7 in the socket of the glove compartment housing. Replace the lamp, install the lampshade hook on the left into the socket, and then press the right side of the lampshade until it locks.
Top of page
Welcome! Lamps - in fact, in a car they are needed only to illuminate something, for example, to illuminate the road, to illuminate the interior, etc., but not all lamps last forever, and especially if you take the light bulbs that are in the headlights (Especially the low beam lamp ), then they constantly burn out and have to be replaced with new ones from time to time, but what to do if you just bought a car and don’t know how to change the headlight bulb in it, that’s why this article was written in which everything was described in detail .
Note! In order to replace light bulbs, you will need to stock up on: Be sure to wear clean gloves, this is only necessary so as not to stain the lamp, because when you touch the glass bulb of a halogen lamp with your hand, after a very short time it will first begin to shine poorly and eventually eventually it will go out, so it is not advisable to touch the glass bulbs of the lamps, but if you do accidentally take it, then use a rag moistened with alcohol to clean the greasy fingerprints from the glass bulb!
Something else, namely, replacing lamps in a car should only happen when the battery is de-energized, so in order to de-energize it, take with you also a small wrench with which you remove the minus terminal from the battery! (If you don’t know how to remove the terminal, then see all the details in the article: “Replacing the battery”, point 1)
Summary:
Where are all the bulbs in the headlight? In order to answer this question, you will first need to study a little the design of the headlight, for example, let’s take a headlight removed and disassembled from the Priora and look at it and thereby you will understand where which light bulbs are located, for example, the low beam lamp is on the outside and is also indicated in the photo with a red arrow, and the high beam light bulb is indicated by a blue arrow and, as you already understand, it is located in the inside of the car, but besides these two there are a couple more lamps, namely the turn signal lamp (Indicated by a green arrow) and another light bulb which few people know, a side light lamp that is designed to show the dimensions of the car in the dark, and it is built in next to the high beam lamp and is indicated by a white arrow.
When do you need to change headlight bulbs? Accordingly, they change when they burn out, so if you notice that the light at night (or during the day if this concerns the low beam headlights and turn signals) has begun to poorly illuminate the road, then you can already think about replacing the lamp with a new one, but when you buy a new lamp, be sure to inspect it from all sides, and especially inspect the glass bulb; if there is even a small through crack in it, then this lamp will not work for a long time 100%; after 3 minutes have passed, most likely the lamp will burn out and therefore you will have to change it to new.
H4 car lamp tests
1. Which lamps are the brightest were determined by the Test Lab channel (June 2020). The rating is as follows:
- OSRAM Night Breaker
- Philips X-Treme Vision
- Philips Vision
- Philips Vision Plus
- Philips Longlife Ecovision
- OSRAM U37R
- Narva
- OSRAM Cool Blue
- GE 50440U
Out of the standings:
- MTF Argentum
- OSRAM Super Bright
2. Test of H4 automobile lamps “Behind the Wheel” in the laboratory and on the roads (March 2022):
| Zone III (measurement direction: 0°-0°), lx | Counter. point B50L (measurement direction: 34′ up, 3°26′ left), lx | Counter. point 75R (measurement direction: 34′ down, 1°09' to the right), lux | Counter. point 50R (measurement direction: 52′ down, 1043′ to the right), lux | Notes | |
| Standardized values, lux | 1,00 | <0,60 | >9,60 | >9,60 | |
| Standard Philips H4 lamps | 1,00 | 0,60 | 9,60 | 9,60 | the light is visually white |
| ClearLight X-Treme Vision H4 | 1,00 | 0,34 | 15,30 | 26,50 | the light is visually white |
| Narva Xenon White H4 | 0,64 | 0,22 | 8,00 | 12,40 | light visually blue |
| MTF Light Aurum H4 | 2,04 | 1,00 | 12,88 | 28,40 | the light is visually yellow |
| LED MAS H4 | 1,20 | 1,20 | 1,40 | 1,40 | no cut-off line |
| DLED H4, 270 lm | 0,40 | 0,40 | 0,40 | 0,40 | no cut-off line |
| DLED H4, 900 lm | 7,60 | 4,24 | 7,20 | 5,70 | no cut-off line |
How to replace all the lamps in the headlight on a VAZ 2170-VAZ 2172?
Replacing the high beam lamp:
In order to change this lamp, you will need to first disconnect the battery and then get to the back of the headlight, and when you are there, at the beginning of the operation, remove the cover that covers the high beam lamp with your hand (Let us remind you that the lamp is located closer to the center of the car and thus, it can be considered an internal lamp), after the cover is removed (see photo 1) you will see a wire connector (Indicated by a blue arrow in photo 2) which is connected to the lamp terminal (Red arrow), so by pressing the latch which holds this connector, disconnect it from the lamp output, and then remove the spring clip from engagement with the hook (see photo 3) and ultimately remove the lamp itself from the hole in the headlight (see photo 4).
Note! The high beam bulb is installed in its place in the reverse order of removal, but just be careful not to touch the glass bulb of the lamp with your hand!
Replacing the low beam lamp:
To replace this lamp, you will need to do all the same operations that are carried out with the high beam lamp, that is, first look on the back side where the low beam lamp is located (It is located on the outside and further from the center of the car, unlike the high beam lamp ), so when you understand where the light bulb is, use your hand from the back of the headlight to first remove the rubber cover (It is round in shape and its removal is shown in photo 1) which covers the lamp, and when the cover is removed, disconnect the wire connector (Indicated by the red arrow on photo 2) from the lamp output (Indicated by a blue arrow), then remove the spring metal clamp that prevents the lamp from wobbling and falling from the two metal hooks with which it engages (see photo 3) and then move this clamp to the side, and when the latch no longer interferes, remove the low beam bulb from the headlight in which it is located (see photo 4).
Note! Install the new lamp in its place in the reverse order of removal, but when installing, hold the lamp terminal with your hands and not the glass part!
Replacing the side light bulb:
This lamp is located, as mentioned earlier, next to the high beam lamp, so to replace it you will first need to remove the rubber cover from the high beam lamp (How to do this, see above where replacing the high beam lamp is described, everything is described in detail there), and after removal, pull the socket and remove it together with the side lamp from the headlight (photo 1), then, holding the socket in your hand, grab the lamp itself and pull it, thereby it will come out and be removed from the socket (see photo 2).
Replacing the turn signal lamp:
This light bulb differs from all others in the way it is made, that is, it is not halogen but just an ordinary base lamp, it is also marked “PY21W”, it does not burn out very often since we do not always use the turn signal, but only in some cases (When turning, when parking for a long time, we turn on the emergency lights), but in order to replace it you will need to stock up on a screwdriver and use it to unscrew the four screws that secure the headlight trim (see photo 1) and then remove it (see photo 2), and when the trim will be removed and nothing will prevent replacement, find the place where the lamp itself is located and then grab it with your hand and turn its socket counterclockwise (see photo 3), and then pull the socket to remove the lamp completely from the hole in the headlight , and when the lamp is removed, grab the glass part of it with your hand and turn it counterclockwise and thereby remove it from the socket in which it is located (see photo 4).
Additional video clip: On the new second-generation Priors, the light bulbs are replaced a little differently, that is, instead of rubber covers there is one large plastic cover, when you flip it off you can immediately get access to the low and high beam lamp, see the video clip below for more details :
Replacing any of the lamps in the headlight unit of a Lada Priora is not at all difficult. Our step-by-step illustrated instructions will help you cope with this task. There are differences in the procedure for replacing lamps in the headlights of cars manufactured before and after 2013, which we will show.
LADA > Priora
Attention! High and low beam lamps are halogen. You should not touch their glass flasks, as fingerprints will darken when the flask is heated. You can remove dirt from the flask with a clean rag soaked in alcohol.
Replacing headlight bulbs on a car manufactured after 2013
Headlight differences
The headlights received differences with the release of the second restyled Priora, which received both front and rear updated optics.
Headlight Priora 1 until 2013
1-Cover covering the low beam lamp, 2-Horizontal headlight adjustment bolt, 3-Ventilation valve, 4-Turn indicator lamp with socket, 5-Vertical headlight adjustment bolt, 6-Cover covering the high beam lamp, 7-Power connector block - headlights.
Headlight Priora 2 after 2013
1-Power connector for the headlight unit, 2-Vertical headlight adjustment bolt, 3-Cover covering the low and high beam lamps, 4-Turn indicator lamp with socket, 5-Horizontal headlight adjustment bolt.
As you can see from the pictures, the headlights showed virtually no visual difference. The only exception is the protective covers; there are two of them on the old model, and one on the new one.