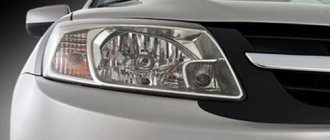
| Sooner or later, the lamps in the headlights begin to burn out, so you may need instructions on how to replace the lamps in Kalina's headlights. This photo report will also be useful if you decide to replace conventional headlight bulbs with LED ones. |
You can replace the lamps without removing Kalina's headlights. For clarity, the replacement process is shown with the headlight removed. Remove the negative terminal from the battery.
Removing and installing Kalina low beam lamps
To replace low beam headlight bulbs you will need:
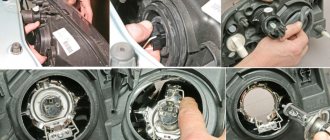
- Remove the protective rubber cover from the headlight housing by pulling one of its three blades.
- Disconnect the wire ends from the lamp.
- Release the spring clip from its engagement with the two hooks and move it away from the lamp.
- Remove the low beam lamp from the Kalina headlight housing.
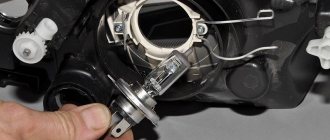
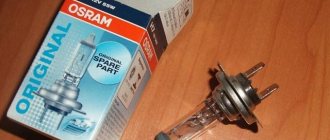
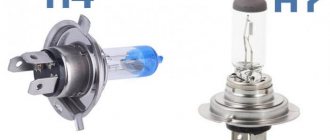
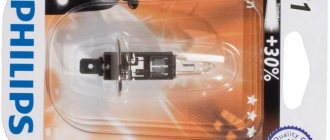
Installation of a new low beam lamp (H7) is carried out in the reverse order.
Attention
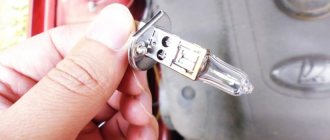
| High and low beam lamps are halogen. Do not touch their glass bulbs with your fingers, as traces from them will cause the lamp to darken when heated. You can clean the light bulbs with a clean rag soaked in alcohol. |
Adjusting the headlight beam
Correctly adjusting headlights can only be done in a service station. However, let's look at how this operation is performed by experienced craftsmen.
Kalina-2 block headlight, correct adjustment of the beam direction
There are two adjustment screws on the back wall of the unit called the headlight unit. The first of them, located closer to the radiator, allows you to deflect the light beam “up and down”, and the “horizontal” direction is adjusted with the second screw. Ideally, this should happen: when the car is 5 meters from the screen, the border of the light spot touches line “2” (see figure). Line “1” is spaced from the ground at a distance equal to the height of the centers of the headlights. The second line is drawn 65 mm lower.
When making adjustments, the corrector switch is moved to position “0”. Of course, you only need to turn on the low beam. We also note that the headlights are adjusted one by one (the “excess” light source is covered with a cloth).
Here are a couple more tips that will be useful:
- The centers of the beams should be on lines AE, BE;
- Line “0” has the following meaning: it intersects with line “1” at one point, so the border of the spot should pass exactly through this point;
- The caps of the plastic adjustment screws are compatible with a hex screwdriver. However, a Phillips screwdriver will also work.
So, we have fully examined how to adjust the headlights on Kalina-2. Of course, replacing lamps with subsequent adjustment is a less labor-intensive operation than connecting a radio. However, accuracy is important here. And the special equipment used to perform the settings is only available at service stations.
Removing and installing Kalina high beam lamps
To replace the high beam headlight bulb you will need:
- Disconnect the wire block from the lamp.
- Remove the latch from engagement by squeezing its ends.
- Remove the high beam lamp from the Kalina headlight.
Installing a new high beam lamp (H1) is done in the reverse order.
How the work is carried out
Let's figure out how to replace the low beam light bulb on Kalina with your own hands, the process is quite simple and, by and large, does not require any special devices, you only need your hands. But still, the tool may be needed at the preparation stage.
Preparation
It is important to ensure a comfortable and safe working environment, so remember the following:
- The work can be done anywhere - even in the yard near the house, but it is advisable to go to the garage. There you can not be afraid of precipitation and, if necessary, find this or that tool.
- First of all, the hood is opened and the terminal is removed from the battery. We remind you of this in every review. Therefore, make it a habit to de-energize the system when working with electrical equipment to prevent short circuits and electric shock.
- Further preparation depends on what engine is installed in your car, you need to provide access to the rear of the headlight housing, and for this you need to disconnect the expansion tank on the left, and the options on the right may be different. Therefore, be guided by the situation and decide for yourself. What needs to be removed and what should not be touched.
Without easy access, work is much more difficult to carry out
Replacement process
Replacing the low beam bulb on Kalina is as follows:
First of all, you need to remove the rubber plug, which protects the interior of the headlight from moisture and dirt; this is also very important, so do not damage this element. It's very simple: grab one of the three protrusions and pull away from the body, the element will come off quite easily.
The plug is located behind the low beam headlight on the rear side
Next, you need to remove the two contacts and move them to the side; this is easier to do while the low beam light bulb on Kalina is still fixed
It is important to remove the elements carefully so as not to damage the insulation or break the wires, otherwise you will have to carry out repair work as well. After the wires are disconnected, you can proceed to the next step - releasing the latch, which presses the base to the reflector and holds the element in a certain position. To do this, you need to disengage the clamp from both sides by lightly pressing it and moving it away from the base.
Removing and installing Kalina size lamps
To replace the side light bulbs in the headlight, you will need to remove the protective rubber cover by pulling one of its three blades.
- Remove the bulb socket.
- Remove the lamp from the socket.
Installing a new side light bulb (W5W) is done in the reverse order.
Snapshot
Block headlight (left): 1 — ventilation tube;
2 — low beam section cover; 3 — cover of the high beam section; 4 — light beam regulator in the vertical plane; 5 — lamp socket for side light and daytime running light; 6 - electrical connector; 7 — regulator of the light beam in the horizontal plane; 8 — direction indicator lamp socket Headlight unit (left): 1 — ventilation tube; 2 — low beam section cover; 3 — cover of the high beam section; 4 — light beam regulator in the vertical plane; 5 — lamp socket for side light and daytime running light; 6 - electrical connector; 7 — regulator of the light beam in the horizontal plane; 8 - turn signal lamp socket
Block headlight (left): 1 — ventilation tube; 2 — low beam section cover; 3 — cover of the high beam section; 4 — light beam regulator in the vertical plane; 5 — lamp socket for side light and daytime running light; 6 - electrical connector; 7 — regulator of the light beam in the horizontal plane; 8 - turn signal lamp socket
We show the replacement of lamps on the left headlight unit. For better access, move the air filter to the side. To replace the lamp in the right headlight unit, this is not necessary. For clarity, we show the work on a removed headlight. We change the lamps in the right headlight in the same way.
To replace the low beam lamp, remove the larger diameter rubber cover from the headlamp housing.
Removing and installing Kalina turn signal lamps
- Turn the turn signal socket counterclockwise 45°.
- Remove the socket from the headlight housing.
- Remove the turn signal bulb by pressing it in and then turning it counterclockwise until it stops.
Installing a new turn signal lamp into the headlight is done in the reverse order.
2302-18-10-10 (Copy)
Pulling the lamp, remove it from the socket.
Pulling the lamp, remove it from the socket.
Pulling the lamp, remove it from the socket.
We install the new W21/5W lamp in the reverse order.
Replacing headlight bulbs on a car manufactured before 2013
The only difference in the procedure for replacing lamps in the headlight of a car manufactured before 2013 is that the side light lamp is located under the high beam lamp cover, and the daytime running light lamp is simply absent.
We will show you the replacement of the side light lamp on the right headlight unit.
Removing and installing Kalina taillight lamps
- Remove the socket with the parking and fog light bulb by turning it counterclockwise.
- Remove the lamp from the socket by pressing it and turning it counterclockwise until it stops.
Installing a new lamp in the Kalina's rear light is done in the reverse order.
- The combined parking and fog light lamp has 2 protrusions located at different levels. When installing it, the protrusions must fit into the corresponding grooves of the cartridge.
- The grooves on the flashlight body have different widths; this should be taken into account when installing the lamp socket.
The operations for replacing the remaining taillight lamps are performed in the same way.
Replacing lamps yourself
If the diagnostics carried out showed that it was the light bulb that burned out, then it is not at all necessary to take the car to a service center, where such a change in the lighting element will cost 2-3 thousand rubles or more. You can do all the work yourself. For most cars, the headlight design is identical, so the car owner is guaranteed not to encounter any difficulties with carrying out such repair and service work.
Only on new cars will it be necessary to dismantle the bumper in order to remove the headlight and change the burnt out light bulb. In such a case, it is best to take the car to a service center, where specialists, having extensive practical experience, will carry out such repairs in a short time.
Tips for installing your device
The active subwoofer has two line outputs, which allows you to connect it to a car radio.
Connecting such a subwoofer is not difficult. What to do if the speaker system is passive? To connect a passive subwoofer, you need to install an additional amplifier. A special speaker cable is used with a length equal to the distance from this device to the amplifier.
In addition, for the correct and competent installation of the device necessary to determine the minus and plus outputs on the speaker.
Installing a new one: sequential instructions
The procedure for removing and installing a headlight, which is located on the right or left side, is not particularly different from each other. It is only important to act strictly according to the instructions. When installing a new light bulb, you must only hold it by the base and do not touch it with your hands. When removed, you can completely hold it in your hands.
Note that for the Lada Kalina (16-valve engine) a lamp with an H7 socket is required. Install the new one as follows:
- Determine the seat so that the protrusion in the base coincides with the groove on the headlight. It must be firmly fixed. Only then will it be clear that the protrusion has fallen into the groove;
- press the latch against the lamp so that the center of the base is between the antennae of the latch;
- snap the latch into place;
- connect both wires to the clamp and close the lid tightly.
Step-by-step replacement instructions
Each H7 standard bulb has an iron base, which is pressed to the headlamp with a wire clamp. To bend this bracket, just get close to the plane of the headlight from behind. Let's open the hood and see what exactly will bother us.
Engine compartment of Kalina-2 (VAZ-2192, 2194)
Behind the headlight on the right is a washer reservoir. It is dismantled like this: disconnect the electric motor terminals, tighten the plug harder, find one nut and one fastening bolt. The fastening elements are unscrewed with a 10mm wrench, then the tank is placed on the engine. Next we could look at how to remove the headlight on Kalina-2, but in this case this is not required.
Before performing any manipulations with electrical equipment, always disconnect the negative terminal of the battery. It is better to connect this terminal last (before closing the hood). Be careful.
Replacement sequence:
- Remove the rubber cover covering the low beam lamp compartment;
- Disconnect both terminals from the lamp contacts;
- The fastening bracket is removed from the grooves by first pressing on it, then the bracket is moved to the side;
- They take out the lamp, install a new one in its place, and return the bracket to its place.
Next, perform steps “2” and “1” in reverse order. The connection diagram is not important - there are only two contacts, and both go to the filament. Now, if we connected LEDs, then everything would look more complicated.
The bracket presses the cartridge to the plane of the headlight
When installing a halogen light source, you must remember: the surface of the lamp glass must be perfectly clean. Do not allow grease marks to remain on the flask. Installation is carried out using only cotton gloves. The glass of the flask is cleaned with industrial alcohol or Secunda.
When and why to change
The factory light is adjusted during the production process, at the time of passing technical inspection. In the new car, the modules shine with maximum power and at the peak of their capabilities. The need for replacement is determined by the following main criteria:
- Reducing light intensity.
- The appearance of yellowness and cloudy areas on the cut-off strip.
- Complete shutdown of one of the light modules.
- Increased brightness after the suspension hits a pothole or has mechanical contact with the headlight.
Kalina lamps installed on the conveyor last no more than 4 years. Cloudiness, deterioration of visibility and the appearance of unlit areas appear after the filament burns and the bulb smokes. In this case, the light does not pass through the dirt well and does not reach the desired areas of the reflector. There are yellow spots of light and darkened areas on the road.
The thickness of the light module filament is calculated by production engineers. When struck, the lamp shakes and the spiral becomes thinner. An external examination reveals a large increase in beam power. This indicates that the halogen lamp will soon fail, since the thin filament heats up above the set temperature and begins to melt. The service life of a damaged part ranges from one minute to several hours.