A car malfunction can lead to serious consequences, especially if a part of the chassis fails while driving. In this case, the danger will threaten not only the driver and passengers, but also other road users. Uncharacteristic noise or crunching indicates a CV joint malfunction that must be repaired immediately.
External and internal grenade (CV joint): differences and features
So, before checking the CV joints, it is necessary to separately take into account a number of features. First, the hinges can be internal or external. So, they rarely fail at the same time. In fact, the outer CV joint breaks more often. However, it cannot be ruled out that the problem is not, for example, the left internal grenade or the right internal hinge.
At the same time, to an inexperienced car enthusiast, both internal and external CV joints may seem the same. In fact, they differ in terms of design, experience different loads, have different operating modes, and the very signs of their malfunctions are somewhat different from each other. Let's figure it out.
- The design of the outer and inner CV joints is somewhat different due to the different operating modes of these hinges. The outer CV joint is connected to the hub, and its main task is the need to transmit torque at any angle of rotation or inclination of the wheel.
- In turn, it is important for the inner joint to compensate for the misalignment of the transmission and the drive shaft, thereby partially relieving the outer CV joint. At the same time, the internal joint ensures complete “integrity” of the shaft, provided there is a large suspension travel. In other words, it is the inner CV joint that allows the drive shaft to become slightly longer or shorter under certain conditions.
- If you compare the hinges visually, the body of the inner CV joint is larger than the outer one. Due to this, the inner race of the CV joint can move along with the shaft and balls inside the housing along the tracks. Also, the inner hinge can be rotated at an angle, although less than the outer hinge. If we consider the outer CV joint, it is rigidly fixed to the shaft and is more responsible for the ability to turn. On some cars, the outer grenade is so firmly attached to the shaft that it must be cut off to remove it.
Let’s also add that a special lubricant for the CV joint is placed in the joint cavity. This lubricant protects the element from moisture and shock loads. Please note that the CV joint cannot be filled with lubricant of unsuitable properties and type. In this case, the constant velocity joint will quickly fail.
Also note that front-wheel drive cars have a transverse engine, that is, the gearbox is shifted to the left. The result is that the left drive shaft will be shorter than the right one. So, the longer right shaft is not always solid. There are options when it is made of two parts, which are connected using a suspension support (suspended bearing).
The fact that on some cars a tripod is used as an internal joint, rather than the usual type of CV joint discussed in the article, deserves special attention. In any case, the operating principle of the tripod is still similar and there are no fundamental differences.
Diagnostics of the condition of CV joints
If there is a suspicion that there is play in the CV joint on a VAZ 2109, the unit must be disassembled and all parts diagnosed. To do this, the structure is disconnected from the car, and then the order of work is as follows:
- The clamps holding the protective cover are removed.
- The part moves along the wheel drive shaft. The cover on the right wheel drive is tightened or turned out.
- The hinge must be knocked off the shaft with a hammer or a special drift.
Tip: Do not apply load to the assembly separator.
- The hinge is washed.
Tip: Before disassembling the product, using paint or a touchstone, mark the relative position of its parts, except for the balls.
- The hinge is secured in a vice.
- The separator and cage are tilted so that the ball can come out of the CV joint housing.
- Using a screwdriver made of soft metal, the ball is squeezed out of the separator.
- The remaining balls are pulled out in the same way. They can be pulled out one after the other or through one.
Advice: Do not turn the separator by applying great force to it. The balls may become blocked and further disassembly of the assembly will be difficult.
- It is necessary to install the separator with the holder in such a position that the elongated windows of the separator are opposite the protrusions of the assembly body.
- The separator and clip are pulled out.
- The cage is removed from the separator after placing its protrusion in the separator window.
Tip: In hinges with identical windows on the separator, it does not matter which window is used to remove the balls.
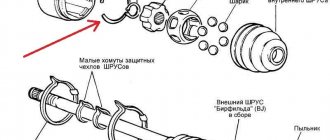
CV joint parts for VAZ 2109
- Building 1.
- Separator – 2.
- Clip 3.
- Balls – 4.
The CV joint parts are washed well. Further:
- Their condition is being examined. There should be no cracks on the separator jumpers, there should be no burrs or deep holes on the cages, and no traces of corrosion on the working surfaces of the hinges.
- Backlash in VAZ 2109 CV joints occurs when the working surfaces of the elements are worn by more than 0.1 millimeters.
- If deviations are found that cannot be eliminated, a complete replacement of the CV joint is necessary.
Advice: Replacing CV joint parts on a VAZ 2109 car should be done with similar spare parts. Only the CV joint boots can be replaced separately.
Assembling the hinge of a VAZ 2109 car
So:
- Before starting the operation, you need to lubricate all parts with special CV joint-4 lubricant.
- When assembling the cage with the hinge body, it is necessary to ensure that the marks made before disassembling the assembly match.
- In the separator, the balls are installed in an inclined cage. The angle of inclination should be twice that of the separator.
- The CV joint is filled with lubricant, the filling volume is 40 cm3.
- A new retaining ring is mounted into the shaft groove strictly in the center. The groove must first be filled with grease.
- While maintaining the alignment of the shaft and the cage relative to the ring, the shaft must be rested against the cage.
- After a sharp blow with a hammer on the end of the shaft, the ring should shrink and slide through the hole in the cage.
- “Excess” air is released from the cover by pulling the seating belt of the cover away from the drive shaft.
- The fastening clamps are put in place.
- The area of fixation and tightening of the boot with clamps is checked. There should be no deformations or traces of parts contacting the road surface. Otherwise, the parts are replaced with new ones.
- If the VAZ 2109 CV joint rotates smoothly, without jamming from force applied by hand, it means that the unit is assembled correctly.
You can watch the video on how to remove the CV joint play in a VAZ 2109.
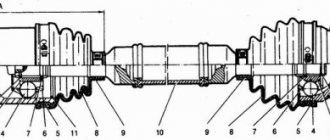
Internal CV joint device
The internal constant velocity joint is designed to transmit torque from the transmission to the outer CV joint. It differs from the external one in size (increasingly) and cost, although it consists of the same parts:
- Bowl-shaped housings with a driven shaft.
- The inner race is a spherical fist with a drive shaft.
- A separator in the form of a ring with holes to hold the balls.
- Metal balls.
The roller type of hinge is characterized by the presence of a support, which, using three rollers, moves along tracks cut into the inside of the body. The balls or rollers are located in the grooves of the housing and are held by a cage, which is connected to the drive shaft by a splined joint. When the angle of the drive and driven shafts changes, the balls move along the grooves, continuously transmitting force.
External and internal CV joints
Each wheel of a front-wheel drive vehicle is equipped with 2 CV joints. The inner joint connects the gearbox and the axle shaft, the outer joint connects the axle shaft with the wheel hub. Working in pairs, they ensure transmission of torque under all types of loads.
In the most common ball joints, the outer CV joints are equipped with radius grooves that ensure uninterrupted operation of the vehicle when the wheels are turned. Internal grenades with straight grooves compensate for the movement of assembly parts along the axis when the front suspension oscillates and vehicle vibrations.
We will describe the design differences between different types of CV joints below.
Ball
They consist of a body (outer race) with 6 grooves, a separator, 6 balls and an inner race with 6 grooves. During vehicle operation, the balls move along the grooves, ensuring the transmission of torque from the engine to the wheels.
Ball grenades are most often found on front-wheel drive passenger cars.
Internal structure of a ball CV joint
Operating principle of a ball joint
Tripods
In tripod CV joints, instead of balls, spherical rollers are used, which are mounted on the support pins using bearings.
Tripod automobile grenades are installed on both cars and light-duty trucks.
Operating principle of a tripod car grenade
Internal structure of a tripod CV joint
Cam
Cam CV joints structurally consist of 2 forks and 2 shaped disks. The coupling (contact) area of the forks is significant, so the hinge elements can withstand severe loads during operation.
Cam joints are widely used on heavy-duty trucks.
Internal structure of a fist car grenade
Twin gimbals
They are the least popular devices. They are made of two cardan joints connected to each other.
Currently used in the production of heavy-duty construction equipment, tractors, and some models of trucks and SUVs.
The operating principle of a paired cardan CV joint
Why does the CV joint crunch?
Video of replacing the outer left CV joint
Experienced drivers are able to determine the location of a car breakdown by ear. Such skills are acquired over time, but the crunch of a CV joint cannot be confused with anything.
In order to understand the nature of this characteristic noise, you should remember how the CV joint is designed. The task of the CV joint is the transmission of rotation from one axle shaft to another, provided that the angle between them continuously changes.
This property is due to the need not only to rotate the drive wheel, but also to give it the ability to turn and move up and down on a spring.
The CV joint consists of the following main elements:
- outer body in the form of a bowl with six semicircular grooves inside and a semi-axis outside;
- the inner race is in the form of a spherical fist and also has six grooves and a splined connection for the axle shaft;
- Between the inner walls of the bowl and the holder there are 6 balls in the separator.
All elements are made so precisely that they have no play when assembled. The cage transmits force through the balls to the body and rotates it, and moving the balls along the grooves makes it possible to change the angle between the axle shafts.
Over time, a hole forms at the point where the balls come into contact with other elements and a backlash appears. The free movement of the balls (rolling) generates a sound that is very similar to crunching.
Considering that CV joints are installed two on each wheel, when alarming symptoms appear, it becomes difficult to find out which CV joint is crunching: inner or outer, right or left.
Service life and maintenance
A grenade in a car is a consumable item. It will have to be changed quite often. Fortunately, the cost of the unit and repairs is usually not the highest.
How much a factory part costs depends on three factors:
- Driving manners;
- Machine models;
- Timely service.
The first factor is critical. Grenades are especially afraid of the trigger falling down when the steering wheel is turned to the extreme position. At such moments the node experiences maximum load.
If you mostly move calmly, then you can look for a resource for your car on thematic forums. There are cars in which a standard product can cost more than one hundred thousand.
Timely maintenance means periodic inspection of the boots, their timely replacement and filling with lubricant. If a crack appears in the rubber, the death of the CV joint will occur in just a couple of weeks. And in rainy weather this can happen even faster. This is due to water, which, when it gets into the assembly, leads to corrosion and leaching of the protective lubricant.
Surely you will be interested to know that in addition to grenades, absolutely all ordinary cars have a TV! Be sure to read our article on this so you can be a knowledgeable car owner.
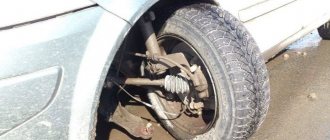
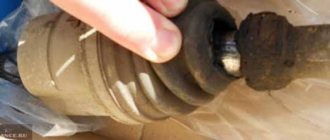
A torn boot is a typical fault.
Anthers, by the way, are quite inexpensive. The lubricant is also cheap and is called tritely - “CV joint”. When purchasing, do not forget to check that the anthers come with clamps for tightening them.
Advice on how to extend the life of a grenade:
- Do not press the pedal to the floor when turning, especially when starting off
- Change boots and lubricant in a timely manner
The lifespan of external and internal grenades is very different. The first is subject to great effort, since it is forced to turn at significant angles, and therefore makes itself felt more often.
The internal part may well not be bothered for the entire service life of the car.
Destruction of the ABS system ring
Another additional part is sometimes installed on the CV joint - a toothed ring of the ABS system, from which a special sensor reads the rotation speed. Due to age, this ring rusts, becomes damaged or even bursts, after which the entire ABS system goes into emergency mode or is completely deactivated. It all depends on the specific design of the CV joint - sometimes the ring can be changed separately, and sometimes you will also have to buy the entire assembly.
Sounds and symptoms of breakdown
There are several signs of a hinge failure:
- Anther rupture. It is enough to go to a service station, where the faulty element will be replaced, and the need to repair the CV joint itself will disappear.
- The sound of a grenade. The sound is very reminiscent of the friction of brake pads worn down to metal.
- Jerks. When the car starts moving, the driver may feel slight shocks. This behavior indicates broken grenade grooves.
- Clicks. They appear at the moment of movement, and their number varies from 2 to 5. When moving, the unpleasant sound disappears, but the next time you try to move, it appears again. This also indicates a malfunction of the grenade.
- Crunch. If the sound appears directly when moving, then this is an alarming signal. The CV joint is not only worn out, it is about to seize. Driving with such damage is dangerous, so it is best to call a tow truck and send the car to a workshop.
Development on the spline part
This damage is typical for CV joints with an intermediate shaft (extension). Actually, in the articulation mechanism, abrasion or breaking of the splines occurs. This happens due to either a design defect or the same aging of the metal. Over time, the articulation mechanism begins to rust, wear appears and, as a result, play, which leads to vibrations. The most annoying thing is that the CV joint itself may be completely serviceable, but the entire assembly will have to be replaced.
How to check CV joint wear - causes and signs of grenade wear
A constant velocity joint (popularly called a grenade) does not fail all at once, with rare exceptions. Among the main reasons for CV joint failure are:
- Lack or insufficient amount of lubrication.
- Damage to the boot, which allows dirt and water to enter the part, which accelerates wear.
- Initially low quality parts.
- Aggressive driving with sudden starting and braking, turning the steering wheel all the way to one side, towing heavy trailers.
- Mechanical damage when overcoming bumps on the road.
- Natural wear and tear.
Worn CV joint
Before checking for a faulty CV joint, you should pay attention to factors that may indicate problems:
- Crunching sound of the outer joint when turning with the steering wheel turned all the way at the moment of starting.
- Knocking and vibration of the internal joint during straight-line movement - initially when overcoming uneven surfaces, and later when driving on a flat road.
- The appearance of oily spots on the anthers.
- The formation of minor jerks when starting to move and accelerate, especially if the engine, clutch and gearbox are operating normally.
Leaking CV joint boot
Particular attention should be paid to the crunching sound, which is a sign of critical wear of the CV joint and a signal for immediate replacement.
What to do if a grenade knocks in your car - DIY repairs
Despite the awareness of modern drivers (and almost everyone has to become such when their “iron horse” fails), almost no one has heard of a spare part called a CV joint. Well, those who have already become acquainted with it have probably already spent quite a large amount of money on replacing it or, at best, repairing it. In this article we will talk about these very cunning and important automotive components, and also reveal the secret of their long, trouble-free operation.
How to check the inner CV joint without removing it
There are several ways to check the internal CV joint for serviceability without removing it from the car. To implement the first, you will need a section of road with uneven surfaces located in such a way that a car can drive along them on one side.
Inner CV joint
The entire process of checking the internal CV joint in this case consists of several stages:
- We accelerate the car to 15-20 km/h.
- Then we run over one side of the bumps and listen.
- We repeat the procedure by driving the other half of the car over uneven surfaces.
The presence of a breakdown will be indicated by a knocking sound in the area where the hinge is installed, as well as increased twitching during further acceleration.
We drive through a hole on one side of the car
Another way to check which CV joint is crunching from the inside is to hang the car on a lift. The verification process consists of the following stages:
- The entire car or its front part is suspended, which allows you to create a critical angle and extremely increase the load on the inner CV joint.
- We start the engine and press the gas a little so that the wheels start rotating.
- We listen carefully from which side the uncharacteristic sound is heard, which will allow us to determine which internal CV joint has failed - right or left.
In this way, you can check the internal CV joints of the car without extra costs. Although it would be more informative to check at a service station if such an opportunity exists.
How to diagnose hinge faults
Diagnostics of the external hinge is simple: just turn the steering wheel to its extreme position and drive off. At the maximum angle between the axle shafts, a characteristic crunch will appear - this is a sign of failure of the outer hinge.
It is best to check the internal CV joint on a lift
But the internal mechanisms also have a peculiarity - they can crunch during linear movement. To check, it is not necessary to have special skills, since you can check the internal CV joint by driving off-road - when you get into holes and ditches, the sound is amplified many times over. But the most accurate diagnosis can be made as follows:
- drive the car onto a lift;
- in a suspended state, engage first gear, allowing the wheels to rotate slowly;
- in this position, the faulty CV joint will produce a clearly audible crunch;
- again, when you try to move the shaft by hand, you will feel significant play.
If the symptoms are obvious, then you need to buy a CV joint and install it on the axle shaft. Anthers, clamps and lubricant are usually included in the kit.
Front-wheel drive cars are very popular all over the world. Some motorists prefer front-wheel drive rather than rear-wheel drive cars, considering them more convenient and reliable. Front-wheel drive vehicles use MacPherson strut or multi-link suspension. Both of them have a number of positive aspects, they are reliable and durable, and besides, they are not expensive to repair, what else do you need? However, like everything in this world, front-wheel drive is not without its drawbacks; owners of such cars have to more often change ball joints, front wheel bearings, as well as CV joints (constant velocity joints), which, by the way, will be discussed today in my article .
CV joints , or “grenades” as they are also called, cause a lot of trouble for car owners, so it is not surprising that they are sometimes called the “weakest point” of front-wheel drive. Despite the durable materials used in the production of grenades, as well as various coatings, due to friction and impacts that occur on the front suspension, CV joints quite often fail. A banal rupture of the CV joint boot can lead to complete failure of this expensive part. In order to prevent a CV joint malfunction and not end up with expensive repairs, you should carry out a visual inspection of the chassis from time to time, and also monitor the integrity of the CV joint boot. Today I will talk about how to check the CV joint; if you suspect its malfunction, you will learn about the causes and signs of a “grenade” malfunction.
How to check the outer CV joint without removing it
There is one simple way to check the external CV joint without additional investment and with minimal time.
Outer CV joint
It is enough to choose a flat area on which you can ride without disturbing anyone. After this we perform the following actions:
- Turn the steering wheel to one side as far as it will go.
- We begin a smooth movement and listen.
- We repeat the same procedure with the steering wheel turned in the opposite direction.
We turn the steering wheel all the way and drive.
In this case, how to check which CV joint is crunching is also quite easy. When turning the steering wheel to the right while moving, a crunching sound may appear in the left hinge and vice versa.
Development of a tripoid in a needle bearing
Tripod CV joints come in two types: regular and with an external race. The main reason for failure of both types is wear. In a simple version, at certain angles the tripoid begins to slide rather than spin. With an external roller, the bearing rotates at any angle of rotation, operates more smoothly and wears out noticeably longer.
On some models, the tripoid housing is located in the gearbox. In this case, it is made of higher quality metals and carries more load. If your car has a choice between a ball and tripod CV joint, then it’s definitely worth paying extra for the latter.
How to check removed CV joints
A simple way to check removed CV joints is to clean them of grease and conduct a thorough visual inspection. Especially in the area of working surfaces - balls, separators. There should be no cracks, chips, pockmarks or other marks indicating wear.
Inspecting the CV joint
A damaged CV joint must be replaced, since the metal elements of the part cannot be repaired. In case of emergency, you can swap places - in this case, the load will fall on the surfaces that have not yet been worn out, which will allow you to gain a little time before replacing parts. When installing new CV joints, they should be filled with new lubricant and sealed with a boot.
Do-it-yourself replacement or professional help
So, knowing how to check the CV joint and being sure that it is the one that is faulty, the car enthusiast has a question about how to fix the breakdown. It is irrational to repair CV joints; such parts must be replaced. If you have a convenient garage and all the necessary tools, you can carry out the repairs yourself.
If you have doubts about your own abilities, or do not have an experienced mentor or the necessary tools, then it is better to seek help from a car service center. Otherwise, there is a risk of incorrect installation and damaging the new part.
How to identify a breakdown on a VAZ and other cars and understand that the CV joint needs to be changed
You can find out which hinge has become unusable and started to crunch using a universal method. To do this you need to proceed as follows:
- Align the car wheels.
- Apply the handbrake, neutral gear.
- Jack up one of the front drive wheels.
- Engage first gear, release the clutch pedal and move off.
- The next step is to slowly apply the brakes. If the internal “grenade” malfunctions, characteristic knocking sounds will appear on the right or left. The problematic external hinge will manifest itself as a crunching sound. For more accurate diagnostics, during the described procedures, you can turn the steering wheel first to the left and then to the right.
Safety rules cannot be neglected here. It is important not to forget about the hand brake and use a wheel chock. The jack can be lowered only after the wheel stops rotating.
How to check the outer CV joint
Diagnostics must begin with these elements. There are two main methods to focus on here.
Firstly, on a flat area with the steering wheel turned all the way, it is recommended to drive in a circle. It is better to lower the side windows. This is necessary in order to hear better:
- When turning left, knocking noises may appear on the right side, indicating a malfunction.
- On the contrary, when moving to the right, crunching and other sounds may appear from the opposite side.
- In addition, steering wheel vibration may also occur.
How to check the inner CV joint
In this case, it is more difficult to determine the breakdown, since it does not appear so clearly. When accelerating or driving fast, a humming or other noise may appear against the background of vibrations and jerking of the car.
If the car is driving slowly on an uneven road with a lot of potholes, then if there are problems with the internal joint, you can hear its crunching.
You can specifically drive through holes with your left and right wheels to more accurately diagnose the location of the problem.
Where is it knocking? — how to determine a possible car breakdown based on the location of the knock. A modern car is a complex structure consisting of many components, assemblies, and parts. During operation, individual parts of the machine wear out. Certain problems appear...
Is it possible to diagnose grenade malfunctions yourself?
Since the grenade is a simple hinge, it can easily fail. The principle of its operation is very similar to the operation of a bearing - two surfaces, between which balls made of durable metal are located. The difference is that grooves are cut out on the surfaces, due to which you can change the position of the drive axle shaft relative to the driven one. If you take a used CV joint, you can rotate the two axle shafts with your hands without much effort and see how the unit works. You won’t be able to turn them on the new one, since there are no gaps and you need to make a lot of effort to turn them.
Several forces act on the hinge at once. Firstly, when driving, torque is transmitted from the gearbox to the wheel. Secondly, the relative position of the axle shafts is constantly changing, as you rotate the steering wheel while driving or drive over an uneven surface. And there is always friction in the mechanism, which destroys it. In some place, a development may appear, as a result of which the gap between the surfaces increases and extraneous crackling and noise become audible.
Causes and prevention of premature wear
The service life of the external and internal “grenade” depends on many factors. A node can fail for various reasons.
Here are some of them:
- poor product quality, lack of sufficient lubricants;
- consequences of a strong impact as a result of a collision or accident;
- dust, dirt, sand getting inside the structure due to a torn boot;
- poor road surface;
- incorrect installation;
- aggressive driving style.
Experts recommend regularly monitoring the condition of both types of hinges, checking the integrity of the rubber boot. For prevention, it is recommended to periodically dismantle the unit, wash its internal parts, and change the lubricant.
After replacement, the clamps on the boots must be carefully tightened so that the rubber boot does not rotate.
Premature wear can be prevented if you drive on uneven roads as carefully as possible, avoiding sudden acceleration and turning with the wheels turned out as far as possible. The outer joints receive all the impacts from the wheels, and sand, dust and water are more likely to get in here.
How to check a wheel bearing and whether it is possible to drive if it is humming Over time, as a result of using the car, various noises appear when it is moving, which indicate wear of one or another part. Its timely replacement solves the problem in the best way...
The symptoms described above show how to identify malfunctions. If there is a need to replace the CV joint, it is better to contact specialists, since incorrect installation will significantly reduce the service life of this element.
Crunch in place: unfortunately, this also happens
But all of the above applies when the car is in motion, and the crunching itself is heard exclusively in turns. And it’s a completely different matter; crunching sounds are clearly audible at rest when you turn the steering wheel of a stationary car left or right.
But, as with the occurrence of extraneous noise while driving, you can hear them in the steering when you turn it in place if:
- the source of the noise is the steering wheel itself;
- or have questions about the condition/wear of the steering rack.
We will also try to cover them in more detail.
Atypical and even funny causes of crunching
For all this, it is enough to inspect and identify what exactly is faulty, as it could be:
- Curvature of the shaft rod. It’s hard to believe, but such a steering defect can result not only from a frontal accident, but also from simple operation.
- The interface between the shaft and the rack. But to get to this joint, you have to try very hard.
- The protective cover rubs against the moving parts of the steering. This is especially applicable to inexpensive machines, as well as those that have been in use for a long time: some of the fasteners could simply break/get lost.
- Even a slipped carpet touching the steering shaft/its crosspiece. But this is an absolute rarity, an exception to the rule.
And in order to understand what exactly is the source of extraneous noise when turning the steering wheel, you need to disassemble the steering column and find the cause.
Causes of failure
Development on the CV joint cage
The reasons may be as follows:
- A manufacturing defect that was not identified before installation. There are often cases when counterfeit products are installed on new cars. This also includes the very low quality of the metal used to make the assembly.
- Insufficient amount of graphite lubricant or its absence. Poor quality of the anthers, as a result of which it ruptures and dust, dirt, sand, water and other debris gets onto the rubbing surfaces.
- How you drive and where you drive is also important. Aggressive driving coupled with poor-quality road surfaces means rapid wear of the grenades and prompt replacement.
Consequences of untimely replacement of the CV joint
If you do not pay attention to the obvious signs of a CV joint malfunction , this will sooner or later lead to the following consequences:
- The CV joint will simply fall apart while driving and the car will lose the ability to move. This is the most favorable scenario.
- The CV joint will jam. One of the drive wheels will stop rotating, but the other will not. At high speeds, this can cause loss of control and a serious accident.
You definitely shouldn’t turn a blind eye to the emerging symptoms of a malfunction; in the future, because of this, you can lose not only money and time, but also your own health.
Where to buy quality CV joints
In order to change worn-out CV joints as rarely as possible, you need to competently approach the issue of their choice. There are several brands that have been tested by motorists and service center workers and have proven themselves to be excellent. Among them is the company IBERIS. CV joints from this manufacturer are distinguished by:
- excellent quality of materials used;
- high-precision assembly;
- adequate price;
- big choice.
You can purchase IBERIS products (and not only) in the IXORA store. Managers-consultants will certainly help you make the right choice, and the quality of the product will certainly leave the most demanding buyer satisfied.
>
How to replace a grant
The first question: “should I change it myself or at a service center?”
In principle, for most budget cars (VAZ, Chevrolet, Hyundai, etc.), if you have experience in repairing the vehicle's chassis and tools, replacing the hinge is not that difficult. You can even do without a hole. But you will have to sweat.
Typically, it is precisely these spare parts that make up a kit for replacing a grenade in a store: boot, lubricant, grenade, boot clamps, retaining ring for the axle shaft
For expensive cars, without experience and tools, for cars under warranty or insurance - definitely the way to service.
The second thing that car enthusiasts often encounter is the locksmith’s phrase “if one grenade crackles, then both need to be changed at once.” Moreover, some insist on replacing the external-internal pair. Others persuade you, when one of the outer ones cracks, to replace the second one and leave the inner ones.
The motivation is simple: if one part is broken, then the second one will soon fit. You decide. And although we have already said more than once that the consumables are inexpensive, but with a mass replacement, the repair will cost a pretty penny.
But no one can know when the working joints “crack”. And practice shows that they can travel for more than one thousand kilometers.
Therefore, answering the question “do both grants need to be changed?” We think it's not worth it. Let the details finish in due time and save your budget. Moreover, before the “explosion”, the grenade itself will warn you in advance with light clicking sounds.
Debugg
The detection of even small defects in the boot indicates that the joint is filled with dirt and lack of lubrication. The CV joint cannot be operated in this condition, so it is necessary to remove the boot and fill the hinges with new lubricant.
Before applying fresh lubricant, the part is disassembled, thoroughly cleaned, and dirt is completely removed. Then the mechanism parts are washed with gasoline, dried and new lubricant is applied. For the internal hinge, 100–110 grams of lubricant are used; for the external hinge, 70–80 grams are sufficient. The CV joint is installed on the wheel and covered with a boot.
Experts recommend installing new, original boots after lubricating the hinge, since old parts lose elasticity and may crack after a short period of time. Non-original anthers do not fit perfectly at the mounting points, so a new portion of dust and water will quickly fill into the gaps.
You can fix the problem yourself
An important condition for the successful operation of CV joints is the choice of high-quality lubricant. Experts advise giving preference to compositions based on molybdenum disulfide, which minimize friction in the components and effectively protect them from corrosion, and also have a minimal destructive effect on the boot.
It is important! It is contraindicated to use graphite lubricant for CV joints. It cannot protect the part from increased loads, and therefore leads to accelerated wear.
Cut or broken spline part
The worst-looking damage is when the CV joint simply collapses along the metal. The first reason for such destruction is the purchase of a low-quality CV joint, the production of which was defective or low-quality raw materials were used. The second reason is making changes to the design of the car, usually a lift (increasing the ground clearance) of SUVs. In this condition, the CV joint becomes in a non-standard position, turns at non-standard angles, and sometimes touches other parts of the car.
Not often, but there is another problem - overtightening of the hub nut, which leads to destruction. It is usually determined in the first meters of movement after leaving the lift or when moving through pits. An obvious mistake by the installer.