The direction of the light flux changes when the car trunk is occupied by any cargo. The sag of the rear end causes the headlights to point upward, causing oncoming drivers to be dazzled and the road surface to be poorly illuminated. To change the direction of the light beam, you do not have to get out of the car; this is done by a hydraulic regulator or electric corrector.
Hydrocorrectors for headlights were introduced on rear-wheel drive cars from VAZ of the classic type. Today, instead of hydraulic systems, car enthusiasts install a Granta electric headlight corrector, which allows them not to worry about the integrity and tightness of the connecting tubes. However, the manufacturer often equips the car with hydraulics. Headlight adjustment is required for optimal illumination of the road in difficult visibility conditions. The inability to adjust the light beam puts the lives of the driver and passengers at risk.
What does a hydraulic corrector consist of and how does it work?
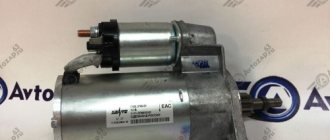
The design of the adjustment device is non-separable and simple; the hydrocorrector of the Lada Granta headlights consists of the following elements:
- the main cylinder located under the dashboard;
- a working cylinder located on each headlamp;
- reflector regulating mechanisms;
- connecting components.
A knob for controlling modes is displayed on the instrument panel, helping the owner change the pressure in the master cylinder. A change in pressure causes the reflector to rotate, and therefore the direction of the light flux.
The peculiarity of the hydrocorrector is its tightness and closedness. If a visual inspection reveals places where fluid is leaking or there are cracks, the connecting tubes require replacement.
The change in pressure in the main cylinder is transmitted to the working elements, causing the pistons to rotate, changing the angle of inclination of the reflector. Electrical correctors operate using on-board electricity and therefore do not depend on the ambient temperature. More reliable devices of this type are more expensive.
Ideas for tuning headlights and their implementation
How can you tune the optics in the Lada Grant:
- Buy and install tuned optics. This option is one of the most expensive in terms of cost, however, it is considered the most effective. Tuned headlights will look really “cool”.
- Install eyelashes. This option is the cheapest in terms of implementation. You can purchase ready-made eyelashes in stores or online, which you just need to put on your car after first cleaning and degreasing the glass surface. If necessary, you can build eyelashes yourself; this will allow you to get a more original product, because you yourself can choose the appropriate shape. Eyelashes can be made from fiberglass, plastic or LEDs.
- Install new light bulbs - diodes or gas-discharge, that is, xenon. This option will not only improve the appearance of the car, but also provide better road lighting.
- Tint the headlights; for this purpose you can use a special film or tinting varnish. Please note that tinting may make the lighting worse, so you may need to install brighter lamps in addition.
Photo gallery “Tuned headlights”
Is it possible to repair a hydraulic corrector?
Manufacturers of correctors for the Lada Granta did not provide for the possibility of restoring the device. It is assumed that the driver should make a change. However, it is possible to repair the hydraulic corrector yourself, although it eliminates the problem only for a while. It is impossible to achieve full functionality, however, the lampshades are installed in the working position and secured in it.
The choice between an electric corrector or a hydraulic regulator is based on several parameters:
- cost – hydraulics will cost much less than an electric corrector;
- operating conditions - when the car often finds itself in situations with sudden temperature changes, it is worth paying more, but getting a reliable adjustment system;
- car model - not all cars allow you to connect an electric corrector, however, it is possible to install one on a Lada.
Step by Step Actions
The first step is to assess the general condition and find the cause of the problem. If the tubes are damaged - cracks or breaks are noticeable, the connecting elements must be replaced. When the crack is located near the corrector, the tube is bitten off; if the damage site is not nearby, the entire length is replaced. Next, the system is pumped with antifreeze:
- The corrector plug is removed.
- The actuator rod extends.
- Using a syringe, antifreeze is introduced into the system, the entry of air is strictly excluded.
- Instead of a plug, a self-tapping screw without a sharp part is installed.
If there is no adjustment because the rod is damaged or broken off, extension is carried out.
Fog lights VAZ 2114 and VAZ 2115: what you need to know
So, in order to decide which PTF is better for the VAZ 2114 or 2115, it is worth noting that the choice must be approached responsibly. First of all, early versions of the VAZ 2114 were produced without fog lights, but subsequent “fourteenth” and similar “tags” may initially have standard PTFs.
If there are no fogs, in the second case there are still bumper plugs. This makes installation much easier. Let’s also add that many drivers of VAZ 2114 or 2115 are simply not satisfied with the standard VAZ fog lights. One way or another, owners are looking for the best option for both installation and replacement. Let's figure it out.
Instructions for replacing parts
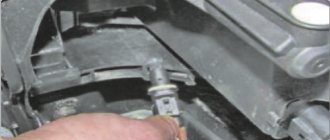
To replace the headlight hydraulic corrector on a Lada Granta car, you will need a wrench (head 21). Algorithm of actions:
- The adjustment knob on the dashboard is removed. There is a nut behind it that can be unscrewed with a knob. Afterwards you can pull out the main cylinder.
- Under the hood, the clamps holding the hydraulic mechanisms are pressed out. To pull them out, you need to turn the cylinders counterclockwise.
- The connecting tubes are secured with clamps having screw clamps. They need to be unfastened and brought into the car interior using the hole previously hidden by the seal.
Diagnostics and adjustment of optical elements on Grant
How to remove the headlights yourself, how to raise the optics, how to adjust the position of the low and high beam lamps? Let's start with the issue of diagnostics and settings; the methods described below are relevant for many car models. Fret Grants are equipped with lens optics and halogen bulbs. Using the hydraulic corrector, you can adjust the light of the left and right headlights yourself; if necessary, you can activate the delay function for turning off the lighting after activating the ignition after 45 seconds. As for the rear lights, of course, they do not need adjustment.
To adjust the light output, you will need a set of wrenches, as well as a Phillips-head screwdriver. To properly adjust the headlights, the spare wheel must be in place, in the niche under the luggage compartment, and it is also advisable to fill the fuel tank with a full tank. These nuances will ensure maximum load on the car; for more accurate diagnostics, the car should be placed on a horizontal surface.
How to adjust optics:
- First of all, you need to start the power unit of the car and wait a few minutes until it idles. The car itself should be set to the parking brake.
- Check the tire pressure level - if necessary, the tires should be inflated.
- It is advisable that there is a smooth and light wall in front of the car, but if this is not possible, then a sheet of plywood or drywall should be installed about three meters in front of the car. Its height should be about 2 meters. Markings should be applied to the wall itself.
- Next, a load weighing about 75 kg is placed on the driver's seat to simulate the driver being behind the wheel. This will align the low beam line from the light sources.
- To prevent possible vibrations from the car body and shock absorbers, the car needs to be rocked slightly from side to side.
- Next, the electric corrector must be installed in the position of one person in the car, corresponding to the load in the driver’s seat.
- After this, the low beam is activated and the lights are adjusted - separately left and right. A corrector is used for adjustment. In accordance with the above diagram, the lighting flux from the lamps should be similar to that shown in the figure.
Instructions for setting up the headlight
A special thumbwheel is used to adjust the lighting flux horizontally, and a hexagonal screw is used to adjust the lighting vertically. If necessary, you can raise or lower the lighting from the optics, for example, if there is a heavy load in the trunk and the front part is raised. When the low beam adjustment is completed, it is necessary to perform a test drive to check the quality and correctness of the procedure. You must not allow the light from your optics to blind oncoming drivers.
Optics check
By installing a new electric corrector, the car owner also gets the opportunity to study the efficiency of the optics:
- condensation in the headlamp indicates an upcoming replacement - this condition leads to deterioration of illumination;
- a dark coating indicates that the lamp is failing;
- the reflective layer comes off when it’s time to allocate money for replacement, both blocks;
- Scratches, cracks and chips on the lens require the installation of new glass.
It will not be superfluous to clean the headlights from dust and dirt. It’s easy to cope with the replacement in your own garage, however, if you don’t want to change the electrical corrector on Grant yourself, this procedure will be performed at any service center.
Procedure for adjusting the headlights of a Lada Granta with your own hands
Tool preparation: screwdriver, hexagon.
- Installation of the machine within the perimeter of the repair area, on a flat platform.
- Checking the tire pressure, the presence of a spare tire in the trunk, the weight of the load on the driver's seat is 75.0 kg.
- Adjustment / correction of the light beam at a distance of no more than 3.0 meters from the wall.
- Check the illumination angle of each headlight one by one.
- Completion of work, testing for serviceability and accuracy of lighting.
Reasons for failure of the hydraulic regulator
When the driver notices that one or even both headlights do not respond to control, the symptom indicates that the device is not working. Common reasons:
- the working cylinder is jammed, one of the lamps does not turn;
- depressurized due to wear of sealing components;
- the rod and lever of the actuator are not fastened tightly enough;
- the connecting tubes are damaged, which caused a loss of tightness.
Violation of integrity leads to the fall of reflectors on both sides - they end up in the lowest position.
Damage to tubes in the hydraulic system occurs due to sudden temperature changes in the engine compartment.
There are several ways to deal with the problem that has arisen on the Lada Granta:
- replace the hydraulic regulator with an electric corrector;
- fill the working cylinders with antifreeze;
- replace faulty cylinders with plugs for headlights;
- install self-tapping bolts, fixing the reflectors.
Plugs or bolts will make the system functional but unregulated. Filling with antifreeze allows you to adjust the position, however, the measure still remains temporary, since then a full replacement will be required.
Expert answer
If you know how to remove correctors, then do it at your leisure. We will not repair them here, nor will we change them. Instead, we use one trick. Carefully study all the photos, and then get to work.
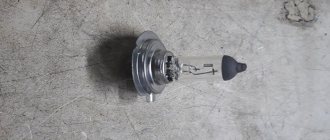
- Carefully remove, and if necessary, first bite off both hoses on each module. There will be liquid inside, it is poisonous;
Bite off hydraulic corrector hoses on the left headlight
Our self-tapping screw puts pressure on the piston, and it must be screwed in at an angle. This is the trick.
Height adjustment
If necessary, carry out additional adjustments. To do this you need a 6mm hex key. The adjusting screw in the Grant is fixed above the corrector module, which must be installed in place.
Vertical direction control
The setup itself is carried out according to standard methods. But we will assume that the “side regulators” are in the correct position. Then the procedure will be simplified:
- We move 5 meters away from the wall;
- We ensure that the upper horizontal border is at a distance of 52-53 cm from the ground. There is no need to go any higher - you will blind oncoming traffic.
How to turn on near or far
The light switch on the Grant is located below the left of the steering wheel - similar to the tenth family.
Switching the handle clockwise gives the headlight and low beam modes.
To turn on the high beam:
- turn the light knob to the extreme right clockwise - the low beam will turn on;
- push the left steering column switch forward (the one that controls the turn signals);
- your high beam will light up - and a blue headlight icon will appear on the panel - keep an eye on it so as not to leave the car with high beam when it is no longer needed.