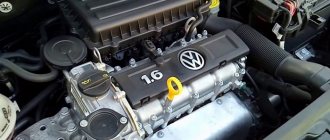
What lamps are installed in VW Polo
VW Polo sedan cars produced in Russia differ in the design of their headlights; updates were introduced after restyling in 2015. If previously lighting devices used H4 type lamps, combining low and high beam filaments in one bulb, then in more recent cars these functions are separated. Both low and high beam are provided by separate H7 lamps.
| Name | EEC designation | Power, W |
| Volkswagen Polo until 2015 | ||
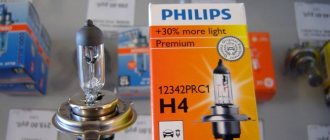
| high/low beam lamp | H4 | 55/60 |
| Volkswagen Polo after 2015 | ||
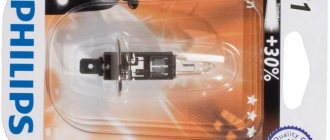
| low beam lamp | H7 | 55 |
The power of the low beam filament in the H4 lamp is 55 Watts, the single filament of the H7 lamp has the same power. Exceeding these values when choosing is extremely undesirable, since it leads to many problems:
- unreliable operation of the lighting device due to overheating of the lamp;
- overheating of the headlight with subsequent damage, the thermal power of the lamp needs to be dissipated, which the design is not designed for;
- increased current consumption leads to the need to change the fuse rating, which is dangerous; they will no longer be able to protect power circuits in normal mode;
- the wiring and the places where the wires are sealed into the lugs overheat;
- the overall energy consumption increases, the balance between the generator and the battery is disrupted.
Due to the modification of the machines, the replacement procedure has changed. If in pre-restyling cars it was extremely easy to change the light bulbs, then in new ones you will have to remove the headlight. But this is not difficult, the fastening of their housings is made in a very technologically advanced manner, both for mounting them on the conveyor and for servicing; replacing the low beam lamp takes a few minutes.
To replace, you should purchase reliable lamps from trusted manufacturers and it is highly undesirable to use light sources with altered characteristics. All kinds of LED or xenon lamps will distort the light beam, causing blinding oncoming drivers; Polo reflector headlights are not suitable for this. Lamps with increased luminous flux should also be avoided. They differ only in the threads that work with strong heat. Low durability is very inconvenient for constant use; lamps become consumables.
It is recommended to change lamps in pairs, on the left and right sides. Experience shows that their service life under the same conditions has a slight spread, so it makes sense to combine the purchase and operation procedures.
Rotate clockwise.
Oleg (Maxim) hasn’t seen it with us, but it will appear, I’ll definitely replace it, but without any alterations and the price is acceptable. My son-in-law installed cheap Chinese ones on the w polo with front dimensions. And one didn’t burn for a month.
Vassily (Wendel) in the grant with the replacement of these lamps is not so simple... these lamps for DRLs are suitable, but in terms of brightness they will be rather weak!
Oleg (Maxim) In Orel, in a company store, they offered LED lamps for Granta with a bend in the antennae and the size will not light up for 750 rubles each. They gave a year warranty. I would like to simply replace it without changing the design.
Vassily (Wendel) is very expensive and the dimensions are not too big!
Oleg (Maxim) is not far from us. Maybe we have them too. I just didn’t really focus on it. 26,000 is almost the mileage, the relatives are burning and there are simple two Wartas in reserve for 80 rubles each.
Replacing low beam lamps on Polo 2013-2015. (dorestyle)
In pre-restyling models, access to the rear of the canopy for maintenance is provided. This is convenient and safe from the point of view of possible damage to glass and paintwork. Replacement of light bulbs is carried out in the following order, the same for the left and right sides.
- On the back of the case, find a suitable connector with three contacts. This is a standard header for base/plinth type H4. The connector is placed directly on the contacts. The space between the contact block and the housing is covered with a rubber boot with a hole for power supply.
- Remove the connector from the housing by rocking and pulling it back. You must hold on to the block; pulling on the wires is unacceptable. There is no need to use force; with small displacements of the pads to the sides, the connection is undocked quite easily, there is no lock there.
- Remove the rubber boot.
- By simply pressing the protruding loop, the retaining spring is retracted back and down, after which the base is completely released and can be removed.
- The new H4 lamp fits neatly into place, exactly as its predecessor stood, with the flat horizontal contact facing up.
- Reinstall the wire retainer by lifting and snapping its bracket.
- Place the rubber boot and electrical connector in their original position. Make sure that it “sits” all the way and the contact is reliable.
- Test turn on the low beam to make sure everything is in order.
Do not touch the quartz flask with your bare fingers; the appearance of grease stains leads to an increase in temperature and rapid failure.
Video
When replacing the boot, you need to make sure that it tightly covers the gaps between the case and the base.
Step-by-step instruction
- The distance from the ground surface when installing elements should be at least 25 cm. At the same time, the height should not exceed 150 cm (I wonder who will place running lights at this level?)
- The minimum distance between two blocks of lighting elements should not be less than 60 cm (this is the standard that the Polo sedan falls under). For small cars, for example, where the body width is less than 130 cm, the law allows lighting fixtures to be placed at a distance of 40 cm.
- The area covered by daytime running lights should be limited to 25-200 cm². The range is wide, so even the numerous Chinese “counterfeits” that fill the automotive market will meet this criterion.
- But what Chinese manufacturers really forget about is the power of light. According to GOST, it should be in the range of 400−800 Cd. Most of the goods brought by Chinese suppliers are not even close to the nominal value.
Expert opinion
It-Technology, Electrical power and electronics specialist
Ask questions to the “Specialist for modernization of energy generation systems”
Types of lamps and features of their replacement If you want to upgrade the lighting system in your Polo Sedan passenger car, you can install different types of lamps for the headlights. Ask, I'm in touch!
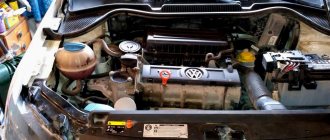
Replacing low beam lamps on Polo 2015-2019. (restyling)
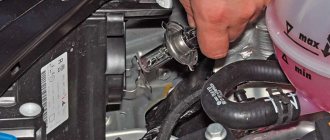
On restyled versions, access is difficult, so replacing the low beam lamp will require removing the headlight. It's not as difficult as it might seem. You will need to remove a Torx screwdriver from the trunk. Or use a similar attachment from any tool kit for motorists.
The Torx screwdriver lies in the organizer placed inside the spare wheel; its shaft allows the installation of one of two sides with different calibers; you need to choose the appropriate one.
- On the upper part of the partition, suitable for the headlight housing, there are several screws with Torx heads; unscrew two of them located on the stampings. The one that holds the housing stop between them does not need to be unscrewed.
There are two options: disconnect the electrical connector coming from the back of the headlight, or leave it in place, but then it will be less convenient to work, the unit cannot be completely removed from the car, everything will have to be done hanging near the bumper. But if you have the skill, it's not difficult. To disconnect the block, you need to press the plastic clamp on it towards the supply wires and pull the contact group back.
- In addition to the two mounting screws, the headlight is held on the vehicle by two spring latches hidden under the bottom of the headlight. Apply some force while simultaneously rocking it up and down and pushing it over the bumper. The latches will release and the headlight will be removed.
Do not use excessive force, as this may damage the latches. It's better to spend a few extra seconds swaying.
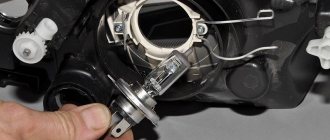
- The low beam bulb is located closer to the fender and is covered at the back with a rubber boot. It is larger in size than the one covering the second lamp.
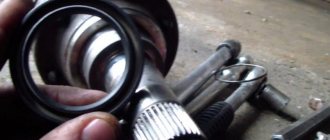
- The plastic handle of the plinth must be turned counterclockwise by 30-40 degrees, which will remove it from the fixing grooves.
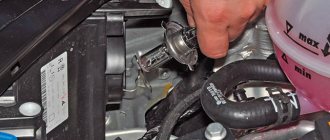
- Remove the lamp together with the socket, then gently rock it out of the socket, remembering how it stood with its protruding antennae relative to the connector.
- The new light bulb is installed with the same precautions, that is, without touching the bulb with bare hands. We recommend doing this with lint-free gloves.
- The headlight is assembled in the reverse order, the socket is turned clockwise until it stops in the grooves, the cap is installed in its proper place.
- The headlight is carefully inserted into the latches, the screws are screwed into place.
- After a trial run, you can proceed to the second side.
Video: replacing a light bulb
see also
Comments 14
Get ready for the second one to burn out) I, too, first burned out on the driver’s side, and after a week and a half, on the driver’s side too. And they also worked for three years))
These holes are not for removing the trim, but for adjusting the PTF, if there are any, the hook is needed to remove the caps that are placed on the wheel bolts!
Those. Is it absolutely not recommended to remove the pads this way?
Those. Is it absolutely not recommended to remove the pads this way?
The central hole is for adjusting the light-shadow border of the PTF, the one furthest to the center for removal. Although the linings can be easily removed by hand. IMHO
These holes are not for removing the trim, but for adjusting the PTF, if there are any, the hook is needed to remove the caps that are placed on the wheel bolts!
Just the hole that is closer to the central grid is intended for removing the trim - read the Vag instructions :-), but the central one in the trim is just for adjusting the light-shadow boundary of the PTF. IMHO
7556CW02B No need to change polarity, set it and forget it. I removed it from the previous car and installed it on the new one)
At the end of the 19th century, Thomas Edison's incandescent light bulb was still a novelty for automobile companies that were just beginning to develop in Europe and North America. Therefore, initially kerosene was poured into car headlights, which was the main source of fuel for most mechanical cars of that time.
Only in the 1920s. Electric lamps have become fashionable: since electricity appeared in houses, why not install it in cars? This method was much cheaper and simpler. After all, an immense amount of kerosene was consumed, and refilling it every time before a trip was a burden for the motorists of that time.
Selection and replacement of low beam lamps and other optics on the Volkswagen Polo Sedan, tuning options
Constantly driving with the lights on, as required by the rules, leads to relatively rapid wear of the filaments of incandescent lamps, so replacing the low beam with a Polo when visiting a service station will lead to unreasonable expenditure of time and money.
Expert opinion
It-Technology, Electrical power and electronics specialist
Ask questions to the “Specialist for modernization of energy generation systems”
Low beam lamp Volkswagen Polo: features of replacing light bulbs on a VW Polo sedan, how to choose and change the light in the headlights with your own hands Moreover, the operations are simple, once you become familiar with the procedure, the procedures are done quickly and do not require any additional tools or equipment, sufficiently supplied with the car . Ask, I'm in touch!
FAQ
What are the best h7 low beam lamps?
What low beam lamp is on Polo sedan?
The pre-styling version has 55/60 H4, combined low and high beam. The restyled one (updated in 2016) has 55 H7, the same for low and high range.
What kind of light bulbs are on the Volkswagen Polo sedan restyled?
Low and high beam bulbs - 55 H7. Dimensions and side turn signal - W5W.
Announcement of a new application from our team
We've just launched a new iPhone app that lets you share and search your referral links among your contacts. What is a “referral link”? This is when you recommend, for example, a bank card to your friends. If a friend applies for it using your link, you will both receive bonuses: up to 750₽.
We invite you to install it and try it out; we will be glad to receive any feedback: “Bring a friend.”