For safety and reliability of movement, the side lights in the car must always be in good condition. Many drivers neglect the rules of safe driving on the road, and when they find a burnt out light bulb, they do not change it immediately. There is even a possibility that the driver may travel like this for several days.
You can replace the light bulb by visiting a service station, but you can also do it yourself.
In this article we will talk about how to independently and step-by-step replace the side light bulbs, both on a foreign car and on a domestic car. There are minor differences; most often, replacement occurs according to similar principles.
In order for the car to be clearly marked at night or in the dark of the day, any car is equipped with side lights. Side light bulbs are installed on any car, both front and rear. Side lights are low-power lamps, so it is not advisable to install LED or halogen lamps that are many times more powerful, because in some cases this can lead to unpleasant consequences, such as melting of the wiring.
General information
To indicate the vehicle at night when parked, the design provides side lights. They are present both in front and behind the car. Usually these are low-power lamps, which, unlike the head light, are not in the focus of the reflector. For this simple reason, it makes no sense to install more powerful halogen or LED lamps. Moreover, this can lead to melting of the wiring, which is not designed to withstand such a large load.
As for the reasons for the failure of side lights, there are several of them. Firstly, the light bulb has a limited lifespan. The original shines longer and better, but it is more expensive. Chinese analogues are cheap, but very often burn out. Another reason is a malfunction in the electrical circuit, as well as a leak in the headlight, which causes moisture to get inside the housing. Well, now let's figure out how to replace the side light bulb on a Kalina.
Purpose
The front lights are called head lamps; they are located in the headlight unit in front of the car on both sides. They are the outermost ones in the lighting system, and owe their name to the fact that they show the width of the car to oncoming vehicles.
The rear lights are intended for exactly the same mission—so that you can be seen by those driving behind you. This is especially true when overtaking; you don’t want someone to hit your “swallow” without seeing its real size.
Hence the important advice: if it suddenly happens that you need to go at all costs and you discover that the light bulb in the left side light has burned out, replacing it with a new one is impossible due to the lack of one, don’t be lazy and move it from the right side. And we will tell you how to do this.
Required Tools
Replacing side lamps on a Renault Logan will require the use of the following tools and materials:
- clean fabric or rubber gloves;
- 4 pieces of halogen bulbs with W5W base;
- alcohol for cleaning flasks;
- a screwdriver with a cross blade;
- keys for 8 and 10;
- to remove the battery you will need a 13mm socket;
- extension;
- rags.
The presence of gloves allows you to keep the bulbs of halogen devices clean. Oily hand stains cause rapid formation of dark spots and lead to failure of the light bulb. The light becomes dim and uneven, quickly losing brightness. In this case, the service life is reduced by 5-10 times from that declared by the manufacturers.
Where is the marker lamp located, its functions
Front and rear lights ensure the safety of both the vehicle and pedestrians. They light up in the dark when moving, and also remain on when the car is parked on the roadway or side of the road.
The main function of any size is to attract the attention of other drivers in the dark and show them the size of the car. During the daytime, these lighting elements are not used, since bright sunlight makes them dim and almost invisible.
The front marker lights must be white and remain on continuously at night and in poor visibility conditions. This instruction is contained in the traffic rules and must be followed by all drivers without exception.
The rear side lamps are also located on the same line and, according to the requirements, must be red.
Important! Tail lights, regardless of what type of lamps are installed in them, should not shine brighter than brake lights and direction indicators. And if for some reason one of the elements does not light, the violator may receive a fine.
If a malfunction is detected and the lights burn out, you should immediately replace the failed element. You can find many different videos on the Internet on how to replace a side lamp on different Nissan Qashqai models.
On Nissan Qashqai 2011–2012, as well as all other models, the front dimensions are located in the headlights.
Sequencing
- Disconnect the negative headlight;
- We remove the front bumper and clear the approach to the body mount;
- We turn out the bolts of the headlight unit;
- Carefully disconnect the cable drive of the light corrector;
- We unscrew the three screws holding the headlight unit and tilt it to the side;
- Press the locking device and remove the cover;
- Carefully separate the wire connection block;
- Below the main lighting lamp we see the size socket. To change it, you can get to it without removing the bumper and headlight housing, but only by carefully inserting your hand between the headlight and the engine;
- On the left headlight we turn the socket clockwise, on the right - counterclockwise and remove it freely;
- Remove the lamp.
- Renault lamps have the article number W5W. We check the number and brand and put it in place.
- We put the headlight unit back together, connect the wiring block, install the light control cable and the bumper and fasten the housing.
How to replace the rear fog light bulb Attention! Do not touch the lamp bulb with your hands - work with cotton gloves to avoid rapid failure of the lamp. If you are a fan of bright lighting solutions, we advise you to choose a new technology lamp made on the basis of LED elements, of which there are at least 15 pieces. They are sold in almost all auto stores, but their cost is high and ranges from 2,700 rubles
If there are no catalog options from 2012, 2013, 2014 and 2022, you can buy analogues from 2010, 2022 and 2022
They are sold in almost all auto stores, but their cost is high and ranges from 2,700 rubles. If there are no catalog options from 2012, 2013, 2014 and 2022, you can buy analogues from 2010, 2022 and 2022
If you are a fan of bright lighting solutions, we advise you to choose a new technology lamp made on the basis of LED elements, of which there are at least 15 pieces. They are sold in almost all auto stores, but their cost is high and ranges from 2,700 rubles. If there are no catalog options from 2012, 2013, 2014 and 2022, you can buy analogues from 2010, 2022 and 2017.
The headlights on all generations of Logan cars do not differ in size. On the 2006 and 2007 models, the turn signals had frosted glass, from 2008 to 2012 - ordinary transparent glass, and from 2012 to the present - an orange reflector.
When is the replacement made?
Vehicle manufacturers do not provide clear regulations for carrying out this work. There are only 3 reasons why car enthusiasts change their side light bulbs to new ones as needed:
- The light elements have failed - they have burned out or gone out due to external mechanical influence.
- The owner of the car decided to install more modern LED bulbs.
- The lights began to shine too dimly.
The first reason is clear and does not require explanation. Installing LEDs is a useful operation, since these elements shine well, last a long time and consume much less electricity. The main thing is to maintain the polarity of the contacts during the replacement process, otherwise the new light bulb may fail or the fuses will begin to blow.
As a rule, a car enthusiast does not pay attention to the decrease in the luminous flux of running lights until he replaces one burnt-out headlight bulb. Then it becomes noticeable how much dimmer the old element burns than the new one. The reason is the internal darkening of the base glass from settling metal particles emanating from the heated spiral. Therefore, it is recommended to update old “dimensions” in pairs.
Reasons for replacing the side light bulbs
Replacing lamps in restyled and pre-restyled cars is different. As a rule, in the first case, replacement is somewhat more difficult. Nowadays, replacements do not need to be made so often because LEDs have replaced the old incandescent lamps.
However, there are situations in which replacement is definitely worthwhile.
- You want to improve the appearance of your car and get brighter bulbs. It is worth remembering that LEDs combine well with cold xenon.
- You want to increase the life of your side lights. LEDs have a longer lifespan than incandescent bulbs.
- You want to reduce the amount of electricity you consume or simply keep up with current technological trends.
The reasons for the lamp malfunction may lie in a manufacturing defect. Cheap Chinese lamps quite often fail before the stated end of their service life. Also, the malfunction may be hidden in the car’s electrical network or a leak in the headlight.
Additionally, we recommend reading our specialist’s article, which describes how to change the low beam light bulb on a Priora.
You can read about how to replace the license plate lamp in the material of our specialist.
We also recommend reading an expert’s article on how to replace a low beam light bulb without problems or unpleasant consequences.
Review of Chinese diodes
Many Chinese-made automobile parts enter the domestic market. Each modification is assigned its own brand, but this does not affect their performance at all. We offer to compare several types of w5w led in w5w dimensions.
Car parking lights w5w led
Thus, one can understand how large the differences are between the technical characteristics specified in the operating instructions and during use.
| Name | Technical features | Price, rub./piece | Conclusion |
| SMD3528 | Consists of 4 pieces, color Tc – 5,000K. The power indicator does not exceed 0.5W. It has built-in lenses, thanks to which the light is directed only forward, without illuminating the reflector. | 90 | An outdated option, preference should be given to more modern models. |
| SMD5050 | The set includes 5 pieces. Maximum color tС -6,000K. The manufacturer guarantees a power of 1W. However, they do not have a high level of brightness or a long service life. | 130 | Has average quality performance. For this price you can purchase newer modifications. |
| SMD7014 | 20 diodes with color Tc – 6,000K, power 2.5W. Guaranteed service life – 100,000 hours. | 170 | The product produces quite bright light. Recommended for installation. |
| SMD3020 | 68 units with a color temperature of 6,000-6,500K, with white-blue light. Lighting equipment for replacing front side marker light bulbs with a large number of diodes. | 200 | 68 low-power diodes are equal in performance to 8 high-power ones. This is most likely a marketing ploy. |
Device breakdowns
According to the traffic regulations (Chapter 19), it is prohibited to use a vehicle with damaged external lighting devices. It is also prohibited to drive a car at night with the headlights and sidelights turned off. If at least one device malfunctions, there is a high probability of receiving a fine, justified by the use of a car with breakdowns.
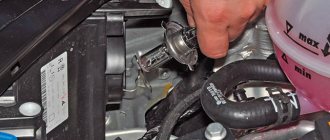
Like any other equipment, sidelights can fail. Novice drivers often wonder how to replace the side light bulb. The process is quite simple. To do this, you need to open the car hood, remove the cover from the inside of the lighting equipment, remove the base, and replace the lamp.
VIDEO: How to change the front side lights of a car
No less rare are cases when, when replacing a halogen part with an LED element, the control panel may display a malfunction of the sidelights. This is not scary, since the on-board computer is designed for high power of luminous components, and diodes consume significantly less watts, so the control panel simply does not see them. However, experts recommend not changing the classification of the source, since LED lights are not suitable for all vehicles.
Very often, drivers simply forget to turn off the sidelights, which leads to a rapid discharge of the battery. Some device manufacturers have been able to solve the current problem: when the dimensions are functioning and the door is open, the vehicle emits an audible signal, reminding the driver of a forgotten task. Also, new modifications of cars have already been “trained” to independently control the operation of the lighting device.
Often the installation has a long service life, but if a malfunction is detected or the need for urgent repairs arises, this procedure will not take much time.
VIDEO: Replacing the brake light bulb
Power parameters of all lamps
| Name | Lamp power, W |
| Headlight low beam (xenon, halogen type H7) | 55 W |
| Headlight high beam (xenon, halogen type H7) | 55 W |
| Front turn signal | 21 W |
| Front clearance | 5 W |
| Front fog lamp (type H8) | 35 W |
| Side turn signal repeater | 5 W |
| Rear turn signal | 21 W |
| Stop signal | 21 W |
| Taillight | 5 W |
| Reversing light | 21 W |
| High brake light | LEDs |
| License plate light | 5 W |
| Rear fog lamp | 21 W |
| General interior lighting lamps | 8 W |
How to Choose Suitable Replacement Parking Lights
You can choose a suitable lamp both in car services and at car flea markets. At the same time, experienced drivers do not recommend purchasing cheap Chinese products, since the likelihood that they will burn out ahead of schedule is quite high.
When choosing a light bulb, you need to pay attention to the following characteristics.
- Brightness _ This is the most important characteristic of a light bulb, which is assessed by its luminous flux. Luminous flux is measured in lumens. For an incandescent lamp this value is approximately 50 lumens. Remember that the purpose of side lights is to inform other road users of the size of your vehicle. Light sources should not dazzle other road users, but at the same time they cannot be too dim. The upper threshold of luminous flux for side lights is 150 lumens, and the lower threshold is from 50 lumens. Traffic safety sometimes directly depends on the brightness of the side lights, since failure to inform in a timely manner that your vehicle is starting to slow down can lead to an accident.
- Construction . In the design of cheap Chinese light bulbs, the base is made of plastic. In this case, there is a high risk of melting, since plastic is by no means a heat-resistant material. If the part gets very hot, the plastic begins to melt and, as a result, the light bulb fails too early. More expensive models feature high-quality plastic that is heat-resistant. With increased brightness, the incandescent lamp begins to produce heat, which heats the lampshade. Therefore, recently the most popular are baseless lamps, the contacts of which are made on the basis of a glass plate and a sand board. Incandescent lamps are also very energy-intensive. With increased electricity consumption, fuel consumption begins to increase. When choosing a light bulb, it is also worth remembering to save energy.
- Price . The side light bulb is one of those car parts that you definitely shouldn’t skimp on. By buying lamps at low prices, you run the risk of replacing such lamps too often, and in the end, such “savings” will only lead to more serious expenses. It is best to purchase lamps from trusted manufacturers such as Osram and Phillips.
Selection of lighting fixtures
There are many types of light sources consisting of several elements in the automotive aftermarket.
The Renault company recommends using conventional incandescent external lamps in its Logan cars. As a rule, the power of the front elements is from 3 to 5 watts. Of course, there are craftsmen who install light sources with a power of more than 10, or even 15 Watts on their cars. Such lamps undoubtedly have a bad effect on the life of Renault Logan lighting devices.
For lovers of bright lighting solutions, manufacturers have created a special lamp with several LED sources. This solution actually has a good effect on the life of the main lighting element and does not put it at risk. The brightness of the LED lamps is quite enough to indicate the car in the dark.
There is one significant drawback, which lies in its fragility. Manufacturers are trying to increase the service life of their parts and solder in a special resistance that imitates a regular lamp. With the use of such technologies, the service life of LED elements has increased significantly.
If you have already made your choice and made a purchase, you are faced with the task of replacing old elements with new parts.
How to replace the side light bulb in restyled models
Before replacing a light bulb, it is advisable to place the car on a relatively flat surface so as not to tilt again, and also turn off the engine. This way you will avoid electric shock, which is supplied to the light bulb when the engine is on. To avoid a short circuit during operation, on most cars it would be a good idea to disconnect the negative terminal of the battery. It is always better to start replacing from the right side. The headlight unit is equipped with a plastic cover. It is dismantled using a socket and extension.
There may be some minor additional complications with this operation. The socket with a light bulb is sometimes more difficult to get due to the fact that it is quite small in size and is located in a hard-to-reach place. To remove this cartridge, find it and start rocking it up and down until the cartridge is completely removed. There is no need to rotate the chuck.
Start installation work from the side where the washer fluid reservoir is installed. Then you should move on to the headlight installed on the battery side. The cartridge on this side is more difficult to reach due to the body. While removing, use your hand to lift the part up.
The dismantling process requires the presence of a special tool. Manufacturers place a protrusion on the lamp socket. Use a flat blade screwdriver to grab onto this tab and use a lever action to remove the cartridge.
Workflow Description
Preparation
How to change the low beam bulb on a Priora List of required actions
If the low beam on a VAZ 2107 has disappeared and as a result of the check it is found that the lamps are to blame, then you should purchase new products. This model uses the AKG12-60+55 modification with an H4 socket; this marking indicates that the product has a power of 60 W for high beam and 55 W for low beam; you can purchase such an element at any store that deals in spare parts for domestic cars.
The working process
A huge advantage of the work is that, unlike modern models, access to the headlights is not limited in any way; this greatly simplifies doing the work yourself and allows you to achieve the best result, since you are in complete control of the process.
Important! To prevent the battery contacts from oxidizing during operation, you should protect them with lubricant; if there is no special composition, then ordinary grease would be an excellent option - it will protect lead from oxidation and ensure excellent contact over a long period of time
- If there is no low beam on a VAZ 2107 on only one side, then you can replace one lamp, although experts advise installing two at once, since the light may vary. One way or another, the work begins with any headlight that is convenient for you, first wipe the inside, since most often it is dirty and debris can get inside later.
- First of all, it is necessary to remove the plug, which covers the installation site of the light bulb and serves as protection against moisture and dirt getting inside the housing. This element is removed very simply: grab it and turn it counterclockwise until it comes off, usually this happens in half or even a quarter of a turn.
Advice! When disconnecting a block, it is better to immediately check how well the wires fit, since long-term use may cause the connection to break.
Next you will see a spring clamp that presses the lamp to the body and ensures its immobility during operation. To release it, you need to press the element on top and carefully move it to the side, everything is very simple and very quickly, when you see this knot, you can easily figure out how this is done.
Replacing side light bulbs in pre-restyling models
To do this, you must first prepare the car as indicated above (place it on a flat surface and turn off the engine), and then begin installation work.
- Open the hood and disconnect the negative cable from the battery (to avoid a short circuit).
- Remove the plugs that go to the lamps, and then remove the element into which the plug is installed.
- Turn the light bulb clockwise 45 - 60 degrees, then remove the spare part. To remove the lamp, gently pull it towards you. The socket itself first rotates along with the light source, then it is removed.
- Install a new light bulb and carry out the reverse dismantling.
Replacing the rear light. — logbook of Renault Logan 16V on DRIVE2
Replacing rear light bulbs on Renault Logan
By pressing the turn signal lamp 2 and turning it counterclockwise, remove the lamp from the holder socket. It should not be too high so as not to blind drivers driving behind.
The test can be done using a multimeter or by installing a known good fuse. The same applies to the failure of the sensor that turns on the brake lights. They can be used not only for additional brake lights, but also for markers.
To avoid such a problem, you need to regularly clean the terminals and coat them with a special lubricant.
Replacing the bulb in the main brake light is no more difficult than replacing the low beam bulb.
In this case, you need to disconnect the battery and begin replacement work. To do this, you need to perform the following manipulations: Disconnect the wiring harness from the rear markers; if your front marker lamp has burned out, then read the material: Two thumbs are marked with arrows. Pull the headlight towards you and remove it. We put everything back together; on the other headlight the work is done in the same way.
Replacing the license plate light bulb is almost the same. When replacing, do not touch the lamp bulb; any grease that gets on it will speed up its failure.
Replacing a brake light bulb on a Renault Logan in a new body. The replacement is similar, only the mountings of the rear parking lights have changed slightly. The rear dimensions are secured with one wing, which must be unscrewed. After this, pull the headlight towards you.
Instructions for replacing lamps
Inside the headlight units of different cars there are 2 types of lamps and connectors - old and new (restyling). Replacing a pre-restyling type side light bulb is performed as follows:
- Once you reach the back of the headlight, disconnect the power supply connector to the light element. There is no need to disconnect the sockets of powerful headlight lamps.
- Grasp the connector and rotate 45–60° counterclockwise. Remove the element from the slot.
- Carefully pull the light bulb out by the base without rotating it around its own axis.
- Insert the new one in its place, making sure that the contacts line up correctly.
- Connect the wires and check the functionality of the new part, then reassemble the unit in the reverse order.
Note. On different vehicle models, old-type elements can be rotated in different directions - clockwise and counterclockwise.
When installing a purchased lamp, you should not touch the base with your bare hands, as warned by the instructions included with each product. Before installation, wrap the glass flask with a soft rag or put on cloth gloves.
Updated versions of elements differ in overall dimensions and installation method. Replacing the lamp is done in the same way, only you do not need to disconnect the connectors and turn the socket - the part is removed from the socket along with the wires.
Another thing is that access to the light bulb is often limited - you cannot grasp the socket with your hand. In such cases, 2 options are practiced:
- use a special tool;
- First pull out the large headlight bulb, then take out the side light bulb.
The owners of some cars use the free space behind the headlights to install a gearbox that operates in liquefied gas engine power systems. Removing the unit to replace the lamp can be quite difficult.
Changing the light elements of the rear “dimensions” is much easier. The main work is removing the plastic and fabric trim from the luggage compartment side. The light bulbs are removed from the sockets in the manner described above.
Sequencing
- Disconnect the negative headlight;
- We remove the front bumper and clear the approach to the body mount;
- We turn out the bolts of the headlight unit;
- Carefully disconnect the cable drive of the light corrector;
- We unscrew the three screws holding the headlight unit and tilt it to the side;
- Press the locking device and remove the cover;
- Carefully separate the wire connection block;
- Below the main lighting lamp we see the size socket. To change it, you can get to it without removing the bumper and headlight housing, but only by carefully inserting your hand between the headlight and the engine;
- On the left headlight we turn the socket clockwise, on the right - counterclockwise and remove it freely;
- Remove the lamp.
- Renault lamps have the article number W5W. We check the number and brand and put it in place.
- We put the headlight unit back together, connect the wiring block, install the light control cable and the bumper and fasten the housing.
Attention! Do not touch the lamp bulb with your hands - work with cotton gloves to avoid rapid failure of the lamp. If you are a fan of bright lighting solutions, we advise you to choose a new technology lamp made on the basis of LED elements, of which there are at least 15 pieces
They are sold in almost all auto stores, but their cost is high and ranges from 2,700 rubles. If there are no catalog options from 2022, 2022, 2022 and 2022, you can buy analogues from 2020, 2022 and 2022
If you are a fan of bright lighting solutions, we advise you to choose a new technology lamp made on the basis of LED elements, of which there are at least 15 pieces. They are sold in almost all auto stores, but their cost is high and ranges from 2,700 rubles. If there are no catalog options from 2020, 2022, 2022 and 2022, you can buy analogues from 2022, 2022 and 2020.
The headlights on all generations of Logan cars do not differ in size. On models 2006 and 2007, the turn signals had frosted glass, from 2008 to 2022 - ordinary transparent glass, and from 2020 to the present - an orange reflector.
How to change the side light bulb yourself?
Driving a car with inoperative “dimensions” is prohibited by the rules - any traffic police officer who records such a violation has the right to issue a fine to the driver. To replace a side light bulb that has burned out and gone out, you do not need to visit a car service center - every car enthusiast can perform this operation. The following instructions describe how to make the replacement correctly.
Side light circuit
It's very easy to replace the side light bulb yourself.
In order to save fuel and reduce the load on the generator, daytime running lights are now often included in this circuit, which makes it quite complicated.
You might be interested to know whether it is possible to use LED lamps in a car? Read more in this article
The standard wiring option is quite simple and consists of the following elements:
- circuit breakers;
- front and rear position lamps;
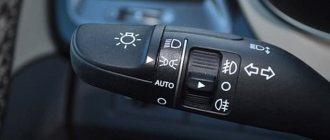
- central or key switch;
- Let's take a closer look at the first two elements.
Circuit breakers
Sometimes blown fuses are the reason why the side lights do not light up on one side or another.
There are usually two fuses in the circuit, for the left and right sides separately. Since the light bulbs consume little power (4-5 W each), the fuse rating is small, only 5-7.5 A.
Where are the side light fuses located?
In the same place as the others, in a single block. On most modern cars, this block is located under the instrument panel next to the steering column, or, more often, on the lower left, under a plastic trim.
In the latter case, it is enough to remove the cover protecting the unit, mounted on latches. On the back of the cover, as a rule, there is a sticker with information about which circuit this or that fuse protects, indicating its rating.
The biggest inconvenience in this case may be insufficient knowledge of the English language - it is in this language that inscriptions are usually made, even on Korean and Japanese cars.
Lamps
Externally, the headlight bulb is marked W5W, but today LED sidelight bulbs are increasingly used.
Their advantage over incandescent lamps is their greater durability, and the price of both largely depends on the manufacturer. The most famous products are Philips, Osram, Tesla.
Watch the video about LED bulbs for side lights:
Moreover, as the “Behind the Wheel” test showed, expensive products do not always justify their price.
Also, quite often, the front dimensions are equipped with light bulbs with a metal base, but this, one might say, is a thing of the past.
For rear position lights, the most common lamp is with two spirals - 21 and 5 (or 4) W.
The 21 W coil lights up when you press the brake, i.e. In this case, the light bulb serves as a brake light, while the lower power spiral works as a side light.
Just as with any other lamps, purchasing a more expensive product does not guarantee any exceptional durability.
What malfunctions may be present?
It is not recommended to continue driving in a car whose brake light has stopped lighting up. This breakdown can provoke a dangerous situation on the road. The performance of lighting devices requires periodic checks and if malfunctions are detected, immediate elimination will be required.
Among the most common breakdowns are the following.
- One of the brake lights stopped showing signs of glow.
- Both elements do not light up when the brake pedal is activated.
- The additional brake light lamp does not function.
Due to the fact that these elements belong to the on-board vehicle network, the first action will be to check its condition. We check the integrity of the fuse marked F3, which is assigned the function of providing power to the brake lamps. This fuse link is located in a block located in the cabin on the left side of the Renault Logan front panel. The power withstood by the fuse element is stated at 10 Amps. Indirect confirmation of the failure of the insert is the lack of functionality of both lamps. The check is simple - just replace the suspected fuse with a known good element. Alternatively, you can use a multi-tester to monitor circuit integrity.
If the above actions do not produce results, then the continuation of the troubleshooting will be to examine the supply cable network for a break. Among the priority areas for increased attention are areas of wiring bends.
We continue the search. Let's look at the switch in the brake light circuit. This unit is located in the pedal module and secured with a bracket. To ensure convenient control, it is recommended to dismantle this element. This can be done using the following algorithm:
- disconnect the terminal from the battery, since the circuitry of this section of the on-board network is under continuous voltage supply;
- disconnect the supply wire connector;
- To remove the element from the mounting socket, turn it at a 90-degree angle and, using slight manual force, pull it towards you. In a couple of seconds the design will be in your hands.
To check the sensor, we measure its resistance using a tester. You can connect a new analogue. To measure, we connect the leads of the testing device to the contacts of the sensor and at the same time carry out several periodic presses on its rod. If the device registers a malfunction, then the additional brake light lamp must be replaced.
When the sensor turns out to be working and the inspector is convinced of this fact, the next step is to check the power supply to this element through the adjacent section of the Renault Logan on-board network. To implement this action, we return the terminal to the battery terminal and use a tester to measure the presence of voltage at the sensor terminals. If voltage is supplied, we proceed to directly checking the lamps themselves. Installing the sensor in its original place is the same basic procedure as removing it. How is the additional brake light lamp replaced?
Replacing lamps
Usually, before replacing light bulbs, it is recommended to remove the terminal from the battery. Why is not clear. It is enough to simply de-energize the circuit using a switch - in case you accidentally short-circuit during replacement.
Replacement of rear marker
To provide access to the taillight lamps, you need to remove the hatches installed in the trunk trim.
To replace the tail light bulbs, it is usually necessary to remove the circuit board with the bulbs from the light. It is installed on latches, which are carefully bent with a flat screwdriver. There is no need to disconnect the wires.
There are also lanterns in which each lamp is connected separately. In this case, remove the desired cartridge from the socket by turning it slightly.
After replacing the lamps of both front and rear lights, you should check their functionality, for which you do not need to install the socket or board directly into the lamp. It is enough just to check that there is no short circuit to ground.
An important point - when replacing dimensions, always pay attention to the condition of the cartridges and contacts - the fuse only protects the circuit from short-circuiting, and fires in the wiring often occur due to poor contact.
Replacing the front marker
The most common option for connecting a headlight unit is to have a single power connector - for ease of dismantling the headlight itself. In this case, the power wires for all consumers (lamps, electrical corrector) are located inside the housing.
However, consumers are often connected separately. Before replacing, the main thing is to determine the location of the side light bulb, so as not to mistakenly remove, say, the headlight range control unit.
If you are changing light bulbs for the first time, it is better to start on the right side. The battery is usually located on the left, which interferes with both visibility and operation.
The replacement process itself is simple - remove the lamp together with the socket from the headlight, for which you turn the latter counterclockwise. The wires do not need to be disconnected if they are long enough to work comfortably.
It is important to pay attention to the condition of the cartridge - whether there are any traces of melting, which indicates overheating. A defective cartridge may subsequently cause a short circuit, so do not delay replacing it if necessary.
And here about what xenon and bi-xenon are, what is their difference https://mytopgear.ru/interesting/ee/ksenon-i-biksenon-v-chem-raznitsa/
Repair
As already said, it is prohibited to drive a car in the evening or at night if the side lights are not on, so we will look for the cause and then eliminate it.
If you are sure that the paths through which electricity passes are in good condition, the first thing to do is check to see if the lamps have burned out. And if they need a replacement, do it.
For the head lamp, the replacement procedure is as follows:
- Open the hood;
- We disconnect the battery, or even better, remove it. After all, we are talking about electricity, which is unsafe;
- From the engine compartment, holding the lamp with your hand, disconnect the wires directly going to the light bulb from the block;
- Remove the rubber cover;
- We move the latch to the side, disengaging the spring from the hook;
- We take out the size bulb;
- We replace it with a new one and put everything back together.
When the replacement is made, we check whether the head lamps are on.
Light bulbs in the rear dimensions on a VAZ 2110 are installed as follows:
- We de-energize the car;
- From the trunk (open) side, remove the contact part of the rear light with lamps. To do this, you need to release the latches;
- Remove the headlight bulb and replace it with a new one.
Do not forget that you cannot touch the halogen lamp with your bare hands. Replacement must be done with gloves. The fact is that dark spots will appear where you touch the light bulb. In addition, it has been proven that such a light bulb burns out much faster.
Replacing the turn signal lamp:
1) In this case, everything is very simple, first of all, you will need to understand where this lamp is located, so that it is more clear to you, see the photo below:
Note! As you already understood, in the photo the arrow indicates only the chamber or, as it is also called, the lamp base, but the lamp itself is not visible, so in order for you to be able to see it and easily remove and change it, grab this base part with your hand and then turn it it clockwise by a small degree, and thereby remove it from there!
2) When the base together with the lamp itself is removed, grab the light bulb with your hand (Indicated by the arrow) and then slightly press on it and turn it counterclockwise and remove this lamp.
Note! When you install a new lamp, make sure that it fits into the grooves, one of them is indicated by an arrow in the photo, and when it fits in there all the way, turn it so that it locks, and after fixing, check that it doesn’t fly out of there!
Important! When you buy a new lamp for either low beam or high beam, be sure to look at the markings that are placed on the base of the bulb, because cars may have bulbs for low beam, for example H1, and for high beam, for example H4, and therefore if If you also install an H1 lamp on the high beam, then both headlight units will shine differently! (Different lamps can only be installed by the previous owner of your car, because from the factory, as mentioned a little earlier, the same H1 bulbs were installed on both the high and low beams)
By the way, before changing the lamp, check the fuse that goes to it; perhaps it has simply blown and because of this the lamp does not work!
Additional video: For more information on how to replace all lamps, see the interesting and instructive video below:
Preparation Tips
To replace two side light bulbs, you do not need to create special conditions and drive the car into the garage - the work is carried out in any convenient place. What to do:
- Disconnect the negative terminal of the battery.
- Remove components and parts that block access to the headlight units from the engine compartment.
- Remove the plastic protective caps covering the rear parts of the blocks where the light fixtures are located.
To change the side light bulb, you need to get to the headlights from the rear, having first removed the interfering elements. Depending on the make and model of the car, there may be an air filter housing, a battery, cooling system pipes, and so on near the headlight units. Decorative plastic panels and trims should also be removed.
Let's sum it up
On some modern premium cars, it is not possible to even change a light bulb yourself. Whether this is good or bad, we cannot say for sure. But on budget models this option is available. Moreover, it is advisable to carry out the replacement yourself, because there is nothing complicated or impossible here.
Visiting a service station to replace a marker lamp is not the best solution. This way you will waste much more money and precious time. And when you replace it yourself, you will gain valuable experience that will be useful in the future. It is recommended to take a burnt-out lamp to a car dealership and buy a similar one. You shouldn’t chase more powerful lighting devices, they usually only bring problems. On some brands of cars, like Renault Logan, it is more difficult to replace a lamp than on others. But nothing is impossible, so it’s definitely worth addressing this issue.