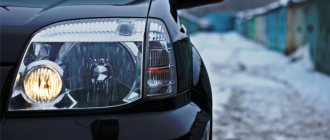
Traffic rules prohibit with faulty low beam headlights or without side lights in the dark or when there is insufficient visibility on the road .
The rear lights have a Renault Logan combined bulb (with 2 filaments).
In it, the side lights are connected to the brake signal. Its failure is fraught with big troubles. Turn signals can be given by hand, but the trouble is that not all drivers are able to recognize them. Therefore, it is better to be ready to change any of the car’s lighting elements at any time of the day, right on the road. We will describe how to change the lamps in a car yourself .
What kind of lamps does Renault Logan use in its headlights?
Renault Logan is an economical sedan developed by a French company in 1998.
In Russia, sales of this model began in 2004. Logan is in great demand not only in our country, but also in a number of other countries, such as Romania, India, Morocco, Iran and Colombia. Depending on the market, Logan can be sold under the Dacia, Renault and Nissan brands. The first body of this model was a sedan. But in 2006, a station wagon and a cargo van were shown at the French Motor Show. Logan in a hatchback body was already called Renault Sandero. The main goal of the designers was the affordable price of this car and competitiveness with such models as Fiat Albea, Hyundai Accent, etc. The first restyling was made in 2008, the changes were minimal, both inside and out. The new generation Logan was released in 2012. The car received a new appearance, it became a little longer and narrower.
In order for Logan to remain cheap, the designers had to abandon complex stamped body parts. The minimum set of options does not include airbags, electric power steering or power windows. It was also decided not to create new engines for the second generation of the model, but to leave the well-proven, time-tested engines. Renault Logan versions did not have xenon installed; the headlights always had halogen lamps, so the light left much to be desired. Since light directly affects traffic safety, the driver needs to know what lamps are installed, as well as the ability to replace them.
Scheme of work
Diagram of operation using the example of the front right headlight. The first thing you need to do is remove the front bumper. You can learn more about the process of dismantling the bumper by following the article below.
After removing the front bumper, our hands will be able to reach all the headlight mounting points. The optics body has three mounting points. One is located at the bottom, the master begins dismantling from the bottom point. For convenience, a ratchet wrench is used. The next bolt is located to the right of the headlight, and the 3rd fastener is located on top.
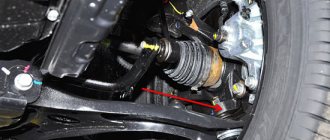
The fastenings are given away and before removing the headlight, you need to disconnect the corrector cable. The protective rubber cap is removed first, then we lift the corrector cable up and it comes out of its housing niche.
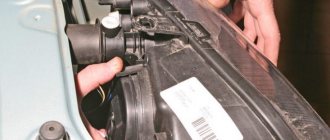
Then we take out the headlight towards ourselves and now there is excellent access to all connectors. We give away the chips for the turn signal, marker (you can remove it together with the base), as well as the low beam connector.
For clarity, the technicians once again showed the procedure for removing the corrector on a removed headlight. The entire process of work is clearly and clearly shown by the masters in the video:
Let's repeat:
Remove the rubber cap and slide it down.
To remove the cable, pull it towards you so that the shirt comes out of the lock.
- We lift the cable up, disengage the edge and remove it.
- When installing the cable in place, insert the edge into the groove, pull the shirt towards you a little and snap it into the lock.
- We put the protective cap in place.
A question was asked on this topic: does the removal process itself depend on the year of manufacture of the Renault Logan? According to the master, the removal procedure is the same on all models and even the attachment points are similar.
How were all the operations performed with the optics removed? For example, we changed the glass, then we installed the lamp power supply chips in the reverse order. When installing the headlight, it is necessary to correctly direct the guides on its body. The guides should fall into place.
If the body has not been subject to impacts and the front panels have not been deformed, then no adjustments to the headlight will be required. It will “sit” on its standard socket, after which, pressing on the headlight housing, we put it in place and tighten all 3 bolts of its fastening.
We install the corrector cable, protection, and this completes replacing the front headlight with your own hands.
For clarity, the craftsmen take pictures with a camera by lifting the car on a lift. And you can also work from a viewing hole or even on a flat, dry area.
Articles and parameters of suitable lamps
The side lights of Renault Logan are implemented with halogen lamps with a W5W socket for the front headlights and P21/5W for the rear ones. This is the factory configuration, which is prohibited from changing according to current rules. However, many users prefer to install brighter and more economical LED bulbs. Designs with 13 crystals are commonly used.
Important! They consume less energy and have an increased service life. This option is not suitable for replacing front headlights, since they are installed in the headlights together with the headlights, which become very hot
LED devices cannot work in such conditions and quickly fail. This feature should be taken into account when choosing suitable lamps.
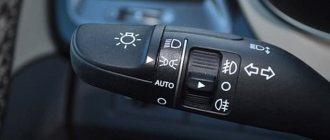
Possible malfunctions of the light switch and their elimination
In Renault Logan, the light switch becomes unusable from time to time. This usually occurs due to wiring problems. They may stop turning on all the lights at the same time, and, for example, only the side lights.
To fix this problem, you need to disconnect the negative from the battery, and then remove the cover from the steering wheel and unscrew the switch. Disconnect the terminal by pressing the clamp on both sides. Inspect the part to determine which wire has broken. Most often, this happens with black and red. To repair the regulator, you will need to replace both of these wires.
We recommend: Renault Logan throttle body cleaning procedure
Replacing the rear marker light
- Disconnect the negative terminal of the battery;
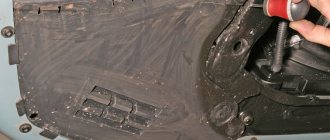
- In the trunk we separate and remove the upholstery (see photo below);
- Disconnect the wiring for the rear lights;
- Using a Phillips screwdriver, unscrew the headlight mounting screws (on the Logan 2nd phase, the nuts are made of plastic);
- Pull out the rear light and remove the light panel from the latches;
- We remove the faulty light bulb from its seat by turning it and insert the new one with pressure, turning it until it stops;
- We put the panel back, return the lamp and trunk trim to their place.
The replacement work on the left and right is identical, the side does not matter. In all years of production, the design of the rear lights on the Renault Logan has remained virtually unchanged.
Changing the light sources of the rear headlight unit
Unscrew the two plastic nuts securing the rear light inside the trunk.
We remove the flashlight without disconnecting the wire block from it. To change the side light in the rear lights , inside the trunk of Renault Logan 1 you need to unscrew the two nuts securing the light, they are plastic. remove the foam gasket from it , then 2 plastic latches are pressed out , after which the holder with all the lighting fixtures is removed.
Remove the foam gasket from the lantern. We press the two plastic latches and remove the holder from the flashlight body.
To remove the turn signal bulb from the holder, press it and turn it counterclockwise . P21W is installed in the reverse order . The fog light and reverse signals are also being replaced . Combined P21/5W ( dimensions plus brakes ). On each holder near the cartridges the power of the lighting device is indicated.
By pressing the combined side light and brake signal lamp and turning it counterclockwise, remove it from the holder socket. The power of the light source is indicated on the holder next to each cartridge.
Replacing steering rods and boots for Renault Logan
Lamp type h4
Lamps with h4 socket have a double-filament design and are capable of simultaneously providing two functions - low and high beam. This versatility allows you to save space in the Renault Logan headlight and ensure optimal balance and configuration of both functions. However, there are also some disadvantages:
- the price of h4 lamps is higher than the cost of other samples;
- if one filament fails, the second continues to work normally, however, the entire lamp will have to be replaced;
- The service life of double-filament lamps is lower than that of single-filament lamps.
The main advantage of h4 light bulbs is the ease of replacement. It is much easier to navigate the design of the headlight and there is less chance of mistakenly removing the wrong lamp if there is only one. In addition, you need 2 units instead of 4, which is cheaper, even taking into account the difference in the cost of h7 and h4 lamps.
Which lamp is suitable for the first generation Logan
Standard lamps in the head optics of the first generation Logan Renault car are h4 halogen lamps. The power of the lamps is 55/60 W (low/high beam). Used for cars produced in 2004-2013 (pre-restyling models). Halogen lamps are installed at the factory, although there are other types of lamps with an H4 socket suitable for installation in the Logan headlight unit.
Which one is suitable for the second generation?
On the second generation Logan, high and low beam are provided by two separate h7 lamps. This allows you to optimize the operation of the lamps, since a situation often arises when, due to one burnt-out filament, the user has to throw away one working and one half-functional lamp. The use of two units also has negative sides - the cost of purchasing lamps increases, and the heating inside the headlight housing increases.
The size of the case itself also had to be increased, although not by much. The factory model is a halogen design that demonstrates an optimal set of qualities and properties. It is noteworthy that it is impossible to change the type of lighting fixtures without consequences - according to current rules, changing the type of lamp is considered unauthorized interference with the design of the car and entails penalties.
Choosing a manufacturer
The list of manufacturers of automotive lighting is large; it is extremely difficult and impractical to list it in its entirety. It is easier to single out several well-known companies that supply the market with exemplary and reference models with different distinctive features and capabilities. Among the most popular companies are:
- Philips;
- Osram;
- Bosh;
- General Electric;
- Koito;
- MTF.
On a note
It is worth considering that it is recommended to use clean gloves when handling the light bulb itself.
It is much more convenient to press out plastic stoppers using nylon thread or fishing line, which is wound in several layers and draped like a loop.
If during replacement the air temperature is less than zero, then be careful, because... The plastic is quite fragile and the stoppers can simply break in the cold. Therefore, it is recommended to carry out this procedure in the warm season or in a heated garage.
- Author: admin
Rate this article: (0 votes, average: 0 out of 5)
Installing new rear side lights
- Disconnect the negative terminal.
- Disconnect the rear light wiring.
- Separate and remove the trunk trim.
- Unscrew the headlight mounting screws.
- Take out the rear light and unclip the light bulb mounting panel.
- Pull out the non-working light bulb (to do this you need to turn it).
- Insert new side lights - press and turn until they stop.
- Reinstall the panel and lamp, secure the trunk trim.
The process of how to replace a headlight bulb on a Renault Logan is the same on new and old models - the design has undergone almost no changes. The procedure for the right and left lamps is the same.
Information provided by the online spare parts store www.z-renault.ru
Changing the room lighting source
Use a screwdriver to press out the plastic clamp of the flashlight and remove the flashlight from the hole in the rear bumper.
In the rear bumper of the 1st generation Renault Logan there is a special hole in which the license plate lamps are located. To get to them, you need to use a flat screwdriver to press out the plastic clip and remove the flashlight. disconnect the electrical wiring block from it . The diffuser is removed by pressing its clamps . After this, the lighting element can be removed and replaced with a new one marked W5W . The entire structure is assembled in reverse order.
Having released the clamp of the wire block, disconnect the wire block from the lamp. We press the latches with our hands and remove the diffuser. We take out the light source from the lantern.
Replacing the front light bulb on a Renault Logan
Many Renault Logan owners, when the light bulbs fail, go to a service station to replace them. But the problem can be solved on your own. Changing a parking light bulb is as easy as changing any other bulb. Moreover, if you have an alarm connected to these lights, the bulbs may burn out more often than usual.
Since each such light element has its own expiration date, no one is immune from the fact that one of them fails along the way and will have to be urgently replaced. In this article we will talk in detail about how to change the side light bulb on a Renault Logan.
Front headlight
Block headlight (auto edition)
In Logan, block headlights are installed, and therefore in one design there are low beam and high beam lamps and direction indicators. When replacing any of the lamps, it is not necessary to disconnect the battery. The fog lights are located separately from the headlight unit at the bottom of the bumper; more information about replacing the lamp in them is here.
The process of replacing marker lamps in detail
Some owners remove the block lamp completely, but this is a lot of unnecessary steps. My hand can easily fit into the gap, even where the battery is!
- Use the head to remove the headlight unit.
- Then you need to disconnect the negative wire from the headlight.
- Remove the entire front bumper.
- Disconnect the headlight range control cable.
- To move the headlight to the side you need to unscrew three screws.
To replace a side lighting element, no additional equipment is required; the process will not take more than 5 minutes.
- In order to replace the lamp, you need to open the hood and feel on the headlight unit for the side lamp socket, which is located just below the headlight lamp.
- Finding the lamp body by touch is not difficult.
We took out the socket and tried to remove the burnt out lamp.
The lamp has been removed and we are preparing to install a new parking light lamp.
It is only necessary to remove the light bulb from the housing while wearing cotton gloves.
LED lamps
Some Loganovods recommend using diode lamps when replacing. They reduce current consumption and improve visibility on the road
We recommend that you pay attention to lamps with at least 13 diodes
Installing diode lamps will not replace your requirement to drive with daytime running lights or fog lights on.
Conventional and LED lamps for side lights
Installing LED lights is no different from conventional ones. And the light from diodes is better, the current consumption is also less. The most important thing is to make the right choice.
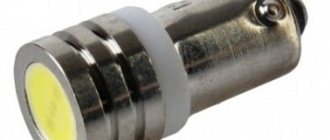
13-LED marker lamp
It became much brighter
If you want to change the low beam lamp on a Renault Logan, then this article will tell you everything about it in detail.
Are the headlights different on different generations of Logan?
Today, the Renault Logan car has two generations. The first began its life in 2005 in (Moscow) and ended in 2015.
The second generation was born in Togliatti (AvtoVAZ) in 2014, and its production continues to this day.
As can be seen from the above photos, headlights differ somewhat between generations, and these differences are not only external, but also structural. Nevertheless, the algorithm for replacing side light bulbs for Renault Logan I and Renault Logan II is almost the same. The only difference is the protective cover (Logan II), which covers the lamp base of the dimensions.
As for the rear lights, their design has not changed at all, which means that the algorithm for replacing the bulbs in them remains the same.
Sequencing
- Disconnect the negative headlight;
- We remove the front bumper and clear the approach to the body mount;
- We turn out the bolts of the headlight unit;
- Carefully disconnect the cable drive of the light corrector;
- We unscrew the three screws holding the headlight unit and tilt it to the side;
- Press the locking device and remove the cover;
- Carefully separate the wire connection block;
- Below the main lighting lamp we see the size socket. To change it, you can get to it without removing the bumper and headlight housing, but only by carefully inserting your hand between the headlight and the engine;
- On the left headlight we turn the socket clockwise, on the right - counterclockwise and remove it freely;
- Remove the lamp.
- Renault lamps have the article number W5W. We check the number and brand and put it in place.
- We put the headlight unit back together, connect the wiring block, install the light control cable and the bumper and fasten the housing.
Attention! Do not touch the lamp bulb with your hands - work with cotton gloves to avoid rapid failure of the lamp. If you are a fan of bright lighting solutions, we advise you to choose a new technology lamp made on the basis of LED elements, of which there are at least 15 pieces
They are sold in almost all auto stores, but their cost is high and ranges from 2,700 rubles. If there are no catalog options from 2012, 2013, 2014 and 2015, you can buy analogues from 2010, 2016 and 2022
If you are a fan of bright lighting solutions, we advise you to choose a new technology lamp made on the basis of LED elements, of which there are at least 15 pieces. They are sold in almost all auto stores, but their cost is high and ranges from 2,700 rubles. If there are no catalog options from 2012, 2013, 2014 and 2015, you can buy analogues from 2010, 2016 and 2017.
The headlights on all generations of Logan cars do not differ in size. On the 2006 and 2007 models, the turn signals had frosted glass, from 2008 to 2012 - ordinary transparent glass, and from 2012 to the present - an orange reflector.
Methods for replacing lamps
How to change the low beam light bulb in Renault Logan? According to the manufacturer's instructions, this requires performing many rather labor-intensive operations:
- Remove the bumper and protective cover from the headlight.
- Remove the headlight by disconnecting the power wires and the corrector cable.
- Remove the protective cover from the high/low beam sunroof.
- Release the spring clip and pull out the lamp.
- Replace the burnt out light fixture with a new one and reassemble in the reverse order.
I don’t know why the designers offer so much fuss when on both generations of Renault Logan you can replace any light bulbs without disassembling the car in 5 minutes. In this case, no tools are needed at all. All we need is:
- clean cotton gloves or cloth;
- replacement lamp;
- hands (in the photos shown for Renault Logan I, even one was enough for the master);
- wish.
Let's start with Renault Logan I and take a look at its headlight:
Headlight Renault Logan I
We are interested in the hatch, which I marked with an arrow. In the assembled unit, this hatch is closed with a rubber corrugated seal and a plastic cover on top.
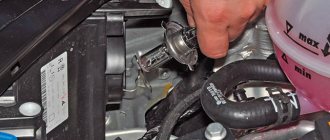
So, open the hood, put your hand between the battery and the Renault Logan body (right headlight) and feel for the cover. If your hand does not fit through, then the battery can be removed. For example, I did it without removing the battery.
If your hands are too large and you cannot reach the headlight, ask anyone you know for help - the whole operation will take no more than five minutes.
Press the lock, marked with a red arrow, and remove the cover. Under it there is a rubber seal and a power supply block for the high/low beam bulb.
Simply pull out the block and then remove the rubber seal.
In front of us is a light bulb, pressed with a spring clip. I marked it with an arrow.
Squeeze the top part of the lamp clamp and fold it down. Now the light device can be grabbed by the contacts and pulled out of the socket.
Before installing a new one, let’s take a break and talk about the features of halogen light sources. The main one is the high (up to 250 degrees Celsius) temperature of the flask. That is why it is made of quartz glass. If you take such a lamp with bare hands, then the particles of fat remaining on the glass will instantly burn and form a film that does not conduct heat well. As a result, at the point of contamination, the flask will overheat and simply melt.
This is why I listed clean cotton gloves or cloth in the accessories. If you need to hold a halogen light bulb by the bulb, do so only with gloves or through a clean cloth.
Expert opinion
Alexey Bartosh
Specialist in repair and maintenance of electrical equipment and industrial electronics.
Local overheating can be caused not only by particles of fat from the hands, but also by any other dirt. If you accidentally stain the device or handle it with bare hands, simply wipe the flask with a clean cloth soaked in alcohol.
Let's continue with the replacement. We put on gloves, remove the lamp from the box, take it by the contacts and install it in its normal place, pressing it with a spring clamp. We put on the rubber boot, connect the power supply and close the whole thing with a protective cover. The bulb in the right headlight has been replaced.
We do the same with the left headlight. The gap there, however, is somewhat narrower, but an average person (literally) can cope with the task quite well.
Now let's take a look at the Renault Logan II headlights. Externally they look like this:
There are two hatches in front of us. In one (I marked it with an arrow), there is a low beam light bulb. In the second - high beam and side lights. As in the first generation, we put our hand into the slot and feel for the desired cover. Here it is rubber. We grab it by the special petal and simply pull it off. Under the cover we see the power supply connected to the lamp. We're filming that too.
We put on gloves, install the new device, put the power supply on it and put the protective cover in place.
You don't need to use a screwdriver to remove the light bulb. Just slide the lamp down and it will come out from under the clips.
Step-by-step instructions for replacing front side lights
In order to change the Renault Logan front light bulb, you need to perform the following sequence of actions:
- the negative wire is disconnected from the housing;
- the bumper is dismantled, access to the fastening elements is freed;
- the bolts and three self-tapping screws are unscrewed;
- the cable of the light corrector is unhooked, after which the body is moved to the side;
- the latch is released and the cover is removed;
- the connecting wire block is disconnected;
- The side light socket is located below the main light. You can replace the lamp without removing the headlight housing; just open the hood and stick your hand into the gap formed between the engine and the housing;
- to remove the cartridge, you need to turn it clockwise on the left side and counterclockwise on the right;
- Burnt out lamps are removed and new ones are inserted. You must work with gloves. The replaced flask is wiped with alcohol to wash off possible greasy stains;
- Reassemble in reverse order.
Some users disconnect the battery and create more space to get work done. However, most owners cope with the task quite well without this; the hand of an ordinary person fits into the gap between the engine and the body.
Features of headlight adjustment
The lamps are adjusted by working with several correctors. Renault Logan has created a system for controlling them from the interior using a switch and a cable system. These correctors will help you adjust parameters such as angle and others.
In some cases, the operation of the headlight range control may be disrupted and it will become impossible to control it from the interior. The cause of the problem may be either in itself or in the cable system - they may need to be replaced.
1. All light bulbs used in Renault Logan
2. Main types of parts
3. Removed headlight
Selection of lighting fixtures
There are many types of light sources consisting of several elements in the automotive aftermarket.
The Renault company recommends using conventional incandescent external lamps in its Logan cars. As a rule, the power of the front elements is from 3 to 5 watts. Of course, there are craftsmen who install light sources with a power of more than 10, or even 15 Watts on their cars. Such lamps undoubtedly have a bad effect on the life of Renault Logan lighting devices.
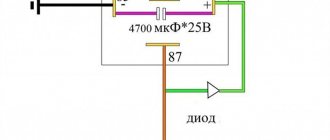
For lovers of bright lighting solutions, manufacturers have created a special lamp with several LED sources. This solution actually has a good effect on the life of the main lighting element and does not put it at risk. The brightness of the LED lamps is quite enough to indicate the car in the dark.
There is one significant drawback, which lies in its fragility. Manufacturers are trying to increase the service life of their parts and solder in a special resistance that imitates a regular lamp. With the use of such technologies, the service life of LED elements has increased significantly.
If you have already made your choice and made a purchase, you are faced with the task of replacing old elements with new parts.