With the advent of the cold season, many owners of domestic small-class Lada Kalina cars are faced with an annoying situation when the heating system “refuses” to effectively heat the interior space. This state of affairs prompts you to venture into searching for the causes of the malfunction; in some cases, the stove fan needs to be replaced, and sometimes the stove motor needs to be replaced.
Procedure in case of extraneous noise from the heater fan on the Lada Kalina
The car's heater is used very actively, especially in cold weather.
Very often, after a long mileage, when you turn on the heater, an annoying whistle is heard, which disappears after turning off the fan, so it becomes clear that the problem is not in the stove itself, but only in the fan. You will learn what to do if the heater fan on your Lada Kalina whistles in our article. In most cases, when a whistle appears, the breakdown can be fixed, and in more than half of the cases this can be done independently.
Website about joints
How to replace the heater motor (fan) of a Lada Kalina car with your own hands. Replacement occurs without removing the panel or seats. Everything should take no more than 1 hour.
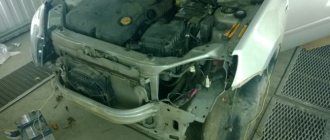
With the onset of cold weather, the stove motor began to buzz loudly, and then jammed and stopped working altogether, which was saved by a strong blow to the panel. The owner did not wait for it to completely break down and decided to replace it. There is no need to completely disassemble the panel; just remove the glove compartment, unscrew a couple of plastic covers and we get direct access to the motor mounts. It is necessary to remove the old motor carefully, as the “snail” can easily be damaged.
Major breakdowns
Noise and whistling are already a breakdown; it is worth noting that the stove either works or it doesn’t. If there is no airflow from it at all, then most likely the motor is jammed or the brushes are worn out. And if there was noise and then at one point it disappeared and the heater stopped working altogether, this means that the motor has stopped and the bearing or bushings need to be checked.
By the way, the appearance of a noise or whistle is not always a signal that the engine is failing; it may also be that a large amount of dirt has accumulated in it and just needs to be cleaned.
Therefore, first of all, when noise appears, disassemble the heater and try to clean and lubricate it, in most cases this helps.
Disassemble and clean the fan
The main thing is that before starting work, do not forget to disconnect the terminals from the car’s battery so that a short circuit does not occur.
There are two options for developing actions:
- Just clean it: to understand what the problem is, you will need to spin the already removed engine; if it turns over with difficulty, sometimes even familiar noisy sounds appear, then in this case you will need to vacuum the engine and lubricate the bearings and other rotating parts. You can lubricate with any silicone grease or WD-40. Also be sure to clean all dirt from the shaft. In 65% of cases, these actions are enough to get rid of extraneous sounds from the stove and will last for a long time.
- Repair or replace shaft bearings: To determine whether any work needs to be done on the shaft bearings, you first need to look at their condition. If they don't turn at all, then you will have to disassemble the motor. Bearings may fall apart or become jammed from prolonged operation. Of course, you can just buy a new motor and not have to worry about repairs, but a new part costs a lot and if you try really hard, you can still fix the old one yourself.
How to remove the fan on Lada Kalina
If the stove on Kalina is humming, it is already clear from what has been described above that it is simply necessary to repair or replace the fan motor. Therefore, we begin dismantling by removing the outer plastic grille and removing the cabin filter.
- Then remove all debris from the seat so that it does not fall on your head while removing the fan.
- To proceed further, you will have to remove the front passenger seat, otherwise you will need to take an acrobatic pose inside the Kalina's cabin.
- The fan runners are held on by four nuts that need to be unscrewed. Then open the glove compartment and empty it of its contents, unscrew the four screws on its back wall and don’t forget about one more on the outside, under the airflow grille.
- Remove the decorative trim from the front right pillar; under it there are two more screws that secure the plastic panel and the blower unit. You need to unscrew them, remove the blower unit and lift the plastic panel, which is held on by Velcro. Underneath you will find two nuts; you will need to loosen them using a socket wrench. Then move the torpedo as far as possible and lock it in this position.
- Sit comfortably on the floor of the Lada Kalina and remove the heater fan, while disconnecting the electrical connector. You will need to replace its turbine with a new motor or repair the old one and put it back. Then install the unit in its place and reassemble everything in reverse order.
Replacing the heater motor without removing the panel
Hi all!
For the second year now, the heater motor on my Kalina has been beeping frequently. If before this happened quite rarely, now for the second day in a row the fan practically does not stop. I decided that there was nowhere to delay and this morning I stopped by BB with a new engine, the price of which is 1,400 rubles. I took the Luzar company, since it was the one that was praised by the majority of potassium growers. So, the first thing I did was remove the front passenger seat by unscrewing the 4 bolts that secure them, which resulted in much more free space.
Then we open the glove compartment, take out all the things from there, and unsnap the “curtain” mounting plate, then unscrew all the screws that are visible in the photo below:
Then unscrew one screw on the left side:
And another one on the right side. After this, you need to unscrew three more screws in the upper part of the glove box lid:
In general, next we remove the side trim of the passenger compartment pillar, as shown in the photo below:
After this, unscrew the screws from below using a short screwdriver or a bit and a ratchet:
Now we lift the upper black cover and unscrew the two nuts under it using an extension, a socket and a ratchet, as well as two self-tapping screws (shown by arrows):
Next, slightly lift the side air duct and unscrew the bolt:
So, we still have to deal with the lower bolts, two on the left and one on the right:
After performing all these manipulations, it seems that nothing will interfere anymore and now you can move the right side of the instrument panel to the side, and then put something under it to fix it in this position:
The photo above does not show an ideal option, and in my case I had to move it back a little more so that I could pull out the stove fan. Then you can crawl up from below with your hands and disconnect the power plug from the heater motor, after first bending the block clamp:
Next, unscrew the three screws that secure the heater fan to the housing:
And after that we try to pull the motor out, if you manage to do this. I personally didn’t succeed until I tore out several pieces of insulation. As a result, after an hour of effort, we finally managed to pull the motor out, resulting in the following picture:
Then we put the new fan in its place without any problems! In fact, this is true - installation compared to removal is just idleness! In total, the whole job took me 3 hours.
The new motor works at least twice as well, and now blows better at first speed than before at second! It is not noisy, although the sound is not much different from the standard one.
In general, if you have any questions, ask, I will try to answer. If I messed something up in the description, please correct me, as I was in a hurry and might not have mentioned something!
Source
Procedure for resuscitation of the Lada Kalina stove fan motor
- Before removing the clamp, mark the location of the impeller relative to the shaft and remove the impeller.
- After you gain access to the two bolts, you need to unscrew them and open the motor.
- Unhook the anchor lock at the top, remove the washers and pull out the anchor.
- This will give you access to the bushings.
- Clean and lubricate parts.
- At anchor, wipe and sand the contact plates with the finest grain sandpaper.
- You also need to clean the contact pads and wipe them down.
- Do not lubricate the contact surfaces under any circumstances! Everything should be sterile clean and shiny.
- Use graphite lubricant only to lubricate high friction surfaces. But under no circumstances use oil or grease for these purposes, as they will leak in the future.
Important! Do not drill holes or pour oil onto the shaft or spray WD while removing the cooling hose. This is not recommended, although you can find many recommendations on this matter on the Internet. Such actions are dangerous for the motor and can lead to its failure.
- Reassemble the motor in reverse order. Now it will not buzz and will spin without squeaks or noises.
- Reassemble all other parts in reverse order.
As you can see, the steps are not at all complicated, the main thing is not to get confused about what to screw on during assembly. If you have problems with heater fan noise, try to solve the problem yourself as much as possible. If repairing the problematic part is impossible, then replace it with a new one, and if you still doubt your abilities, seek the help of specialists.
Source
How to independently change the heater fan in a Lada Kalina car
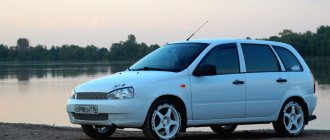
If the car interior is left without heating in the cold season, this does not bode well for either the driver or his passengers. This rule applies to all passenger cars, and the Lada Kalina is no exception. In general, the heater in this car is quite reliable. But it has one weak point: the furnace fan. It is this part that most often fails and becomes a source of real headache for the Kalina owner. Is it possible to replace the stove fan on a Lada Kalina yourself? Can. Let's figure out how this is done.
Conclusion
Treat your car with care, carry out timely maintenance of the stove and there will be no problems with heating the Lada Kalina. Removal and replacement of the motor will be required only after its maximum operational capabilities have been reached.
Perhaps you know some other interesting ways to replace an engine? Or there is a desire to share with readers your own experience of carrying out repairs. Write comments. Any information would be very helpful.
Source
Purpose of the heating fan in the Lada Kalina
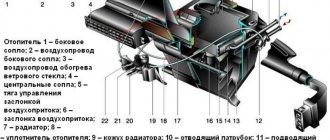
To understand why a car needs a heating fan, you should have a good understanding of how its heating system functions. The Kalina engine is constantly cooled with antifreeze. Having warmed up, the antifreeze from the engine goes to the main radiator, blown by the main fan. If this happens in the cold season and the driver turns on the heater, then hot antifreeze from the main radiator enters the heating radiator, which is half the size of the main one.
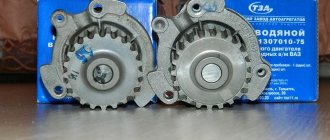
The Kalina heating fan is made of very unreliable plastic
The heater radiator quickly heats up with boiling antifreeze. The heat emanating from it is supplied through an air duct system to the interior of the car. And this hot air is pumped in using a heating fan, which constantly blows on the stove radiator and is driven by a small electric motor, and the intensity of heating of the interior directly depends on the rotation speed of the heating fan. Thus, without a heating fan, hot air simply cannot enter the car’s interior, and any breakdown of this device leads to the fact that the driver in the cabin begins to freeze.
Where is the heating fan located?
The heating fan on the Lada Kalina is located behind the heating radiator, which, in turn, is located under the central panel of the car, to the right of the driver. It is not possible to see this entire structure from the interior.
Air ducts and ventilation nozzles in the Lada Kalina are located throughout the front panel
To replace the heating fan, the driver will have to completely or partially dismantle the central panel. There are no other options.
Common faults
The stove itself on Kalina is well conceived, but due to the poor quality of the elements and parts, various troubles constantly happen to it. Even the latest models with climate control have various “diseases”.
The list of the most common faults looks like this:
- The heater core is leaking;
- the heater damper is jammed or does not open completely;
- failure of the fan or control unit;
- gear motor failure;
- the temperature sensor or heater resistor has become unusable;
- The cabin filter is clogged.
To find out where this or that element of the heating system is located, you should look at the operating instructions; there will definitely be a corresponding diagram there.
The design of the Kalina stove without climate control is such that the air sucked in by the fan passes through the air filter and enters the heater radiator. There it is heated and supplied to different areas of the cabin through adjustable grilles and openings. The dampers are controlled and the fan speeds are switched manually. This heating system is more reliable because it does not contain any electronics.
Signs and causes of furnace fan failure
The owner of the Lada Kalina will immediately know that the stove fan has broken down. Here are the characteristic signs of failure of this part:
- the pressure of hot air blown out of the deflectors is greatly weakened and practically does not depend on the position of the stove regulator;
- The operation of the heater is accompanied by a loud creaking noise, which turns into a grinding noise when the fan speed increases.
All this happens for the following reasons:
- One or more fan blades are damaged. The fact is that the fan on the Lada Kalina is made of plastic, and this plastic is far from being of the best quality. This is especially true in severe frost. If there is a small crack on the blade, then at low temperatures it is guaranteed to increase and the blade will completely collapse. This, in turn, will reduce the pressure of air pumped into the cabin, which will immediately become noticeable to the driver and passengers by the lack of pressure in the deflectors;
- Fan squeaking occurs due to wear of the bushing on which the fan is mounted. This bushing lasts an average of five to six years, after which it will inevitably have to be replaced, since during this time it wears out almost completely (and it is advisable to install a ball bearing in place of the bushing, since its service life is twice as long).
Here we should make one digression and tell a real-life incident. As mentioned above, when replacing a furnace fan, drivers try to install them not on bushings, but on ball bearings. Until recently, there were no problems with this: you had to go to the nearest auto parts store and buy a Luzar fan. But for some time now it has become difficult to find products from this company. I don’t know what this is connected with, but the fact remains: “original” VAZ fans with hubs are on sale everywhere, but devices with ball bearings cannot be found during the day. One driver I know solved the problem in a very original way: instead of rushing around car stores, he simply ordered the required part from the Chinese online auction “Aliexpress”. The ball bearing fan arrived in the mail about a month and a half later. According to him, it cost only a third more than Luzarov's. This is probably a markup for shipping.
The ball bearing heater from Luzar is currently in short supply
About lubrication of the Lada Kalina stove fan
Lubricating a squeaky bushing on a Lada Kalina fan is a pointless task. Yes, lubricant will remove the annoying squeak for a while. But if the bushing is worn out badly, then even the thickest lubricant will very soon be used up and the bushing will begin to creak with redoubled force. Therefore, car owners prefer not to lubricate worn bushings, but to replace them along with the fans. And this is the only rational option.
Assembly
We return the brake pedal to its place. The stop will interfere with doing this, so it needs to be moved to the side and this will allow you to return the pedal to its rightful place. If the stop is bent forward, then after returning the pedal to its place, straighten the stop using pliers.
After connecting the pedal to the rod, do not forget to install the locking plate.
Also, do not forget to install, connect and be sure to configure the brake pedal pressure sensor:
Also, we install the gas pedal bracket and the pedal itself on it, which we must fix on the bracket with a locking plate.
That's probably all in the cabin, now let's move on to the engine compartment. Don’t forget to put the steering rod back in place and screw the thermal protection back into place (if you unscrewed it):
We put in place the air filter, the air duct, then the platform for the battery and the battery itself.
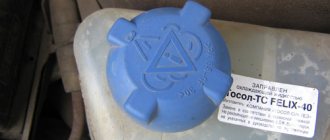
So, everything is assembled, all that remains is to fill in the antifreeze and remove the air lock from the stove. Before pouring antifreeze, make sure that all hoses are put in place and all clamps on them are tightened, including the throttle body heating hose.
Frankly, after filling in the antifreeze and checking the cooling system, at first I was a little depressed that the stove was not heating again. In desperation, I added gas and noticed that at high speeds the air coming from the stove was much hotter. Then it dawned on me: there was an air lock in the system. Air accumulates at the highest point (I have it in the hoses) and does not allow antifreeze to circulate normally through the stove.
I expelled the air from the system in the same way as I have been doing for about 7 years. It is enough just to drive at high speeds (3-4 thousand rpm) and the flow of antifreeze will itself break the air plug into bubbles, and then carry them into the expansion tank. Monitor the antifreeze level and make sure that the expansion tank cap allows air inside well, and then you won’t be afraid of an air lock.
That's probably all, dear readers! I sincerely hope that this article will help you replace the stove radiator and you will no longer have problems with this unit. I wish that the stove in your car works perfectly, never leaks, and that even in severe frost, your car will be warm and cozy!
I installed the standard radiator using a reverse circuit on December 5, 2015. I’ve been driving with it for almost a month, the New Year is just around the corner, I’m very pleased with the stove so far))
PS December 2016 I drove with the heater radiator installed in a reverse pattern until May 2016, and then Kalina was polished to a shine and passed into the possession of the second owner. During these six months, I did not identify any problems with the stove radiator, but summing up the accumulated experience of “fighting” with the stove radiator, I will assume that next time I would install the radiator according to the usual scheme. But how to do this without removing the panel? - you ask. Here's how: Some good person told me that the radiator of the Kalina stove can be installed with the pipes forward, cutting off the fittings a little and putting on them extended hoses from the VAZ-2108, stuck out of the engine compartment. You will have to tighten the clamps on the fittings not in the engine compartment, but in the cabin, and here you will have to tinker. This method was suggested to me by a competent specialist at a good car service center, for which I express my gratitude to him from the entire community of potassium growers.
Source
Kalina stove. Replacing the stove radiator
Replacing a heating radiator on a Lada Kalina
Before proceeding with disassembling the heating system, you should stock up on everything necessary for repairs. Here's what we need:
- new furnace fan;
- Phillips screwdriver;
- small pliers;
- set of sockets and ratchet.
Sequencing
Before starting work, it is necessary to do several preparatory operations. First, you need to let the car engine cool down properly. Secondly, you need to remove the negative terminal from the battery.
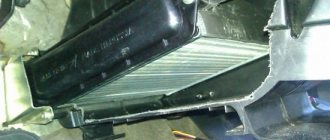
- To get to the heating fan, you will first have to remove the air filter. It is held on by two bolts, which are unscrewed with a ratchet.
The most convenient way to remove the cover of the Kalina air filter housing is with a ratchet wrench
The expansion hose pin is removed with pliers
To remove the plug, you need to press the bottom latch of the sensor with your finger.
The clamps on the injection pipe are loosened with a flat screwdriver
No tools are required to remove the adsorber
Unscrew the nuts securing the air intake with a 10mm socket placed on the ratchet
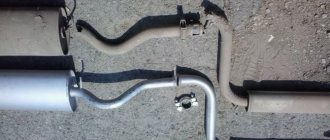
To remove the fan from the niche, the pipe located to the right of it will have to be slightly moved
Video: changing the stove fan on Kalina
Replacing the fan speed resistor on a Lada Kalina
Before starting work, you should say a few words about why a car owner might need to change the high-speed resistor on the heater. It's simple: this resistor is responsible for the fan rotation speed.
The heating resistor is responsible for the rotation speed of the Kalina stove fan
If at some point the driver discovers that the furnace fan is always running at the highest speeds and does not react in any way to the position of the regulator, it means that the speed resistor has failed and needs to be replaced, since this device cannot be repaired.
Replacement sequence
There is nothing difficult about replacing the resistor. The driver will have to perform only three actions.
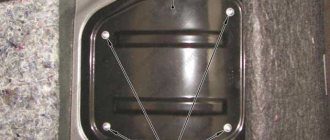
- There is a rectangular plug on the storage shelf of the Lada Kalina. It must be carefully pryed from below using a flat screwdriver and removed.
Under the plug there is a Kalina fan resistor
To remove the resistor, you need to disconnect the plug from it.
After removing the plug, the resistor is removed manually