The main task of the stabilizer is to reduce the roll of the car when passing uneven roads and when performing maneuvers.
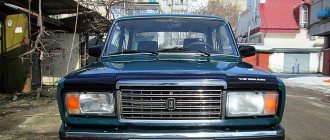
On the seven, the stabilizer has four attachment points: two internal ones, which are located on the body spar, and two external points on the lower suspension arms. The outer bushings are subject to greater wear due to the significant load on them. But a comprehensive replacement of stabilizer bushings is recommended for all attachment points.
PURPOSE, DESIGN AND PRINCIPLES OF OPERATION OF THE VAZ 2107 STABILIZER
It has already been written above that the SPU is one of the important parts of the car. But why? The answer is simple - thanks to it, driving improves significantly, becoming more comfortable. This device makes it possible to keep the chassis tilt under control without increasing the pressure on the camber of the rear wheels.
The increased control over the vehicle on sharp turns is especially noticeable.
Thanks to the stabilizer, it will be possible to enter such turns at higher speeds without the risk of capsizing.
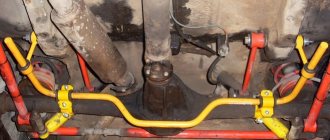
The roll bar SPU looks like a C-shaped hose that is installed next to the axle. The stabilizer is mounted on brackets with rubber bushings inside.
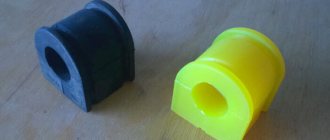
It is worth noting that the VAZ 2107 stabilizer bushing is the weakest point in the design and breaks most often.
The stabilizer works on the principle of distributing the load between two suspensions.
It works relatively simply - when making a sharp turn, the car can roll. Stabilizer, since one wheel lowers and the other, accordingly, rises. The stabilizer prevents this from happening by twisting the rod and raising the lowered wheel and lowering the raised one. Thanks to this, the car is leveled.
Types of self-propelled chassis:
- Automotive;
- Tractor;
- Special universal self-propelled chassis.
Typically, the chassis is produced in an automobile or tractor plant, and the equipment that sits on it is produced in another specialized plant for the production of attachments. For example, off-road equipment is installed on vehicles such as URAL.
An example of a self-propelled chassis is a truck crane. Universal self-propelled chassis are widely used in agriculture on seasonal equipment.
Universal self-propelled chassis
The self-propelled chassis most closely resembles a tractor; the only difference is the layout, in which the engine is located behind the cab, and in front of the cab, apparently, is a frame with a front axle. The frame can be installed with one or two beams. Various special equipment used in agriculture (dump truck body) is installed on the frame. The canopy of equipment is carried out quickly, for the convenience of replacing it if necessary.
Scope of application of self-propelled chassis
-In agriculture;
-In forestry;
-In municipal and road repair services;
-In warehouses (lifts, loaders).
DIAGNOSTICS
A breakdown can occur for a variety of reasons, so it is impossible to determine the exact time of full operation without breakdowns. Basically it all depends on the operating conditions. For example, if you often drive off-road, the stabilizer will break down often.
Basically, the SPU is checked during annual maintenance, but no one bothers you to do it yourself at any time.
First you need to remove the wheel. After this, use the steering wheel to make a maximum turn in any direction and shake the “bare” stand from side to side with your hand, grasping the middle third. If there are faults, looseness will be noticeable.
Signs of a broken rear stabilizer
The most common signs of failure are:
- Vehicle roll during sharp maneuvers, instability;
- The car begins to sway, as soon as you turn the steering wheel a little to the side;
- If you drive on an uneven road, you will hear a sound from the suspension;
- The car begins to “yaw” when braking;
- If you lower the steering wheel, the car will start to swerve.
How should the stabilizer be positioned?
A correctly installed SPU should twist when the wheels turn.
Therefore, on passenger cars it is strictly forbidden to weld to the frame, since there must always be an intermediate link between it and the wheel. For example, in the VAZ 2107 bushings act as such a link. It is not recommended to use a stabilizer without them.
Causes of creaking stabilizer bushings
Drivers most often complain about bushings creaking either in cold or dry weather. But these are not the main factors and each driver may have his own reasons for this problem. They are individual for everyone. Main reasons:
- The material from which the bushings were made is of poor quality;
- When it freezes, the rubber from which the bushings are made becomes harder and loses its elasticity, which is why squeaks are heard;
- The bushing has simply worn out and can no longer fulfill its direct duties;
- Due to the design features of the car.
Before replacing the anti-roll bar, you need to figure out what the problem is. Most often you just need to replace the rubber bands.
Why does the stabilizer bushing squeeze out?
In fact, the bushing is quite gentle to use. It can wear out pretty quickly. This mainly happens in winter. In cold weather, the bushing freezes, which can cause cracks to appear on it. Various reagents that are used to sprinkle roads during icy conditions can also play a role in this.
If the driver did not notice the problem in time, the cracks continue to grow. Because of this, the bushing begins to lose its elasticity. And so, at the next turn, it can simply be squeezed out of the eyelet. It is no longer possible to return it back - it is too worn out and will not be able to perform its direct functions.
After this, when entering a turn, the motorist may hear a creaking and grinding sound. The vehicle's handling will also decrease.
About double stabilizers
As the name suggests, there are two rods in this stabilizer. But such a device is installed only on the front wheels. Basically there are no fundamental differences.
Thanks to this SPU device, the stiffness of the suspension will increase significantly, which on the one hand is good, but on the other hand, some problems may arise. The fact is that on the classic VAZ 2107 the two front wheels operate independently of each other - that is, if the left front wheel lifts, the right one does not. But due to the installation of a double stabilizer, everything will change - the suspension will become semi-independent and the steering will become much stiffer, and the traction will become worse.
Therefore, before purchasing and installing a double SPU, you need to think carefully - either comfortable driving and good cross-country ability, or no roll.
Front shock absorber malfunctions
The fact that the shock absorbers have become unusable can be judged by the sharply increased braking distance and the gradual deterioration of adhesion to the road surface.
In addition, there is a risk of aquaplaning, a state of complete loss of vehicle control while driving on wet asphalt.
Typically, hydroplaning lasts a few seconds, but this is enough to cause an accident, and only a very experienced driver can cope with such a nuisance.
In order to prevent this problem, you should watch for the following signs, which determine the condition of the front suspension.
- Uneven tire wear.
- Oil leak. If even a small oil trace remains after parking, this first of all indicates a malfunction of the shock absorbers.
Nodes become defective for several reasons:
- damage to the seal;
- piston rod defect or corrosion;
- break in the spring;
- deformation of bushings and other fasteners. This malfunction causes loud noise while driving.
- mechanical defects of the case;
- poor condition of the spring or its incorrect installation. A breakdown in the spring is indicated by deterioration in vehicle stability and the appearance of noise at speed;
- wear of silent blocks.
ADVANTAGES OF TIMELY REPLACEMENT
Replacing bushings is a simple process that any driver can handle. As they say - “if there is a desire.” If it is not there, it is better to contact a car service center, where you will be provided with professional assistance.
Thanks to the timely replacement of worn bushings, the anti-roll bar of the VAZ 2107 can last longer.
Thanks to the new bushings, driving on roads, regardless of whether they are of high quality or not, will become much more comfortable and safer.
Basic elements of a car suspension
Any pendant consists of several basic elements:
Tires. This is the first stage in the system for smoothing out uneven road surfaces. Having a certain degree of elasticity, the tire is able to dampen a small amount of vibrations that occur during movement. If there are malfunctions in the tire suspension, the wheels can act as an indicator of a malfunction, since the service life of the tire in such a situation is quickly reduced and uneven wear occurs.
Basic elastic elements. The elastic elements of a car suspension include springs, leaf springs and torsion bars. The purpose of these elements is to provide an elastic connection between the body and the road surface. The entire load of the car falls on the springs, and due to their elasticity, the body is held at a certain height. During operation and heavy overloads, the metal of the elastic elements wears out, causing their rigidity to change. Such changes negatively affect the performance of the suspension as a whole. The angle of the wheels changes, the ground clearance decreases, and the load capacity decreases. Body sagging when unloaded is the main signal that the springs need to be replaced.
Additional elastic elements. Additional elastic elements include compression buffers; their use is necessary to dampen high-frequency vibrations, as well as vibrations generated during the contact of metal elements. Thanks to the presence of such elastic elements, the service life of other suspension components is significantly increased.
It is extremely important to monitor their good condition and promptly replace worn parts.
Guiding devices. The main task of the guide devices is to ensure the movement of the wheel in the established plane. Thanks to a system of levers, when moving on an uneven surface, the wheel moves in a vertical direction, while maintaining a perpendicular position relative to the road surface
Any violations in the guide elements will lead to rapid and uneven wear of the wheel tire, as well as other suspension elements.
Damping element. The element of the damping device is a shock absorber. The use of shock absorbers in the suspension system allows you to solve problems such as body vibration when driving on uneven roads, as well as smoothing out vibrations on other elements of the vehicle's suspension. Thanks to the damping function, constant contact of the wheel with the road is ensured, the car becomes more stable when driving.
Anti-roll bar. When turning at speed, the anti-roll bar prevents the vehicle from rolling. When performing a turning maneuver, the wheels on one side of the vehicle begin to lift off the road, which can cause the vehicle to roll over. At this moment, tension is created on the stabilizer, which tends to return the rising edge of the car to its place.
Fastening elements for individual parts. Fastening elements include ball joints, silent blocks and bolted joints that connect the remaining elements of the vehicle's suspension.
SOLUTION
Many beginners may experience problems or difficulties when replacing bushings. This section of the article will help you solve them.
When to replace transverse stabilizer bushings
SPU bushings are replaced immediately after wear is detected. If this is not done and you continue to drive with worn bushings, then irreparable problems may soon appear and then you will have to replace the stabilizer completely.
Installation materials and tools
In order to successfully change rubber bands you will need:
- A set of new bushings for the rear stabilizer;
- Set of open-end wrenches;
- Flathead screwdriver and hammer;
- Composition WD40;
- Mounting blade.
Sequence of operations for replacing rear stabilizer bushings on a VAZ 2107
Having prepared everything you need, you can begin the repair:
- After the car is placed in the pit, you need to inspect the fastenings. Usually, due to long-term use, a layer of dirt and rust could appear on them. To eliminate these unpleasant consequences, you need to treat the compounds with WD 40. After that, all you have to do is wait about fifteen minutes. During this time, dirt and rust should dissolve and work can continue.
- The nuts must be unscrewed with a 17mm open-end wrench.
- In order to loosen the stabilizer bar with the clamp, you will have to use a mounting blade. Having inserted it into a narrow hole, you need to use the lever principle and bend the clamp.
- After this you need to get rid of the old gum. This can be done with a knife.
- The place where the new bushing will be installed must be cleaned of dirt and rust. After this, you can install a new rubber band, having first lubricated its inside with grease (it should be sold with the kit). Now you need to put it on the rod and move it along it to the installation site.
- After the fifth step is completed, you need to tighten the nut on the clamp.
- Then all that remains is to replace all the other bushings according to the instructions above. Afterwards, you need to evaluate the quality of the work performed - if the stabilizer is not warped and no play is detected, then the replacement was carried out correctly. You can drive.
Strengthening stabilizing traction
Some owners of the “classic” VAZ, who love to improve their car in every possible way, have even gotten to the stabilizing unit. There is an opinion that the car behaves better on the road if you install a double stabilizer on the VAZ 2101-07. This modernization improves the car's handling, since rigidity does not allow it to sway and deviate from the trajectory.
To realize the strengthening of the stabilizer, you need to buy the following parts:
- stabilizer rod;
- set of rubber bushings;
- 4 brackets designed for attachment to the lever.
The new rod must be immediately trimmed by 80 mm on each side. Then remove the “original” rod along with the brackets. Further steps - according to the instructions:
- Remove the outer bushings from the “original” rod and clean the ends.
- Place 2 middle bushings on the new rod so that they coincide with the brackets on the old one. Pull the outer rubber bands onto the ends of the rod.
- Pull additional rubber bands on the old stabilizer that match the outer ones on the new one.
- Place the rods together and twist them with brackets placed on additional bushings on both sides.
- Install a reinforced stabilizer on the car.
A similar design can be made by welding from bushings from a Niva and stabilizer struts from a VAZ 2110. This will cost a little more, and the appearance will not be very aesthetically pleasing.
VIDEO REPLACING STABILIZER BUSHINGS ON A VAZ 2107. USEFUL VIDEO:
Let's summarize - the stabilizer for the classic VAZ 2107 is an extremely controversial tuning element. On the one hand, it increases the stability of the car, but on the other hand, it reduces cross-country ability and driving comfort. However, it has one undoubted advantage - ease of maintenance. Even a novice car enthusiast can cope with this. After all, the only part of the SPU that is subject to rapid wear is the bushings, replacing which will not be a problem for a person who has at least once held a wrench with a mounting blade in his hands.
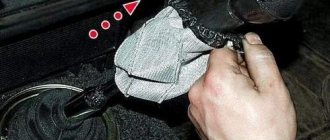
Seat belts
At first, cars were equipped with belts with two-point fastening, which “held” riders by the stomach or chest. Less than half a century has passed since engineers realized that the multi-point design is much better, because in the event of an accident it allows the belt pressure to be distributed more evenly over the surface of the body and significantly reduces the risk of injury to the spine and internal organs. In motorsports, for example, four-, five- and even six-point seat belts are used - they keep a person “tight” in the seat. But in civilian life, three-point ones have taken root because of their simplicity and convenience.
For the belt to function properly, it must fit snugly to the body.
Previously, belts had to be adjusted to fit the figure. With the advent of inertial belts, the need for “manual adjustment” has disappeared - in normal conditions, the reel rotates freely, and the belt can wrap around a passenger of any size, it does not hinder actions, and every time the passenger wants to change the position of the body, the strap always fits snugly to the body. But at the moment when “force majeure” occurs, the inertial reel will immediately fix the belt. In addition, modern cars use squibs in their belts. Small explosive charges detonate, yank the belt, and it presses the passenger to the back of the seat, preventing him from being hit.
Seat belts are one of the most effective means of protection in an accident.
Therefore, passenger cars must be equipped with seat belts if fastening points are provided for this. The protective properties of belts largely depend on their technical condition. Belt malfunctions that prevent the vehicle from being used include tears and abrasions in the fabric strap of the straps that are visible to the naked eye, unreliable fixation of the strap tongue in the lock, or the absence of automatic release of the tongue when the lock is unlocked.
For inertia-type seat belts, the webbing should be freely retracted into the reel and blocked when the vehicle moves suddenly at a speed of 15 - 20 km/h. Belts that have experienced critical loads during an accident in which the car body was seriously damaged must be replaced.
WHAT IS A REAR STABILIZER
The rear stabilizer for the VAZ 2107 is a curved C-shaped rod installed next to the rear axle of the “seven”. The stabilizer is attached at four points. Two of them are located on the rear suspension arms, two more on the rear side members of the “seven”. These fasteners are ordinary eyes with dense rubber bushings inside (these bushings are the weak point of the entire structure).
The rear anti-roll bar for the VAZ 2107 is a conventional curved rod with fasteners
Today you can purchase a rear stabilizer and fasteners for it at any spare parts store. Some drivers prefer to make this device themselves, but this is a very labor-intensive process that requires certain skills that a novice car enthusiast simply does not have. That is why the replacement of bushings on a finished stabilizer will be discussed below.
PURPOSE OF REAR STABILIZER
The anti-roll bar on the “seven” performs two important functions at once:
- this device gives the driver the opportunity to control the tilt of the car’s chassis, while the force acting on the camber of the rear wheels practically does not increase;
- After installing the stabilizer, the tilt of the suspension between the axles of the car changes significantly. As a result, the driver is able to better control the car;
- The improvement in car control is especially noticeable on sharp turns. After installing the stabilizer, not only does the lateral roll of the car during such turns decrease, but you can also take them at a higher speed.
ABOUT THE MINUSES OF THE REAR STABILIZER
Speaking about the advantages that the stabilizer provides, one cannot fail to mention the disadvantages that also exist. In general, the installation of a stabilizer still remains the subject of fierce debate among car enthusiasts. Opponents of installing stabilizers usually justify their position with the following points:
- Yes, after installing the rear stabilizer, lateral stability increases significantly. But this is a double-edged sword, since it is the high lateral stability that makes it much easier for the car to skid. This circumstance is good for those who engage in so-called drifting, but for an ordinary driver who finds himself on a slippery road, this is completely useless;
- If a car enthusiast decides to install a rear stabilizer on his “seven”, then he is strongly recommended to install a front one, and not a regular one, but a double one. This measure will help prevent excessive loosening of the car body;
- The cross-country ability of a car with stabilizers is reduced. On sharp turns, such a car often begins to cling to the soil or snow with its stabilizers.
It is easy to notice that the ground clearance of a VAZ 2107 with a stabilizer decreases, which affects cross-country ability
Thus, a driver who is thinking about installing stabilizers should weigh all the pros and cons as carefully as possible, and only after that make a final decision.
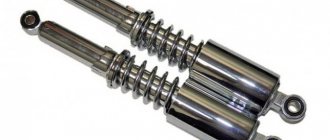
Reasons why you need to change the shock absorber struts of a VAZ 2110
- Knock in the suspension.
- A slight vibration feedback to the steering wheel, which impairs vehicle controllability.
- The appearance of rocking of the front of the car.
- A slight deviation of the wheels from straight-line movement.
If the driver detects such deviations, an urgent replacement of the VAZ 2110 stabilizer strut is needed. The durability of the struts depends on the quality of the road surface and the manufacturer. The price of quality products is slightly higher than that offered by less popular manufacturers of structures.
Tip: There is no need to check the wheel alignment after replacing the shock absorber struts; they do not have any effect on the wheel alignment angles.
Replacing stabilizer parts for a VAZ 2110 car
To work you need to purchase:
The instructions suggest the following procedure:
- The car is installed on a viewing hole or its front part is raised and fixed on supports.
- For safe operation, the car is placed on the handbrake.
Tip: To prevent unexpected movement, the car must be firmly secured in place by placing “shoes” or wheel chocks under the rear wheels.
Unscrew one nut at a time, securing the car body to the arms of the anti-roll bar struts, on both sides.
Unscrewing the stabilizer fixing nuts
- The spring washers are removed.
- The bolts are removed from both sides.
- Unscrew two nuts holding the stabilizer bars to the body.
- The spring washers are removed from the studs.
- Along with the struts, the brackets and stabilizer bar are pulled out.
- If you only need to replace the stabilizer bar on a VAZ 2110 or its bushings, unscrew the nuts securing the struts to the levers, then knock the struts off the assembly rod with a polymer or wooden hammer.
- The VAZ 2110 stabilizer strut and bushing are visually inspected. In case of deformation of the racks, rupture, wear, loss of elasticity, cracks or loose fit of the bushings to the surface of the rod, all elements are replaced with new parts.
Tip: To remove bushings that have become unusable, a press is required, so it is easier to replace the rack together with the bushings.
The assembly rod is inspected. It should be without deformation, the ends should be located in the same plane.
https://youtube.com/watch?v=WHWGaJjP3xM
Tip: Minor changes in geometric dimensions on the stabilizer bar can be corrected, in other cases the part needs to be changed.
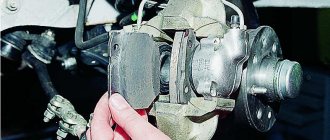
- Stabilizer pads that are worn, torn, have lost elasticity, or do not fit tightly to the bar must be replaced with new ones. To do this, new cushions are put on the stabilizer bar, at a distance of 350 millimeters from its center. Their cuts are located towards the front of the car.
- The struts, lubricated with soapy water, are placed on the stabilizer bar, as shown in the photo.
The shock absorber strut is placed on the rod
- The structural rod is installed in place, the nuts securing the cushion brackets are tightened until the play in the cushion sections is eliminated.
- Tighten the front nuts first, from the side of the cut, then the rear ones.
- The nuts are tightened to hold the front struts until the gap between the arms and the struts disappears.
- With the suspension loaded, all stabilizer fixing nuts are finally tightened. The car is standing on a hard surface. The tightening torque of the rack elements is 4.3 – 5.3 kgf-m; bracket 1.3 – 1.6 kgf-m.
How to correctly replace a strut on a stabilizer bar on a VAZ 2110 can be clearly seen in the video.
SIGNS OF REAR STABILIZER BREAKAGE
It’s not difficult to guess that something is wrong with the rear stabilizer of the VAZ 2107. Here's what's observed:
- a characteristic grinding or creaking noise, which is especially clearly heard when entering a sharp turn at high speed;
- a significant increase in vehicle roll when cornering and a decrease in controllability when cornering;
- the appearance of play on the stabilizer. Play can be easily detected by placing the car in an inspection hole and simply shaking the stabilizer bar up and down;
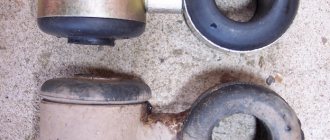
- destruction of bushings. The play mentioned above is almost always accompanied by the destruction of rubber bushings. They are squeezed out of their eyes, crack and completely cease to perform their functions.
On the right is a worn stabilizer bushing, the hole in which is much larger than in the new bushing on the left
All of the above things indicate only one thing: it’s time to repair the stabilizer. In the vast majority of cases, repairing the rear stabilizer comes down to replacing damaged bushings, since the fasteners and rod rarely need repairs. Such a need may arise only in the event of serious mechanical damage, when the driver caught a large stone or curb with the stabilizer, for example.
HOW SHOULD THE STABILIZER BE POSITIONED?
A properly installed stabilizer should be able to twist under the influence of forces on the wheels, and it should do this even when the forces applied to the right and left wheels are directed at completely different angles.
On the "seven" rear stabilizers are installed only with rubber bushings
That is, stabilizers on passenger cars should never be directly welded to the frame; between the frame and the wheel mount there must always be some kind of intermediate link responsible for compensating for multidirectional forces. In the case of the VAZ 2107, such a link is dense rubber bushings, without which it is strictly not recommended to operate the stabilizer.
The stabilizer on the VAZ 2107 is usually attached at four key points
WHY DOES THE STABILIZER BUSHINGS PUT OUT?
As mentioned above, the bushings on the stabilizer serve to compensate for the forces on the wheels. These efforts can reach enormous values, especially when the car enters a sharp turn. Rubber, even of very high quality, systematically subjected to enormous alternating loads, inevitably becomes unusable. Severe frosts and reagents that are used to sprinkle roads in our country during icy conditions also contribute to the destruction of bushings.
The rear stabilizer bushing is worn out, torn lengthwise and comes out of the clamp
It usually starts with cracking of the bushing surface. If the driver does not notice the problem in time, the cracks become deeper and the bushing gradually loses its rigidity. At the next sharp turn, this cracked bushing is squeezed out of the eye and does not return back to it, since the elasticity of the part is completely lost. After this, play appears on the stabilizer bar, the driver hears a creaking and grinding sound when entering a turn, and the car’s controllability decreases sharply.
ABOUT DOUBLE STABILIZERS
Double stabilizers are installed only on the front wheels of the VAZ 2107. As the name suggests, there are already two bars in this device. They have the same C-shape and are located approximately four centimeters from each other. The mounting lugs in the double stabilizers are also paired. Otherwise, this design does not have any fundamental differences from the rear stabilizer.
Front stabilizers on the VAZ 2107 are usually made of two paired c-shaped rods
Why use two bars instead of one? The answer is obvious: to increase the overall stiffness of the suspension. The double front stabilizer copes with this task perfectly. But one cannot fail to note the problems that arise after its installation. The fact is that the front suspension on the classic “seven” is initially independent, that is, the position of one wheel does not in any way affect the position of the second. After installing a double stabilizer, this situation will change and the suspension will turn from independent to semi-independent: its working stroke will be significantly reduced, and in general the control of the car will become tougher.
Of course, the roll when entering turns with a double stabilizer will be reduced. But the driver should think: is he really ready to sacrifice personal comfort and cross-country ability of the car for the sake of its stability? And only after answering this question can you start working.
Dismantling with popular foreign cars
- wrenches, sockets;
- penetrating lubricant type "VD".
We begin work from the inspection hole.
- Jack up the car and remove the front wheels.
- We treat threaded connections with liquid lubricant “VD”.
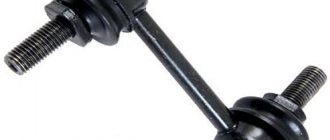
- We unscrew the nuts of the lateral stability bar rods and remove the rods, simultaneously assessing their condition.
- Unfasten the steering rack and move it slightly to the side.
- Disconnect the interfering engine mount.
- Unscrew the fastenings of the U-shaped subframe.
- We unscrew the bolts on the brackets of our defective parts.
- We are replacing stabilizer bushings from Megan 2.
- We do the assembly, moving backwards point by point.
Also read about replacing the VAZ 2110 clutch cable and replacing the Ford Focus 2 clutch master cylinder.
When replacing stabilizer elements on a Renault Duster, you initially only need to remove the plastic shields from under the arches, after which you can immediately unscrew the brackets of our gaskets.
Access to the described units is just as easy for the popular German. When carrying out work on a Volkswagen Polo sedan, you don’t even need to remove the plastic shields - they are not here. The spacer mounts are easily accessible from the side when the wheels are removed.
Now let’s look at changing the stabilizer bushings for the Kia Sid. For this repair you will need:
- spanners;
- ratchet heads;
- penetrating lubricant.
We also begin work from the inspection hole.
- Here, too, everything is much simpler. The bracket bolts are easier to reach. We only remove the crankcase protection.
- We treat threaded connections with penetrating lubricant.
- Unscrew the lower and upper bolts of one bracket.
- Unscrew the lower and upper bolts of the second bracket.
- We separate the unscrewed staples, move them and take out the leaky rubber (or polyurethane) tabs. We install new spare parts.
- Let's put everything back together.
Here we add that changing the stabilizer bushings on the Mitsubishi Lancer 9 is done in a similar way. Moreover, on this car on the right you don’t even have to remove the wheel if you have a long wrench with a “12” head on hand. Next, let's see how the replacement is carried out on a Mazda 6. It is necessary to prepare the following tools before repairing:
- spanners;
- ratchet heads;
- penetrating lubricant.
We also start from the inspection hole.
- Remove the front wheels by lifting the car.
- Spray the threaded connections with penetrating aerosol.
- We unscrew the rear fastenings of the subframe, and then lower this part of the part.
- Unfasten the steering rack, then move it slightly.
- Now unscrew the bolts of the brackets of the faulty elements.
- We are replacing the bushings on the front stabilizer.
- We do the assembly in reverse order.
This concludes the procedure. It should be added that, for example, in the Tiguan, when replacing stabilizer elements, part of the subframe is also lowered.
What to do with other popular cars
- wrenches and socket wrenches;
- penetrating aerosol.
As you can see, the technology is simple. By the way, when replacing defective elements of the rear stabilizer of this car, you don’t even need to jack up the rear part. It is even easier to perform a similar operation there.
Now let’s figure out how to replace bushings on a Chevrolet Lacetti. We should prepare:
- wrenches and socket wrenches;
- penetrating aerosol.
- Jack up and remove the front wheels.
- We treat all threaded connections with a penetrating aerosol and wait a few minutes.
- We dismantle the rods by unscrewing two of their fastenings - if they do not give in, you can tap the key with a hammer.
- Next, we proceed to unscrew the rod mounts. One of the bracket bolts gives in from the inspection hole. But the second one can be unscrewed from above, through the engine compartment, using several extensions and a socket. Otherwise, if you abandon this method, you will have to dismantle the beam.
- We do the same with the second gasket bracket.
- Next, we replace these stabilizer bar bushings.
- When we attach the parts back, it is better to immediately install new rods so as not to have to deal with these units again after a short run.
This is where the procedure ends.
About the choice of jet thrusts
Traction "Track"
The product is very popular among owners of the “Seven”. These rods are distinguished by their high reliability and high price, which starts from 2100 rubles per set.
Trek thrusters are distinguished by high reliability and high price
The main difference between Trek is the heads for the bushings. Firstly, they are large, and secondly, they are attached to the rods by welding. The silent blocks on Tracks are also made of especially dense rubber, which significantly extends their service life.
Read more: Skoda Octavia 2022: configurations and prices for Russia, new body, photos, videos
Rods "Cedar"
Kedr rods have an affordable price and mediocre quality
The quality of Kedr is somewhat inferior to Trek. This is especially true for bushings and silent blocks. All this wears out quite quickly, and therefore they will have to be changed more often. But there is also a good side - a reasonable price. A set of “Cedar” rods can be purchased for 1,700 rubles.
Belmag rods
Despite the simplicity and reliability of Belmag rods, they have one significant drawback: they are not so easy to find on sale. Every year they are found less and less often on the shelves of auto parts stores. But if the car owner still manages to find them, then he can be congratulated, since he got a reliable product at a reasonable price. The cost of Belmag rods starts from 1800 rubles per set.
Today it is not so easy to find Belmag rods on sale
So what should a driver choose from all of the above?
The answer is simple: the only criterion for choosing jet rods is the thickness of the car owner’s wallet. If a person is not short on funds, the best option would be to purchase Trek rods. Yes, they are expensive, but installing them will allow you to forget about problems with the suspension for a long time. If you don’t have enough money, it makes sense to look for products on the shelves. Well, if this idea is not crowned with success, there remains a third option - “Cedar” rods, which are sold everywhere.
Here we should say a few words about fakes. Knowing that car owners most often choose products from the three above-mentioned companies, unscrupulous manufacturers are now literally flooding the shelves with counterfeits. Moreover, in some cases, the fakes are made so skillfully that only a specialist can identify them.
Structural features of the mechanism.
The strut provides a reliable and constant relationship between the wheels and the stabilizer beam; to put it simply, it is intended to create a movable connection between these suspension elements. Let's consider options for connecting struts with other suspension parts, their design and features:
- Ball joints are one of the simplest and most common connection methods, which ensures full movement of the joints. Balls are constantly under high load, as a result of which they wear out quickly. The stabilizer link, being a movable structural element, is constantly exposed to centrifugal force, due to which it can stretch, compress and twist. Often, ball joints are used in a stabilizer with a complex beam design. The element is beyond repair and requires replacement.
- The earrings have a primitive but durable design, which consists of a stud with rubber elements secured to it using lock washers. Between the rubber stops are the eyes of the stabilizer beam and the suspension arm. The earrings can withstand constant high loads and are easily repaired.
- Silent block is a rubber-metal hinge movable within one plane. It has a good service life and good maintainability, but it is not suitable for use in suspensions with a complex design.
Dependent suspension
Dependent suspension is characterized by the dependence of the movement of one axle wheel on the movement of the other wheel.
The transfer of forces and moments from the wheels to the body with such a suspension can be carried out directly by metal elastic elements - springs, springs, or using rods - rod suspension.
Metal elastic elements have a linear elastic characteristic and are made of special steels that have high strength under large deformations. Such elastic elements include leaf springs, torsion bars and springs.
Leaf springs are practically not used on modern passenger cars, with the exception of some models of multi-purpose vehicles. It is possible to note models of passenger cars that were previously produced with leaf springs in the suspension, which continue to be used at the present time. Longitudinal leaf springs were installed mainly in the dependent wheel suspension and served as an elastic and guiding device.
On passenger cars and trucks or minibuses, springs are used without springs, on trucks - with springs.
Springs as elastic elements are used in the suspension of many passenger cars. In the front and rear suspensions produced by various companies of most passenger cars, helical coil springs with a constant cross-section of the rod and coil pitch are used. Such a spring has a linear elastic characteristic, and the necessary characteristics are provided by additional elastic elements made of polyurethane elastomer and rubber rebound buffers.
On Russian-made passenger cars, cylindrical coil springs with a constant cross-section of the rod and pitch in combination with rubber bumper buffers are used in suspensions. On cars from manufacturers in other countries, for example, the BMW 3 Series, a barrel-shaped (shaped) spring with a progressive characteristic, achieved through the shape of the spring and the use of a variable-section rod, is installed in the rear suspension.
On a number of cars, a combination of cylindrical and shaped springs with variable rod thickness is used to provide progressive characteristics. Shaped springs have a progressive elastic characteristic and are called “miniblocks” due to their small height dimensions. Such shaped springs are used, for example, in the rear suspension of Volkswagen, Audi, Opel, etc. shaped springs have different diameters in the middle part of the spring and at the edges, and miniblock springs also have different coiling pitches.
Torsion bars, usually of round cross-section, are used on cars as an elastic element and stabilizer.
Elastic torque is transmitted by a torsion bar through splined or tetrahedral heads located at its ends. Torsion bars on a car can be installed in the longitudinal or transverse direction. The disadvantages of torsion bars include their large length, necessary to create the required rigidity and suspension travel, as well as the high alignment of the splines at the ends of the torsion bar. However, it should be noted that torsion bars have a low weight and good compactness, which allows them to be successfully used on middle and high-class passenger cars.
Traction properties
The traction properties (traction dynamics) of a car determine its ability to intensively increase its speed. The driver’s confidence when overtaking or driving through intersections largely depends on these properties.
Traction dynamics are especially important for getting out of emergency situations when it is too late to brake, difficult conditions do not allow maneuvering, and you can avoid an accident only by getting ahead of the events
Just as in the case of braking forces, the traction force on the wheel should not be greater than the traction force with the road, otherwise it will begin to slip. The traction control system (TBS) prevents this. When accelerating the car, it slows down the wheel, the rotation speed of which is higher than that of the others, and, if necessary, reduces the power developed by the engine.
McPherson suspension
A similar design is named after the engineer Earl McPherson, who developed it in 1960. In the language of car enthusiasts, it is also called a “pumping spark plug.” The device is represented by one lower arm, a block of a spring element, and a stabilizer bar.
A special feature of this type of suspension is the use of a shock-absorbing strut, which is what is popularly called a candle. It consists of a shock absorber and a spring. At the bottom, this component part is attached to the wheel hub, and at the top it is fixed to the support (glass) of the car body.
This type of car front suspension performs several important tasks at once. The stand not only absorbs and dampens vibrations, but also serves as a fastener for the wheel to the vehicle body. The functionality of the wishbones is to provide a movable connection between the wheel and the car body, as well as to prevent its longitudinal movement. As for the stabilizer, it is, in fact, a torsion bar, which has an equally important role - to counteract the torsional force.
McPherson suspension is used not only for the front axle, but also for the rear axle, which determines its enormous popularity. Its advantages include compact size, simplicity of design, and reliability. As for the minuses, this is a change in the camber angle with a significant wheel travel relative to the car body.
Vehicle handling
Controllability is the ability of a car to move in the direction specified by the driver.
One of the characteristics of handling is steering - the ability of a car to change the direction of movement when the steering wheel is stationary. Depending on the change in the turning radius under the influence of lateral forces (centrifugal force during a turn, wind force, etc.), the steering can be:
- insufficient - the car increases the turning radius;
- neutral – the turning radius does not change;
- excessive - the turning radius decreases.
There are tire and roll steering.
Tire steering is associated with the ability of tires to move at an angle to a given direction during lateral slip (displacement of the contact patch with the road relative to the plane of rotation of the wheel). When installing tires of a different model, the steering may change and the car will behave differently when cornering when driving at high speed. In addition, the amount of lateral slip depends on the tire pressure, which must correspond to that specified in the vehicle’s operating instructions.
Roll steering is due to the fact that when the body is tilted (roll), the wheels change their position relative to the road and the car (depending on the type of suspension). For example, if the suspension is double wishbone, the wheels tilt to the side of the roll, increasing the slip.