Description of the nuances of assembling a 12 Volt voltage stabilizer for a car, a list of necessary parts, 3 circuit options. + TEST for self-test. We will analyze the TOP 5 questions on the topic and the TOP 3 soldering irons for boards.
TEST:
To understand whether you have sufficient information about car stabilizers, you should take a short test:
- Why install a 12-volt stabilizer on your vehicle? a) The vehicle’s network produces an inconsistent voltage. This depends on the state of charge of the battery. The voltage ranges from 11.5 - 14.5 Volts. But LED bulbs only require 12 volts. To supply the required voltage, SN is installed. b) LED lamps operate at 18 Volts. In order for them to function when connected to a car, additional load has to be supplied through a stabilizer.
- Why do LED light bulbs often burn out without a stabilizer? a) The main reason is a low-quality LED manufacturer. b) Due to surge voltage on them.
- In what case will it be necessary to additionally connect an aluminum radiator to the stabilizer? a) If more than 10 LEDs are installed on the car. b) When installing LED lamps of different colors on the car.
- How are LEDs connected? a) 3 LEDs are connected in series to a resistor, and then the assembled set is connected in parallel to the next LEDs. b) 3 LEDs are connected in parallel to a resistor, and then the assembled set is connected in series to the next LEDs.
Answers:
- a) Depending on the state of charge of the battery, the LED lamps will receive a fluctuating voltage - from 11.5 to 14.5. That is why the MV is connected to the lamps - to obtain a constant voltage of 12 Volts (this indicator is needed for LEDs).
- b) LEDs are not designed for voltage surges that come from the battery, so they soon burn out without a stabilizer.
- a) If more than 10 LEDs are installed on a car, then it is advisable to equip the circuit with an aluminum radiator.
- b) First, 3 LEDs are connected in series to a resistor, and then they take a new coupler and connect them in parallel to each other.
Car owners often install LED lighting on their cars. But light bulbs quite often fail, and all the created beauty immediately fades. This is because LED bulbs do not work properly if they are simply connected to an electrical outlet. For them it is necessary to use special stabilizers. Only in this case will the lamps be protected from voltage surges, overheating, and breakdown of important components. To install a voltage stabilizer on your car, you need to understand this issue in detail and study a simple circuit that you can assemble with your own hands.
Definition: CH 12 volt for a car is a small device designed to dampen excess voltage in a car coming from the battery. As a result, the connected LED lamps receive a constant load of 12 volts.
Selection of 12 V stabilizer
The car's on-board network provides power from 13 V, but LEDs need only 12 V to operate. That is why it is necessary to install a voltage stabilizer, which will provide exactly 12 V at the output.
By installing such equipment, it will ensure normal conditions for the operation of LED lighting, which will not fail for a long time. When choosing stabilizers, motorists are faced with problems, since there are so many designs, and they all work differently.
You should select a stabilizer that:
- It will function correctly.
- Provides reliable protection and safety of lighting equipment.
Important details you need to know
You can also highlight paragraph 5, subparagraph 12, which says that the main headlights (the so-called headlights) themselves should be turned on only after the side lights have been turned on. An exception can be considered those moments when the side lights turn on briefly as signals (flashing).
Despite the fact that this does not seem particularly important at first glance, when connecting daytime running lights yourself, you will have to take into account all these nuances and delve into them.
However, there are many car enthusiasts who claim that stabilization is completely unnecessary and their DRLs work perfectly without it. They argue that installing a stabilizer will be a waste of time and there is no difference between “empty” DRLs and DRLs with a stabilization unit. And, it seems, connecting daytime running lights is just an additional expense.
As a result, you will get reduced brightness of the daytime running lights and their immediate task (the reason for which you installed them) - warning drivers from oncoming traffic - will not be performed effectively enough.
Using LED daytime running lights without an additional stabilization unit, you will need to replace them almost annually, or even more often, while their direct function will be performed worse. Is it worth being lazy and saving a couple of hundred rubles because of this?
Expert opinion
It-Technology, Electrical power and electronics specialist
Ask questions to the “Specialist for modernization of energy generation systems”
Refinement of running lights com you can find several options for control units for daytime running lights, which have a pleasant price tag and many positive reviews. Ask, I'm in touch!
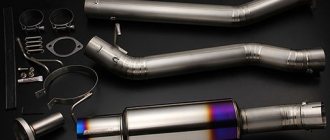
A simple 12 V voltage stabilizer with your own hands
If you have even minor skills in assembling an electrical circuit, then it is not necessary to purchase a voltage stabilizer ready-made. To make a homemade device, a person will spend 50 rubles or less; a ready-made model costs slightly more. There is no point in overpaying, since the result will be a high-quality device that meets all the necessary requirements.
The simplest but most functional stabilizer can be made with your own hands without much effort. It is very difficult to assemble a pulse device, especially for a beginner, and therefore it is worth considering linear stabilizers and amateur circuits for it.
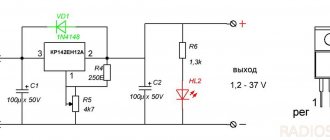
The simplest 12 volt voltage stabilizer is assembled from a (finished) circuit, as well as a resistance resistor. It is advisable to use the LM317 chip. All parts will be attached to a perforated panel or universal printed circuit board. If you assemble the device correctly and connect it to your car, you can provide good lighting - the lights will stop blinking.
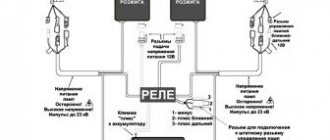
LM317 circuit
Connection diagram
Manufacturing recommendations
For manufacturing, you will need electronic components for the selected circuit. You can purchase them in specialized stores or online. For a device based on an integrated linear stabilizer, a housing is not needed, but you need to take care of the radiator. You will also need a radiator when making a ruler using discrete elements. More complex devices must be assembled on boards. Those skilled in home technology will be able to design and etch the PCB themselves. For the rest, it is better to use a breadboard - cut off the required piece and mount the elements on it.
Breadboard mounting.
You also need to select or assemble the case, not forgetting about heat dissipation. Heat-shrinking the board is not the best option in this regard. You will also need a soldering iron with a set of consumables.
It is difficult to give general manufacturing instructions - it all depends on the chosen scheme and preferred technologies. But we can give some advice to those who have little experience in the manufacture of electronic devices:
- all connections must be carefully soldered (being careful not to overheat the elements and conductors in the insulation) - operating conditions will be associated with shaking and temperature changes, and poor-quality soldering will immediately make itself felt;
- the body of the structure must prevent water and dirt from getting inside - when installing the device under the hood, these substances will be sufficient;
- if the case is not used, the soldering points must be carefully isolated - for the same reasons;
- After assembly and performance testing, it would not be superfluous to coat the board on the solder side with varnish and dry it.
Only a careful approach to manufacturing can guarantee at least some long-term operation of a homemade product in harsh conditions.
12V MV Parts List
To make a voltage stabilizer with your own hands, you should find or buy the following parts:
- Board - 35 by 20 mm.
- Chip LD 1084.
- RS407 diode bridge. If this is not the case, then we select any small diode intended for reverse current.
- Power supply with a transistor and two resistances. This equipment is needed to ensure that the end is turned off when the low or high beam headlights are turned on.
Three LEDs must be connected in series with a current-limiting resistor that equalizes the electric current. This set should then be connected in parallel to the next set of light bulbs.
My experience
My friend has a VAZ PRIORA, and he is a fan of putting LED lamps in the dimensions, headlights, etc. They really didn’t walk for a long time without such stabilizing elements (a couple of months, that’s all). Now one set of cheap options has been running for three years, and all thanks to stabilization!
There are also disadvantages: such elements are placed in the break of the wire that goes to the source; “IN” and “OUT” are even indicated there where the wire should be connected and where to output it. The cost for 5 pieces is approximately 160 rubles, that is, each one is about 30. A friend set it to 11.8V, connected the wires to the boards and filled them with a glue gun, now they are not afraid of moisture.
Personally, I myself bought such boards and experimented with them, I have a power supply that produces from 15 to 24V. From it I powered two wires and connected them to the module, and from there to the LED, I set it to about 11.9. And you know, no matter how I switched the voltage in the power supply, behind the board it remained stable at 11.9V without any jumps (the whole experiment will be on video).
So the conclusion is that you can buy stabilizers (about 30 rubles apiece), the light bulbs themselves (about 50 rubles apiece) and in TOTAL you get an option for 80 - 100 rubles that will work for a very long time (3 years for sure).
Now we are watching the video version
Here is the material, I think it was useful to you, subscribe to the site and the channel will have many more interesting videos. Sincerely yours, AUTOBLOGGER.
Similar news
- Why does the alternator belt whistle? When cold or under load. ...
- How to install xenon. Is it possible to do this in the headlights of a regular car...
- How to check a fuse in a car. We use a multimeter (test...
Add a comment Cancel reply
How to make a 12-volt voltage stabilizer for LEDs in a car using the L7812 chip
To assemble a high-quality voltage stabilizer, you can use a three-pin DC voltage regulator, available in the L7812 series. This device will power not only individual light bulbs in a car, but also an entire strip of LEDs.
L7812
Components:
- Chip L7812.
- Capacitor 330 uF 16 V.
- Capacitor 100 uF 16 V.
- 1 amp rectifier diode. You can use a 1n4001 or a Schottky diode.
- Heat shrink 3 mm.
- Connecting wires.
Assembly order:
- We slightly shorten one leg of the stabilizer.
- We use solder.
- We add a diode to the short leg, and then capacitors.
- We place heat shrink on the wires.
- We are soldering wires.
- We put on the heat shrink and press it with a hair dryer or a lighter. It is important not to overdo it and not melt the heat shrink.
- We supply power to the input on the left side, and on the right there will be an output to the LED strip.
- We carry out a test - turn on the lighting. The tape should light up, its service life will now increase.
This is how you make a 12V voltage stabilizer with your own hands.
Use for connecting side lights and low beam headlights
The next connection option is to use side lights and low beam headlights in the circuit, which are themselves connected to the power circuit.
The current consumption in this implementation is very small (calculated in mA), so the LEDs emit light when the car is turned on, but the spiral from the chassis does not light up.
What kind of lighting do you prefer?
Built-in Chandelier
If the driver turns on the headlights, then the voltage increases, the potential difference, on the contrary, decreases, the LEDs turn off, but the DRLs themselves turn on.
The scheme for connecting daytime running lights to the dimensions also has a number of disadvantages, and they cannot always be neglected.
- The chassis is independent of the engine and continues to operate when the engine is turned off. This is contrary to GOST.
- This circuit does not work if your DRLs have their own LEDs.
- The circuit will not work correctly when using very powerful LEDs.
- In order for the circuit to work correctly and to avoid a short circuit, it is necessary to install an additional fuse on the circuit.
A number of disadvantages can be mitigated by using a few tricks. For example, if you take the positive wire that relates to the LED module, not directly with the battery positive, but through the ignition positive, then the first point will become invalid and the running gear will not work when the engine is turned off.
Another option, similar to connecting through side lights, is connecting to a circuit with a low beam lamp. It works like this: if the low beam lights up (the driver turns it on manually), then the DRLs go out at the same moment. The rest of the time they work.
This scheme is worse than connecting to a circuit with side lights, because in addition to the fact that it retains all the points of shortcomings from the list above, in addition it is a direct violation of not only GOSTs, but also traffic rules.
According to traffic regulations, it is prohibited to use DRLs when parking; only side lights are used for this function.
It is also important to know 3 nuances on how to assemble a 12 volt voltage stabilizer with your own hands
- It is advisable to connect LEDs through a current stabilizer. In this way, it will be possible to balance the fluctuations in the electrical network, and the car owner will not worry about current surges.
- The power supply requirements must also be observed, since, in this way, your self-assembled stabilizer can be correctly adjusted to the electrical network.
- It is advisable to assemble a unit that will provide decent stability, reliability and stability - the stabilizer should last for many years. That’s why you shouldn’t cheap out on components – buy them in good electronics stores.
Schemes of simple stabilizers
DRL controller: DIY options, step-by-step instructions
- Dimensions. The selected stabilizer must be compactly placed in its planned installation location with normal access.
- View. Of the commercially available devices, the most reliable, compact and inexpensive are stabilizers based on small microcircuits.
- Possibility of self-repair. Since even the most reliable devices fail, it is necessary to give preference to repairable stabilizers, radio components for which are commercially available in sufficient quantities and at an affordable price.
- Reliability. The selected stabilizer must provide a constant voltage value without significant deviations from the range declared by their manufacturer.
- Price. For the electrical system of a car, it is enough to purchase a device costing up to 200 rubles.
How to avoid 3 mistakes when soldering a circuit
- Before starting all soldering work, be sure to select the most suitable soldering machine for assembling the microcircuit. The old one lying at home or in the garage is suitable only for experienced people, but a beginner will ruin the board, unable to cope with the power. The most suitable voltage range for connecting boards and wiring is 15-30 watts. We don’t use more power, otherwise the board will burn out and you’ll have to start all over again with new parts.
- Before you start connecting parts by soldering, make sure that the circuit is well cleaned. For high-quality processing, a simple composition is used - any soap is mixed with clean water. Afterwards, a clean napkin is dipped into the prepared solution and the board is wiped very efficiently over the entire surface. If there are traces of soap left on the metal, wipe them off carefully with a dry cloth. Quite dense deposits are often noticed on boards. To get rid of them, you will have to go to an electrical store and buy a special cleaning composition. The sellers will tell you everything you need. We process the area until a slight metallic sheen appears.
- We place the contacts on the board in the correct sequence - first we work with small resistors, and then move on to large parts. If you first attach all the large parts, then the small parts will become very inconvenient to attach - large components will get in the way.
Don't neglect the advice. They will allow you to create a better connection, and hence the durability of the stabilizer.
Choosing a belt for the machine
I’ll try not to pour water, but will briefly look at what to look for when choosing an LED strip
LED Matrix Type
LED interior lighting. To illuminate the car interior, including the trunk, choose SMD 3528 60pcs/m (the size of one LED crystal is 3.5x2.8mm). Why she?
Firstly, we get an average power of 4.4-4.8 W per linear meter with a luminous flux of about 250-300 Lm. With such power, LEDs do not require heat dissipation and the LED strip can be easily mounted on plastic elements. And the luminous flux is sufficient to fully illuminate any interior elements.
Secondly, this is the most common tape on sale, we buy it in the first store we come across.
Options like SMD 5050, 5630, 5730 are not suitable due to their high power. Unpleasantly high brightness and the need to mount a heat sink make them not the best choice for LED car interior lighting.
Exterior car lighting. Here we turn on the head. If there is LED lighting under the bottom of the car, you can choose more powerful LEDs - SMD 5050 30/60 pcs/m. The aluminum profile will be our heat sink (more about installation later). For LED illumination of license plates or (God forbid) headlights, this is a bad choice. Such LED lighting will be a bait for traffic police inspectors (read about installation rules and fines at the end of the article).
Regular LEDs or RGB - there is no difference. RGB is a little more expensive, it is more difficult to connect and requires an additional control controller (read more about connecting an RGB strip). But it allows you to change the backlight color.
Protection class
There are mainly three protection classes on sale - IP20, IP65, IP68.
- IP20 – open tape without protective coatings, suitable for use indoors in dry rooms. Afraid of moisture, dust, and any mechanical influences.
- IP65 – with a protective silicone layer that can protect against condensation.
- IP68 - sealed, waterproof LEDs that can be placed on the bottom of the car.
LED class IP68 For LED illumination of the glove compartment or the bottom of the dashboard, IP20 is also suitable if no one pulls it or pours water on it. For illumination of other elements, IP class 65-68 is desirable.
TOP 3 soldering irons for circuit boards
To simplify the work of soldering the stabilizer, it is advisable to buy a high-quality soldering iron. The stores have units from good and trusted manufacturers that you should pay attention to:
- Ersa is a German company. The product is very good and reliable, but expensive, and therefore not everyone can afford it for their home.
- Chinese company Quick. The quality is excellent and the price is reasonable.
- Luckey. The most budget option. Do not leave the device turned on unattended - it may cause a fire.
A 10 W soldering iron is enough to make a simple microboard. When purchasing, examine the handle - it should not heat up quickly. Wood is an ideal option. Plastic will quickly become hot, hard rubber is heavy, and therefore difficult to work with small parts.
It is advisable to choose a tip made of copper - it is easy to clean off carbon deposits after work. The stings come in different shapes and are sold in sets. This will not be useful for a beginner, but experienced people will find it convenient to use attachments of different configurations.
Voltage stabilizers for cars
Testing homemade LED headlights
After about 2 hours of testing, the system reached a temperature of about 35 degrees, that is, despite the use of resistors instead of chip inverters, much less than an equivalent incandescent lamp.
The uniformity of backlight shades is not ideal. The lower part of the headlights is good - the diodes shine perfectly with rows of lenses and illuminate evenly. Higher up - due to the tilt of the glass LEDs, the light begins to scatter a little, and the brightness depends slightly on the viewing angle.
It would have been possible to customize the LED strips in stages, but the priority was to provide a reasonable cost-to-effort ratio that would completely satisfy the car owner.
- After a month of testing, when the car traveled about 2 thousand kilometers, not a single LED burned out. Let's see how it goes next.
- After a year of driving, when the car traveled about 10,000 km, one diode was burned out and one strip went out. Probably turned out to be defective.
The time investment for these car tail lights is 3 days to 2-3 hours a day, and the cost of materials for both lamps is 3000 rubles - this is very good.
—>Auto parts and service stations —>
And so, today we will talk about LEDs... Modern technologies do not stand still, and not so long ago LEDs joined the competition with conventional incandescent and gas-discharge lamps. It is worth noting that the technology itself is far from new, it is about a century old. Previously, LEDs were used for display, and only later, gradually, starting with illumination of something, the technology switched to lighting. Of course, the LED itself has undergone some changes during development, from optical changes to cooling systems.
Click on image to enlarge
Briefly about LEDs:
An LED or light-emitting diode is a semiconductor device with an electron-hole junction that creates optical radiation when electric current is passed through it in the forward direction.
The light emitted by an LED lies in a narrow range of the spectrum. In other words, its crystal initially emits a specific color (if we are talking about LEDs in the visible range) - in contrast to a lamp that emits a wider spectrum, where the desired color can only be obtained by using an external light filter. The emission range of an LED largely depends on the chemical composition of the semiconductors used.
LED blinking, problem?
Having studied various correspondence on automotive-related forums, we can conclude that a huge part of car enthusiasts are faced with the problem of blinking LED lamps in their cars. As a rule, these are car enthusiasts who are trying to improve interior lighting with their own hands, modernize side or lighting headlights.
Chaotic blinking followed by failure of the lamp irritates the driver, and the question arises in his head: “Why did this happen?” After all, on the packaging of LED lamps there is a bright inscription: “Service life - 30 thousand hours.” To deal with such reasons and find the answer, you need to understand how and what to properly “feed” the LED in a car...
Correct LED activation
The most important parameter of an LED is the rated current consumption, that is, the current at which the manufacturer guarantees optimal light output during the stated life of the product. Ideally, the function of the current limiter should be performed by a current stabilizer built into the lighting device. However, often this same stabilizer is not there. In large-sized devices, the situation can still be corrected. But what about small, low-power LED lamps that are often installed in side lights, dashboards, or various small-sized devices inside a car? The body of these devices is too small even to install a primitive current stabilizer. To solve this problem, special external stabilizers have been developed, but for various reasons, most car enthusiasts for some reason avoid such products. Perhaps some are not aware of the possible consequences, others avoid additional costs, others listen to sellers, for whom the main thing is to sell the product.
It couldn't be simpler
This is the simplest scheme, which involves connecting to a battery or generator as a power source.
The scheme provides that the DRLs will be activated simultaneously with the engine starting. The point is to connect the plus to the positive terminal from the ignition switch of your Renault Logan or the same Lada Largus, and fix the minus on the car body in any convenient place. Everything looks simple and extremely logical. But you should not rush to conclusions, nor should you make such a connection. After all, it has an obvious drawback.
If the system is assembled according to this scheme, the diodes from the DRLs will start working constantly while the key is in the ignition switch. There is no question of any coordination with other headlights here. Therefore, such a connection contradicts GOST and traffic regulations.
Other less popular methods
Many people are interested in how to connect DRLs without a relay on their own, but it depends on the electrical system of your car; look for a solution in online clubs dedicated to your car. The most important thing is that power is supplied to this place after the engine starts.
The basic diagram for connecting the DRLs is through a 4 or 5 contact relay, which turns off when the low one is turned on. Those who are not too lazy to rummage through the car’s wiring can connect it from the oil pressure sensor or generator. On any vehicle, when the engine starts, the oil pressure light on the dashboard lights up, the signal from this wire is used to supply power. The second way to connect running lights yourself is to connect to a generator. They will turn on automatically when voltage appears on the generator.
Operating mode
According to technical regulations for cars, DRL should automatically turn on when the engine starts. When you turn on the low beams, they should turn off automatically so as not to dazzle at night.
There are also combined models with installed turn signals on sale. The turn signal duplication section is connected separately in parallel to the standard turn signals. Having a stable diet is also a must.
DRL with turn signal
For models with additional control, there is a follow-up backlight function that operates for 10 minutes after the engine is turned off. It illuminates your path to your home or dugout, depending on where you live. Osram DRL has a mode in which they do not turn off, but dim by 50%. I just don’t know how legal it is and whether it will cause blindness.