Wheel bearing diagnostics, causes and signs of failure
Let us briefly list the signs of this breakdown:
- Noise when driving from the front (right or left), and when turning there is also a noise or howling.
- Vibration in the interior is a sign that repairs are required, as the lubricant may have dried out or a lot of dirt has entered.
- A grinding or crunching sound means that the front wheel bearing has already fallen apart.
Before jumping to conclusions, do a step-by-step diagnosis:
- Jack up the side where there are characteristic signs, but before doing this, remove the wheel.
- Rotate the disk by hand; if there is a “rolling” sound or other noise, a replacement is needed. When the product is in good working order, rotation is smooth, without jamming or noise.
- Remove the brake disc, check the hub play by moving it by hand in the axial direction - if you feel the movement without measurements, then the front hub bearing needs to be replaced.
Advice:
Before disassembling the unit, try tightening the hub nut, then do the diagnostics again. There is a high probability that the noise will go away, but this will not last long, at least it will allow you to drive another 100-200 km.
Reasons for failure:
- Not economical driving, over pits and potholes in the asphalt.
- Frequent overheating of the mechanism.
- Damage to the boot, contamination of the spare part from the inside.
- Wear of the product according to the warranty service life (60 thousand km stated).
- Malfunction of other elements (the brake disc is unbalanced, the rotating mechanism is worn out or the wheels are unbalanced, etc.).
Be sure to watch the video on how to check a wheel bearing:
How to check a wheel bearing
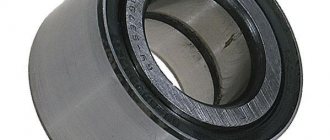
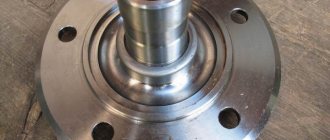
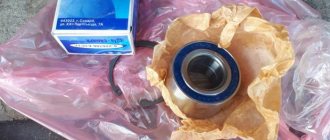
Bearing sizes
The article contains a photo of the VAZ-2108 front wheel bearings, as well as a drawing of a puller indicating all dimensions. Therefore, if you are in doubt whether you purchased the right roller, check the dimensions of the hub. The part number is 256907.
The dimensions of the element are:
- The outer diameter of the holder is 64 mm.
- Inner diameter – 34 mm.
- Weight – 445 g.
- Balls with a diameter of 9.525 mm are installed inside.
- The total number of balls is 28.
- The unit is designed to operate at rotation speeds above 6000 rpm.
In any car store, salespeople will be able to advise you on the best quality product.
Three ways to replace the front wheel bearing on a VAZ 2109 with your own hands
There are three popular methods that vary in speed and quality of replacement. Depending on your needs, choose the replacement option that suits you. Before performing any operations, familiarize yourself with the unit structure.
| P.P. | Designation | Name |
| 1 | 2108-3001014 | Steering knuckle |
| 2 | 2108-3001060 | Inner anti-splash ring |
| 3 | 2108-3001061 | Dirt-proof steering knuckle ring |
| 4 | 2108-3103032 | Lane bearing retaining ring. |
| 5 | 21080-3103020-02 | Bearing 256907 front hub |
| 6 | 2108-3103012 | Hub |
| 7 | 2108-3103061 | Front hub mud ring |
| 8 | 2108-3103079 | Hub washer |
| 9 | 2108-3103065 | Hub cap |
| 10 | 2108-3103068 | O-ring for hub cap |
| 11 | 2110-3103065 | Hub cap |
| 12 | 1/40442/71 | Hub nut |
Preparatory activities before replacement
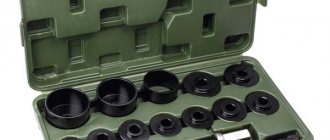
Regardless of the chosen replacement option, you will need a minimum set of tools:
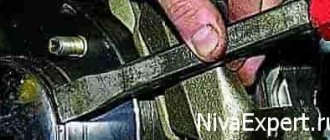
- Large screwdriver.
- Keys: 17, 13, 10.
- Hexagon 10.
- Hammer and chisel.
- A long 30mm wrench or a 30mm socket with a knob.
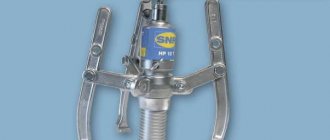
- Wheel puller for VAZ (photo).
- Mandrels (or heads) for knocking out the old part from the hub.
- Torque wrench.
We prepare the car, place it on a flat surface, you will also need bright lighting. You will complete all the work faster with an assistant, and also if you use an inspection hole (overpass). Put the car in first gear, and be sure to put chocks under the rear wheels.
Advice:
The first, more efficient and high-quality replacement option is recommended for work, since pressing in and out is carried out using a removable device, in a shock-free manner.
Stages of work
Work begins with the car being placed in a comfortable position and in first gear. To prevent it from rolling, it is better to install special wheel chocks under the wheels.
Now you can go down into the inspection hole and begin actions that are carried out in the following order:
- Using a wrench, unscrew the wheel bolts, followed by unscrewing the bearing nuts from the front wheel hubs with a 30mm wrench. It is worth noting here that if a VAZ 2110 car has alloy wheels, you will have to remove the wheels. In order to turn the front hub nuts, you must press the brake pedal at the moment of turning, so an assistant is needed here;
- Now you need to use a screwdriver and use it to press out the calipers;
- As soon as they are pressed out, you need to use the 17th key to unscrew the calipers from the steering knuckles. As a result of these manipulations, the caliper may hang on the brake hose; to prevent this from happening, you must carefully tie it up;
- Next, you need to carefully unscrew the brake discs directly from the hubs.
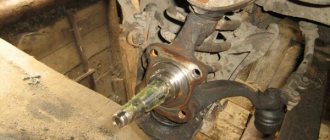
Remove the cap
Unlock the nut on the hub Unscrew the hub nut
Remove the wheel, caliper and brake disc. unscrew the hub nut completely
We screw in the studs and attach the brake disc to them
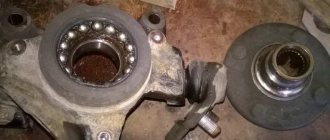
We knock the hub out of the bearing with blows
Remove the bearing from the CV joint
Remove the retaining ring in front of the bearing. Using a puller, press out the hub bearing.
Wheel bearing and puller
Pressing in a new bearing
Press the hub into the bearing
In addition to the listed types of work, you may also need to remove:
- Trunnion assembly;
- Hub cap;
- Retaining ring.
After this, the hub part is available to the master and can be replaced. There are several options for reinstalling a component, so a few words should be said about each.
Replacing the front wheel bearing of a VAZ 2109 - first steps
Regardless of the replacement method, the initial operations will be similar:
- Before putting the car on a jack, it is recommended to loosen the front hub nut.
- Then loosen the front wheel mounts.
- After removing the wheel, unbend the locknut collar.
- Next, tighten the bolts that hold the caliper, top and bottom, one at a time.
- Then use a screwdriver to straighten the pads in the caliper.
- We hang the caliper or move it to the side. Further operations will follow, based on the specific replacement option.
Inspection of the hub and further actions
After removing the part, you must immediately check the condition of the trunnion. If it is seriously damaged, you will have to replace it too. For minor scratches and dirt, it is enough to remove everything with sandpaper. The front hub itself undergoes the same inspection. The presence of cracks and deep potholes indicates the impossibility of its further use. Minor scratches allow the part to be reused.
To remove the bearings, first remove the O-rings on both sides. Then there are the bearings themselves. A special mandrel, hammer and drift will help here. The main thing is not to distort the outer ring to avoid damage to the inner surface. Bearings are removed in a similar way when repairing the rear hub. When both bearings are removed, you need to clean and inspect the inner surface of the part.
If there is serious damage, a new spare part must be installed. If, as a result of an external inspection, it is determined that the cause of the malfunction was the bearings, and the hub itself does not have serious damage, then we install new bearings in the old part after cleaning and lubrication.
If necessary, we purchase a new hub into which we press both bearings. This is done using the same mandrel
Next, we reassemble the entire assembly in the reverse order, paying attention to the wear and performance of the remaining elements of the front suspension. You need to know that the procedure for removing and installing the rear hub is significantly different from the one suggested
If you have ABS, it is important not to forget to check the performance of the gear and install the sensor
How to remove a bearing on a VAZ 2109 using method No. 2 with removing the strut, but without using a puller
The entire structure is removed, along with the steering knuckle. The part is replaced directly on the rack (possibly with a removable device). There is no need to do a wheel alignment.
Execution order:
- Unscrew and remove the steering tip as well.
- After this, you will need to free the strut from the top bolts under the hood.
- We also remove the strut assembly from the CV joint and disconnect it from the car.
- Now we change the part using the methods described above. Either using a puller, or using mandrels to remove and then press in a new front wheel bearing
It is important to know:
It is not recommended to use impact methods, especially when installing a new part. Use the pressing options described in method No. 1 or No. 3.
More details about the operation are presented in the video:
Replacing the front bearing 2108-2110
Nuances
In the process of reassembling the entire node, you must proceed as follows:
- Press in the bearings;
- Install retaining rings;
- Collect your fists;
- Mount new bearing components on them;
- Mount the assembly on the hub;
- Using a mandrel, you need to drive the hubs until they stop.
You can use a puller or press to press in bearing parts. But in no case should you use a hammer, since in this case cracking of the component will inevitably occur. The forces should be directed to the outer rings.
It should also be noted that double-row ball bearings are installed in the hubs, which do not require lubrication and adjustment measures.
Due to the lack of such care, the VAZ 2110 bearings will certainly be destroyed when removed from the hub, so this measure should only be resorted to for a complete replacement.
How to change a part on a VAZ 2109 using method No. 3 without removing the rack and without using a puller
The rotating mechanism assembled with the hub is dismantled. Then the hub itself is knocked out of the axle (possibly with a removable device or a press). It will be necessary to do a wheel alignment.
Execution order:
- After dismantling the caliper, unscrew the two bolts securing the strut.
- Just as described above, we dismantle the rotating mechanism from the ball joints and remove the CV joint. Then, on the table, unscrew the drum from the hub (or do this in advance).
- Remove the protective cover.
- We free the fist from unnecessary elements and clamp it in a vice.
- We knock out the hub, and then the old wheel bearing, or use a vice, press or puller.
- We install the new product, clamp the structure in a vice without distortions, as shown in the photo, and press it into place.
The process is shown in more detail in the video:
Replacing the front wheel bearing of a VAZ
Installation of parts for repair and replacement
Replacing the front hub is not difficult if you have sufficient qualifications. To do this, you need to study its structure and the sequence of work. Then you need to prepare the following tools:
- jack for lifting a car;
- a set of different heads;
- wrenches for “17” and “22”;
- a special puller used to remove ball joints;
- a universal key for unscrewing the wheel.
To ensure safe work, a rigid and reliable support is installed under the vehicle, and the wheels are secured with shoes to prevent rolling. Replacing the rear hub requires the same measures. Removing the front hub of a VAZ 2110 is carried out in the following order.
- Use a punch or screwdriver to remove the protective plastic cap covering the bearings in the center. If it is damaged, you will need to install a new one.
- Using a chisel, the shoulder of the bearing nut is straightened.
- The car is secured using the handbrake and boots. You also need to engage first gear.
- The nut is loosened using a strong 30mm socket.
- The wheel nuts are loosening.
- Both front wheels are supported using jacks or a lift, following the safety precautions described above. It is important to suspend both wheels, otherwise the transverse stabilizer will not allow the hub to be removed.
- We remove the wheel and the brake caliper, which is bolted to the back of the VAZ hub along with the pads, and move it to the side so as not to damage the hose. If you have an anti-lock braking system, the ABS sensor is removed.
- Remove the brake disc. It should move freely, since it is attached only to the wheel studs.
- Completely unscrew the nut from the front hub axle. Remove the support washer.
- Using a little force, we remove the main part. If this does not happen, then you need to pass two diametrically opposed bolts through the brake disc, which are screwed into the holes of the hub. Then pull the disc forcefully.
Return to contents
Choosing a front wheel bearing for a VAZ 2109
The main task when replacing is to ensure a long service life. It’s no secret that the quality of the spare part plays a huge role, and how long the new part will serve you depends on it.
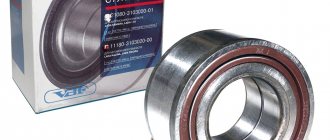
When choosing, be sure to know the exact marking (article or number) of the front bearing. The VAZ 2109 has a double-row angular contact ball type with thick lubricant inside, marking according to GOST - 256907С17 . Foreign equivalent - 309726DA.
Manufacturers of wheel bearings and their articles
| No. | Manufacturer, country | Catalog number | Dimensions, mm | Price, rubles |
| 1 | Pilenga | PW-P 1307 | 34*64*37 | 400 |
| 2 | Torque, Finland | T-12106 | 500 | |
| 3 | Lada (original) | 2108-3103020 | 400 | |
| 4 | ASP Mensan | BCR001 | 540 | |
| 5 | SPZ | 2108-3104020 | 400 |
Read more about manufacturers and prices in the article on replacing front bearings on a VAZ 2110.
It is also useful to read and become familiar with the nuances regarding the dimensions of the part.
It is important to know:
To strengthen the suspension, as well as the reliability and durability of the car enthusiast, roller products are installed in the hub, the marking of which is 537907.
Manufacturers
Many motorists do not know which VAZ-2108 front wheel bearing to choose for their car. Now you can find several manufacturers on the market:
- GPZ-23, Vologda, has the abbreviation VBF. The plant has earned the trust of motorists and is one of the best manufacturers of wheel bearings for domestic cars. Due to the relatively low cost, these parts are practically not counterfeited.
- SPZ, Saratov - according to many experts, the bearings of this manufacturer are the most reliable, durable and high quality. And most importantly - the very low cost of parts.
- GPZ-20, Kursk is no longer engaged in the production of wheel bearings, but you can find products in stores and warehouses.
- Experts do not speak very well of the Samara SPZ-3. The cost of the bearings is very low, but the quality is not great, the service life is very short.
Some auto stores try not to deal with little-known companies that produce low-quality products. Therefore, on the shelves you can only find bearings from Saratov and Vologda.
Replacement procedure
Lubricate
So, we have determined that this cannot be done with a little blood, and the car really needs to replace the bearing. Therefore, we adhere to a clear procedure and begin work.
- Remove the brake drum. There should be no problems with this, since it is fixed quite simply on the rear wheel.
- Pry up the hub cap using a flathead screwdriver and remove it.
- Now, using a narrow chisel, straighten the collar of the nut, which was jammed in two places at once. Don’t be afraid, it wasn’t you who did something, such a jam is provided at production so that the element does not fly out of its rightful place.
- Use a 30mm socket to unscrew the fastening nut.
- Remove the unscrewed nut and also dismantle the thrust washer.
- Arm yourself with a three-legged or two-legged puller, which will allow you to remove the hub from its place.
- If you don't have a three-jaw tool, press out the hub using two bolts or screws. As the practice of craftsmen has shown, bolts for fastening the head of a power unit are excellent for these purposes.
- Screw the screws into the opposite holes for fastening the wheel and rest their ends against the heads of the bolts securing the hub axle to the rear suspension beam of your car.
- Try to tighten the screws evenly to allow the hub to press out. There is no need to remove the pads.
- As a rule, the inner race of the bearing should remain on the hub axis.
- Secure the ring using a puller, then remove it.
- If you don’t have a puller, you will have to additionally dismantle the brake pads and use a chisel to mix the ring to the axle.
- Next, the ring moves. Two mounting blades will help you with this.
- Do not be afraid that after processing with a chisel, some kind of defects or nicks will form on the hub axis. This is not terrible, but it is highly recommended to process them with a needle file.
- Arm yourself with pliers, thanks to which you can carefully remove the retaining ring.
- Using a piece of suitable pipe, also carefully knock out the bearing, leaning on the inner ring.
- Another option is to press it out using a wheel bearing puller.
- Clean and effectively lubricate the hub into which the new rear wheel bearing is pressed with a puller or vice. The pressing force must be applied to the outer ring. It will be most convenient for you to do this using the outer ring from an old bearing.
- Install the new retaining ring in its proper place.
- Using light blows on the inner ring, press the bearing onto the axle. Drive until deep enough to fit the nut.
- Full pressing is carried out with the nut already on.
- Be sure to use only the specified torque to tighten the fastener.
- Press the collar of the nut into the two grooves of your hub axle to restore the element to its original appearance.
This procedure cannot be called incredibly complicated, but you will have to “tinker” in your garage. But this is better and more cost-effective than going to a service station and entrusting your car to unknown specialists.
The good thing about the VAZ 2110 is that you can easily repair it yourself. A number of works are carried out on the basis of the operation and repair manual. But if you do not have experience, or the breakdown is too serious, contact the professionals. It may cost more than doing the repairs yourself, but the quality of the work is above all. This is a guarantee of the safety of your car and your own safety on the road.
Loading …
How to adjust the differential preload of a VAZ 2114
It happens that the blocking begins to lag or does not work at all. The reason is that the preload decreases or disappears altogether. In this case, you should not rush to change the entire assembly; it is recommended to try to increase its value (preload) yourself. To do this, you need to select the required thickness of the adjusting ring and install it in the gearbox housing socket. The whole procedure is quite labor-intensive, so it is recommended to use the vehicle’s operating instructions.
Causes of malfunctions
Due to the design features of the differential and its operational purpose, destructive processes occur due to friction, force loads and other reasons. As a result, active wear of the unit and its elements occurs. The main causes of malfunctions are as follows:
- Bearing wear and damage to their integrity;
- Damage or wear of oil seals;
- Insufficient amount of oil in the transmission, as well as its poor quality;
- Other reasons.
The first signs of problems in the operation of the VAZ 2114 differential:
- Increased noise in the bridge or box;
- Oil leaks;
- Bridge jamming;
- Plays and knocks during inspection;
- And other non-standard operation of the unit and its components.
If you observe abnormal operation of the differential mechanisms, the first thing that is recommended to do is to check all the connections of the unit for tightness and no oil leakage. If the integrity of connections and fastenings is not broken, and signs (noise or disruption of functionality) are present, dismantling and disassembling of the unit is required to identify and eliminate the causes.