If the transverse stabilizer bushings in the suspension fail, this can hardly be called a critical failure requiring immediate repair. Because of this breakdown, the car will not lose control and its wheels will not fall off. But in order to drive a car with broken bushings, the driver will need very strong nerves. Because knocking and grinding noise caused by worn bushings will be heard in any cabin. In this article, we will tell the reader how to replace roll bar bushings in passenger cars, both domestic and foreign, with your own hands.
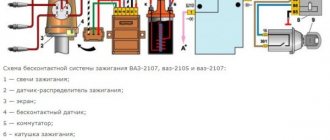
PURPOSE, DESIGN AND PRINCIPLES OF OPERATION OF THE VAZ 2107 STABILIZER
It has already been written above that the SPU is one of the important parts of the car. But why? The answer is simple - thanks to it, driving improves significantly, becoming more comfortable. This device makes it possible to keep the chassis tilt under control without increasing the pressure on the camber of the rear wheels.
The increased control over the vehicle on sharp turns is especially noticeable.
Thanks to the stabilizer, it will be possible to enter such turns at higher speeds without the risk of capsizing.
The roll bar SPU looks like a C-shaped hose that is installed next to the axle. The stabilizer is mounted on brackets with rubber bushings inside.
It is worth noting that the VAZ 2107 stabilizer bushing is the weakest point in the design and breaks most often.
The stabilizer works on the principle of distributing the load between two suspensions.
It works relatively simply - when making a sharp turn, the car can roll. Stabilizer, since one wheel lowers and the other, accordingly, rises. The stabilizer prevents this from happening by twisting the rod and raising the lowered wheel and lowering the raised one. Thanks to this, the car is leveled.
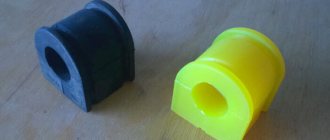
Front stabilizer “Sport” ShS 20 mm, Tehnomaster
Anti-roll bar for VAZ 2108-2115, 2110-2112, Lada Priora cars
Installed to reduce suspension roll and improve wheel traction.
Connecting elements on rubber bushings.
Stabilizer thickness 20mm
Installed without modifications (for cars without lowered suspension)
In warehouse in Samara
Our online store tuningprosto.ru presents a range of stabilizers VAZ cars . An anti-roll bar is a part of a car suspension that connects opposite wheels using an elastic element. The stabilizer is installed on both the front and rear axles of the car. When turning, the centrifugal force tilts the car, the load on the outside wheels increases, on the inside it decreases, and, as a result, the body rolls and sways. All this can lead to the car overturning. To reduce roll when cornering, an anti-roll bar is used. When installing stabilizers , the car's handling improves, the sharpness and accuracy of maneuvering increases, which gives a high level of comfort during dynamic driving.
DIAGNOSTICS
A breakdown can occur for a variety of reasons, so it is impossible to determine the exact time of full operation without breakdowns. Basically it all depends on the operating conditions. For example, if you often drive off-road, the stabilizer will break down often.
Basically, the SPU is checked during annual maintenance, but no one bothers you to do it yourself at any time.
First you need to remove the wheel. After this, use the steering wheel to make a maximum turn in any direction and shake the “bare” stand from side to side with your hand, grasping the middle third. If there are faults, looseness will be noticeable.
Signs of a broken rear stabilizer
The most common signs of failure are:
- Vehicle roll during sharp maneuvers, instability;
- The car begins to sway, as soon as you turn the steering wheel a little to the side;
- If you drive on an uneven road, you will hear a sound from the suspension;
- The car begins to “yaw” when braking;
- If you lower the steering wheel, the car will start to swerve.
How should the stabilizer be positioned?
A correctly installed SPU should twist when the wheels turn.
Therefore, on passenger cars it is strictly forbidden to weld to the frame, since there must always be an intermediate link between it and the wheel. For example, in the VAZ 2107 bushings act as such a link. It is not recommended to use a stabilizer without them.
Causes of creaking stabilizer bushings
Drivers most often complain about bushings creaking either in cold or dry weather. But these are not the main factors and each driver may have his own reasons for this problem. They are individual for everyone. Main reasons:
- The material from which the bushings were made is of poor quality;
- When it freezes, the rubber from which the bushings are made becomes harder and loses its elasticity, which is why squeaks are heard;
- The bushing has simply worn out and can no longer fulfill its direct duties;
- Due to the design features of the car.
Before replacing the anti-roll bar, you need to figure out what the problem is. Most often you just need to replace the rubber bands.
Why does the stabilizer bushing squeeze out?
In fact, the bushing is quite gentle to use. It can wear out pretty quickly. This mainly happens in winter. In cold weather, the bushing freezes, which can cause cracks to appear on it. Various reagents that are used to sprinkle roads during icy conditions can also play a role in this.
If the driver did not notice the problem in time, the cracks continue to grow. Because of this, the bushing begins to lose its elasticity. And so, at the next turn, it can simply be squeezed out of the eyelet. It is no longer possible to return it back - it is too worn out and will not be able to perform its direct functions.
After this, when entering a turn, the motorist may hear a creaking and grinding sound. The vehicle's handling will also decrease.
About double stabilizers
As the name suggests, there are two rods in this stabilizer. But such a device is installed only on the front wheels. Basically there are no fundamental differences.
Thanks to this SPU device, the stiffness of the suspension will increase significantly, which on the one hand is good, but on the other hand, some problems may arise. The fact is that on the classic VAZ 2107 the two front wheels operate independently of each other - that is, if the left front wheel lifts, the right one does not. But due to the installation of a double stabilizer, everything will change - the suspension will become semi-independent and the steering will become much stiffer, and the traction will become worse.
Therefore, before purchasing and installing a double SPU, you need to think carefully - either comfortable driving and good cross-country ability, or no roll.
Double stabilizer for classic VAZ
How to make a double front stabilizer for a classic VAZ (2106, 2107, 2101) with your own hands.
Detailed instructions for the manufacture and installation of a double vase stabilizer - several options. The front double (reinforced) stabilizer increases the vehicle's stability in corners (due to its rigidity) and improves handling. Such tuning of vases will not take much time and will not require much effort, and the effect will be noticeable immediately.
To make it, you will need the following spare parts (you can buy it in a store or at a car market).
— Front stabilizer VAZ 2101 or VAZ 2106 VAZ catalog number — 2101-2906010
— Stabilizer strut 2110 – 4 pieces. VAZ catalog number - 2110-2906050
— Stabilizer bar cushion 2121 V — 2 pieces. VAZ catalog number - 2121-2906040
— Anticorrosive (anti-gravel) and fairy for washing dishes. First you need to prepare the extreme mounts for the second stabilizer to the first.
We remove the rubber bushings from the stabilizer struts 2110
Then we cut the racks with a grinder and weld the rings (which are in the photo above) in two pieces (that is, we cut 4 racks and leave 4 rings). Then we insert the rubber bushings back (the fairy will help us in this difficult task). This is what happens
Now we take a new stabilizer and trim it from each edge by 7-8 centimeters. We remove the fastenings to the spar from it, that is, only the stick remains without any canopies.
Remove the stock anti-roll bar.
In the photo everything is laid out before installation on the car.
Stabilizer cushions from Niva VAZ 2121
Next, we put the stabilizer pads 2121 on the cut stabilizer in the places where the stabilizer is attached to the spar.
After the pillows are in place, take the cut stabilizer and insert the pillows into the mounts located on the stabilizer removed from the car. Then we put the previously made fasteners on the edges of the stabilizers as shown in the photo (the fairy will help tighten the bushings).
The double stabilizer for the classic VAZ is ready.
Stabilizer installed on the car
Attaching the new stabilizer to the old one using manufactured mounts
Attaching the double stabilizer to the spar
We cover problem areas (or the entire structure) with anticorrosive.
More photos.
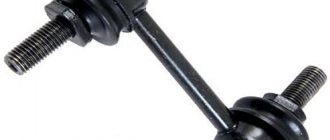
Stabilizer link 2110
Stabilizer cushions from Niva VAZ 2121
Already cut and welded rings for double stabilizer (for connection)
Bulgarian new stabilizer (7-8 cm)
Ready-made double stabilizer for a VAZ classic
Double stabilizer installed on a VAZ car
Well, one more option.
The complexity of manufacturing a double stabilizer is small, and you will feel the effect immediately.
Rear stabilizer for Niva VAZ 21213 2121 21214
Rear stabilizer for classic VAZ-2107 VAZ-2106 VAZ-2101
Exhaust modification on Lada 2107 double muffler NEX photo and video!
ADVANTAGES OF TIMELY REPLACEMENT
Replacing bushings is a simple process that any driver can handle. As they say - “if there is a desire.” If it is not there, it is better to contact a car service center, where you will be provided with professional assistance.
Thanks to the timely replacement of worn bushings, the anti-roll bar of the VAZ 2107 can last longer.
Thanks to the new bushings, driving on roads, regardless of whether they are of high quality or not, will become much more comfortable and safer.
Replacing stabilizer struts on Renault Logan. French consumables
- Open-end wrenches for “10” and “13”;
- TORX key T40;
- Head on "18".
- The front part of the car is hung on jacks. Don't forget to put stands under the car. It is advisable to place them under the subframe, this is especially important in the case of removing the racks along with the bar;
- Before work, it is advisable to treat the threaded connections with penetrating lubricant (liquid wrench);
- The nut is unscrewed from the stabilizer link mounting bolt. After which, the bolt is knocked out through the spacer with a hammer;
- At the next stage, the bolts securing the rack at the top and bottom are unscrewed;
- Before removing the strut, be sure to remove the brake hose from the hook to avoid damaging it. After which the stand is removed;
- Lastly, the bushings that secure the stand are removed; it is also recommended to change them.
- After removing the struts on both sides, you can proceed to work on removing the stabilizer itself:
- While holding the nut from turning with a TORX T40 wrench, unscrew it. After which, remove the silent block and remove the bushing;
- Unscrew the 2 bolts securing the rod to the subframe;
- Unscrew the nuts securing the brackets. After that, the mountings of the pillows are pryed off with a screwdriver and moved to the side;
- The cushions are removed from the stabilizer and new ones are installed. Assembly is carried out in reverse order. It is advisable to install new bushings and silent blocks, even if they are not damaged.
- “Pros and cons of polyurethane silent blocks”;
- “Which silent blocks are better, rubber or polyurethane.”
AutoFlit.ru
SOLUTION
Many beginners may experience problems or difficulties when replacing bushings. This section of the article will help you solve them.
When to replace transverse stabilizer bushings
SPU bushings are replaced immediately after wear is detected. If this is not done and you continue to drive with worn bushings, then irreparable problems may soon appear and then you will have to replace the stabilizer completely.
Installation materials and tools
In order to successfully change rubber bands you will need:
- A set of new bushings for the rear stabilizer;
- Set of open-end wrenches;
- Flathead screwdriver and hammer;
- Composition WD40;
- Mounting blade.
Sequence of operations for replacing rear stabilizer bushings on a VAZ 2107
Having prepared everything you need, you can begin the repair:
- After the car is placed in the pit, you need to inspect the fastenings. Usually, due to long-term use, a layer of dirt and rust could appear on them. To eliminate these unpleasant consequences, you need to treat the compounds with WD 40. After that, all you have to do is wait about fifteen minutes. During this time, dirt and rust should dissolve and work can continue.
- The nuts must be unscrewed with a 17mm open-end wrench.
- In order to loosen the stabilizer bar with the clamp, you will have to use a mounting blade. Having inserted it into a narrow hole, you need to use the lever principle and bend the clamp.
- After this you need to get rid of the old gum. This can be done with a knife.
- The place where the new bushing will be installed must be cleaned of dirt and rust. After this, you can install a new rubber band, having first lubricated its inside with grease (it should be sold with the kit). Now you need to put it on the rod and move it along it to the installation site.
- After the fifth step is completed, you need to tighten the nut on the clamp.
- Then all that remains is to replace all the other bushings according to the instructions above. Afterwards, you need to evaluate the quality of the work performed - if the stabilizer is not warped and no play is detected, then the replacement was carried out correctly. You can drive.
Replacing stabilizer struts for Ford Focus 2 and 3. Typical American
- We lift the front part and install it using a support. Then the wheels are removed. The rack fastenings are treated with penetrating lubricant “liquid key”;
- Using a hexagon, the hinge pin is kept from turning, and the nut securing it is unscrewed;
- The hinges are disconnected from the front suspension strut bracket;
- Unscrew the hinge located at the bottom, this is done identically to the top one;
- We disconnect the strut hinges from the stabilizer bar, then the strut is removed from the car;
- The next step is to remove the front suspension cross members;
- The bolts securing the stabilizer bar brackets are unscrewed;
- The bar is removed, along with it we dismantle the brackets and pillows;
- Use a screwdriver to remove the staples from the cushions;
- After that, the pillows are removed; to do this, you just need to unclench them with your hands.
- Assembly is carried out in reverse order. It is recommended to tighten the nuts with a certain torque; to do this, you will have to use a torque wrench. After assembly, the system (power steering) should be bled.
- First, unscrew the nut securing the hinge. We keep the finger itself from scrolling using a hexagon;
- To completely dismantle the strut, you will need to tighten the nut securing the strut to the suspension cross member;
- The stand is pressed down and removed;
- Next, the bolts securing the cushion brackets are unscrewed. And the stabilizer bar is removed from the car;
- Using a screwdriver, the bracket is removed from the bar, the cushion is unclenched by hand;
- Installation begins by pressing the cushion into the bracket. The rest of the work is done in reverse order.
- First, the rear springs are removed;
- Next, unscrew the nut securing the strut. Again, use a hexagon to keep it from turning;
- Unscrew the bolts securing the stabilizer bar pads, there are 4 of them in total. After that, the rod is removed assembled with the struts, pads and brackets;
- The rubber bushings are removed from the rack, and it is removed from the rod; the same is done on the second side;
- If necessary, rubber cushions and racks are removed from the bar and replaced.
AutoFlit.ru
VIDEO REPLACING STABILIZER BUSHINGS ON A VAZ 2107. USEFUL VIDEO:
Let's summarize - the stabilizer for the classic VAZ 2107 is an extremely controversial tuning element. On the one hand, it increases the stability of the car, but on the other hand, it reduces cross-country ability and driving comfort. However, it has one undoubted advantage - ease of maintenance. Even a novice car enthusiast can cope with this. After all, the only part of the SPU that is subject to rapid wear is the bushings, replacing which will not be a problem for a person who has at least once held a wrench with a mounting blade in his hands.
Salon VAZ-2105
Initially, the interior of the “five” was conceived as safer, more functional and comfortable compared to its predecessors of the first generation. Safe movement was facilitated by special bars in the door structure, as well as optional hydraulic supports for the front and rear bumpers. All these steps were taken in connection with plans to enter the North American market.
The basic equipment included adjustable headrests in the driver and front passenger seats, seat belts in the front seats (in the rear as an additional option). To reduce the effort when rotating the steering wheel, a ball bearing was used in its design.
The instrument panel, door cards, and headliner were made from solid plastic molds. The instrument panel consists of four switches, a block of indicator lamps and three round sections with parameter indicators. To control and monitor the status of various systems on the instrument panel are provided.
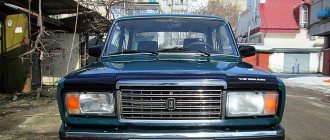
Model of the car VAZ 2105 "Zhiguli"
produced by the Automobile Plant since 1980. In terms of its design, the VAZ 2105 is a rear-wheel drive sedan with four doors for five passengers.
Based on this model, the VAZ 2107 and station wagon 2104 were later produced. With its appearance, the VAZ 2105 was fully consistent with the fashion trends of the early 80s. Thus, its body had straight lines with aluminum bumpers, the headlights were voluminous and rectangular, although for Russian residents there is no point in describing this model due to its wide popularity and demand even in our time, 30 years after the start of its production.
The technical characteristics of the VAZ 2105 are as follows: engine capacity is 1.3 liters with a power of 64 hp. Dimensions: length 4130 mm, width 1620 mm, height 1446 mm. Ground clearance 17 cm. Trunk volume is small, up to 385 liters. The curb weight of the car is 995 kg. Fuel consumption in the urban cycle is 10 liters per 100 km.
In terms of maintenance, the VAZ 2105 is one of the most inexpensive models. This makes it possible to carry out a wide variety of tuning of the VAZ 2105 with your own hands and traditional repairs of the VAZ 2105 with your own hands. Until now, a large number of VAZ 2105 models are in demand and travel along the roads of our country. And all this is possible thanks to the low cost of this car, as well as the low costs of repairing and operating the car. And this is despite many design flaws and periodic repairs, and also despite the fact that this model, in its maneuverability on slippery and icy roads, does not meet modern global safety standards. After all, maintenance and operation are one of the most important indicators of a car’s attractiveness.
WHAT IS A REAR STABILIZER
The rear stabilizer for the VAZ 2107 is a curved C-shaped rod installed next to the rear axle of the “seven”. The stabilizer is attached at four points. Two of them are located on the rear suspension arms, two more on the rear side members of the “seven”. These fasteners are ordinary eyes with dense rubber bushings inside (these bushings are the weak point of the entire structure).
The rear anti-roll bar for the VAZ 2107 is a conventional curved rod with fasteners
Today you can purchase a rear stabilizer and fasteners for it at any spare parts store. Some drivers prefer to make this device themselves, but this is a very labor-intensive process that requires certain skills that a novice car enthusiast simply does not have. That is why the replacement of bushings on a finished stabilizer will be discussed below.
PURPOSE OF REAR STABILIZER
The anti-roll bar on the “seven” performs two important functions at once:
- this device gives the driver the opportunity to control the tilt of the car’s chassis, while the force acting on the camber of the rear wheels practically does not increase;
- After installing the stabilizer, the tilt of the suspension between the axles of the car changes significantly. As a result, the driver is able to better control the car;
- The improvement in car control is especially noticeable on sharp turns. After installing the stabilizer, not only does the lateral roll of the car during such turns decrease, but you can also take them at a higher speed.
ABOUT THE MINUSES OF THE REAR STABILIZER
Speaking about the advantages that the stabilizer provides, one cannot fail to mention the disadvantages that also exist. In general, the installation of a stabilizer still remains the subject of fierce debate among car enthusiasts. Opponents of installing stabilizers usually justify their position with the following points:
- Yes, after installing the rear stabilizer, lateral stability increases significantly. But this is a double-edged sword, since it is the high lateral stability that makes it much easier for the car to skid. This circumstance is good for those who engage in so-called drifting, but for an ordinary driver who finds himself on a slippery road, this is completely useless;
- If a car enthusiast decides to install a rear stabilizer on his “seven”, then he is strongly recommended to install a front one, and not a regular one, but a double one. This measure will help prevent excessive loosening of the car body;
- The cross-country ability of a car with stabilizers is reduced.
On sharp turns, such a car often begins to cling to the soil or snow with its stabilizers. It is easy to notice that the ground clearance of a VAZ 2107 with a stabilizer decreases, which affects cross-country ability
Thus, a driver who is thinking about installing stabilizers should weigh all the pros and cons as carefully as possible, and only after that make a final decision.
How to replace the anti-roll bar on a VAZ 2101-VAZ 2107?
1. First, remove the protection (If it is installed) from the car, if it does not interfere with the removal of the stabilizer, then you can leave it alone (Where the stabilizer is located, read above), now hang both front wheels (So that the stabilizer does not twist) and on both sides unscrew the nuts securing the metal brackets to the lower arms (see large photo below), unscrew the nuts carefully, without breaking off the studs (Studs age over time and breaking them is as easy as shelling pears), then remove the nuts and the engravings behind them and pry them off with a screwdriver, remove both the brackets that hold the bushings, just keep in mind that both brackets (Right and left) are different, when installing new bushings, do not confuse these brackets with each other (Look at the small photo in which number 1 shows the left bracket, and number 2 the right) otherwise they will crush the bushings and the bushings will have to be replaced with new ones.
SIGNS OF REAR STABILIZER BREAKAGE
It’s not difficult to guess that something is wrong with the rear stabilizer of the VAZ 2107. Here's what's observed:
- a characteristic grinding or creaking noise, which is especially clearly heard when entering a sharp turn at high speed;
- a significant increase in vehicle roll when cornering and a decrease in controllability when cornering;
- the appearance of play on the stabilizer. Play can be easily detected by placing the car in an inspection hole and simply shaking the stabilizer bar up and down;
- destruction of bushings. The play mentioned above is almost always accompanied by the destruction of rubber bushings. They are squeezed out of their eyes, crack and completely cease to perform their functions.
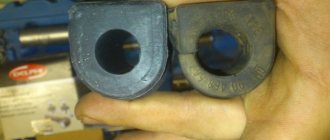
On the right is a worn stabilizer bushing, the hole in which is much larger than in the new bushing on the left
All of the above things indicate only one thing: it’s time to repair the stabilizer. In the vast majority of cases, repairing the rear stabilizer comes down to replacing damaged bushings, since the fasteners and rod rarely need repairs. Such a need may arise only in the event of serious mechanical damage, when the driver caught a large stone or curb with the stabilizer, for example.
HOW SHOULD THE STABILIZER BE POSITIONED?
A properly installed stabilizer should be able to twist under the influence of forces on the wheels, and it should do this even when the forces applied to the right and left wheels are directed at completely different angles.
On the "seven" rear stabilizers are installed only with rubber bushings
That is, stabilizers on passenger cars should never be directly welded to the frame; between the frame and the wheel mount there must always be some kind of intermediate link responsible for compensating for multidirectional forces. In the case of the VAZ 2107, such a link is dense rubber bushings, without which it is strictly not recommended to operate the stabilizer.
The stabilizer on the VAZ 2107 is usually attached at four key points
WHY DOES THE STABILIZER BUSHINGS PUT OUT?
As mentioned above, the bushings on the stabilizer serve to compensate for the forces on the wheels. These efforts can reach enormous values, especially when the car enters a sharp turn. Rubber, even of very high quality, systematically subjected to enormous alternating loads, inevitably becomes unusable. Severe frosts and reagents that are used to sprinkle roads in our country during icy conditions also contribute to the destruction of bushings.
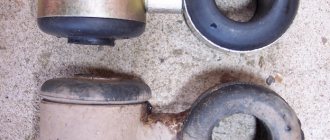
The rear stabilizer bushing is worn out, torn lengthwise and comes out of the clamp
It usually starts with cracking of the bushing surface. If the driver does not notice the problem in time, the cracks become deeper and the bushing gradually loses its rigidity. At the next sharp turn, this cracked bushing is squeezed out of the eye and does not return back to it, since the elasticity of the part is completely lost. After this, play appears on the stabilizer bar, the driver hears a creaking and grinding sound when entering a turn, and the car’s controllability decreases sharply.
ABOUT DOUBLE STABILIZERS
Double stabilizers are installed only on the front wheels of the VAZ 2107. As the name suggests, there are already two bars in this device. They have the same C-shape and are located approximately four centimeters from each other. The mounting lugs in the double stabilizers are also paired. Otherwise, this design does not have any fundamental differences from the rear stabilizer.
Front stabilizers on the VAZ 2107 are usually made of two paired c-shaped rods
Why use two bars instead of one? The answer is obvious: to increase the overall stiffness of the suspension. The double front stabilizer copes with this task perfectly. But one cannot fail to note the problems that arise after its installation. The fact is that the front suspension on the classic “seven” is initially independent, that is, the position of one wheel does not in any way affect the position of the second. After installing a double stabilizer, this situation will change and the suspension will turn from independent to semi-independent: its working stroke will be significantly reduced, and in general the control of the car will become tougher.
Of course, the roll when entering turns with a double stabilizer will be reduced. But the driver should think: is he really ready to sacrifice personal comfort and cross-country ability of the car for the sake of its stability? And only after answering this question can you start working.
Replacing stabilizer struts and itself on a VAZ 2110-VAZ 2112
Welcome! The anti-roll bar is, as such, a metal stick that works to twist when the car enters a turn, that is, it has two ends that are connected to the arms and in the very center it has a U-shape (See the photo above, you can see what this looks like stabilizer), thanks to this shape, when the car turns, this stabilizer prevents it from falling on its side; it works to twist, and when the left part of the body, for example, rolls, and the right rises, it twists and it turns out that it holds that part which tilts so that it does not fall too much, and on the one that has risen, the stabilizer puts pressure on it so that it does not rise even higher, thus in turns the car is more confident and does not fall too much on its side, which ensures its stability on the road and safer driving.
Note! To replace the stabilizer on a car, you will need to stock up on: Firstly, an inspection hole, because the stabilizer is located under the bottom and you will have to crawl under the car, in addition, you will need a wrench with union heads, or you can also stock up on an extension cord instead of a wrench, as well as Take all the wrenches that you have (spanners, sockets, etc.), you will need a bit of a suitable diameter (you will understand exactly what diameter of the bit is needed as you read the article), and we recommend stocking up on WD-40 or something like this, since the bolts are most likely soured and you won’t be able to unscrew them so easily!
Where is the anti-roll bar located? As we have already said, in order to see it you will have to crawl under the car, move under the bottom closer to the front wheels and you will see there the stabilizer itself (Indicated by blue arrows) and also the levers to which the stabilizer struts are connected (Connection points indicated by red arrows).
When should you replace the anti-roll bar? If it is deformed, it needs to be changed or after a very long time of use, as we all know, iron over time loses all its properties and weakens, thereby the car begins to roll more when entering a turn and it becomes no longer safe to drive, with regards to the deformation of the stabilizer , then it may be due to a collision with a curb or due to a collision with a large stone, since usually the bottom of the car is deformed during a collision, also the exhaust system (Muffler) and even the stabilizer can get damaged, so if you have this happened on the road, be sure to get out of the car and inspect the underbody of the car for deformed parts; if necessary, replace all parts that are damaged with new ones.
Note! As for the stabilizer struts, if they are deformed, the first thing that will appear is knocking in the front part of the car, with these knocks there will also be a kickback on the steering wheel and the front part of the car will begin to sway, in addition, if you let go of your hands from the steering wheel, the car can pull to the side , this will indicate that the racks have become unusable and it’s time to inspect them and, if damage is detected, replace them with new ones!
How to replace the anti-roll bar and its struts on a VAZ 2110-VAZ 2112?
Removal:
1) First, you will need to lift the front part and for convenience (you don’t have to do this in principle) remove both wheels from the car (For information on how to remove a wheel correctly, read the article: “Replacing wheels on a car”), then take two wrenches and one hold the bolt (indicated by the red arrow) from turning, and with the other unscrew the nut of this bolt, which is indicated by the white arrow.
Note! Before hanging the front part (this is if you are going to remove the wheels), be sure to put something under the rear wheels, and also brake the car with the handbrake so that it stands upright and does not fall to the ground at one point!
2) Then take a bit of a suitable diameter or something else like it and with its help knock out the bolt, the nut of which you unscrewed with a wrench a little earlier (see photo 1), immediately after which go to the other side and do exactly the same operation of unscrewing the bolts with the nut and knocking it out, as soon as the operation is completed, you will have to remove the two central fasteners that hold the stabilizer in the central part, to do this, take the wrench and socket in your hands and use it to unscrew the two nuts that hold the bracket, for example the left pillow or the right one is attached (see photo 2), as soon as you finish with one bracket, remove it, on the other side, unscrew the two nuts in the same way and remove exactly the same pillow bracket.
Note! If you are changing the stabilizer struts, then it makes no sense to completely remove the stabilizer itself, so as soon as you knock out the bolts, proceed to removing the struts, to do this, just pull them and remove them along the stabilizer bar, see the video at the end of the article for more details!
3) Well, when you remove the stabilizer, proceed to disassemble it or immediately replace it with a new one, but simply the parts removed from it may be useful to you in the future, it is possible that the new parts will not be deformed soon, so the old ones, and even if they in good condition (This is unlikely) it is recommended to leave it, in general disassembly, at the beginning of the stabilizer strut, remove it from the bar itself as shown in photo 1, then make a mark for yourself with either a bright colored marker or electrical tape (see photo 2, the mark is indicated by an arrow), in which exact place your pillows are currently located (One of the pillows is indicated by a blue arrow in photo 2), as soon as you have indicated their installation locations, you can safely remove them from the bar and when installing new pillows on barbell, you know the place where they need to be placed, but removing the pillow, by the way, is not very difficult, first the steel bracket is removed from it (indicated by a green arrow) and only then it is either cut or carried along the bar until it is removed from it , for the convenience of removing and installing new cushions, we recommend that you lubricate the rod with soap so that the cushions can be removed much better.
Note! If your bar itself is damaged, but just a little, then you can straighten it using improvised means (Hammer), there is nothing terrible about it and, in principle, this should not affect the performance of the suspension, but we remind you again, this is only in case the rod is very slightly damaged (Bent somewhere), and not completely deformed!
Installation: All parts on the bar are installed in the reverse order of removal, if necessary, lubricate the grease with soap so that the parts move easier on it, install all of them exactly in the same places where the old ones were, otherwise you simply won’t secure the stabilizer to the body, because you will have the pillows and their bracket in a completely different place (not where they should be attached to the body).
Note! After replacing the struts with new ones, there is no need to adjust the camber, because the angle of the wheels will not change from this replacement!
Additional video clip: For more information on how to change the struts on the stabilizer bar, see the video below, everything is shown and explained in detail.
Vaz-Russia.ru