A knock on the stabilizer bar is a harbinger of the fact that this suspension part will soon need to be replaced, and, consequently, additional expenditure of money. However, few people know and are trying to restore the racks.
Restoring the struts is only possible with a prompt response from the car owner! If there is a knock, quickly remove them and revive them. This reaction will allow the stabilizer struts to serve for at least 100 thousand km. If you drive one or two thousand kilometers, they will have to be changed without any options. But if you “tamper” the rack in time, then it can easily cover another 50 thousand kilometers, about the same as a new one.
How to properly repair a stabilizer link?
Today, every driver knows how important it is to drive with “fresh” stabilizer struts. This can be useful both for the car and for the safety of the driver and his passengers. The problem with the Russian market is that all these racks are quite expensive. Their price is low, but they have to be changed constantly. The eternal costs of an easy-to-understand part, which ultimately becomes a consumable, makes the driver want to know how to repair a stabilizer bar so as not to buy a new one.
Replacing the rod, valves, adjusting the stiffness of shock absorbers
The next malfunction is damage to the rod, seals, and valves inside the strut. There is a certain selection of spare parts on the market for repairing dismountable shock absorbers. In addition, an experienced car enthusiast never throws away old spare parts, but tries to repair them. In addition, you can always extract workable parts from them.
- So, let's disassemble the shock absorber.
Don't forget to wear gloves, the job is dusty
Turning work is usually cheaper than the cost of a new shock absorber
Tip: The entire process of disassembling the shock absorber should be photographed. This will avoid problems during assembly.
It is important to ensure the cleanliness of the unit; the ingress of dirt or solid metal particles will quickly damage the restored shock absorber. Get rid of stains, dirt and dust while disassembling
Get rid of stains, dirt and dust while disassembling
All parts must be carefully checked
It is recommended to replace the oil seal
After pumping the oil, the rack needs to be pumped as usual
Video: How to repair car MacPherson struts
https://youtube.com/watch?v=82i8P9E6WKU
If you have basic information about how your shock absorbers work, you can save money on replacing them. Most rack models are repairable, and components are either purchased at reasonable prices or made independently.
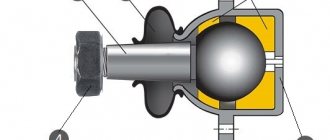
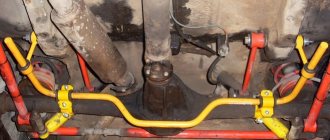
Stabilizer link components
Before talking about repairing struts, you need to fundamentally understand their structure so that the driver clearly understands how to deal with all this. It should be noted that this element is one of the simplest components of a car. It is enough just to understand the structure and structure of the part once, and in the future all the work will be done by itself.
Front stabilizer
Racks can be divided into three types based on fastening:
It should be noted that hinged struts are much more common. They are attached to the body and stabilizer of the car, allowing you to connect these two important parts of the car, forcing them to work synchronously. Hinged ones are very common; they are constantly purchased because they are easy to install. In addition, many note improved vehicle movement. But be that as it may, the racks do not last long.
Stabilizer link
The structure of the hinge elements is very simple - these racks consist of the same metal rod and hinges at the ends. The hinge itself is a supporting element with a boot and lubricant under it. This allows the part to work more gently with the suspension, which results in a lighter ride.
Stabilizer link with bushings
Also on the market you can also find racks with bushings, which differ in the same types of fasteners. Everything is much simpler here - no boots or grease, the stand works on its own. But it is difficult to deal with such an element in the future, but at least the bushings can be repaired, it is only important to understand how to do it.
Combined stabilizer link
Combination struts are the same joint supports and bushings, only presented on the same strut in opposite places from each other. If the driver plans to repair the stabilizer link after using it, it is better not to buy such complex elements, as they require a different approach. Sometimes it happens that the hinges cannot be repaired, but the bushing can, so the element will have to be thrown away in any case.
Types of structures
The repair process differs in some features, depending on the type of fastening used in the car model. There are two types of parts:
- Ball joints are installed on a significant part of modern cars. They break due to insufficient production of lubricant and wear. Restoring such stabilizer elements can be problematic and sometimes impossible.
- Bushings - this type can be found much less frequently, however, there are not many problems during operation.
Let's consider all the stabilizer struts and the intricacies of their own repair.
Repair of racks with hinged supports
Repairing a stabilizer link with a hinged support is not as easy as it seems. Most likely the element will only serve once. I would like to note that the main reason for the failure of the element is that the lubricant under the hinges wears off over time or, worse, gets mixed with dirt. Anthers serve as a kind of barrier against this dirt, but over time they cannot withstand the mileage and cease to properly perform all their functions.
Anthers
When buying articulated struts, the driver should choose only high-quality boots, but not too rough ones. You need to pay attention to the integrity of the anthers, since in fakes, as a rule, they can often be torn. Unfortunately, not everyone attaches importance to this, which is why they buy a new part every few months.
Articulated struts
Repairing hinges is easy, but it is not always possible. After removing the stand, you should try to turn the hinge with your fingers. If it spins without problems, the rack can still be saved; if a crunching sound is heard, repair is impossible. When making repairs, use a wrench to unscrew the locking ring from the rack so that you can get to the boot. It is lifted up and completely cleaned of dust and dirt. Most likely there will be no lubricant there anymore, so it’s enough to buy a new one and apply it there yourself.
Important: This process is often performed immediately after purchasing the stand. The problem is that the manufacturer can deceive its customers by applying not a good lubricant under the boots, but simple technical Vaseline. This way the rack will last much longer and will not need to be repaired later.
Technical Vaseline
In any case, even if you managed to lubricate the rack after using it for a long time, it can serve no more than five thousand kilometers. Typically, such manipulations are carried out if at this time it is not possible to buy a new rack. Articulated ones are inexpensive, so the driver usually buys a new one.
Repair work
Ball elements
Restoring them, as already mentioned, is not easy. Typically, the restoration process involves replenishing the amount of lubricant in the boot. The following actions are envisaged:
- Removing the support. The stages depend on the specific make and model of the machine, as well as its technical features.
- Determination of wear. You need to move your finger and determine how easily its rotation is ensured. If there is a crunch, repair is impossible.
- Restoring the flare of the ring that secures the boot. To do this, take a tube and place it in a vertical position.
- With your finger down, the support is inserted into the tube. Next, the retaining ring is removed using pliers.
- Use a screwdriver to lift the boot, which is then folded up and filled with lithol using a brush.
- The boot that covers the hinge must be sealed using a thin wire wrapped around the boot.
- The retaining ring is placed in its original place, and the functionality of the hinge is checked. Movement and movement of the finger should be difficult.
Attention! A part that has been restored has a shorter service life compared to faulty elements, so during operation it is important to take into account that such supports can be driven after 1,000 km.
Repair of structures with bushings
Typically, such models are used on expensive machines and are easy to repair.
To repair the rack yourself, you will need to acquire bushings; it is better to give preference to polyurethane options. This approach will make the service life of the spare part longer.
The procedure for carrying out the work is quite simple:
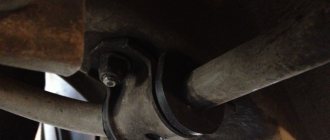
- The stabilizer links are removed using a special removal tool.
- The parts are inspected and the condition of the stabilizer tips is taken into account: if there is a noticeable increase in wear, the rod is completely replaced.
- The support to be removed is clamped in a vice. Using a hammer, knock out the bushing head. Usually this stage of repairing racks with your own hands goes without problems.
- The new bushing is lubricated with oil and placed in place of the old design, and clogged. The main thing is to secure the element correctly, since each model has a different method of fastening.
Repair of racks with bushings
As already mentioned, bushings are much less common, most often on expensive cars from well-known brands. It has also been observed that bushing struts are an ideal option for an SUV. Unlike hinged ones, this type can be completely repaired, but only if the rack is not yet completely worn out. To do this, you need to check the base - that same metal rod. If everything is fine with it, remove the rack from the car.
Replacing the bushing and stabilizer link
Next you need to repair the stabilizer link. Ends with bushings are more expensive than articulated ones, but if the base is intact, then why buy the entire part? For this purpose, the bushings are sold separately from the base and the driver can freely buy them if necessary. Removing the bushing is easy, you just need to knock it out with a hammer; it is recommended to hold the rod itself in a vice so as not to miss.
conclusions
Carrying out restoration and repair work independently will help reduce the costs of each driver associated with car repairs. The process of carrying out operations on your own is quite complicated, the main thing is that the racks are repaired in accordance with the recommendations of specialists. In the process of performing work, you need to take into account some features and nuances. Repair in the first case - with ball joints - is carried out for a short time.
Read also: What do shoes hanging on wires mean?
Many car enthusiasts are interested in how to repair stabilizer struts with their own hands. After all, replacing these parts is quite expensive; it is much easier to repair this component of the suspension. Restoring racks will cost much less; in some cases, you won’t even need to buy consumables. Moreover, any driver can do this.
The work requires a minimum number of tools. Restoration methods depend on the features of the strut itself, or more precisely on the features of fastening this part to the stabilizer and body.
Recommendations for use
The driver is always interested in how to repair the stabilizer link, but if you think about it, you can drive competently and won’t have to repair it so often, right? Russian mechanics have prepared several tips for drivers on how to operate their car with minimal damage to the anti-roll bar struts:
- drive smoothly, avoid skidding;
- slow down when turning;
- avoid small obstacles;
- do not increase speed on uneven roads.
In order for the struts to last longer, you first need to think about the correctness of your driving style. If the stabilizer receives a signal of danger during drifts, it tries to smooth out this very movement, which is first felt by the struts. To prevent this from happening, it will be enough to brake when turning, then the racks will wear out much longer.
Braking on corners
The stabilizer deals not only with turns. Also, its synchronous operation with the car’s suspension can be affected by uneven roads, small holes, humps or speed bumps. In this case, it is better to go around the bumps, but if the whole road is breathing with difficulty, then it is better not to increase the speed.
Car suspension diagram
The anti-roll bar ensures the safety of the car and the driver when driving, but this cannot be done without struts, which need to be constantly changed or repaired. If you have enough experience in this area and can share it with us, write in the comments.
How to change the rod, valves, how to adjust the stiffness of shock absorbers.
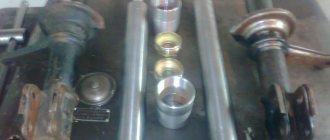
Another problem is a violation of the integrity of the rod, seals, and valves inside the strut. But of course, stores already have a set of spare parts for this unit. And an experienced driver is not in a hurry to take old parts to a landfill; he repairs them. At least some useful details can be extracted.
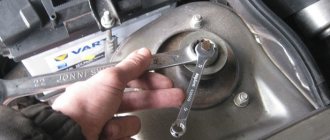
First, we disassemble the shock absorber. It is better to carry out the work wearing gloves and work clothes. We take it out and identify damage to the rod with the piston, valves and o-rings. Damaged parts are removed. We recommend choosing suitable replacement rubber bands on the market. If it was not possible to select the metal parts to the required size, then they are ordered from a turner. The labor of a turner will cost less than buying a new shock absorber. The shock absorber is assembled, but you need to check yourself often: whether the sequence is broken and whether the parts are mixed up
We highly recommend filming the disassembly with a camera, this way it will be much easier to cope with the task and nothing will be lost. It is important to maintain cleanliness when assembling the unit, because debris and small particles can easily render a newly repaired shock absorber unusable. Remove dirt and stains while disassembling the unit. It is necessary to carefully inspect the valve mechanisms, because the parameters of the shock absorber depend precisely on their normal functioning
You can adjust the shock absorber stiffness by changing the number of washers. Just before doing this, you need to read the factory instructions. Now we put the rod in place in the unit. It is better to replace the oil seal, but if it is in perfect order, then you can simply clean it and add fresh lubricant. Next, fresh lubricant is added to the shock absorber, right to the very edge of the pipe. When you put the rod back in place, the excess will flow out on its own. Don’t be afraid that you will waste a lot of oil; here you need to not let air inside the pipe. When the oil is pumped in, the strut needs to be pumped as always. When the rod is in place, it is slowly moved so that the bubbles come out using the valves. After this, the shock absorber is completely assembled and installed on the car.
Important! General work tips
- Drivers, do not forget that the racks are changed in pairs. If you are planning to change the left shock absorber, then the right one is also subject to this procedure. The same can be said about renovations. Moreover, the unit may outwardly work without problems, but after 1500 km it breaks down.
- We advise you to carry out repairs of both the rear and front shock absorbers not on jacks, but on goats that are more appropriate in this case. The main reason is safety.
- Note that VAZ shock absorbers at the front are easier to change than on foreign cars with front-wheel drive. In the second case, you will have to use ties to be able to compress the springs evenly on both sides.
- Once you've finished replacing the strut, don't forget about the wheel alignment. After repair, the required optimal angle is usually violated. This leads to rapid damage to the tires, poor vehicle handling, and damage to the suspension unit.
- If you have basic information about the design and operation of your car's shock absorbers, you can save money on replacing them.
- Often, shock absorber strut repairs are done on your own, and other parts are made independently or purchased inexpensively.
- To work independently with shock absorbers, it’s a good idea to see and look for defects in the part. There is nothing impossible about this. Just imagine what your “new” shock absorber was like and what it is like now. In case of even minimal discrepancies, there is already a reason to think about repairs. When it comes to establishing the working capacity of the spring - if you don’t notice any damage or cracks - you don’t have to change it
Common coilover failures
We have been rebuilding and repairing coilovers and rebuilding coilover suspensions for many years now; sometimes the owners of coilovers neglect the condition of the suspension so much that they have to change most of the suspension parts. Often, an accident or other incident causes damage to the shock absorber rod, housing or adjusting nuts or upper shock absorber cups. It has also become very fashionable recently to buy used screw racks on car club forums or auctions in Japan, Europe and America. Practice shows that most of these used shock absorbers require at least maintenance, and at most serious repairs even before installation on the car.
We list the main types of screw suspension failures:
- loss of oil due to damage to seals
- loss of gas due to damaged seals
- oil entering the gas chamber due to damaged seals
- water getting into the oil due to damage to the seals
- rod damage due to boot damage
- rod damage due to chrome peeling on the rod mirror
- mechanical damage to the rod from impact
- souring of the shock absorber adjustment mechanism
- souring of the adjusting nuts
This is not a complete list of possible damage to shock absorbers; the level of damage is revealed during primary and secondary diagnostics.
Diagnostics of helical suspension before repair
Before repairing a coilover, a primary diagnosis is first carried out, which can identify most of the breakdowns.
Primary diagnostics are carried out without disassembling the shock absorber and allow you to identify loss of gas or oil, damage to the oil seal and rod mirror, breakdown of the stiffness adjustment mechanism, and also allows you to assess the general condition of the shock absorber.
Secondary diagnostics are carried out with a complete disassembly of the shock absorber and allow us to identify all possible breakdowns and damage, such as the formation of an emulsion, chips getting into the oil, damage to seals, wear of guide bushings and others.
Why coilover rebuilds and coilover suspension repairs should be done in JTlab
We have been repairing screw suspensions from various manufacturers for many years, such as:
- Ohlins
- TEIN
- CUSCO
- ZEAL
- RSR
- HKS
- XYZ
- DGR
- B.C.
- D2
- JIC
- Bilstein
We always have oil seals in stock, and we also have a wide range of possibilities for finding and delivering rare spare parts for shock absorbers from America, Japan and Europe. A wide selection of equipment for refilling coilovers allows us to repair mono-tube and twin-tube shock absorbers and fill them with gas. After repairing the coil suspension, we retain the shock absorber adjustments. A wide selection of shock absorber oils allows you to select suspension characteristics to suit customer requirements. We produce parts for coilovers, so we can perform even complex repairs or even manufacture a completely new shock absorber.
What is a shock absorber and why is it needed?
A modern car is simply unthinkable without shock absorbers. This is the most important part of a car for comfortable driving on uneven roads. After all, as you know, there are two troubles in our country, and one of them is bad roads. It is the shock absorber that absorbs all shocks and impacts transmitted from the imperfect road surface to the car body.
The main task of its work is to maintain good grip on the road surface even when driving on rough terrain. This allows you to move comfortably in a vehicle without noticing every hole or bump on the road.
Front shock absorbers, as a rule, differ from rear shock absorbers in type of design. The rear struts are often classic two-pipe ones, and the front struts are double-sided hydraulic.
They differ due to the degree of influence on the handling of the car - the front struts are much more important here. If the shock absorbers are in good working order, this ensures comfortable and trouble-free driving of the vehicle.
Types of shock absorbers
Automotive shock absorbers differ in the type of active filler and the type of design.
According to the filler, they are divided into:
- Gas - filled with gas under pressure, there is also a small amount of oil. They are only single-pipe. Suitable for sporty riding.
- Oil-filled - filled with special oil, also have an air chamber. Designed for riding at a relaxed pace, inexpensive and accessible.
- Gas-oil - filled equally with both oil and gas. Suitable for off-road driving.
According to the type of design, shock absorbers are:
- monotube - have one cylinder, used in sports car suspensions. They are also called monotube. Such shock absorbers are only gas.
- double-pipe - consists of two cylinders placed one inside the other. Not suitable for fast driving over rough terrain.
What is the difference between a strut and a shock absorber?
The main difference is that the strut may include not only a shock absorber, but also a spring, a steering knuckle and sometimes a bearing. If only the shock absorber breaks, then the car can still get somewhere. And if the rack breaks, movement is simply impossible.
note
I would like to note that it is recommended to repair car shock absorbers only in pairs (standing on the same axis).
Leaking or play in the shock absorber rod is the most common reason why shock absorbers come to us for repair.
We draw your attention to the fact that with such repairs the characteristics (changes in compression and rebound forces) of the shock absorber do not change
We do not change the factory setting of the bypass piston in an automotive shock absorber (including the bottom valve for twin-tube type shock absorbers).
When working with a monotube shock absorber (these are shock absorbers from motorcycles, ATVs, snowmobiles and sports cars), we pump in the same amount of nitrogen as before the repair. Measurement is carried out before repair.
Or, at the request of the client, we can change the nitrogen pressure up or down.
Of course, there is a slight change in the compression and rebound forces when replacing the fluid in the unit, but this change is so insignificant that it cannot be felt on the car. Only our digital stand can show the difference. We consider this quite acceptable. We use special hydraulic oil of the MOTUL brand, which is intended only for use in shock absorbers.
We want the shock absorbers repaired in our company to please you for a long time with their high-quality and long-lasting performance. and we do everything for this.
Contact us, we will help you!
We are waiting for you in our service!
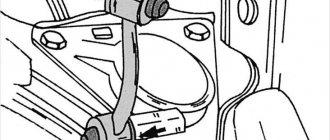
11.5. Removing and installing the front stabilizer bar
REMOVAL
1. Block the rear wheels, apply the handbrake, then jack up the front of the vehicle and place it on axle stands. Remove both front wheels.
2. Remove the lower engine shield (where available) and the exhaust pipe of the muffler/converter (refer to Chapter
Power and exhaust systems).
3. On models equipped with a manual transmission, disconnect the gear selector rod from the transmission as described in Chapter
Transmission.
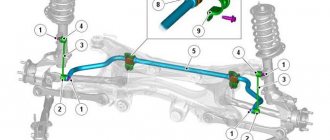
4. On models where the stabilizer bar is attached directly to the lower control arms (all models except Scenic), loosen and remove the nuts and bolts securing the stabilizer bar mounting clips (refer to accompanying illustration). Unhook both clips and remove them from the arms.
5. On models where the stabilizer is attached to the lower arms via rods (Scenic), unscrew the mounting nuts and bolts and remove the stabilizer mounting clips from the subframe (refer to the accompanying illustration).
6. Move the stabilizer bar out from under the car and remove the rubber bushings.
7
Carefully inspect the stabilizer components for signs of wear and damage, paying particular attention to the mounting bushings. Replace worn components as needed.
| INSTALLATION |
11.5. Removing and installing the front stabilizer bar
REMOVAL
1. Block the rear wheels, apply the handbrake, then jack up the front of the vehicle and place it on axle stands. Remove both front wheels.
2. Remove the lower engine shield (where available) and the exhaust pipe of the muffler/converter (refer to Chapter
Power and exhaust systems).
3. On models equipped with a manual transmission, disconnect the gear selector rod from the transmission as described in Chapter
Transmission.
4. On models where the stabilizer bar is attached directly to the lower control arms (all models except Scenic), loosen and remove the nuts and bolts securing the stabilizer bar mounting clips (refer to accompanying illustration). Unhook both clips and remove them from the arms.
5. On models where the stabilizer is attached to the lower arms via rods (Scenic), unscrew the mounting nuts and bolts and remove the stabilizer mounting clips from the subframe (refer to the accompanying illustration).
6. Move the stabilizer bar out from under the car and remove the rubber bushings.
7
Carefully inspect the stabilizer components for signs of wear and damage, paying particular attention to the mounting bushings. Replace worn components as needed.
| INSTALLATION |
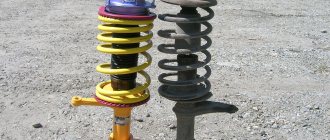
Varieties
When you are confident that the shock absorber is to blame for all the troubles that happen to the car, you can begin repairs. Whether it consists of a complete replacement or simply restoration depends directly on what kind of shock absorbers you are dealing with.
They are:
- two-pipe oil;
- single-pipe gas;
- gas-oil;
- adjustable;
- collapsible;
- non-separable;
- with electronic adjustment;
- with magnetic adjustment;
- with hydraulic-mechanical adjustment;
- pneumatic, etc.
Each specific type of unit has its own recommendations and repair schemes.
First of all, I advise you to look at the instruction manual and understand exactly what components are installed on your car.
If in your case there is a set of gas, oil or gas-oil shock absorbers, and they are dismountable, there is a chance for restoration and restoration. For rear and front elements, the recommendations will be the same. Only dismantling is performed differently.
Restoration of gas devices
Since the price of new shock absorbers can sometimes be steep and unaffordable for some car owners, many try to solve the problem on their own.
Typically, gas shock absorbers are found on domestic cars, and these are mostly classics. But there are also exceptions.
In particular, gas shock absorbers can be found:
- at the Ural motorcycle;
- for Subaru Legacy;
- VAZ 2109;
- Mitsubishi Lancer 9;
- Renault Duster;
- UAZ 469;
- VAZ 2106;
- VAZ 2114;
- Moskvich, etc.
If you have determined that the car has gas elements, you can begin work on restoring them. Nobody gives a 100% guarantee, but there are chances, and they are quite large.
You need to start with dismantling. To do this you will need a pit or a lift. Next, the wheels are removed and the rack fasteners that the support holds are unscrewed. This is relevant for removing rear elements.
At the front, you usually need to completely remove the strut along with the brake disc. Nobody said it would be easy.
Now there are a few more important steps.
You need to do the following:
If possible, problematic components are restored. But usually some of them need to be replaced. For such purposes, repair kits are provided in auto shops.
Put everything back in its place. The repair of the gas shock absorber can now be considered complete.
Working with oil shock absorbers
All primary stages are carried out in the same sequence as in the previous instructions. That is, you need to remove the elements, remove the excess, and carry out repairs.
Nobody disassembles oil shock absorbers into parts anymore. There is a special cartridge on sale. The old one needs to be removed and replaced with a new one. Then everything returns to its place. Afterwards, a wheel alignment must be carried out, and the shock absorbers are also pumped. You can try to do this yourself.