Window lifters on the VAZ 2106 are an important element, since they provide, although minimal, comfort. The design of the mechanism is simple, but at the same time, sometimes malfunctions arise with it, which it is better for the car owner to familiarize himself with in advance, so that if problems arise, he knows what needs to be done and in what order.
- Window lifter malfunctions
Glass fell - The glass does not respond to the rotation of the handle
- Broken cable
- Gearbox failure
- Mechanism grinding
- Glass creaks
- Removing the window regulator
Video: replacing the upper window lift roller
- Video: replacing the window regulator on a VAZ 2106
- Which ones to choose
Video: installation of electric windows on the “six”
how to supply and install the mechanism, repair and diagram
The VAZ 2106 window lifter has a reliable design, but, like any mechanism, it can fail. The article discusses typical malfunctions of power windows on the “classic” and provides instructions for removal and installation.
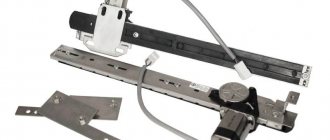
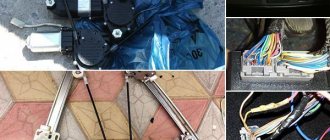
Design and types of window lifters
The mechanical window lifter on the VAZ 2106 has a simple design and consists of a control handle, a glass lift transmission system, a cable and three rollers.
Many drivers install electric windows instead of classic ones.
They come in two types:
- Cable. The design includes an electric motor with a drum on which the cable is wound, and a gearbox. The upper drum is connected to a conventional window lifter using a spline. With its help the cable is activated.
- Rack and pinion. They use the principle of a steering rack in a car.
To install the electric mechanism, you need to purchase a kit consisting of wires, fasteners, backlit control keys, a decorative plug, and installation instructions (the author of the video is VALENTIN VERNIGORA).
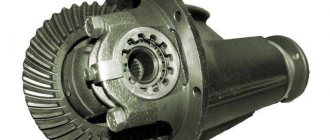
Common faults and solutions
Over time, the window lifting mechanism becomes unusable - it is impossible to raise or lower the glass.
There may be several reasons for a device malfunction:
- cable break;
- foreign objects entering the mechanism;
- gearbox wear.
There is no point in repairing window regulators, since their cost is low; it is easier to buy a new device and replace it.
Electric lifts may have the following faults:
- All power windows do not work: the fuse is blown, there is no connection to ground, the wiring is broken. The repair consists of replacing fuses, restoring ground connections and electrical circuits.
- The lift on one of the doors does not work. The switch is faulty, the reverse current relay is broken, the electric motor is broken, the wiring is broken, the connector is disconnected. Faulty parts should be replaced, the wiring restored, the connector connected.
Removal instructions
To complete the work you will need the following tools:
- Phillips and flathead screwdrivers;
- a set of keys;
- knob;
- extension.
The removal procedure consists of the following steps:
- First of all, you need to remove the casing.
- Next, the glass is lowered as far as possible. Use a Phillips screwdriver to unscrew the bolt holding the clamp.
- After unscrewing the bolt, lower the clamp down.
- Then on the left side of the door, just loosen the roller nut using a wrench.
- The cable is now free and can be removed from the roller.
- Next, unscrew the three nuts holding the window regulator.
- When unscrewing the third bolt, the mechanism should be held from the inside.
- When the window lifting mechanism is free, move it to the side.
- After unscrewing the last nut, you can remove the window regulator from the door.
Next, repair or replacement is carried out. The rear mechanism is installed in the same way.
Installation Features
Installation of a new or repaired window lifter is carried out in the reverse order of removal.
Photo gallery “Installing a window lifter”
To install a power window, follow these steps:
- Dismantle the door, remove the door trim. Next, the electric window lifter is installed using self-tapping screws.
- After installation, you need to check the sliding of the glass.
- Connection to the vehicle's electrical network should be made according to the electrical diagram.
- Next, the door is installed on the car.
- A control button is mounted on the toolbar.
After installation, the electric window lifter must be checked for functionality. You can install a heated rear window.
Video “How to change window regulators on a VAZ”
This video demonstrates how to replace a window lifter on a VAZ (car video - Pavel Pavek).
Technical parameters of electric windows
Typically, such power window kits have the following performance characteristics:
- The nominal voltage is 12 V;
- The period of lowering (rising) is 5 seconds;
- The applied force during the operation is 120 N;
- Current consumption - no more than 7.5 A;
- The service life between repairs is 30,000 cycles.
Such systems are provided with preventive protection against overheating during extreme overloads of more than 1.5 seconds, i.e. the electric motor of the system is turned off. Installation of a window regulator on a VAZ 2106 is carried out in place of the previous standard product without additional work to integrate this device into the electrical system of the vehicle.
Such VAZ 2106 window lifters, the price of which is determined, have a warranty during operation; as a rule, these conditions apply for 12 months from the date of purchase.
The kits are supplied as follows:
- Window lifters for 2 front doors,
- Electrical wiring kit,
- Switches with symbols, backlit
- Fasteners,
- Decorative type plug;
- Description of mechanism assembly.
Power window
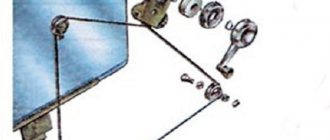
- The first thing you need to do is distinguish between the side of the window regulator, the right and left sides are different from each other.
- Next, we check the fastening of the glass to the glass bracket, it must be strong, otherwise replace the necessary parts.
- We attach the adapter plate to the glass brackets; for this you will need M5 bolts and lock washers.
- The welded nuts should face the outer door panel.
- We drill holes D=8, as shown in the diagram below.
- We fasten the window regulator with M6 bolts through lock washers.
Next, we move on to wiring the wires; for this you need to purchase window lifter buttons, which are not supplied with the mechanism. The connection must be made according to the diagram:
We screw the mass to the car body, direct current +12 volts with a mandatory break to the fuse, and connect the additional wire to the side lights.
In general, installing power windows on the “seven” is not so difficult; the process is completely simple and understandable.
My first car was a VAZ 2107, I did this work a couple of times, and on my own.
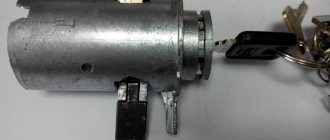
Before installing new window regulators, you must remove the old ones.
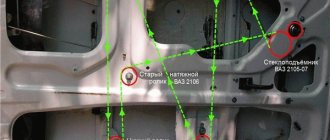
I’ll say right away that the window lifters on the “seven” are equipped with an additional tension wheel (roller), if you removed the window lifters on the “Zhigulevskaya” classic, then remember that there are three rollers, in the “seven” there are four of them, because the glass configuration is different (there is no so-called “window window” ).
Open the car door.
Now we need to remove the lift handle (under the decorative trim there is a lock washer, we use a screwdriver with a flat blade).
The handle has been removed (the glass should be lowered all the way down), now we remove the decorative trim (it is on plastic latches, we insert a screwdriver and snap it off without much effort or fanaticism.
That's all we have before us is the window lift mechanism.
We pick up a key for ten (as far as I remember), we need to unscrew the bolt that secures the tension roller, loosen it
Now you need to remove the fastening mechanism, you need an eight key, you will see three nuts, they are located in the area where the window lifter handle is attached (a sleeve with slots).
The glass that we lowered earlier, now we need to lift it a little and remove the entire window lift mechanism.
Installation is in reverse order, here are just a few tips, be sure to lubricate the window lift cable before installation.
Don’t forget to tighten the window lift cable using a tension roller, pull it all the way, secure it with a nut and check the entire mechanism for functionality (the glass should go down and up smoothly, without any “brakes” or sudden movements.
Removing the window regulator
After the door trim is removed, you can proceed directly to removing the window lifter.
For this you will need:
- crosshead screwdriver;
- two heads ( 10 and 8
); - hammer or ratchet handle;
- extension.
The first stage of work
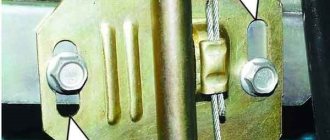
To remove the window lifter, you need to unscrew the fastening of the window lifter cable clamp, which is held on by two bolts: to release the cable in this place, you just need to loosen one of the bolts and the clamp itself will fall down.
loosen the roller nut ; it is held on by three bolts.
Next
, once all the bolts are unscrewed, the car enthusiast will only have to remove and unscrew just one nut, which is located on the inside of the door under the window lifter fastening mechanism, and after this nut is removed, all that remains is to carefully pull the mechanism to the right and pull it out of the door entirely.
Window lifter design
Drive types
Let's start with the drive mechanism, as already noted, it comes in two types - mechanical (also known as manual) and electric.
- The mechanical one is a small gear reducer. With this type of drive, a cable actuator is usually used. Therefore, such a gearbox consists of two gears that mesh with each other. The drive gear is small in size, and it is the one that the driver rotates using a handle mounted on the door. The driven one is much larger in size; it is a drum for winding the cable. Due to the different sizes of these gears, relative ease of opening and closing the glass is achieved.
- An electric drive also uses a gearbox, but of the “worm-gear” type. There is a worm on the electric motor shaft, which is engaged by a gear. The drive motor itself is of a reversible type, that is, when the polarity is changed, its direction of rotation changes, which allows the use of just one element to both lower and raise the glass. This drive is used with all types of actuators.
Actuators
1 – window lifter handle; 2 – facing of the window lifter handle; 3 – power window handle socket; 4 – window lift mechanism; 5 – upper rollers; 6 – screws for fastening the pressure plates; 7 – pressure plates; 8 – sliding glass brackets; 9 – sliding glass; 10 – cable; 11 – lower roller; 12 – bolt; 13 – tension roller
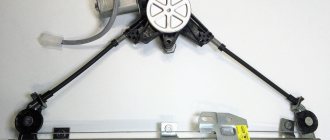
Now, regarding the actuators. With both types of drives, the cable type can be used. At the same time, for mechanical and electrical mechanisms their design differs, and significantly.
Let's consider the design of a mechanical drive and a cable actuator using the example of a VAZ-2107. In addition to the gearbox, it consists of 4 rollers between which the cable moves, with the ends fixed to the drum. One of the rollers is a tension roller and ensures proper tension of the cable for the entire period of operation, since it stretches during operation.
Two rollers are the top ones and they are connected using tension plates to the glass brackets. Because of this, when lowering or raising the rollers move along with the glass. The last roller is the bottom one, it is stationary and it is fixed to the door.
A cable is laid between these rollers in a special way. Moreover, it is not looped. When lifting or lowering, the end on one side is unwound from the gearbox drum, and the other is wound up. Thanks to this, the ability to move the upper rollers, and with them the side glass, is achieved.
In an electric drive, the cable actuator has a different design. It consists of a guide at the ends of which rollers are installed. The electric motor with gearbox is located slightly to the side of this guide. The drive cable is laid between the guide rollers and goes to the gearbox drum, where it is secured.
In the area between the guide rollers, a slider is attached to the cable, which in turn is connected to the glass. When the electric motor is turned on, one side of the cable begins to wind onto the drum, and the other begins to unwind. Due to this, the cable moves between the rollers, and with it the slider with the glass.
The lever actuator operates on a different principle. There is a lever, at one end of which there is a semicircular gear sector connected to the driven gear of the gearbox. Its other end is connected to a bar on which the glass is mounted. The lever on the sector side is connected by means of a bracket to a fixed plate fixed to the door.
There are actuators that include two levers in the design, with the second one playing the role of an auxiliary one.
The third type of actuator is rack and pinion, and there are several types of it. One of these mechanisms has a fixed guide with a gear sector along its entire length. This sector engages with the gearbox gear. In this design, the motor and gearbox are movable and connected to the glass. That is, when turned on, the engine with the gearbox and glass begin to move relative to the rack.
Video: Replacing a VAZ 2109 window regulator. Do it yourself!
Also, the design of electric windows includes a control mechanism, which consists of ordinary keys through which the electric motors are powered from the vehicle’s on-board network.
Window lifter malfunctions
In the summer, on a VAZ 2106, one of the devices that allows you to somehow cope with the stuffiness in the cabin is a window lift. If this mechanism does not work, then driving becomes a real pain. Therefore, Zhiguli owners should know what problems can arise with window regulators and how to fix them.
Glass fell
Mostly, glass falls due to loosening of the cable attachment to the glass itself. As a result, the cable slips, and the lowered window cannot be raised. If the problem lies in a loose fastening, then it will be enough to remove the door trim and tighten it, adjusting the relative position of the glass and the cable.
The glass does not respond to the rotation of the handle
If on your car, when you turn the window lifter handle, you cannot lower or raise the window and at the same time you feel that the mechanism is not working, then the main reason for this phenomenon is the licked slots on the handle itself. It is connected to the gearbox shaft through splines, but due to the soft material of manufacture, the splines on the handle wear out over time. In addition, premature wear is possible due to the tight movement of the glass, which can be caused by misalignment of the guides, the presence of a foreign object in the door, or problems in the gearbox itself.
When erasing the slots of door handles, problems arise with glass movement
Broken cable
One of the malfunctions of a mechanical window lifter is a broken cable. It manifests itself in the same way as when there is a problem with the handle, i.e. in the form of free rotation of the handle. Since the cable is not sold as a separate part, the window regulator in this case will have to be completely replaced. Attempts to restore the break will require a lot of time and effort, and the low cost of the device in question, amounting to about 200–300 rubles, indicates the inexpediency of repair.
Gearbox failure
The design of the window lifter is such that the gears of the gearbox can wear out over time, that is, their teeth simply wear out due to the softness of the metal. As a result, the mechanism runs idle, while the cable and glass do not move. It is possible to replace the worn gear by removing it from the old window lifter, but it is better to install a new product that will last much longer than a restored one.
Mechanism grinding
Sometimes, when the glass is raised or lowered, the device may make sounds similar to grinding. The reason may be a lack of lubrication or damage to one of the tension rollers, which is simply rubbed by the cable, causing the cable to jam inside the roller. In this case, the latter will have to be replaced. If the grinding noise is caused by a lack of lubricant, then you simply need to apply lubricant, for example, Litol-24, both to the gearbox itself and to the cable with rollers.
At the first sign of a grinding noise, the window regulator must be lubricated.
Glass creaks
During vehicle operation, the windows are exposed to various types of contaminants (dust, dirt, sand, etc.). When the door glass is lowered, the abrasive substances on it act on the surface, scratching it and producing a characteristic squeak. Although the doors are designed with special velvets (glass seals), which are designed to protect the glass from scratching by dust and sand, over time they wear out and do not perform their functions well. Therefore, if a characteristic squeak appears, it is better to replace the glass seals.
If a squeak appears while the glass is moving, then most likely the velvets have become unusable
When the mechanism breaks down, what are your actions?
If the window regulator in a VAZ 2107 breaks down, it will not be difficult to fix it. The nature of the failure depends on the type of mechanism. Most often, regardless of the design, it is the teeth of the rotating gear that break. To carry out repairs, carefully remove the car door trim and card, as well as all the elements that are placed on it. After that, remove the window regulator itself and take it to a car dealership. If your mechanism is based on a cable, then with the window completely lowered, place marks on it near the gears. This will greatly simplify reassembly after repairs and will save you from lengthy glass height adjustments.
This is interesting: How not to buy junk cars: important tips
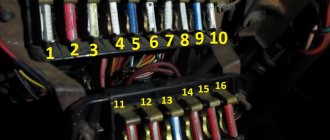
If the electric window regulator in a VAZ 2110 car fails, everything is much more serious. In this case, there may be many possible breakdowns. First of all, you need to check the power supply control unit. In all VAZ 2110 models, the operation of electric windows is controlled by a fuse, which is located in the mounting block under the hood of the car. You can see its serial number on the block cover. If it fails, replace it.
If everything is fine with it, then you need to proceed to the block itself, in which the power windows are controlled. If the electrical contact is poor or the transistors fail, the power window drive located on the passenger side will also not work, because this system is looped together.
If the window in your car does not go down or up completely, this is due to the glass being skewed or pinched. In this case, it is necessary to more accurately set the glass clamps and adjust their positions as accurately as possible. In some cases, replacement of glass rubber seals is required. When exposed to moisture, they expand and prevent the canvas from moving.
The windows in the VAZ 2110 car in some models have glass closers. This is a modern device that allows you not to hold down the button of the electric unit when pressing, because the glass will lower or rise on its own. Very often, glass closers are connected to the car alarm, which allows you to close the windows when you press the lock button on the remote control. If for some reason the glass closers in your car are not working correctly, then the first thing you need to do is check whether the control unit buttons work well. If the problem is in them, then replacement will save the situation. Do not try to disassemble or repair them, it will simply be a waste of time.
It also happens that the reason for poor performance of the glass closer is poor lubrication of the mechanism. To eliminate it, it is necessary to lubricate the drive gears, as well as other elements, depending on the type of window lifter device.
If the electric drive in the mechanism does not work, then it needs to be replaced, while the drive in the driver's door card must work. For the VAZ 2110 car model, buying the required electric drive will not be difficult, since it is available in all car stores. In order not to bother yourself with markings, simply remove the failed part and go to the store with it - this will make choosing the right model much easier.
If the cause of the breakdown of the electric window in the VAZ 2110 could not be determined, then you will have to contact a service center for a more detailed diagnosis. Since VAZ 2110 cars have electronic “brains”, the cause of the breakdown may be a failure of the controller or a failure in the firmware.
The device of window lifters VAZ 2107
A diagram of a window regulator for a VAZ 2107 car for the driver's door will help you figure out what the device is. Mechanism functionality:
- opening/closing windows;
- creating a comfortable microclimate in the cabin;
- raising or lowering the glass to the required level.
These devices come in manual and electric types. In Zhiguli “standard” configurations, a mechanism is installed that opens using a special handle. The electric version allows you to perform this action by pressing a single key. A dashboard with buttons can be installed on the driver's door or personal switches can be placed for all locations where window regulators are installed.
Electric window lifts "six"
The newly installed electric window lifts on the VAZ 2106 make it possible to eliminate the rotation of the window lifter handles when it is necessary to open the windshields at the front of the cabin. It also makes the trip more comfortable and allows you not to be distracted from the process of driving the vehicle.
Another serious advantage appears: when an additional electrical circuit is used in the installed alarm circuit, a method appears for operating the automation when closing the vehicle doors.
Many car enthusiasts are wondering how to replace the window regulator on a VAZ 2106 with a similar mechanism, but with an electric drive. Let us explain that there is nothing complicated in this technological operation; you must have basic plumbing skills and be able to use the tool.
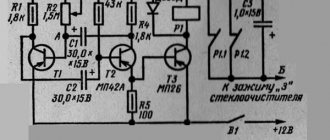
The electric window lifter diagram for the VAZ 2106 is located here:
The device of window lifters VAZ 2107
Every car enthusiast knows what a window lifter is. Its functions are simple: open and close the window, thereby regulating the microclimate and level in the cabin. There are two types of window lifters: manual (colloquially crutches or meat grinders) and electric, controlled from the dashboard or individual buttons.
At the manufacturer's factory, the VAZ 2107 was equipped with manual window lifters, which have a fairly simple design. They are based on the operation of a mechanism to which glass is attached using special fixing devices. The side windows are lowered and raised by turning a handle located inside the cabin.
What kind of window lifters are there on the "seven"?
During its existence, the VAZ 2107 was equipped with two types of window lifters:
- Rack and pinion. They are considered more reliable. Installing this type of window lifter completely eliminates glass distortion. The mechanism works by transmitting the rotational force of the gear, which interacts with a linear rack, to the glass carriage. The main disadvantage is the need for constant lubrication, since the gears of the mechanism were made of plastic, which wears out quite quickly and can damage the entire mechanism.
Adjusting door locks
Before adjusting the lock, it is recommended to outline the outline of the lock on the body pillar.
1. If the door closes too tightly, loosen the fastener bolts, move it outward and tighten the bolts. If the door closes poorly, move the lock inward. In this case, there should be no protrusion or retraction of the door relative to the body.
2. If the door goes down when closing, lift the lock. If the door rises when closing (sagging in the open position), lower the latch.
3. If the door is difficult to unlock with the internal handle, then the position of the internal handle of the lock drive is adjusted. To do this, loosen the screws securing the handle bracket and move the handle together with the bracket to the desired position. Then tighten the screws.
Do-it-yourself replacement of rollers and timing belt on a Grant - step-by-step instructions
- Unscrew the generator pulley mounting bolt. If this does not work, open the plug in the clutch housing, then use a mounting blade to hold the flywheel teeth, thereby securing the crankshaft from turning.
- Once the bolt is removed, remove the generator drive pulley.
- On VAZ 21116 and VAZ 11186 engines, unscrew the three bolts that secure the lower part of the timing cover and remove it.
- Next, remove the timing belt from the camshaft and crankshaft pulley along with the tension roller.
After completing the replacement, adjust the belt tension using the tension roller.
Before you start tensioning the belt, you should warm up the engine so that the coolant temperature is approximately 20-25°. It is at this temperature that the marks on the tension roller should coincide; if the coolant temperature is 80-90°, the mark will shift to the right by 5-6 mm towards the radiator. However, this is provided that you use the rollers that AvtoVAZ prescribed; if you buy something of your own, adjustment according to this scheme may not be suitable.
1. Align the marks on the camshaft pulleys with the marks on the rear timing belt cover. 2. Secure the pulleys using the tool shown above.
7. Then tighten bolt 3 of the tensioner fastening, with a bolt tightening torque of 23-36 N.m. (2.3-3.6 kgf.m.). 8. Remove the crankshaft locking device and turn the crankshaft two turns. If mark 1 deviates beyond mark 2, readjust the belt tension by first unscrewing the automatic tensioner mounting bolt by 45º-90º.
https://youtube.com/watch?v=7zgXJdfatms
Sources
- https://avtovx.ru/kuzov/steklopodyemniki-na-vaz-2106-216/
- https://vaz2106-remont.ru/snyatie-i-ustanovka-mexanizma-steklopodemnika/
- https://vaz-remont.ru/zamena-rolikov-i-remnya-grm-lada-granta-svoimi-rukami/
Installation guide for VAZ 2107 glass lift
The installation process consists of the following steps:
- First, you should carefully study the installation instructions that come with the kit.
- Next, to ensure safety during installation, you must turn off the power supply to the vehicle.
- Then you need to lift the glass all the way up and secure it with tape.
- Next, according to the scheme described earlier, it is necessary to remove the old lifting mechanism.
- We choose a place for the electric motor, usually it is placed at the bottom of the doors. We place the electric motor in the chosen place and make markings for fasteners.
- Using a drill, we make holes according to the markings for installing the mechanism.
- We mount the EPS in the chosen place and secure it with fasteners.
Installing the mechanism in its original place Self-tapping screws are included with the ESP, but it is better to replace them with screws with nuts and a washer for fixation. - After installing the electric motor, which is secured with long bolts, be sure to put two nuts between the door and the electric motor brackets. Thus, during operation, friction of the cable along the door frame can be avoided.
- Next, you need to lay the cable in its regular place between the rollers. According to the instructions, the cable tubes must intersect inside the door.
- Then you should find a place for the seats of the lift control buttons and prepare them.
The best places to do this are the dashboard and door handles. One option is to replace the standard buttons on the dashboard. Installing a strip on a door - We lower the glass down. We fix the glass in the mounting rail. We perform all operations carefully so as not to damage fragile parts.
- At the next stage we will connect the electrical wiring.
Before doing this, you need to carefully study the connection diagram that is included in the package. Installation should be carried out strictly according to the diagram. Wiring diagram - First you need to connect the wires to the center console of the car. They are pulled through a protective corrugated pipe. It’s better to run a separate wire with a fuse so as not to load the cigarette lighter wires!
- We bring the wires out through the prepared holes for the control buttons on the dashboard, connect them and place them in the designated place for them.
Window control buttons - When connecting the power circuit of electric glass lifts to the vehicle's on-board electrical network, fuses must be used. The circuit according to which the electrical wiring is installed must ensure the use of electric drives only when the power unit is turned on.
- The wires that pass through the cabin must be insulated with plastic tubes. They should be laid under the sheathing.
- After installing the electrical wiring, connect the negative terminal to the battery.
This completes the replacement of mechanical windows on the VAZ 2107 with electric ones with your own hands. Now you can begin checking and adjusting the installed device.
Using the installed electric drive, we raise the glass up. It is necessary to adjust the mechanism so that when the glass is raised all the way, there are no gaps left anywhere. After checking and adjusting, you need to put the door trim back in place in the reverse order. Instead of the mechanical window lifter handle, we install a plug.
Installing electric windows yourself increases comfort for the driver and passengers thanks to the ability to control the opening and closing of the side window using a button. In addition, the presence of electric windows allows you to set the alarm so that when arming, all windows automatically close.
Features of replacing the VAZ 2107 window regulator
For owners of other VAZ “classic” cars, replacing the VAZ 2107/2105 window regulator may seem unnecessarily complicated.
Since there are four rollers in total, one tension roller and three guides, and the cable is connected to the solid glass brackets in two places, the cable around the rollers can be routed in two ways - through the upper or lower rolling bearings.
When passing through the lower roller, the upper cable exiting the mechanism is directed through: the lower left guide roller, the upper left guide support, the lower central tension roller, the upper right roller. As an alternative, tracing is also done through the upper roller, which is done in the reverse order. In the same case, the lower cable is guided.
You should prefer the optimal tension force of the cable drive: the cable should not be overtightened, but should not dangle.
Unscrew the lock button by hand or with a Phillips screwdriver. We insert the blade of a flat-head screwdriver between the socket and the trim of the window handle.
We press the lining away from the socket and unplug them.
Remove the handle trim and the window lifter handle.
Using a Phillips screwdriver, through the holes in the armrest, unscrew the three screws securing it.
Using a screwdriver, unscrew the three self-tapping screws on the door trim. Use a slotted screwdriver to pry up and unclip the three plastic clips.
Lifting it up, remove the trim from the door.
Using a slotted screwdriver, pry off the lining of the inner door lock handle.
Use a slotted screwdriver to engage the upholstery and unclip the seven plastic clips located on the bottom and sides of the door. We remove the upholstery.
Lower the window lifter a little.
Using a Phillips screwdriver, unscrew the four screws securing the glass frame to the window lift cable.
Raise the glass all the way up and secure it with tape.
Unscrew the two nuts securing the glass guide.
Using the “8” wrench, unscrew the three nuts securing the window lifter mechanism.
Using a “10” wrench, loosen the tightening of the screw securing the tension roller and, moving it, remove the cable from it.
We remove the cable from the remaining door rollers. By removing the window regulator pin from its hole...
... we take it out of the door.
We install the power window, according to the instructions we outline its location in the door.
Drill a hole at the bottom.
We insert the new window regulator into the doorway and secure it with two bolts.
We screw the adapter plate to the window lifter carriage.
We lower the glass and combine its frame with the adapter plate.
We fasten the glass with two screws.
We lay and connect the electrical wiring. Install the removed parts in reverse order.
Even more useful tips in a convenient format
Which electric windows are suitable for the VAZ 21054?
How to install electric glass lifts Garnet on a VAZ 2105?
The right window lifter on the VAZ 2107 does not work
One of the email window regulators work much slower
On VAZ 2107 cars, mechanical window lifters are installed from the factory, which are activated manually using a handle and a special mechanism. This mechanism must always work properly, since the need to open a window in a car arises quite often while moving. Often, owners of sevens tune their car by replacing the mechanical windows of the VAZ 2107 with electric ones. In the material we will find out the main types of breakdowns of mechanical devices, as well as independent methods for eliminating them.
Summarize
As it becomes clear from our article, replacing a window regulator on a VAZ-2106 is, although not the simplest thing, but also not the most difficult, especially if you understand the process in detail and do everything strictly according to the instructions
. It is also worth noting that the design of the window lifter on the VAZ-2106 is quite reliable, and it is worth changing it only if the device has completely stopped working or the car has been in an accident during which the window lifter mechanism was damaged.
How to change the window regulator on a VAZ 2107
How to change the window regulator on a VAZ-2107
The windows in any car should be in good working order, even if they are rarely used. From the factory, the VAZ-2107 has manually controlled cable lifts. If the car has an electric drive, this already indicates that the car owner has looked at the view. In this article we will look at how to independently replace the power supply with a “family” one.
Design Features
Most owners of the seventh new generation model are confident that the process of replacing window regulators is somewhat difficult. This is due to the fact that the glass is attached to the supports and cable not in one place, but in two places. This solution required adding another video. 4 of them are currently in use (three for direction, one for tension).
It can be easily replaced with simple tools:
Step-by-step replacement at the front door
To install a new electric window, you must first remove the old mechanism.
- Remove the three screws that secure the handle to the door.
- Remove the handle.
- Remove the door trim.
Before disassembling the factory winch, connect the two wire branches.
This is necessary so that the cable does not fall out of the grooves in the drum and the mechanism can be reused.
Structural deletion looks like this:
- Lower the window one turn of the window handle so that you can reach the cable lock and glass supports through the technological doorways.
- One screw must be completely removed and the other slightly loosened on the bracket to secure the cable to the bearing lug. Bring it out.
- Lift the glass to its highest position and secure it with a standard screwdriver. You can use other tools at your disposal.
- Take a 10mm wrench and slightly loosen the nut that secures the tension roller. He is concentrated under the door.
- Remove the tension cable and the three guide reels.
- Remove three nuts to attach the window power supply to the door.
- Loosen the 2 nuts securing the guide groove and slide it to the right.
- The final step is to remove the window from the door.
Power window
how to replace a manual window controller with keys [ VAS
2104]
After removing the mechanism, you can check how the rollers rotate.
Installing a new window regulator
The new mechanism must have a bracket that secures two cable branches. It should not be removed until the installation is complete.
In general, the installation process looks like this:
- Installing and securing the housing in its “own” place.
- Installation of cables around the rollers.
- Fastening glass clamps with cable. It is secured with screws with 2 brackets.
- Installing the guide groove.
- Cable tension.
- The bracket is now removed which secures the cable branches.
- Installation of doors and door trim.
You can route the cable around the rollers in two ways through the roller support (top or bottom). If the bar passes through the bottom roller, the cable runs like this:
- Left guide roller (bottom).
- Left guide (top).
- Central tension spool (bottom).
- Guide element in the upper right corner.
If you replace the front window regulator, it can be bypassed through the top coil in the opposite direction.
- Lower the glass to the down position.
- Turn the handle all the way to lower the window.
- Adjust the cable tension by moving the desired roller.
- Tighten the bolt that secures the roller.
Please note that the stretch marks should be sensitive. The cable should not stretch, but it should not hang either
If a squeak appears after installing a new mechanism, do the following:
- Release and remove the cable from the rollers.
- Cross the lower and upper branches coming out of the mechanism drum.
- Repeat the installation and tensioning procedure.
Brief instructions for replacing the mechanism
In general, the procedure for replacing a window regulator looks something like this:
- The door trim has been removed.
- The cable is disconnected from the clamps holding the glass.
- The cable has been removed from the rollers.
- The guide channel and lifting mechanism are then removed.
- Installing a new window regulator.
- Refilling the cable.
- Installation of glass brackets and cable tension.
- Installing the door trim back.
To summarize, we note that the process of replacing power windows on a VAZ-2107 is a completely completed task for the car owner. During the repair process, the main thing is to carefully follow all the recommendations and installing a new mechanism will not be a problem for you.
There is a special offer on our website. You can get a free consultation with our corporate lawyer by simply submitting your question in the form below.
Reasons for handle breakage
Often, replacing the power window handle will only temporarily fix the problem. Soon the new handle also fails. The reason is that the glass goes down and up too tightly, so you have to put excessive stress on the rather fragile plastic part. In this case, you must first eliminate the cause of the stuck glass or window regulator, and then change the handle.
It’s easy to check the operation of the mechanism - just raise and lower the window.
There are several reasons for the mechanism to jam:
- twisted drive cable;
- glass distortion;
- poor lubrication in the mechanism;
- freezing of ice (in winter).
If the window regulator works hard, you need to remove the door trim, find and eliminate the cause: change the lubricant, melt the ice or replace the faulty mechanism.
Another reason for handle breakage is worn-out window drive splines. In this case, it is necessary to replace the window lifter mechanism with a new one and only then change the handle.
To carry out repair work to replace the rear door windows of a VAZ 2106, we will need eight- and ten-size wrenches and a screwdriver. Once you have everything you need, you can begin the repair.
The sequence of actions will look like this:
- Remove the decorative door trim, as we did when replacing the rear side windows.
- Lower the glass a little and use a screwdriver to unscrew one screw securing the glass frame pressure plate, and simply loosen the second screw. The glass should move freely along the cable without the help of a window lifter.
- Raise the glass as high as possible and fix it in this position, placing, for example, pieces of rubber tubes in the gap between the glass and the inner edge of the glass.
- Loosen the nut securing the tension roller and remove the cable from the rollers. Next, remove the cable from the upper guide roller, which is located inside the door.
- Unscrew the nuts securing the window regulator and remove it (see Removing and installing the front door window regulator of a VAZ 2106).
This completes the work on replacing the rear door window regulator. Replace the mechanism with a new one and install it on the car in the reverse order of removal. After installing the window regulator, adjust it.
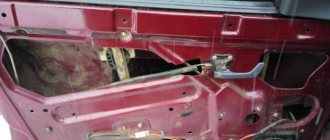
To carry out repair work on the removal and subsequent installation of the front door windows of the VAZ 2106, we will need wrenches “10” to “8” and a screwdriver.
- The first step is to remove the front side glass so that it does not interfere with our work (see Replacing the side windows of the front doors of a VAZ 2106).
- Remove the window lift cable from the upper guide pulley. The upper guide roller is not visible from the outside of the door and is in the same vertical line as the lower guide roller. Unscrew the nuts securing the window lifting mechanism and remove the mechanism along with the cable from the inside of the door.
The front door window regulator of the VAZ 2106 has been removed, replace it with a new one and install it in the reverse order of removal.
- Before installing the window lifting mechanism, wind the cable onto the drum two turns on each side.
- The window lifting mechanisms of the front and rear doors differ in cable length, so they are not interchangeable.
- When installing the mechanism on the door and the cables on the rollers, do not allow the cable to jump off the drum, hold it with your hand.
At this point, the repair of replacing the front door windows of the VAZ 2106 is completed.
Sources
- https://ladaservice.info/lada-priora/raznoe/kak-snyat-ruchku-steklopodemnika-na-priore/
- https://remont-vaz2106.ru/zamena-steklopodemnika-zadnej-dveri-vaz-2106
- https://remont-vaz2106.ru/snyatie-i-ustanovka-steklopodemnikov-perednix-dverej-vaz-2106