VAZ 2106 fuse box pinout, diagram
If you have any problems with electrical equipment: the low or high beams have disappeared or are not working, the turn signals, stove, cigarette lighter, fan, wipers are not working, the signal has disappeared, etc., then this could all be the reason that the fuse has blown. This means it needs to be replaced.
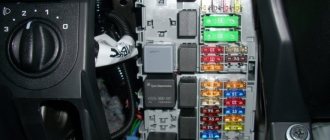
To do this, you need to know the location of the mounting block. And it is located under the steering wheel, on the left side. In order to understand what the VAZ 2106 fuses are responsible for, you need to look at the simple pinout of the old fuse block (FB) and see the description below.
Table “VAZ 2106 fuse designations”
| Fuse number | Current, A | What is he responsible for? |
| 1 | 16 | 1. Lamps 2. Horns 3. Power socket 4. Cigarette lighter 5. Rear lamps 6. Front door open warning lamps 7. Clock |
| 2 | 8 | 1. Windshield wiper and wiper relay 2. Wiper motor 3. Heater motor |
| 3 | 8 | Left headlight (high beam) and high beam indicator lamp |
| 4 | 8 | Right headlight (high beam) |
| 5 | 8 | Left headlight (low beam) |
| 6 | 8 | Right headlight (low beam) |
| 7 | 8 | 1. Left front marker 2. Right rear marker 3. Trunk light 4. License plate light 5. Instrument lights 6. Cigarette lighter light |
| 8 | 8 | 1. Right front marker 2. Left rear marker 3. License plate light 4. Engine compartment lamp 5. Side light indicator lamp |
| 9 | 8 | 1. Oil pressure sensor with warning lamp 2. Coolant temperature sensor 3. Fuel level with reserve warning lamp 4. Parking brake activation and brake fluid level warning lamps 5. Turn signals and corresponding warning lamps 6. Battery charge warning lamp 7. Control lamp carburetor choke control lamp 8. Carburetor shut-off valve 9. Tachometer 10. Reversing lamps 11. Glove compartment lamp 12. Rear window heating relay coil |
| 10 | 8 | 1. Voltage regulator. 2. Generator excitation winding |
| 11 | 8 | Spare |
| 12 | 8 | Spare |
| 13 | 8 | Spare |
| 14 | 16 | Heated rear window |
| 15 | 16 | Engine cooling fan |
| 16 | 8 | "Emergency" |
One of the high beam lamps has burned out
With such a malfunction, the high beam does not fail completely - as a rule, only one lamp turns off. Almost every car owner knows the solution to the problem in this case, but we will still remind you how to make a replacement:
- Unscrew the bolts securing the rim of the faulty headlight
- Turn the glass clockwise and pull the headlight out of the housing
- Disconnect wires from contacts
- Press the latch and carefully remove the light bulb
You can verify that the lamp is faulty by examining the filament (as is the case with ordinary household lamps). If the lamp is faulty, you need to purchase a new lamp and install it in place of the old one, without touching the glass with your hands. After that, reassemble everything in reverse order and make sure the high beam is working.
The “six” light acquires special importance when a motorist has to drive in conditions of poor visibility, in difficult weather conditions and at night. However, any driver must remember that defects in the vehicle’s electrical equipment system, one way or another, affect the functionality of the power plant. And this is despite the fact that the main electrical circuits are protected by relay elements, just as the lighting of the “six” is protected, the safety devices of which are routed to the vehicle’s fuse box.
On the VAZ 2106, the headlight relays, along with other main electrical equipment of this vehicle with high current consumption and high voltage, are connected via relay elements. The main purpose of the VAZ 2106 light relays, whose price is low, is to protect the switch contacts from energy overload.
Car enthusiasts often ask where the high and low beam relays are located on the “six” and what they look like. Let us explain that almost all relay devices, as well as the relay - voltage regulator, are located in the power plant compartment. The exception is the turn signal and hazard warning relays, which are located under the instrument cluster in the car interior, covered by a front panel. Both relays are identical in appearance (they can be easily found on the mudguard on the right as the car moves) and are located next to the battery charging indicator relay.
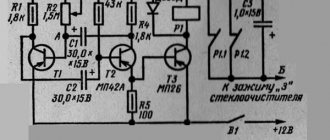
The electrical diagram of the light relay is located below:
On the general diagram of the electrical equipment of the “six” you can see at number 5 the VAZ 2106 low beam relay, and at number 6 the VAZ 2106 high beam relay, which are interchangeable elements. Also here you can see the integration of the main electronic devices of the vehicle into the general electrical supply circuit of the vehicle of this modification.
Relay for high and low beam "six"
As already mentioned, the standard high and low beam relays of the VAZ 2106 are absolutely identical, have similar catalog numbers (90.3747-10 or 113.3747-10), are of the same type as the initiation relay for the radiator fan device of the cooling complex of the power plant and can be replaced with each other friend.
To connect the light relay to the VAZ 2106, devices with item number 113.3747 are used, which are installed in a mounting-type block device. Similar devices are installed in the system to turn on the EDC fan device, heat the stern glass and produce alarm sounds.
The initiation voltage of the device at an average temperature of about 23 °C is within 8 V, and the resistance of the device winding at a temperature of 20 °C is 85 ± 8.5 Ohms.
Instead of products under catalog number 113.3747, it is allowed to use updated high and low beam relays VAZ 2106 90.3747-11 in a plastic case and with increased dimensions. It is also allowed to replace products 113.3747-10 with a mounting bracket with gadgets with fasteners under the nomenclature value 90.3747-10 with the same characteristics.
The automotive industry practices the production of light relays for the VAZ 2106 under the nomenclature numbers 902.3747 (version 11 - without fasteners and 10 - with fasteners), used on injection "sixes", because The device integrates an additional resistance to suppress interference, connected in parallel to the relay winding. For such high and low beam relays, the resistance between connectors “85” and “86” is 65 - 80 Ohms. They are interchangeable with the VAZ 2106 light relay
Relay VAZ 2106
The following shows the location and designation of each factory relay:
- Voltage regulator, which is responsible for proper charging of the battery. Located on the left mudguard.
Battery charge voltage regulator relay - Turning on the radiator cooling fan. It is also located on the left mudguard, behind the expansion tank.
Radiator fan relay - A light on the dashboard that indicates battery charging. The relay is already located on the right mudguard.
Battery charging light relay - Low and high beam headlights. They are also located on the right mudguard. They are identical and interchangeable.
Relay for low and high beam headlights - Turn and hazard warning relay. It is located behind the instrument panel, approximately behind the tachometer.
- The wiper relay is located on the left side, under the instrument panel.
The video below clearly shows where which relay is located.
"Euroblock" VAZ 2106 (new model), diagram
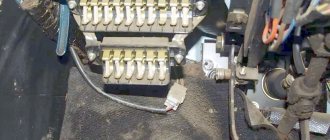
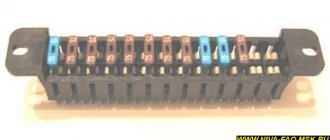
Below is a picture of what the Eurobloc looks like in real life.
Photo of Euro block VAZ 2106
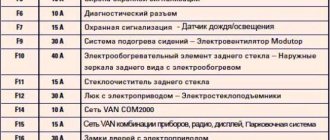
Below is the pinout of the new type of power supply or, as people say, “Euroblock”. The diagram also shows which fuse is responsible for what.
VAZ 2106 fuse block diagram with decoding
Removal and replacement process
There is nothing difficult in the process of changing power supply parts, so we will not describe this process. But we will tell you how to replace an old-style power supply with a new-style device.
- First of all, disconnect the battery. Now open the driver's door and use a screwdriver to pry out the two fasteners securing the decorative interior trim. Move it to the side and you will see a block. Using a Phillips screwdriver, unscrew the screws securing the power supply. Do this carefully so that the wires do not fly off the terminals in the process.
- Once the power supply is unscrewed, move it down. But do not pull it too hard to avoid breaking the wires. Note! Jumpers must be installed on those wires through which voltage comes from the engine compartment. Do not connect the jumper after the fuse itself, otherwise this will result in voltage passing through one part to power several electrical components.
- The order of installation of jumpers should be as follows: 3-4, 5-6, 7-8, 9-10, 11-12, 12-13.
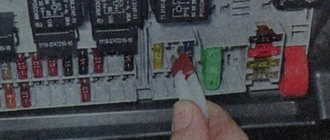
- Now you need to remove each wire one by one, starting with the first fuse from the old power supply, and mount it on the new one. Perform this operation with each contact, until the very last wire. When all the contacts are in place, you should check whether you did everything correctly. In particular, you need to turn on the voltage source and remove the corresponding fuse. If the device stops functioning, then all actions were performed correctly. For example, turn on the low beam headlights and remove one of the power supply elements responsible for the left or right headlight. If it goes out, then you did everything right.
- Check each fuse in the same way. If, when dismantling the element, the device continues to work, then the jumper is most likely installed incorrectly, so double-check the connection diagram.
Replacing the VAZ 2106 fuse box with a “Euroblock”
And finally, for those who don’t know how to replace the old model with a “Euroblock”, the following information. There is nothing complicated here.
You just need to follow the instructions below:
- First you need to disconnect the minus from the battery.
- Use a 10mm wrench to unscrew the old power supply. In this case, the wires are not disconnected.
- According to the diagram above, wires and jumpers are installed.
- It is important to install jumpers only on those wires that carry voltage from the engine compartment.
- Jumpers are installed between pins 3-4, 5-6, 7-8, 9-10, 11-12.
- Next, the wires are removed one by one from the old device and attached to the Euroblock.
- At the end, check that the connection is correct (for example, with the low beam on, if you pull out the 5th fuse, the left headlight should go out).
- All other circuits are also checked.
The video below clearly shows how to replace an old power supply with a Euroblock.
Location and electrical diagram
The power supply itself consists of two lines with fuses, which is installed in the car interior and attached to the body with two nuts. In particular, it is located on the driver's side under the instrument panel. Below is a diagram of the device, as well as the purpose of each element.
Diagram of an old-style block installed in a VAZ 2106 car
Description and purpose of each fuse block of the VAZ 2106 car
As you can see, almost all circuits of a domestically produced car are protected using fusible devices. However, there are exceptions here too. In particular, we are talking about:
- starter retractor relay - it is missing;
- the power circuit of the relay coil, which ensures the operation of the radiator fan of the cooling system, is also not protected;
- the ignition coil is also not protected by a relay;
- If your car has an old-style power supply, then it does not have a power supply circuit for the switch and a Hall sensor.
The element installed in the power supply is designed for a certain voltage in the wiring. This voltage is calculated using a simple formula - the voltage of all energy consumers in the wire must be multiplied by the reserve number, ranging from 1.2 to 1.5. So what's the purpose? In order for the operation to be stable, the nominal values of the block elements must match.
Car VAZ 2106
It should be added that very often owners of 2106 make mistakes by using an ordinary coin instead of a fusible device. It is better not to do this, since a short circuit may occur in your car at any time. Therefore, old-style power supplies, like any other machine component, also require periodic maintenance. Due to design features, that is, weak power supply holders or tips that regularly oxidize, you may notice the contact part burning.
Thus, due to the increased contact resistance, overheating occurs and the contact condition of the element deteriorates. This may result in additional problems with the vehicle's wiring. To prevent this from happening, you should periodically, at least twice a year, inspect the power supply unit as a whole. Clean the mounting sockets, inspect the power supply and promptly replace failed fuses.
But this all applies to old-style power supplies. Some owners of these car models, taking into account the periodic problems with the old-style power supply, change it to a new one.
Power supply unit for a new VAZ 2106 car