The vehicle's steering must always be in good condition. The safety of driving a vehicle directly depends on its functioning. At the slightest sign of malfunction, diagnostics are necessary, and then repair or replacement of the unit, which you can do yourself.
- Steering column VAZ 2106
Steering column design - Steering column problems
Creaks in the column
- Oil leak
- Stiff steering wheel rotation
- Dismantling
- Change of oil
- Video: adjusting the steering column play on a “classic”
- Replacing the pendulum
How to remove
- Replacing bushings
Replacing the steering gear on a VAZ 2106 car
The steering gearbox is an important part of every vehicle. Thanks to this device, the wheels are adjusted. Being a worm-type mechanism, the steering gear has a large margin of safety. However, like any other mechanical device, it is subject to wear and tear. Therefore, there is a need to change it periodically.
Failure of the steering mechanism
When the gearbox finally fails, the ability to drive the vehicle is completely or significantly lost. How to timely determine the “quick end” of the steering mechanism of a VAZ 2106 car, so as not to encounter this at the most inopportune moment? There are several “warning lights” that indicate that the mechanism in question needs replacement.
| Problem | Causes and consequences |
| 1. Extraneous squeaks are heard when turning the steering wheel | This may indicate that a foreign substance of an abrasive type has entered the gearbox, or an internal breakage of the worm or gear. Possible jamming of the unit, loss of control over vehicle control functions |
| 2. Significant play in the steering wheel | In most cases, play is caused by loosening the adjustment bolt and is eliminated by tightening it. If such a measure does not produce results, therefore, the gearbox of the VAZ 2106 car must be replaced |
| 3. Oil leak | This may mean either a rupture of the sealing gasket or a crack or hole in the housing. This is fraught with high oil consumption, insufficient lubrication of the steering mechanism and acceleration of its inevitable failure. |
| 4. Difficulty turning the steering wheel | The reason is insufficient lubrication, displacement of the engagement angle of the worm and gears, partial jamming of moving parts and mechanisms. It is fraught with increased driver fatigue during a long trip, complete jamming of the unit, loss of control over vehicle control functions |
| 5. Knocks and vibrations in the gearbox, which are felt through the steering wheel | The reasons may be: a loose adjustment bolt, failure of sealing couplings and gaskets, or wear and tear of mechanisms moving in mesh. Possible jamming of the unit, loss of control over vehicle control functions |
Replacing a vehicle gearbox is not a particularly difficult task, but this does not mean that it does not require careful preliminary preparation. First of all, you need to decide on the tools that will be used for the removal: which ones are available and which ones need to be prepared or purchased.
In order to replace the steering mechanism on a VAZ 2106 car, you need to acquire a set of wrenches, pliers, pliers, and a device for pressing out the pins of ball joints. Without the latter, the replacement process will become quite noticeably more complicated, which may affect the quality of the work performed. Therefore, you should not save at the expense of your own safety and comfort.
Because due to poor installation of the control mechanisms of the VAZ 2106 car, they can fail at the most inopportune moment, which will expose the lives of the driver, passengers and other road users to unreasonable danger. Next, it is necessary to carry out a superficial inspection of the gearbox housing for damage and assess the external condition.
It is located in the engine compartment, under the main brake cylinder of the car. In case of significant contamination, it is advisable to clean it from dust, dirt and oil stains. This will increase the speed and convenience of replacement work.
Removing and replacing the steering gear
Activities that are necessary to replace the steering mechanism of a vehicle:
- Removing the steering wheel.
- Disconnecting the steering shaft.
- The middle and left side tie rods are disconnected from the bipod and moved to the sides.
- Next, using two wrenches, unscrew 3 bolts that secure the steering gear to the car body. Before performing this procedure, it is necessary to remove the left fender liner.
- After unscrewing the nuts, you need to remove the bolts. This should be done carefully so as not to lose washers and gaskets, the main purpose of which is to adjust the ratio of the two shafts.
- The gaskets are removed (their locations must be marked, since they will be placed back when installing a new steering gear).
- The gearbox is carefully lowered and should hang on the machine body.
- Afterwards, through the top of the hood, the steering gear is removed.
The removed steering mechanism of the VAZ 2106 car must be completely cleaned of dirt. Work is also being carried out to clean the gearbox mounting area. If necessary, work is carried out to defect a section of the body if traces of corrosion or mechanical damage are detected.
It is unacceptable to ignore any, even insignificant in your opinion, problem with the mounting location of the steering gear, since in the future this may negate the work expended now. It is not recommended to leave damaged and suspicious areas of the body without proper care.
Installation of the steering gear is performed in the reverse order. However, in order for the replacement to take place correctly, during assembly work you must adhere to the following recommendations:
- When screwing in bolts and nuts, do not immediately tighten them.
- After completing the process of installing fasteners, you need to get behind the wheel and turn it to the right, and then to the left a few turns. Thanks to this action, automatic adjustment occurs - all parts and elements are finally adjusted to their seats.
- After performing the manipulations described above, it is necessary to finally tighten all bolted connections and reinstall all additionally removed parts and elements in the reverse order.
When the adjustment is completed, it is recommended to check the amount of lubricating fluid inside the crankcase. If the quantity there is not enough, you need to add oil to the required level.
Source
Replacing the steering gearbox on a VAZ 2101, VAZ 2102, VAZ 2103, VAZ 2106
Welcome! The steering gearbox is an integral part of any car, because only thanks to this thing the forces from turning the steering wheel are transmitted to the wheels. But like any other unit, the steering gear wears out over time, which makes it necessary to replace it. You can find detailed instructions for replacing the steering gearbox below.
Note! To replace the gearbox, you definitely need to take a set of tools for its removal and installation, the set of tools should include: A basic set of wrenches, as well as pliers, and you will have to buy a special puller for pressing out the pins of the ball joints, otherwise removing the steering gearbox will be difficult without it!
Summary:
Where is the steering gear located? It is located in the engine compartment of the car, so after opening the hood you can immediately see it, but to get an approximate orientation, the brake master cylinder is located just above the gearbox, and the gearbox itself is indicated by an arrow in the photo.
When should the steering gear be replaced? When it breaks down, control over the car is immediately lost; in other words, the control simply fails. But how can you understand an impending gearbox failure? We will answer this question!
The first signs of gearbox wear include:
- The appearance of various kinds of sounds or so-called squeaks in the steering gear, which are especially audible when turning the steering wheel.
- And also more serious defects of the gearbox include the appearance of large play when turning the steering wheel in the right direction.
Note! But the backlash can also be caused by a loose adjustment screw, which can be treated simply by tightening this screw to the required point. (For information on how to tighten the adjusting screw, see the article: “Adjusting the steering wheel play”) If adjusting the screw does not produce results, then most likely you will have to replace the entire steering gear!
Installing electric power steering
If a car owner wants to install an electric booster on a VAZ-2107, he should give preference to factory units. Before setting up and upgrading the system, the transmission speed sensor should be adjusted. This will avoid turning the steering wheel too “tight”.
Among other additions, when installing an ESD in your car, the vehicle owner will have to install a new choke cable (you can purchase it as part of the ESD kit for the VAZ-2108), replace the gearbox and install a MUR1100E diode.
Electric power steering on a VAZ-2107, when purchasing a ready-made kit, requires the presence of a speed sensor, various fasteners, a choke cable, an ignition switch, several switches and a casing for the steering column.
When assembling an electric power steering for a VAZ-2107 with your own hands, you need to start with the adapter plate and cardan. After removing the crosspiece, you need to select a cardan of the appropriate length. The welded and assembled crosspiece, or rather its bearings, are equipped with new lubricant. After this, the steering device is installed and the electrical component of the power steering is connected. The red wire should go to the battery, and the brown wire should go to its mounting stud. The blue cable for the ignition switch should go to the orange one. The tachometer wires should go to the dashboard chip, and the connecting elements between the speed sensors should go to the ninth pin of the ECU.
How to replace the steering gear, also known as the steering mechanism, on a VAZ 2101, VAZ 2102, VAZ 2103, VAZ 2106?
Note! Before starting the operation, remove the front driver's wheel from the car!
Removal: 1) First you will need to remove the steering shaft from the car. (For information on how to remove the steering shaft, read the article: “Replacing the shaft”)
2) Next, disconnect the middle and left side tie rods from the bipod, and after disconnecting, move both rods to the side. (For information on how to disconnect both rods, see the article: “Replacing steering rods on a VAZ”)
Note! You can watch another interesting way to disconnect rods in the video clip located at the very end of the article! (For disconnecting the rods or, as they say, knocking them out, see “0:00 to 5:10 min”)
3) Now take a wrench in your hands and, at the bottom of the car, use it to unscrew all the nuts of the bolts that secure the steering gear to the car body. (The operation is performed with the fender liners removed, so remove them if they are installed on your car)
Note! Unscrew the nuts carefully and use two wrenches, one of which will hold the bolt itself from turning, and with the other, unscrew the nuts themselves. There are washers underneath all of these nuts, so be careful not to lose them!
4) When the nuts are unscrewed, holding the steering mechanism itself with your hand, remove all the bolts and remove all the nuts, and then try to release the steering gear as it will hang on the car body.
Note! Adjusting shims can also be installed on the bolts, thanks to which the ratio of the two shafts is set, so if you have these shims, then be sure to mark them and when installing a new shaft, install them in the same places where they were before!
5) Then stand up and then move into the engine compartment of the car, and there remove the steering mechanism by grasping it with your hand and pulling it upward towards you.
Installation: 1) Installation of the new steering shaft is carried out in the reverse order of removal, but in order for the installation of the new shaft to be successful, you need to know a few things:
- When you tighten all the bolts and nuts, do not tighten them all the way, just screw them on and that’s it.
- After this, get into the car and turn the steering wheel first to the right by 2-3 turns, and then by the same amount to the left, thanks to which the shaft and the mechanism itself will take the correct position.
- But after the operations have been completed, tighten all the bolts and nuts until they stop and then install all the remaining parts in the reverse order of removal.
Payment via Yandex Cashier
After selecting payment via Yandex, the Yandex Cashier payment system will launch, where you need to select a convenient payment method (bank card, QIWI, Yandex Money account, etc.)
After specifying payment details and confirming payment, payment for the goods will occur.
If you have a bank card in a currency other than the ruble, then the money will be debited from the card at the rate of the Central Bank of Russia at the time of the purchase.
This payment method is optimal for residents of Russia, Kazakhstan and Belarus.
Official website of the Yandex Kassa payment system https://kassa.yandex.ru
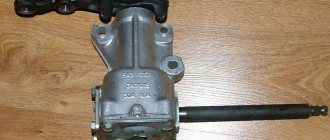
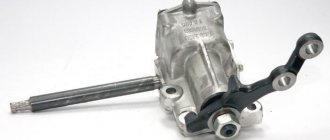
Steering column VAZ 2106
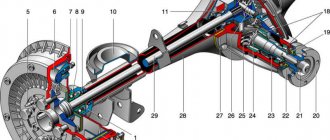
The main purpose of the steering column is to transmit rotational motion from the steering wheel to the front wheels. All “classics” use structurally identical components. The mechanism is attached to the left side member with three bolts. There is a bolt on the top cover with which the gap between the roller and the worm is adjusted. The need to set the gap arises when a large backlash appears in the mechanism. The gearbox and steering wheel are connected to each other through an intermediate shaft, which is mounted on splines that prevent it from turning.
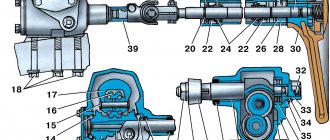
Steering column device
The steering gear housing has a worm shaft mounted on two bearings that do not have an inner race. Instead of an inner ring, special grooves are used at the ends of the worm. The required clearance in the bearings is set using spacers, which are located under the bottom cover. The exit of the worm shaft from the housing is sealed with a cuff. On the side of the spline connection on the shaft there is a recess for a bolt connecting the gearbox shaft to the shaft from the steering wheel. The worm is engaged with a special roller located on the axis and rotating with the help of a bearing. The bipod shaft at the exit from the body is also sealed with a cuff. A bipod is mounted on it in a certain position.
On the sixth model Zhiguli, the steering mechanism works in the following order:
- The driver turns the steering wheel.
- The force is transmitted through the shaft to the worm element, which reduces the number of revolutions.
- When the worm rotates, a double-ridge roller moves.
- A lever is installed on the bipod shaft, through which the steering rods are activated.
- The steering linkage acts on the steering knuckles, which turn the front wheels in the desired direction and at the required angle.
Steering column problems
The appearance of problems in the steering mechanism can be judged by characteristic signs:
If any of the listed defects appear, repairs should not be delayed.
Creaks in the column
The appearance of squeaks can be caused by the following reasons:
- Excessive play in the hub bearings. To fix the problem, it is necessary to adjust the gap or replace the bearings;
- The tie rod pins have become loose. The way out of the situation is to tighten the nuts;
- large play between the pendulum and bushings. The malfunction is eliminated by replacing the bushings;
- wear of the worm shaft bearings can manifest itself in the form of squeaks when turning the wheels. To solve the problem, adjust the clearance in the bearings or replace them;
- The fastening of the swing arms has become loose. The way out of the situation is to tighten the nuts when setting the wheels straight.
Oil leak
Leakage of lubricant from the steering column on a “classic” is a fairly common occurrence. This is due to the following:
- damage (wear) of the oil seal on the shaft of the bipod or worm. The problem is solved by replacing the cuffs;
- loosening the bolts securing the crankcase cover. To eliminate leaks, tighten the bolts diagonally, which ensures the tightness of the connection;
- damage to the seal under the crankcase cover. The cover will need to be removed and the gasket replaced.
Stiff steering wheel rotation
There may be several reasons why the steering wheel turns slowly:
- Incorrect alignment of the front wheels. To fix the problem, you will have to visit a service station and carry out adjustment work;
- deformation of any part in the steering. Steering rods are usually subject to deformation, which is due to their low location and mechanical stress, for example, when hitting an obstacle. Curved rods must be replaced;
- Incorrect clearance between roller and worm. The required gap is set with a special bolt;
- tightly tighten the nut on the pendulum. The way out of the situation is to slightly loosen the fasteners.
Steering column repair
Repairing a gearbox, like any other unit, requires preparing tools and following step-by-step instructions.
Dismantling
Tools you will need:
- 17 and 30 mm head;
- long and powerful knob;
- mount;
- hammer;
- ratchet handle;
- regular open-end wrench 17.
The procedure for removing a node consists of the following steps:
- We unscrew the bolt securing the shaft and steering column.
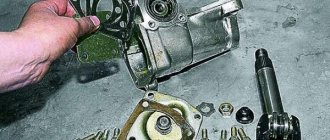
How to disassemble
The mechanism is disassembled for the purpose of troubleshooting parts and subsequent repairs. Tools you will need:
- large socket head 30 mm;
- 14 mm wrench or socket;
- puller for gearbox bipods;
- flat screwdriver;
- hammer;
- vice.
The procedure consists of the following steps:
- We use a wrench to unscrew the nut that secures the bipod to the shaft, and then clamp the gearbox in a vice.
Unit repair
To troubleshoot parts, they are washed in diesel fuel or kerosene. After this, check the condition of the worm shaft and roller. They must not have any damage. The rotation of the ball bearings of the assembly must be free and without jamming. The structural elements of the bearings must be in good condition, i.e., be free of signs of wear, potholes and other defects. The presence of cracks in the gearbox housing is unacceptable. If parts with wear are identified, they are replaced with serviceable elements. The cuffs are changed during any repair work on the column.
Assembly
Before assembly, gear oil is applied to the internal elements, and the process itself consists of the following actions:
- Lightly hit the adapter with a hammer to press the inner ball bearing ring into the mechanism housing.
Video: disassembling and assembling the VAZ steering mechanism
Steering column oil
To reduce friction between parts inside the assembly, lubricant is poured into the crankcase. In Zhiguli, for the product in question, oil of class GL5 or GL4 is used with a viscosity class of SAE80-W90. However, some car owners use TAD-17 instead of modern lubricants. Oil in a volume of 0.2 liters is poured into the steering column.
Change of oil
On the VAZ 2106, as on other “classics”, it is recommended to change the lubricant in the steering mechanism once every 20-40 thousand km. Replacing more frequently is just a waste of time and money. If it is noticed that the oil has become very dark and the steering wheel has become heavier when turning, then the lubricant must be replaced as soon as possible. Tools for work you will need:
- open-end wrench 8 mm;
- 2 large-volume medical syringes;
- small diameter tube or hose;
- a suitable container for draining used oil.
The work comes down to the following steps:
- We unscrew the plug on the gearbox.
- We put a tube on the syringe and use it to suck out the old grease, pouring it into a container.
When adding oil, it is recommended to shake the steering wheel to release air from the crankcase.
Video: replacing the lubricant in the Zhiguli steering column
Level check
Experienced classic car owners claim that oil leaks from the gearbox even when installing a new mechanism, so periodically checking the level will not be superfluous. To determine the lubricant level, you will need to perform the following steps:
- Wipe the surface of the assembly with a rag.
- Unscrew the filler plug.
Gearbox oil
To reduce friction of the internal elements of the steering column, GL-4, GL-5 transmission oil with a viscosity grade of SAE75W90, SAE80W90 or SAE85W90 is poured into the mechanism. In the old fashioned way, many car owners use TAD-17 oil for the unit in question. The filling volume of the gearbox on the VAZ 2107 is 0.215 liters.
Checking the oil level
To avoid premature failure of mechanism parts, it is necessary to periodically check the oil level and replace it. It is worth taking into account that the fluid from the gearbox, although slowly, leaks, and the leak occurs regardless of whether the column is new or old. The level check is performed as follows:
- Use a 8 wrench to unscrew the filler plug.
How to change the oil in a gearbox
As for changing the oil in the steering device, this procedure should be carried out every year and a half. If the decision has been made to change the lubricant, you need to know how to perform the procedure. In addition to the new lubricant, you will need two syringes of the largest possible volume (purchased at the pharmacy) and a small piece of washer hose. The procedure is carried out in the following order:
- Use a key to unscrew the filler plug, place a piece of tubing on the syringe, draw in the old oil and pour it into the prepared container.
Adjusting the steering column play
The need for adjustment arises after repair of the unit or when large play appears when turning the steering wheel. If the mechanism has a large free play, the wheels lag somewhat behind the movement of the steering wheel. To make the adjustment you will need:
- flat screwdriver;
- 19 mm wrench.
We align the steering wheel in the center, and then perform the following actions:
- Using a 19 mm wrench, unscrew the nut located on top of the steering gearbox.
Video: adjusting the steering column play on a “classic”
How to reduce backlash?
The gearbox does not require special care during operation; the main thing is to prevent oil leakage and maintain its level at normal levels. If play appears in the gearbox, the wheels turn only after the steering wheel reaches a certain angle of rotation. This creates inconvenience in driving a VAZ 2106.
You can reduce the backlash yourself; for this you will need an assistant, a 19-mm wrench and a flat-head screwdriver:
- Unscrew the nut on the adjusting bolt;
- Have an assistant turn the steering wheel a quarter turn in both directions;
- At the same time, screw in the screw until you are sure that the play has disappeared;
- Tighten the nut firmly.
After these manipulations, the steering movement will become tighter.
Pendulum VAZ 2106
A pendulum arm or simply a pendulum is a part that connects the steering rods and the steering gearbox. The product is located under the hood symmetrically to the steering gear and is mounted on the right side member.
Replacing the pendulum
Like other parts of the car, the swingarm is subject to wear and tear and sometimes requires repair or replacement. The following characteristic signs indicate that problems have arisen:
- when driving on uneven roads, knocking noises are heard;
- large play in the steering wheel.
When the pendulum breaks down, sometimes you have to exert a lot of force to rotate the steering wheel.
It should be taken into account that the listed symptoms can appear not only when there is a problem with the pendulum arm, but also when the assembly is loosely tightened or the adjusting nut is overtightened.
How to remove
For dismantling you will need:
- a set of open-end or ring wrenches;
- ball pin remover.
We perform the procedure in the following sequence:
- Remove the right front wheel.
- We unscrew the fastening of the rod fingers to the pendulum lever.
Pendulum repair
Repair of the unit comes down to replacing bushings or bearings (depending on the design).
Replacing bushings
Repairs are carried out using the following tools:
- 19 mm wrench;
- vice;
- new bushings;
- lubricant "Litol-24".
The repair sequence is as follows:
- We clamp the pendulum in a vice. We take out the cotter pin and unscrew the fasteners.
Troubleshooting and assembly
After disassembling the pendulum, we check the condition of all parts. There should be no defects on the axle and lever (traces of wear, deformation). With high mileage of the car, bushings are subject to wear. Therefore, they have to be replaced with new ones. There should be no cracks or other damage on the bracket. The pendulum is assembled in the reverse order, with Litol-24 applied to the pendulum axis and the hole under it. The adjusting nut should be tightened so that the bipod rotates when a force of 1-2 kg is applied to its end. A dynamometer is used to determine the force.
Video: replacing the pendulum arm bushings on a “classic”
Replacing bearings
With high mileage of the car, the bearings in the pendulum begin to bite and jam, which requires their replacement. The tools you will need are the same as in the previous case, only instead of bushings you need bearings. Repair consists of the following steps:
- We clamp the part in a vice and unscrew the adjusting nut, but not completely.
When assembling the pendulum, the bearings are pressed so that rotation is free, but without play.
Problems when paying with bank cards
Sometimes difficulties may arise when paying with Visa/MasterCard bank cards. The most common of them:
- There is a restriction on the card for paying for online purchases
- A plastic card is not intended for making payments online.
- The plastic card is not activated for making payments online.
- There are not enough funds on the plastic card.
In order to solve these problems, you need to call or write to the technical support of the bank where you are served. Bank specialists will help you resolve them and make payments.
That's basically it. The entire process of paying for a book in PDF format on car repair on our website takes 1-2 minutes.
