Ease of installation of electric windows on a VAZ 2106
Having electric windows in modern cars is not a luxury. This convenient device, which facilitates the process of raising and lowering the windows, simply must be in the car, including the VAZ 2106. Let's figure out how to install window regulators, how difficult it is to replace the standard mechanism and how to do it yourself.
Replacing the classic mechanism
For the VAZ 2106, mechanisms for raising windows come in two varieties:
| Kinds | Characteristics |
| Cable. | They consist of an electric drive with a gearbox and a reel with a wound cable. The upper drum is connected to the classic window lifter through slots and is designed to operate the cable. |
| Rack and pinion. | They have a different design and work on the principle of a steering rack in a car. Such devices are good for hard-moving car windows, since the mechanism itself moves easily. |
The classic mechanism on the VAZ 2106 is a simple device for raising and lowering the windows, which is controlled using a handle. Despite its simplicity, Six car owners encounter situations when the device needs to be replaced. Given the age of the car, the mechanism may break or malfunction.
The order of your actions when carrying out the procedure for removing a faulty product and installing a new one is as follows.
- Remove the door where the window regulator will be replaced.
- Disconnect the bar that secures the glass to the lifting cable. Move the cable itself to the side and remove the device.
- Check how easily the rollers rotate. If necessary, lubricate them with lithol.
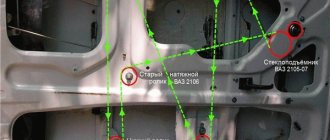
- Attach the new mechanism to the standard connections, passing the cable along the rollers, as indicated in the installation diagram.
- Pull the cable over the rollers without sagging or strong tension.
- Secure the handles while rotating the lifting mechanism of the VAZ 2106 window regulator. The entire structure should rotate smoothly, without jolts.
- Fix the glass in the lower position, lower the device, attach the cable to the bar.
Replacing the “six” window lifting mechanism is quite simple and does not require a lot of time and money.
Window lifter malfunctions
In the summer, on a VAZ 2106, one of the devices that allows you to somehow cope with the stuffiness in the cabin is a window lift. If this mechanism does not work, then driving becomes a real pain. Therefore, Zhiguli owners should know what problems can arise with window regulators and how to fix them.
Glass fell
Mostly, glass falls due to loosening of the cable attachment to the glass itself. As a result, the cable slips, and the lowered window cannot be raised. If the problem lies in a loose fastening, then it will be enough to remove the door trim and tighten it, adjusting the relative position of the glass and the cable.
The glass does not respond to the rotation of the handle
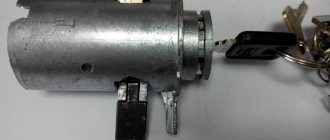
If on your car, when you turn the window lifter handle, you cannot lower or raise the window and at the same time you feel that the mechanism is not working, then the main reason for this phenomenon is the licked slots on the handle itself. It is connected to the gearbox shaft through splines, but due to the soft material of manufacture, the splines on the handle wear out over time. In addition, premature wear is possible due to the tight movement of the glass, which can be caused by misalignment of the guides, the presence of a foreign object in the door, or problems in the gearbox itself.
When erasing the slots of door handles, problems arise with glass movement
If the handle is damaged, you only have to replace it, and it is better to choose a part equipped with a reinforced metal insert.
Broken cable
One of the malfunctions of a mechanical window lifter is a broken cable. It manifests itself in the same way as when there is a problem with the handle, i.e. in the form of free rotation of the handle. Since the cable is not sold as a separate part, the window regulator in this case will have to be completely replaced. Attempts to restore the break will require a lot of time and effort, and the low cost of the device in question, amounting to about 200–300 rubles, indicates the inexpediency of repair.
Gearbox failure
The design of the window lifter is such that the gears of the gearbox can wear out over time, that is, their teeth simply wear out due to the softness of the metal. As a result, the mechanism runs idle, while the cable and glass do not move. It is possible to replace the worn gear by removing it from the old window lifter, but it is better to install a new product that will last much longer than a restored one.
Mechanism grinding
Sometimes, when the glass is raised or lowered, the device may make sounds similar to grinding. The reason may be a lack of lubrication or damage to one of the tension rollers, which is simply rubbed by the cable, causing the cable to jam inside the roller. In this case, the latter will have to be replaced. If the grinding noise is caused by a lack of lubricant, then you simply need to apply lubricant, for example, Litol-24, both to the gearbox itself and to the cable with rollers.
At the first sign of a grinding noise, the window regulator must be lubricated.
Glass creaks
During vehicle operation, the windows are exposed to various types of contaminants (dust, dirt, sand, etc.). When the door glass is lowered, the abrasive substances on it act on the surface, scratching it and producing a characteristic squeak. Although the doors are designed with special velvets (glass seals), which are designed to protect the glass from scratching by dust and sand, over time they wear out and do not perform their functions well. Therefore, if a characteristic squeak appears, it is better to replace the glass seals.
If a squeak appears while the glass is moving, then most likely the velvets have become unusable
Sequence of actions when installing a power window
In order to tune the “six” by installing electric window lifts, it is not necessary to go to a car repair shop. You can do this yourself. On the modern automotive parts market there is a large selection of power window kits. To install the device yourself, no special knowledge or skills are required. Typically, the power window kit includes electrical wiring, control keys, and fasteners.
Installing the mechanism is quite simple and is done in the following sequence.
- Remove the door and install a power window. Use self-tapping screws to attach to the car door frame. This should be done carefully so that the door does not become deformed as a result.
- Check the glass movement for ease of sliding. Adjust the guides if necessary.
- Connect the electrical wiring, referring to the wiring diagram. Route the wires under the panel.
- Assemble the door by installing the plugs in place of the handles.
- Mount the control key in the instrument panel.
- Connect the battery and check the system's functionality. This completes the installation.
When carrying out work on electrical equipment, disconnect the ground on the battery. Do not forget that the circuits of new mechanisms must be protected by fuses.
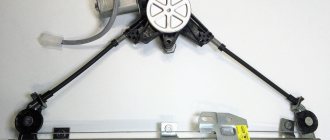
Design and types of window lifters
The mechanical window lifter on the VAZ 2106 has a simple design and consists of a control handle, a glass lift transmission system, a cable and three rollers.
Many drivers install electric windows instead of classic ones.
They come in two types:
- Cable. The design includes an electric motor with a drum on which the cable is wound, and a gearbox. The upper drum is connected to a conventional window lifter using a spline. With its help the cable is activated.
- Rack and pinion. They use the principle of a steering rack in a car.
The device of window lifters VAZ 2107
Every car enthusiast knows what a window lifter is. Its functions are simple: open and close the window, thereby regulating the microclimate and level in the cabin. There are two types of window lifters: manual (colloquially crutches or meat grinders) and electric, controlled from the dashboard or individual buttons.
At the manufacturer's factory, the VAZ 2107 was equipped with manual window lifters, which have a fairly simple design. They are based on the operation of a mechanism to which glass is attached using special fixing devices. The side windows are lowered and raised by turning a handle located inside the cabin.
The standard window lifter of the “seven” is controlled by a handle and is very inconvenient to use
What kind of window lifters are there on the "seven"?
During its existence, the VAZ 2107 was equipped with two types of window lifters:
- Rack and pinion. They are considered more reliable. Installing this type of window lifter completely eliminates glass distortion. The mechanism works by transmitting the rotational force of the gear, which interacts with a linear rack, to the glass carriage. The main disadvantage is the need for constant lubrication, since the gears of the mechanism were made of plastic, which wears out quite quickly and can damage the entire mechanism.
- Cable ones - due to their design, they are weaker and more often fail. The fundamental element of this type of window lifter is a cable attached to the twisting mechanism. The device operates rather slowly due to the low functional properties of the drive, which with force overcomes the resistance of the sealing rubber bands. It may also happen that it begins to overheat and at some point simply fails. The advantage of this type of mechanism is its good maintainability, but too frequent need for repairs practically eliminates this advantage.
Common faults and solutions
Over time, the window lifting mechanism becomes unusable - it is impossible to raise or lower the glass.
There may be several reasons for a device malfunction:
- cable break;
- foreign objects entering the mechanism;
- gearbox wear.
There is no point in repairing window regulators, since their cost is low; it is easier to buy a new device and replace it.
Device assembly diagram
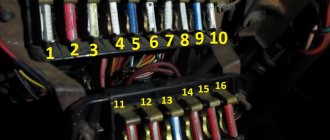
Electric lifts may have the following faults:
- All power windows do not work: the fuse is blown, there is no connection to ground, the wiring is broken. The repair consists of replacing fuses, restoring ground connections and electrical circuits.
- The lift on one of the doors does not work. The switch is faulty, the reverse current relay is broken, the electric motor is broken, the wiring is broken, the connector is disconnected. Faulty parts should be replaced, the wiring restored, the connector connected.
For your information
The cable is tensioned according to the following procedure:
- Lower the window all the way;
- Turn the mechanism handle all the way in the direction of lowering the window;
- Adjust the cable tension by moving the corresponding roller;
- Tighten the roller mounting bolt.
Optimal traction force for cable drive should be preferred: cable
should not be too tight, but should not hang.
A creaking noise may appear when installing a new window. To fix this:
- Loosen and remove the cable from under the rollers;
- Cross the upper and lower branches of the cable coming out of the elevator drum;
- Repeat installation and tensioning of the cable.
Removal instructions
To complete the work you will need the following tools:
- Phillips and flathead screwdrivers;
- a set of keys;
- knob;
- extension.
The removal procedure consists of the following steps:
- First of all, you need to remove the casing.
- Next, the glass is lowered as far as possible. Use a Phillips screwdriver to unscrew the bolt holding the clamp.
- After unscrewing the bolt, lower the clamp down.
- Then on the left side of the door, just loosen the roller nut using a wrench.
- The cable is now free and can be removed from the roller.
- Next, unscrew the three nuts holding the window regulator.
- When unscrewing the third bolt, the mechanism should be held from the inside.
- When the window lifting mechanism is free, move it to the side.
- After unscrewing the last nut, you can remove the window regulator from the door.
Next, repair or replacement is carried out. The rear mechanism is installed in the same way.
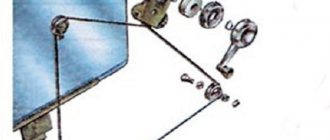
Dismantling the front doors of VAZ 2101, 2102
When replacing parts and door mechanisms, it must be disassembled.
1. Unscrew the screws securing the armrest and remove it. Using a screwdriver, remove the trim 1 from the inside door handle 2.
2. Remove handle 2 of the window lifter by pressing out the socket of the handle and using tool 1 A.78034 to remove the locking spring.
3. Overcoming the force of the spring plastic holders, remove the door trim.
4. With the sliding window in the upper position, unscrew the screws 1 securing the rear groove and the nut securing the front groove, remove the grooves and lower the glass down (2 – window lift cable; 3 – nuts securing the window lift mechanism; 4 – internal handle of the lock drive; 5 – tension roller; 6 – sliding window stop).
5. Having loosened the nut of the tension roller 5 of the window lifter, disconnect the cable 2 from the sliding glass holder, remove it from the rollers, lower the glass down and, tilting its lower edge towards you, remove it from the door through the lower opening.
6. Unscrew the 3 fastening nuts and remove the window lift mechanism.
7. Remove the sliding glass seal, unscrew the screws securing the sliding glass frame and remove it complete with the frame.
8. Unscrew the button 7 (see Fig. Front right door lock) locking the lock and screws 1 (see Fig. Fastening the internal handle of the door lock drive) securing the bracket for the internal handle 2 of the lock drive; unscrew screws 3 (1 – lock lock button; 2 – lock lock rod) and remove the lock together with the drive rods, having previously disconnected rod 15 (see Fig. Front right door lock) from the lock switch arm.
Installation Features
Installation of a new or repaired window lifter is carried out in the reverse order of removal.
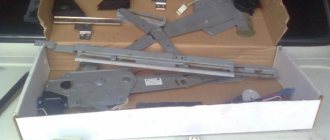
Photo gallery “Installing a window lifter”
To install a power window, follow these steps:
- Dismantle the door, remove the door trim. Next, the electric window lifter is installed using self-tapping screws.
- After installation, you need to check the sliding of the glass.
- Connection to the vehicle's electrical network should be made according to the electrical diagram.
- Next, the door is installed on the car.
- A control button is mounted on the toolbar.
After installation, the electric window lifter must be checked for functionality. You can install a heated rear window.
Last step: installing a new node
Lift A new glass lift must have a bracket that secures the two branches of the cable. Removing it before complete installation is strictly prohibited for the above reason.
In general, the concept of installing a new subassembly looks something like this:
- Installation and fastening of the power window housing on the seat;
- Wires around the rollers;
- Fixing glass clamps relative to the cable (fixing the cable with screws using two brackets);
- Installation of the guide groove;
- Cable tension;
- Dismantling the bracket fixing the cable outlets;
- Installation of upholstery and door handles.
The cable around the rollers can be laid in two ways - through the upper or lower rolling bearings. When passing through the lower roller, the upper cable exiting the mechanism passes through:
- Lower left guide roller;
- Upper left guide bearing;
- Lower central tension roller;
- Upper right guide element.
When replacing the front window of a VAZ 2107, it is also important to move through the upper roller in the reverse order. In this case, the bottom cable is directed.
Tuning a VAZ 2106 using the installation of electric windows
Most modern cars are equipped with such a necessary device as electric windows at the factory. This necessary and useful function greatly simplifies the process of raising and lowering the windows.
The VAZ 2106 cannot boast of this option in the factory configuration, however, its owners are not deprived of the attention of car equipment manufacturers who produce power window kits for self-installation. To install electric windows on a VAZ 2106, you must have some plumbing skills, as well as experience in carrying out electrical work.
Choosing window regulators
All manufactured window lifters can be divided into two main types:
- universal window lifters (installed on the standard window lift control mechanism);
- special devices for raising windows (mounted instead of factory window lifters).
Universal window regulators usually have a cable in their design, which significantly reduces their reliability. Cable breakage is one of the most common failures of devices of this type. However, universal window regulators are cheaper than special ones and are suitable for any car model. In addition, if they break down, you can use the car’s standard system.
Special window regulators are available for certain car models. Their installation is more complicated and involves dismantling the factory window raising system. Despite this, they have a huge advantage - reliability and speed of glass lifting. Such devices have a rack or lever design.
Installation of window regulators on a VAZ sixth model
To carry out work on installing window regulators on a car, you will need the following tools and materials:
- electric drill;
- angle grinder (grinder);
- set of drills;
- screwdriver and set of keys;
- knife;
- ruler, marker, electrical tape.
Before starting work, do not forget to remove the positive terminal from the car battery. Installation of electric windows on a VAZ 2106 begins with disassembling the door on which it is planned to install the mechanism. To do this, remove the handle of the standard window lifter, unscrew the armrest, and remove the door handle trim.
Next, carefully prying the edges of the door trim with a screwdriver, remove it. Be careful not to damage the plastic door card holders. The side trims and rubber plugs for the cable ducts are also removed. Further work on installing the window lifter differs somewhat, depending on its type, so we will consider both cases in detail.
To install a special type of device, it is necessary to dismantle the standard window raising system. Further work should be carried out according to the following plan:
- Secure the glass in the upper position using any available means.
- Attach the adjustment plate with the roller slide installed inside it (or the pressure plates of the lever system) to the glass bracket.
- Carefully insert the window lift mechanism (levers or rack with installed gear motor) into the door slot.
- Attach the device mechanism to the glass bracket adjustment plate.
- Make sure that the mechanism is in a position where the glass is in the maximum raised position. Next, secure the rack or linkage to the door. For this purpose, the manufacturer provides mounting holes. Make the corresponding slots in the door yourself by drilling holes of the required diameter.
- Next, you need to pull the cables through the holes in the end of the door and the stand. Attach the wiring to the door with electrical tape, making sure it moves freely following the gear motor. This will help avoid cable breaks and prevent wires from knocking against the door while driving.
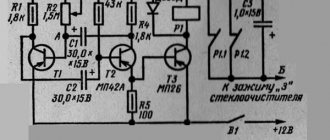
The VAZ 2106 power window diagram is provided by the manufacturer. You need to connect the device to the cigarette lighter wire. This way you can control the windows going up, regardless of the ignition being turned on. In addition, the circuit will be protected by a fairly powerful cigarette lighter fuse. After connecting the battery, check the operation of the power windows and their full travel. Adjust this setting if necessary.
To install universal window regulators, it is not necessary to remove the factory mechanisms; on the contrary, it is necessary to lubricate their structural elements and ensure ease of movement of the glass. We carry out the installation work as follows:
- We drill holes in the door in accordance with the installation grooves of the brackets for fastening the mechanisms.
- We fix the upper mechanism on the outside of the door by installing it on the drive splines of the factory window regulator.
- Making sure that the device drive is in a crossed position, using brackets we fix the gear motor at the bottom of the door, on its inner part.
- Connect the control cables according to the diagram.
To make the glass easier to move, it is recommended to lubricate all guides with silicone spray. This will not only increase the speed of glass movement, but also reduce the load on the electric motor and increase its service life. Additionally, you can install glass closers by connecting electric windows to them.
The price of these electronic devices is low, but they will further increase the convenience of driving your car.