The window regulator is an important component of any car. Although motorists do not use power windows every time they travel, they should always be in working order. In VAZ-2107 cars, the manufacturer installs manual windows with a cable drive. The presence of electric windows in the “Seven” indicates that the car has been modified by its owner.
The main difficulty when carrying out such an operation as replacing a VAZ 2107 window regulator is the small space inside the doors of this car.
Let's take a closer look at the procedure for replacing a manual cable-type window lifter on the front door of a VAZ-2107 car. So:
-First of all, remove the opening handle and the manual window drive handle from the inside of the door;
— Unscrew the door lock button;
— Remove the door trim;
— Unscrew the two clamping plates holding the cables;
— Lower the door glass to the lowest position;
— Using wrench No. 10, loosen the fastening of the tensioner roller and move the roller itself a little to the side so that it becomes possible to remove the cable;
— Using a spanner number 8, unscrew the three fastening nuts of the window lift mechanism;
— Lift the door glass and remove the window lift mechanism through the technological hole in the car door.
Installing a new window regulator is carried out in the reverse order. However, there are some features that I would like to mention:
— Before installing the mechanism, be sure to lubricate the cable with lubricant;
— The lower branch of the cable is immediately fed to the upper roller of the door, and the upper branch will correspondingly go down. Due to the need for such actions, we recommend using a wire, which is removed after the window lifter mechanism has been completely secured and all adjustment work has been carried out;
— There is also one upper invisible roller in the window lift mechanism of the VAZ-2107 car. At first glance, it is simply impossible to put a cable on it. We do this - at the top of the cable we twist an open loop and direct it to the place where this “invisible” roller is located. We move the loop up and down, trying to catch on the roller. Either way, after a few tries, you'll be hooked on this video;
— We adjust the smoothness of the glass movement and finally tighten all the fastening nuts.
That's the whole process of replacing the window regulator on VAZ-2107 cars.
How to repair a window regulator yourself
Comfort in a car is ensured not only by all kinds of systems, which are becoming more and more numerous, but also by fairly simple mechanisms, such as window lifts. After all, any budget model that does not have air conditioning, navigation, and the audio system consists of only a few standard speakers is necessarily equipped with mechanisms for raising and lowering the side windows.
Window lifters with electric and mechanical drives have become widespread on cars. In the former, the glass is raised and lowered by an electric motor, which ensures ease of use and ease of control. The driver or passenger only needs to press the appropriate button for the side window to move down or up.
In power window lifters, the driver ensures the movement of the glass using a special gearbox, which is rotated manually. That is, to lower or raise the glass you need to rotate the handle installed on the door. Window regulators with this type of drive are less convenient to use, moreover, they are practically replaced by electric ones.
Window lifters come in several types, differing in design:
Moreover, these differences relate to the actuators of the lifts, that is, with the help of which the lifting and lowering is carried out. The second component is the drive mechanism.
To consider possible breakdowns of window regulators, let's look at their design.
Design and technological nuances
For owners of other Lada classics, replacing a window regulator on a VAZ 2107 may seem unnecessarily complicated. The cable is connected to the solid glass brackets in two places, which necessitated the use of another roller - here there are 4 of them: one tensioner and three guides.
The repair operation is quite feasible on your own if you have a minimum amount of tools:
- open-end wrenches for “8” and “10”;
- Phillips head screwdriver.
Window lifter design
Drive types
Let's start with the drive mechanism, as already noted, it comes in two types - mechanical (also known as manual) and electric.
- The mechanical one is a small gear reducer. With this type of drive, a cable actuator is usually used. Therefore, such a gearbox consists of two gears that mesh with each other. The drive gear is small in size, and it is the one that the driver rotates using a handle mounted on the door. The driven one is much larger in size; it is a drum for winding the cable. Due to the different sizes of these gears, relative ease of opening and closing the glass is achieved.
- An electric drive also uses a gearbox, but of the “worm-gear” type. There is a worm on the electric motor shaft, which is engaged by a gear. The drive motor itself is of a reversible type, that is, when the polarity is changed, its direction of rotation changes, which allows the use of just one element to both lower and raise the glass. This drive is used with all types of actuators.
Actuators
1 – window lifter handle; 2 – facing of the window lifter handle; 3 – power window handle socket; 4 – window lift mechanism; 5 – upper rollers; 6 – screws for fastening the pressure plates; 7 – pressure plates; 8 – sliding glass brackets; 9 – sliding glass; 10 – cable; 11 – lower roller; 12 – bolt; 13 – tension roller[/caption]
This is interesting: How to remove the window lifter handle of a VAZ 2114
Now, regarding the actuators. With both types of drives, the cable type can be used. At the same time, for mechanical and electrical mechanisms their design differs, and significantly.
Let's consider the design of a mechanical drive and a cable actuator using the example of a VAZ-2107. In addition to the gearbox, it consists of 4 rollers between which the cable moves, with the ends fixed to the drum. One of the rollers is a tension roller and ensures proper tension of the cable for the entire period of operation, since it stretches during operation.
Two rollers are the top ones and they are connected using tension plates to the glass brackets. Because of this, when lowering or raising the rollers move along with the glass. The last roller is the bottom one, it is stationary and it is fixed to the door.
A cable is laid between these rollers in a special way. Moreover, it is not looped. When lifting or lowering, the end on one side is unwound from the gearbox drum, and the other is wound up. Thanks to this, the ability to move the upper rollers, and with them the side glass, is achieved.
In an electric drive, the cable actuator has a different design. It consists of a guide at the ends of which rollers are installed. The electric motor with gearbox is located slightly to the side of this guide. The drive cable is laid between the guide rollers and goes to the gearbox drum, where it is secured.
In the area between the guide rollers, a slider is attached to the cable, which in turn is connected to the glass. When the electric motor is turned on, one side of the cable begins to wind onto the drum, and the other begins to unwind. Due to this, the cable moves between the rollers, and with it the slider with the glass.
The lever actuator operates on a different principle. There is a lever, at one end of which there is a semicircular gear sector connected to the driven gear of the gearbox. Its other end is connected to a bar on which the glass is mounted. The lever on the sector side is connected by means of a bracket to a fixed plate fixed to the door.
There are actuators that include two levers in the design, with the second one playing the role of an auxiliary one.
The third type of actuator is rack and pinion, and there are several types of it. One of these mechanisms has a fixed guide with a gear sector along its entire length. This sector engages with the gearbox gear. In this design, the motor and gearbox are movable and connected to the glass. That is, when turned on, the engine with the gearbox and glass begin to move relative to the rack.
Video: Replacing a VAZ 2109 window regulator. Do it yourself!
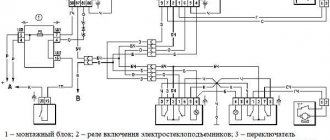
Also, the design of electric windows includes a control mechanism, which consists of ordinary keys through which the electric motors are powered from the vehicle’s on-board network.
Replacing rollers
The seven window lifters have four rollers:
- The first is a tension roller. It maintains the cable in a certain state of tension, but over time it “relaxes”;
- The second and third are fixed on the glass. The left and right rollers transmit lifting torque when controlling the movements of the cable;
- The fourth is fixed to the door and is motionless. It takes the lifting force.
In order to dismantle the rollers, you need to remove the door card and simply unscrew the nuts that secure them. They also need to be installed carefully. After new parts are installed, the structure must be reassembled.
Basic malfunctions of window regulators and their repair
If we generally consider the side window lifting device, then in the mechanically driven cable type there are very few components that can fail. The first of these is the cable itself. Over time, it stretches out, and its threads may break due to corrosion, which will lead to jamming, or it may break completely. Due to excessively applied forces, the gearbox itself may fail.
But in general, such a mechanism is quite reliable, rarely breaks down, and to maintain it, it is enough to lubricate all its elements just once a year.
Video: Replacing the electric window of a VAZ 2110, 2111, 2112 and Priora
But problems with power windows arise more often. At the same time, their actuators themselves are very reliable and break down infrequently. Much more often, malfunctions occur due to damage to the guides.
As for the electrical part, it is this that most often causes non-working lifts.
The most common problems are:
- Blown fuse or main power window control unit;
- Broken or damaged wiring;
- Oxidation of contacts on control keys;
- Electric motor malfunction;
It is in this sequence that the circuit is checked to identify a malfunction. That is, if the power windows do not work at all, then the reason usually lies in the lack of power, so the problem must be looked for in the fuse or control unit.
If a particular lift does not function, then first the circuit up to the control keys is checked, then the keys themselves, then the wiring to the motor and the electric motor itself.
( 2 ratings, average: 5.00 out of 5)
Share with your friends:
( 2 ratings, average: 5.00 out of 5)
Installation
To install a new window regulator, you must select the type of device. If a mechanical fragment is installed, it can be replaced with an electrical one. To do this, you will need to additionally install an electric motor. Experts advise purchasing a set of manufacturers who produce rack-type products: “GRANAT” or “FORWARD”. In the set the motorist will find:
- instructions;
- 2 window lifters;
- wiring harness;
- 2 switches;
- plugs;
- repair kit
It is better to install the product indoors, with good lighting and a reliable source of electricity.
As a last resort, a machine battery is used. In addition to the kit you will need: nuts, glass clamps, wires and fuses, a drill. Next, select the location for installing the buttons. The hole from the mechanical handle can be easily closed with a plug, so there is no need to worry about aesthetics. Instructions:
- Disconnect the battery terminals.
- Raise the glass and secure the element with tape.
- Remove the trim.
- Install the old beet lifting mechanism.
- Install and secure the electric motor and fuses.
- After fixing the electrical product, configure and connect it.
- Create holes for the keys on the handle of the door leaf.
- Install the buttons and run wires from them to the window regulator.
- Connect the contacts.
- Turn on the battery and check the operation of the new device.
Additionally, it is worth cleaning the niche from dirt and treating internal parts with anti-corrosion and silicone agents. This will avoid repeated dismantling in the near future.
VAZ 2107 window lift diagram
If we remove the window regulator not for replacement, then in order to prevent the cable from coming off the guide grooves of the drum, we tie two branches of the cable with wire in the place indicated by the arrows.
Removing the front door window lifter on a VAZ 2107
1. We prepare the VAZ 2107 car for operations (see “Preparation of the VAZ 2107 car for maintenance and repair”). 2. Remove the cable pressure plates and lower the glass all the way (see “Sliding glass of the front door of a VAZ 2107”). 3. Use a 10 mm socket wrench to loosen the bolt securing the tension roller, move the tension roller and remove the cable from the roller.
4. Remove the window lift cable from the remaining three rollers.
This is interesting: Why do you need to tow a car?
5. Using an 8 mm socket or socket wrench, unscrew the three nuts securing the window lift mechanism.
6. Lifting the glass, remove the window regulator from the technological hole in the inner panel of the door.
Installing a front door window lifter on a VAZ 2107
1. Lubricate the window lift cable with grease. 2. Installation of the window regulator is performed in the reverse order. Before adjusting the cable tension, untie the wire securing the cable. 3. By moving the roller, we tighten the cable and check the smooth operation of the drive.
Front door window lifter device for VAZ 2107
1 — window lifter handle; 2 — facing with a lock; 3 - socket; 4 — window lift mechanism; 5 — roller bracket; 6 - screw; 7 — cable pressure plate; 8 — bracket; 9 - glass; 10 - cable; 11 - lower roller; 12 - bolt; 13 - tension roller
The process of dismantling and replacing the device
How to remove and replace mechanical joints with electric ones? Before installing an ESP, you need to take into account that this is not an easy task; it will require a lot of effort and time. Therefore, before you start replacing, think about whether you can complete it. If you doubt this, it is better to entrust the matter to specialists.
So, how to remove mechanical and install electrical joints:
- First, you need to completely lower the joint venture all the way down, after which the handle is removed. To remove the handle, remove the lock washer located between the door trim and the handle itself. To do this, you need to push the edges of the washer apart using a flat head screwdriver and then disengage it from the handle.
- After this, the door trim on each door is dismantled. Having done this, you will be able to see the technological hole and gain access to the structural elements of the joint venture. Using a 10mm wrench, you will need to unscrew the screw that secures the tension pulley. The bolt is unscrewed so that it can be moved back and the cable tension can be released. When the cable weakens, it must also be removed from the rollers.
- Then, using a size 8 wrench, you need to unscrew the three nuts that secure the mechanism for opening and closing the windows. After unscrewing, this mechanism is dismantled through the technological hole in the same way as you removed the cable. If dismantling the mechanism is impossible, you will need to unscrew the nut that secures the glass guides with a 10mm wrench and move it away. When the old SP mechanism is dismantled, you will also need to unscrew the four screws that secure the glass to the cable. When all these steps are completed, the dismantling procedure can be considered completed; now you can install new joint ventures or begin repairing old ones. Before installing the ESP, you need to make sure that all components are in full working order. If defects are found as a result of diagnostics, the damaged parts are replaced with new ones.
- As for the installation itself, before performing the process you need to carefully read the installation and connection manual, it should be included in the kit. In order to prevent possible short circuits in the on-board network during work, it is advisable to disconnect the battery; to do this, open the hood and reset the terminal.
- Next, the glass must be raised all the way to the top and secured in this position; tape can be used for this. After this, you will need to choose a location to install the drive; as a rule, it is installed at the bottom of the door opening. Attach the drive to the future installation location and make markings for fasteners. Using a drill, you will need to drill the corresponding holes.
- Then the electric motor is installed in the selected installation location, the device is mounted in the door. ESPs are usually supplied with self-tapping screws for installation, but we recommend using nuts with a washer instead of them for more reliable fastening.
- Once the drive is installed, you will need to put two nuts between the door as well as the brackets for that motor. This will avoid possible chafing of the cable along the edge when using ESP. The cable itself is placed in its regular place between the rollers. In accordance with the instructions, it is necessary that the branch pipes from the cables intersect inside the door. If we are talking about a rack and pinion mechanism, then, of course, this point can be ignored.
- The next step is to select a location for mounting the control buttons. It would be best to install them on the center console or on the door handle. In the place where the buttons are installed, you will need to make holes corresponding to their size.
- When the strip is installed, the glass will need to be lowered completely down and secured to the installation strip. At this stage you need to be extremely careful, since there is a possibility of damage to fragile elements.
- After completing these steps, the wiring is connected. You also need to read the connection instructions, which are included in the package. All components are connected in accordance with the diagram. To begin with, the wiring should be brought to the center console of the car through a special corrugated hose, which will protect the wiring from external influences. The wires are usually connected to the cigarette lighter power circuit, but if you do not want to load this circuit, you can lay a separate cable to the battery.
- Then, through the holes for the control keys in the center console, it is necessary to bring out the wiring, connect the devices to the electrical circuit and install them in the seat. When you connect the power circuit of the system to the electrical network of your VAZ 2107, it is imperative to protect the circuit with a safety device. At the same time, it is desirable that the electric windows can be operated while the engine is running, this will save the battery charge.
- The wiring that is installed in the cabin must be insulated using plastic tubes. When the installation and connection of the wiring is completed, you need to reconnect the battery and check the functionality of the mechanism, and if necessary, adjust it. To do this, lift the glass as high as possible and make sure that there are no gaps. When the adjustment is completed, it is necessary to install the door trim in place; all assembly steps are carried out in the reverse order. In the place where the handle was installed, you need to install a special plug.
We recommend: We replace the timing chain: when and how, at what mileage, determining wear, etc. » AvtoNovator
Photo gallery “Do-It-Yourself Replacement”
VAZ 2107 2107i Replacing the front door window lifter mechanism
You will need: a screwdriver, keys “8”, “10”. 1. Remove the front door trim (see “Removing and installing door trims”).
2. Unscrew the screws and remove the pressure plates from the two sliding glass frames (see “Replacing the front door sliding glass”).
3. Raise the sliding glass to its highest position and secure it by inserting a mandrel of suitable diameter into the hole in the inner door panel (you can use a screwdriver).
4. Loosen the bolt securing the tension roller, slide it and remove the window lift cable from the roller.
5. Remove the cable from the lower guide roller. 6. Similarly, remove the cable from the two upper guide rollers.
7. Unscrew the three nuts securing the window lift mechanism to the inner door panel.
8. . and remove the mechanism from the hole in the panel.
WARNING The front and rear door window lift mechanisms differ in the length of the cables and are not interchangeable.
9. Install the front door window mechanism in the reverse order of removal and adjust the tension of the window cable as follows: — turn the window drive handle all the way in the direction of lowering the window (the window should be in its lowest position); — move the tension roller, tensioning the cable, and finally tighten the tension roller bolt. Check the smooth operation of the window regulator. If necessary, adjust the position of the guide grooves and the cable tension. 10. Install the door trim in the reverse order of removal.
Replacing the cable
In order to replace the cable if it breaks, you must follow the short instructions:
- Remove the door card, and then remove the cable from the guides.
- Apply a generous amount of lubricant to the cable before installing it.
- First, pull the cable along the upper roller with the lower branch, and bring the upper branch to the lower roller.
- At the top of the cable, fold a small loop and pull it to the hidden roller and secure it in a few movements.
- After the cable is secured to all rollers, check how the window regulator works.
The installation is complete.
Briefly about the change procedure
A simplified process for replacing a defective window regulator in the front door of a VAZ 2107 looks like this:
- remove the door trim;
- disconnect the cable from the clips securing the glass;
- loosen and remove the cable from the rollers;
- dismantle the guide chute and the window lift mechanism;
- install the housing of the new glass lifting mechanism;
- thread the cable along the contour;
- fix the glass brackets relative to the cable;
- pull the cable;
- install door trim.
The final stage: installation of a new node
lift A new glass lift must have a bracket that secures two branches of the cable. Removing it until complete installation is strictly prohibited for the above-mentioned reason.
In general, the concept of installing a new assembly unit looks like this:
- installation and fastening of the window regulator housing in the seat;
- wrapping the cable around the rollers;
- fixing the glass clips relative to the cable (fastening the cable with screws using two brackets);
- installation of the guide groove;
- cable tension;
- dismantling the bracket securing the cable branches;
- installation of upholstery and door handle.
The cable can be routed around the rollers in two ways - through the upper or lower rolling bearings. When passing through the lower roller, the upper cable coming out of the mechanism is directed through:
- lower left guide roller;
- upper left guide support;
- lower central tension roller;
- upper right guide element.
When replacing the front window regulator of a VAZ 2107, it is also important to move it through the upper roller, done in the reverse order. In this case, the lower cable is guided.