The performance of key components and mechanisms in your car is the basis for its safe operation. Such important devices installed on board domestic vehicles include a sound signal.
The Volzhsky auto industry, releasing new models of its cars, equips them with standard signaling devices of type 20.3721. Similar signals are also installed on the Lada Granta. But due to its low sound quality and frequent breakdowns (especially after moisture), many car enthusiasts strive to install a higher quality and “melodic” signal on the Grant.
As an alternative, Volga signals on Granta are especially popular, tested by time and the experience of many drivers. The signal from the Volga actually sounds louder and is more reliable in operation, but replacing the standard signal with a Volga signal requires the driver to have some knowledge of electrical equipment. If you follow the rules for installing electrical wiring, the installation of signals from the Volga to Grant will be done quickly and as correctly as possible.
Replacing the signal with Granta - from simple to complex
Installation of Radiant Elegance sound signals in Lada Granta
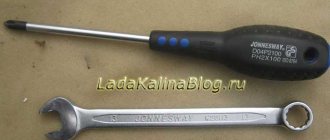
Installed the beeps today, took about two hours. What you need for this: 1) Ratchet and socket 10; 2) Torx screwdriver; 3) A regular Phillips screwdriver. We unscrew 6 bolts from the top, then unscrew the number, followed by 2 more bolts, and three from the bottom. Then we unscrew all the self-tapping screws under the asterisk: - there are 4 pieces at the bottom; — 2 on each fender liner. Pull the right and left parts of the bumper towards you. Photo from phone. The signal is great.
Advantages and disadvantages
| № | Advantages |
| 1. | Weight less than a kilogram. |
| 2. | Using impact-resistant ABS plastic for manufacturing. |
| 3. | Budget cost. |
| 4. | Versatility in application: various classes of automobile brands. |
| 5. | Flaws |
| 6. | Susceptibility to deformation due to mechanical impact, impact, collision. |
Replacing the lada granta signal (VAZ Granta)
- Installation of sound signals S308/S309 in Grant
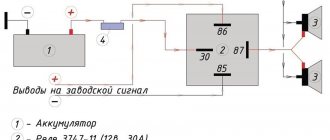
- Sound signal from Volga in Lada Granta
- Installation of Radiant Elegance sound signals in Lada Granta
- Signal from Hella to Grantu
Installation of sound signals S308/S309 in Grant
I installed beeps from classics, each 7.5A. Unlike “Volgov” signals, these are smaller, and their current consumption is higher. Initially I thought of wiring through a relay and a fuse, let’s say to protect the wiring from overheating, but after looking through a sufficient amount of information on the forums I came to the conclusion that this was stupid. We have a standard relay for the signal, it is rated at 15A. This is quite enough.
And so, we acquire sound signals C308 and C309.
Sound signals S308/S309 manufactured by: JSC Lyskovsky Electrotechnical Plant
Now let's look at the location of our beeps. On Granta, unlike Kalina, they stopped installing a plastic protective beam under the front bumper (catalog number for Kalina: 11180280313200), but they left the studs for fastening. There are 2 of them on each side. with a thread for an M8 nut, so we will attach our future brackets to them. We will make the bracket from a connecting plate PS 40×110, bought at Megastroy for 15 rubles. each. (Vector also has it, but is more expensive)
Connection plate PS 40×110 or 40×120
We also need a wire with a cross section of at least 0.75 mm2. I took one, took it with a margin of 4m. I used the following terminals:
RP-M Flat connector without insulation “MAMA” - 2 pcs. We use it on the “” sound signal.
NK Ring tip without insulation - 4 pcs. We use 2 wires, 10 cm each, crimp on both sides. This will be our “-” from the horn to the standard “-” under the headlight on each side.
To prevent the standard plug from “damaging” the “MAMA” (which fed the standard audio signal), we cut off the connector (“DAD”) from the Grant signal, we only need ““ from it.
Also, when preparing the wires, you will need heat-shrinkable tubing, electrical tape, automotive corrugated tubing and 10 nylon ties.
Don’t forget to purchase M8 self-locking nuts - 4 pcs; M6 - 2 pcs. and under them the corresponding lock washers.
And so, we mark and drill the purchased connecting plates according to the drawing. We get one hole for 6mm and two for 10mm. Ask why 10mm and not 8mm? Yes, because the studs for fastening the protective beam are not riveted quite evenly, one can look a little up, the other a little down, and so as not to catch the holes, we drill them 10mm. Drill the second plate in the same way. From an old bicycle inner tube we cut out pads for each resulting bracket so that there is no friction with the radiator frame panel.
The length of the lower part is not particularly important to us, the main thing is to measure the upper part correctly
The brackets are ready. Now let's do the wiring. Measure the “positive” wire as you wish, I pulled the wiring behind the panel of the radiator frame. This is for safety reasons, because if we lay it in front of the radiator, where the temperature sensor is installed, our wiring may flood. But everyone decides this for themselves.
When the “positive” wire is ready, we make 2 “negative” ones, each
10 cm. We crimp on both sides with ring tips. As I said earlier, this is our minus from the sound signal to the standard minus under the headlight.
Afterwards, we assemble everything, check it, put the wires in a corrugated tube and fasten it with zip ties to the factory wiring, the one under the generator and radiator.
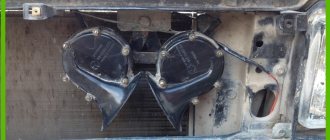
The finished result. There is a gap of about 2 cm between the signal and the headlight.
To achieve clear sound, you need to turn the adjusting screw in the appropriate direction. I didn't have to adjust anything, the buzz is clear and loud.
Lada Granta 2013, l. With. - breakdown
Saint Petersburg
Lada Granta, 2021
565 500 ₽
Mound
Lada Granta, 2012
250 000 ₽
Abakan
Lada Granta, 2014
369 000 ₽
Chelyabinsk
Lada Granta, 2021
598 500 ₽
See more cars on Drome
Participate in the discussion can only registered users.
Login Register
How to replace the horn on a Lada Granta?
The performance of key components and mechanisms in your car is the basis for its safe operation. Such important devices installed on board domestic vehicles include a sound signal.
The Volzhsky auto industry, releasing new models of its cars, equips them with standard signaling devices of type 20.3721. Similar signals are also installed on the Lada Granta. But due to its low sound quality and frequent breakdowns (especially after moisture), many car enthusiasts strive to install a higher quality and “melodic” signal on the Grant.
As an alternative, Volga signals on Granta are especially popular, tested by time and the experience of many drivers. The signal from the Volga actually sounds louder and is more reliable in operation, but replacing the standard signal with a Volga signal requires the driver to have some knowledge of electrical equipment. If you follow the rules for installing electrical wiring, the installation of signals from the Volga to Grant will be done quickly and as correctly as possible.
What does each fuse do?
Controllers are responsible for certain functions in vehicle control.
The fuse diagram of the Granta Liftback is as follows:
| Numbering | Maximum value of I in a section of the circuit, in Amperes | Functional |
| F1 | 15 | -electrical unit that controls the internal combustion engine; |
-correct operation of the injector;
- spark ignition unit;
Replacing the Granta signal without removing the bumper
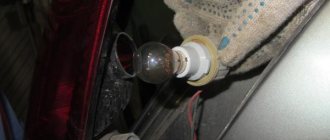
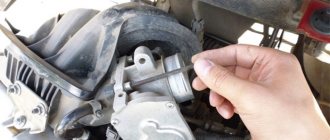
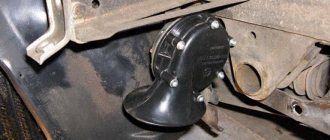
Installed sound signal (type 20.3721 or SZ-3-1), on a Lada Granta passenger car (LADA Granta), one tone. It is located behind the radiator trim on the left side of the car. The production of sound signals, unfortunately, is not of constant quality, which leads to their failure. Some Lada Granta owners have already replaced them a couple of times.
The sound signal is activated through the K8 relay, which is located in the mounting block in the cabin to the left of the steering column. The electrical circuit of the sound signal is protected by fuse F20, rated for a current of fifteen amperes. This fuse also protects the cigarette lighter, trunk lock and diagnostic connector circuits. Most often, it fails due to the fact that drivers use the cigarette lighter socket as a socket, inserting plugs of a smaller diameter into it, which leads to a short circuit in this electrical circuit. And since the fuse has blown, the horn will also not work, and the trunk will not open.
If the sound signal fails, in addition to the fuse in the mounting block, you also need to check the operation of the relay. This can be done in two ways. Or you remove this relay and install a similar known-good relay in its place. However, it should be noted that removing the sound signal relay from the socket is quite inconvenient. The second way to check this relay is to use a jumper, which you close contacts 87 and 30 in the relay socket. If the signal works, it means it is working, and the relay will have to be changed. And if the signal does not work, then the relay has nothing to do with it. Then you will have to remove the Lada Granta bumper to get to the sound signal and disconnect the plug from it and check whether voltage is supplied to its terminals.
Features of the placement of fuses in the Lada Granta Liftback
The Grant Liftback fuses are located near the driver’s left hand.
To gain access, simply remove the decorative plug by pulling it down.
To make it convenient to work, the plug can be removed completely, for which you pull it out of the grooves, on one of which the trunk opening button is fixed (this can also be removed; it applies to the “luxury” and “norm” modifications).
Signal does not work on Granta reasons
Sound signal from Volga in Lada Granta
Good day, as they say. At this point in the evening, I'm a little tipsy from the champagne. Once we were at a wholesale food store that had recently opened, I grabbed some for myself, but it was just for the holiday of Russian champagne. Today my wife and I opened this bottle, an unexpected surge or a sudden desire, an impulse, etc. My wife had enough of 1% of the bubbles, 99% took over, like a gentleman and a gentleman, all in one. I thought about the advisability of installing a mesh in the bumper, but I will write about this a little later. I’ll start in order of installation, and these are sound signals from the Volga. Many Grant Guides combine grid installation and signal installation, and this is advisable (in any sequence or combination). Let me back up a bit: in practice, I liked (was happy with) the native signal, because fortunately you rarely use it. But as a former Volgovod with a stereo signal (specifically on Gaz 31105 the signals were located at a distance from each other, on the sides) I was familiar with it firsthand. This is a native signal on Granta, of course. Everyone is aware.
So, I purchased these signals, although many have single contacts, mine have two. I don’t presume to speak for the original, I didn’t “punch” this topic. As long as they don’t break and “squeak” acceptable, these are the two main criteria. Price tag on the package.
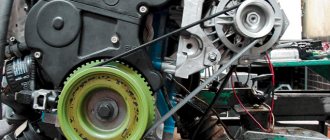
I bought a couple of corners (6 rubles each) for mounting the signal. I drilled a couple of holes with a diameter of 6 and 8 mm. I bent it at the angle I needed. After analyzing the installation, the desired goal was achieved in which the signals did not touch the bumper and did not experience direct rain and other similar issues. To connect, I initially wanted to use an add-on. relay in order to relieve the standard signal circuit by powering the new circuit directly from the battery. But I repeat, the same analysis or estimating the Roll to the nose (purely masculine), looking at the electrical circuit, I realized that in the signal circuit there are no, so to speak, vital consumers that control the processes of the car and affect traffic safety. Plus, in the additional new circuit, the relay itself needs to be protected from direct splashes from puddles, rain, etc. The nuance is that there is nowhere to put the relay in the engine compartment, or to run kilometer-long wires to it. That's why people put extra. the relay is immediately behind the facing, which is not safe in case of an accident. Logically, extra power wires in the impact zone are not needed. These are already two arguments, the third is simpler and faster installation. In fact, the fuse in the original signal circuit is 15A, but upon consumption you need 7.5A (on the box). Contacts for wires and insulators (transparent, such as silicone) were bought in radio components for 12 rubles, both per piece.
I secured the wiring using zip ties along the optimal path.
And lastly, connection. I didn’t find a chip (male-male), so I just bought a couple of contacts, crimped them and insulated them from unnecessary moisture - the consequence is that the contacts disappear over time. In the photo the left contact is positive (for reference). In fact, it has no role.
A little later, installation of the mesh in the bumper . Positive everyone and more sunshine.
Features of the fuse system of the Lada Granta Liftback
The electrical components responsible for starting the engine, battery and generator circuit do not have their own fuses. Therefore, when dismantling this electrical equipment, be sure to disconnect the battery (remove the “-” terminal) so that the circuit does not close.
If the cigarette lighter fuse of the Lada Granta Liftback fails, you will not be able to start the car, since in old-style units one controller (F20) is responsible for several functions, including the immobilizer. Until the immobilizer works, the circuit is not closed and the car will not start.
The fuse box of the Lada Granta Liftback consists of two modules. One of them is in the cabin, and the other is located in the engine compartment, where you can find the fuel pump fuse. If any of the fuses often blows, think about the correct operation of the circuit, seek help from specialists. It is not recommended to make changes to the scheme yourself.
How to fix a car horn, instructions for use
According to the Russian Federation Traffic Regulations and the list of faults presented therein, it is prohibited to operate a vehicle with a non-functioning sound signal.
An ordinary situation, let's say. Early morning, you are driving your car to work and suddenly, unexpectedly and shamelessly, you are “cut off” by a neighbor in the flow of traffic, wedging into your lane. Your further actions are naturally predictable, you immediately hit the brakes and hit the horn with your palm as hard as you can. But bad luck, instead of a powerful signal escaping from the depths of the car’s hood, there is deathly silence. Of course, you managed to avoid an accident, but you failed to warn the boor or just a sleepy, unwary driver. The morning didn't start out well as you had planned.
Of course, there are options and situations that are much worse, when a non-working sound signal led to truly tragic consequences. An inattentive pedestrian running onto the road, or a cyclist running out onto the road, or even worse, any teenager or a very small child... A terrible situation, what is there to hide, which might not have happened if the car’s sound signal .
In this article, dear readers, we will figure out how to fix the signal yourself. Let's get started.
As a rule, the circuit of such a sound signal consists of the following elements: the signal itself, the switch, the fuse and the relay. Battery voltage is supplied through the fuse to the relay coil and contacts. When you press the sound signal, the relay is activated and the electrical circuit is closed, and then the sound signal is activated. Some vehicles do not use such a relay, which means the voltage is supplied directly through the horn switch directly to the horn. In this article, dear friends, we will look at the possibilities of how you can check and repair each of the components of this simple system yourself.
Other section materials
| Technical description |
| Vehicle specifications |
| Vehicle registration details |
| Location of controls and instruments |
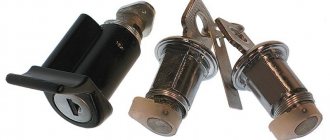
| Car keys |
| Ignition switch (lock) |
| Front and rear doors |
| Hood |
| trunk lid |
| Fuel filler plug |
| Seats |
| Rear view mirrors |
| Interior lighting |
| Instrument cluster |
| Granta steering wheel adjustment knob |
| Steering column switches |
| Granta headlight beam direction control unit |
| Granta heating and ventilation system control unit |
| Safety precautions during maintenance and repair of Granta |
| Location of the main components and assemblies of Granta |
| Vehicle check |
| Maintenance schedule |
| Checking the condition of wheels and tires |
| Replacing windshield wiper blades |
| Checking the fluid level in the windshield washer reservoir |
| Checking the engine oil level |
| Changing the engine oil and oil filter |
| Checking the level and topping up Granta coolant |
| Coolant replacement |
| Checking the condition and replacing Granta spark plugs |
| Removing the Granta air filter replacement element |
| Replacing the fuel filter |
| Adjusting thermal clearances in the valve drive of the Lada gas distribution mechanism |
| Checking the condition and replacing the generator drive belt |
| Checking the condition and replacing the Lada timing belt |
| Checking the condition of the exhaust system |
| Checking the gearbox oil level |
| Changing the gearbox oil |
| Checking the fluid level in the hydraulic brake reservoir |
| Bleeding the hydraulic brakes Granta (VAZ-11183, |
| Checking the condition of the chassis and transmission |
| Checking the steering condition |
| Checking the condition of the brake system |
| Adjusting the parking brake |
| Replacing the heating and ventilation system filter |
| Adjusting the direction of headlight beams |
| The crankshaft does not turn with the starter |
| Loud noise when the starter is running |
| The crankshaft is turned by the starter, but the engine does not start |
| The engine is running erratically |
This is interesting: Cigarette lighter wiring diagram Lada Largus
Signal pair: installation features
When the question arises about what signal to put on the Grant, you should proceed from the experience of advanced car owners. On forums dedicated to automotive topics, you will find a lot of advice regarding choosing a signal for Granta.
Some advise installing only Volga signals, others like signaling devices from Hella, and still others are happy with the standard signal. There are the same disagreements regarding the number of signals, but the overwhelming majority recommend using a two-tone signal.
Installation of a two-tone signal on Grant is carried out in the same order as installation of a standard signal. Two wires are connected to the positive wire, which will power both signals, and the mount works great as a ground. In this case, it is extremely important to ensure reliable contact at the terminals of both signals and at the junction of the vehicle ground and the signal itself.
Sources:
https://jimnysuzuki.ru/avtomobili/ne-rabotaet-signal-na-grante.html https://automotocity.com/avtovaz/ne-rabotaet-signal-na-grante-prichiny.html
Product description
Air signal for passenger cars, trucks, motorcycles. Made of components: ABS plastic body and aluminum alloy pneumatic compressor. Accessory from the global brand: BOOMBLOCK.
Fixation location:
- car engine compartment;
- front fork of motorcycle and scooter;
- truck roof.
Fixation type: mounting bolt “17”. Thanks to the combination of ABS plastic and aluminum, the manufacturer managed to balance the weight of the product as much as possible and reduce weight.
Type of packaging:
- multilayer cardboard;
- cellophane wrapper;
- impact-resistant foam around the perimeter.
Equipment:
- accessory in red;
- metal mounting bolt “17” with nut.
Electromagnetic horns
Due to the simplicity of the design, the electromagnetic type has become widespread and is installed on most modern cars.
Its main components are a solenoid with a contact pair and a diaphragm. Depending on the design, electromagnetic horns can be divided into three types:
- Snail signal . The volume of the beep can reach 115-120 dB, which definitely has an effective effect on the eardrums of others. However, due to their relatively large dimensions and funnel-shaped configuration, their installation is not always feasible or difficult.
Horn signal, also known as a bugle
Symptoms of problems
How can you even determine that the horn is not working or has some kind of malfunction? It's actually extremely simple.
There are 2 main signs of problems with a car horn:
- The signal doesn't work at all. When you press the button, the driver, like other road users, hear absolutely nothing. This is a clear indication that the system has failed;
- The signal appears periodically. There is also a slightly different situation when the horn does not go off with every press. That is, they pressed it once, everything works, but when you try to honk again, the horn goes silent, there is no reaction to the press. Then the situation repeats itself.
Pneumatic horns
The main working elements of pneumatic horns are: horn, diaphragm and membrane. When compressed air acts on the membrane, it causes it to deform and vibrate, and the resulting sound is amplified by the horn. The pneumatic horn is the loudest signal on a car - its volume reaches 145 dB.
Powerful horns of this type are usually equipped with four tubes that generate a signal with a frequency of 400 to 800 Hz. To ensure the full operation of such a device, you will need a fairly powerful compressor capable of creating a pressure of 60 atmospheres.
A pneumatic horn is capable of reproducing not only a monophonic sound, but also some melodies. To do this, the compressor will need significant space under the hood, and the device will also need to be supplemented with a special electronic controller. The compressor for the horn is then controlled by electrical signals supplied by a programmed controller. The driver has several variations of melodies.