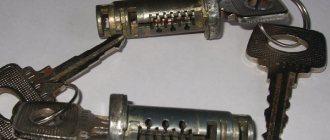
I think that many car owners have encountered such a problem when, with excessive force when turning the key, it could remain in the ignition switch, or rather, its blade. In this case, you will have to replace the lock, since it is almost impossible to get the key.
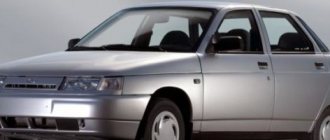
On the Grant, as on other front-wheel drive VAZ cars, the lock is mounted on the steering shaft and secured using breakaway bolts. This was done specifically for security purposes, so to speak, to prevent unauthorized access to your car.
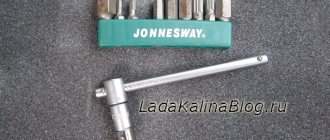
To replace the lock, you will need the following tool:
- Phillips screwdriver
- The chisel is narrow and sharp
- Hammer
- Key for 10
Causes of jammed ignition switch and solution to the problem
During the life of the car, the owner has to deal with many minor problems. They are fairly easy to fix and are a bit of a hassle. But sometimes unpleasant breakdowns occur, putting the car owner in a very uncomfortable position. For example, the key is stuck in the ignition and will not turn. The malfunction is not serious, but it is quite capable of ruining your plans for the coming day. Try to get out of the situation yourself and resolve the issue using one of the proven methods.
Fuel system
It happens that the tank simply runs out of gas, do not forget to monitor its level. You also need to pay attention to its quality. Due to low-quality gasoline, spark plugs often flood, the filter becomes dirty, and moisture forms.
If you have filled in with low-quality fuel, then in this case you need to remove the gas tank and change the coarse and fine filters, you can try to blow out the fuel pipes.
If the injectors are dirty, they can be cleaned using any available method. When there is a lot of water in gasoline, you can add a little alcohol to the tank.
But if there are a lot of impurities and dirt, then only strong cleaning will help. You see that the starter is spinning, but the engine refuses to work and you can’t hear the fuel pump pumping. It may fail, there is no tightness in the power system or the pressure regulator is malfunctioning.
The first thing you need to do is check the pressure in the rail, the normal value is 3.5-4 atmospheres .
Then you need to remove the hatch and measure the voltage in the connector; the light bulb can be inserted into the two terminals in the middle and cranked with the starter. It should light up and if the voltage reaches, but there is no pressure, you can try to hit it. The brushes could simply be stuck. If they are normal, then the coarse mesh may be clogged, it needs to be cleaned or replaced; in winter it may freeze up.
If electricity is not supplied, you need to check fuse F21 and relay k12. The relays (power coils) need to be removed, tapped on them a little, or simply warmed thoroughly in the palms of your hands.
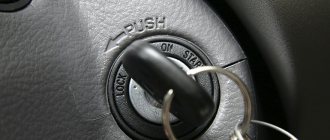
Briefly about the operation of the lock
This switching unit is designed to turn on electrical equipment, ignition and engine starter using a key. For the convenience of the driver and the anti-theft (locking) function, the element is integrated into the design of the steering column on the right side.
In old Soviet cars, the keyhole was located to the left of the steering wheel.
The castle consists of the following elements:
- Cylindrical steel body.
- A secret key mechanism is installed inside the case - the larva.
- Contact group connecting to the larva with a leash.
- A locking rod connected to the lock mechanism protrudes from a side slot in the housing.
Simultaneously with turning the key, the cylinder rotates the shaft of the contact group. Depending on the selected position (usually there are 4), voltage is supplied to different consumers - electrical equipment, ignition system and starter. The locking rod locks the steering wheel only in the first position (Lock). In the same position, the key is removed from the well.
Causes of the problem
Car ignition switches are quite reliable devices. Before the first problems associated with wear arise, the car manages to travel from 100 to 300 thousand km, depending on the brand and country of manufacture. In order to avoid getting into an unpleasant situation, the car owner must clearly grasp the moment when the key gets stuck in any position and take measures to correct the problem.
There are 5 main reasons why the ignition switch of a modern passenger car jams:
- the locking of the shaft connecting the steering wheel to the rack is triggered and does not disengage;
- the moving parts of the secret mechanism are heavily clogged;
- working wear of elements (on cars with high mileage);
- condensate freezing;
- deformation or mechanical damage to the key.
Note. The listed problems have been successfully eliminated on new cars with keyless entry and push-button engine start.
The purpose of the locking system is to mechanically lock the steering shaft in one position and simultaneously disable the starter. If an attacker manages to break the locking rod and turn the steering wheel, it will still not be possible to start the engine. This nuance should be taken into account when troubleshooting a broken lock. A characteristic sign of a malfunction is the key jamming in the Lock position.
Clogging of the cylinder with dirt is a consequence of lubricating parts with conventional automobile oils, including motor oils. These liquids strongly attract dust, which accumulates inside the mechanism over time. At a certain point, the key jams and jams in any position except Start. Accordingly, it becomes difficult to remove it.
Similar symptoms are observed as a result of natural wear and tear of the locking mechanism on cars with a mileage of 200 thousand km. Over a long period of use, the grooves of the secret part of the key are also damaged, which does not allow them to clearly interact with the cylinder. Sometimes car enthusiasts themselves damage the working side of the key by using it as a lever (for example, to open traffic jams). The soft alloy bends and cracks easily from such exercises.
Freezing of the larva is a rare and most harmless cause of problems. Ice inside the lock appears as a result of moisture from outside or condensation when a heated car is left outside during severe frosts. A sign of freezing is easy to recognize - the inserted key does not turn, the typical “movement” is not felt in the mechanism when trying to rotate.
What to do with blocking?
When the ignition switch is stuck in the Lock position, the operation of the mechanical lock depends on the angle of rotation of the wheels. If the steering wheel gets into the sector of action of the locking rod, the latter will lock the shaft in a certain position. As a result, it will be possible to deliver the car to the repair site only with the help of a tow truck - it will not be possible to tow it.
What actions can a driver take in such a situation:
- overcome a jammed mechanism with patience and hard work;
- break off the locking rod, start the engine and move to the garage;
- remove the ignition switch by pulling the rod out of its socket.
The first method involves numerous attempts to turn the key in order to “catch” the position when the mechanism opens. Be patient, exhale and try to rotate the key head while moving the steering wheel. An aerosol lubricant like WD-40 sometimes helps to disengage jammed parts of the cylinder - blow it through the tube into the keyhole.
The first option is the only one that allows the car owner to get by with “little loss” and get to a garage or service station.
Try the method before taking drastic measures .
Let your wife twist the key - maybe she will succeed the first time. On cars where electronic starter locking is not provided, you can break off the rod by sharply turning the steering wheel, applying medium force. Then the car starts by shorting the wires or turning the released key. What are the consequences of such a barbaric method:
- the broken rod will remain inside the steering column, where it will begin to rub, jam and wedge the shaft;
- from excessive force, the shaft may bend and during the repair of the lock it will have to be replaced with a new one;
- if the larva remains motionless, you will need to remove the casing, get to the contacts and find the necessary wires to start the power unit.
The complete disassembly option is suitable for all situations where the lock is jammed.
The task is not an easy one - you need a tool and an understanding of how to dismantle the unit in a certain car model. The task is to get rid of the blockage and get to the contact group, whose shaft can be turned manually or with a screwdriver. In any case, unscrew the plastic lining of the steering column and examine the fastening of the lock: you may be able to remove it. After unscrewing the nuts or screws, disconnect the housing and at the same time move the steering wheel to release the locking rod. If things go wrong, the only thing left to do is call a tow truck.
Computer malfunction
The unit itself is very reliable and rarely fails without external intervention. But water can get on it, and this is the main reason for malfunction.
There are significant flaws in the body design; the drainage holes near the filter are often clogged with dirt and water gets into the block through them.
To do this, you need to check and clean the drainage more often. Also, water can flood the ECU after installing the alarm, when the plugs are not installed tightly or they are completely forgotten to be installed.
You can try to dry the block, but if this does not help, you will have to replace it. This problem can be partially solved by wrapping the block with film or filling it with sealant, but then this is fraught with the appearance of condensation inside the ECU.
It is not difficult to remove the ECU; it is located opposite the front passenger seat, under the glove compartment, behind the soundproofing upholstery, almost on the floor, near the passenger’s feet.
ECU removal sequence:
- Disconnect the on-board network.
- Remove the screw that secures the upholstery.
- Carefully peel back the upholstery and sound insulation layer.
- Unscrew the three nuts securing the ECU.
- Carefully move the unit to the side and remove the two wire clamps one by one.
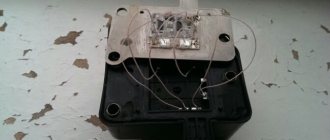
After unscrewing the computer, you need to disassemble it and assess the extent of the damage. We remove the board from the case and carefully inspect it. If it is partially burnt out and blackened, then nothing can be done about it; it needs to be replaced.
But if the board has no visible damage or only the output key has burned out, then in this case the key must be replaced, and the board must be washed and dried. First, you need to wipe it with a clean rag, then rinse it with WD-40 and blow it out with a compressor.
After this, rinse with alcohol several times and blow again. Now the most crucial moment is drying. Using a hair dryer set for a maximum of 1.5 hours, we blow through the board on both sides.
Clogging and freezing of the larva
Due to dirt accumulated inside the lock, the key jams and jams in various positions. If the jam occurs in the intermediate position indicated by the letters ON and ACC, it cannot be removed. What to do:
- purchase WD-40 lubricant in an aerosol can from your local auto parts store and blow it into the mechanism through the keyhole slots;
- make attempts to turn the key by rotating it in different directions and swinging it in the lock;
- periodically add lubricants to dissolve the dirt inside the larva;
- Gently tap the key head and lock with a light hammer or similar object.
Recommendation. During the manipulations, keep the car on the hand brake. By focusing on the stuck mechanism, you may not notice the car rolling away.
Usually the blockage can be cleared using these methods and the key is turned at least once. This is enough to get to the nearest car service center or garage. If attempts are unsuccessful, it is necessary to dismantle the lock or get to the contact group in another way. Without disconnecting the wires, turn the shaft with a screwdriver and start the motor. Do not touch the key - you may accidentally engage the mechanical lock.
Timing belt, valves and damper
The gas distribution mechanism often breaks. The belt breaks only when the car is moving. Unfortunately, no one is immune from rupture, and to prevent this from happening to you, you need to pay attention to its rubbing more often and change it in time.
Sometimes the valves come into contact with the pistons and they bend. To solve this problem, you can install pistons with special grooves. Sometimes the engine does not start due to the damper being turned several teeth, in which case the sensor makes a mistake and shows the wrong phase.
Wear and deformation of the key
In a situation where a worn ignition switch is jammed, it is necessary to perform all the manipulations described above. The goal is to start the engine and deliver the car to the repair site. Use a similar approach: swing and turn the key, lubricate the cylinder with aerosol.
If you are on the road away from any shops, use motor oil for lubrication. Remove the dipstick from the engine and drip lubricant onto the working part of the key, then insert it into the well several times. If there is no result, disassemble the lock - there is no other way out.
Often the cause of a jammed lock is a bent key. Having discovered deformation, bend the splined part on a flat area with light and careful blows of a hammer. A cracked or broken key cannot be used - a piece of metal may remain in the lock the next time you try to start the engine.
Source
Malfunctions of the ignition switch LADA “Granta”
Ignition switch failures can be divided into two types: electrical and mechanical. Electrical faults include malfunctions of the contact group of the lock, as a result of which individual energy consumers (most often the starter) or the entire Granta electrical system as a whole stop working. This also includes a breakdown of the car's immobilizer. Mechanical malfunctions occur due to breakdown of parts of the ignition switch or contact group, as well as physical wear of the contacts. This also includes cases when, due to poor contact, heating and melting of the plastic parts of the contact group occurs. Signs of a malfunction in the ignition switch of the LADA Granta:
- the key does not turn;
- when turning the key the ignition does not turn on;
- The starter or other electrical appliances do not work.
The last two signs do not necessarily indicate problems specifically in the ignition switch, but they certainly appear when the contact group is faulty.
To eliminate the malfunction, it is necessary to replace the LADA Granta ignition switch or part of it, for example, a contact group.
What is needed to replace the Granta ignition switch
To replace the ignition switch you will need:
- key to 10;
- a thin chisel and a hammer (or a drill with a drill bit to drill out bolts with self-cutting heads);
- screwdriver;
- new ignition switch LADA “Granta” or contact group.
The starter does not turn
If you are sure that the problem is not in the APS, then most likely the starter is not working. The Lada Granta is equipped with a cable-driven gearbox and the starter often acts up, especially with a new gearbox.
It is very easy to find out that the starter is not turning: when you turn the ignition key, you do not hear the specific sound of its operation.
Sometimes a car with a robot does not turn the starter, this is due to a weak battery, we recommend charging it and trying again, although sometimes it helps to simply remove and put on the terminals.
Replacing the ignition switch on a Grant
I think that many car owners have encountered such a problem when, with excessive force when turning the key, it could remain in the ignition switch, or rather, its blade. In this case, you will have to replace the lock, since it is almost impossible to get the key. On the Grant, as on other front-wheel drive VAZ cars, the lock is mounted on the steering shaft and secured using breakaway bolts. This was done specifically for security purposes, so to speak, to prevent unauthorized access to your car.
To replace the lock, you will need the following tool:
- Phillips screwdriver
- The chisel is narrow and sharp
- Hammer
- Key for 10
Crankshaft sensor
If the starter turns normally, the fuel pump works, the spark plugs and the “brains” are normal, you need to check the sensor. You need to look at the tachometer; if there is a failure, the revolutions are not visible.
You need to remove it and connect it to a multi-meter. You need to quickly wave a screwdriver in front of the sensor.
If there are no power surges, then it has “died” and needs to be replaced.
You can check it by testing the resistance; it should be approximately 750 Ohms.
If jumps are still observed and the resistance is normal, you need to look carefully to see if contamination has appeared and, if necessary, cleaning should be done.
How to replace the ignition switch of a LADA Granta
The work can be done both indoors and outdoors. To avoid a short circuit, before removing the ignition switch, you must disconnect the ground terminal from the Granta battery. The ignition switch of the LADA “Grant” is removed as follows:
- Unscrew the five lower screws securing the steering column casing;
- Unscrew the left and right side bolts securing the casing;
- dismantle the lower part of the “Grants” steering column casing;
- remove the upper part of the casing;
- squeeze the latch of the wire connector connected to the ignition switch;
- disconnect the connector from the contacts of the Grant ignition switch;
- release the lock of the immobilizer antenna unit wire connector;
- disconnect the connector of the antenna unit of the LADA “Grant” immobilizer;
- using a thin chisel and a hammer, unscrew and remove the bolts with self-cutting heads that hold the ignition switch to the steering column or drill out the bolts with a drill;
- remove the LADA Granta ignition switch from the steering column.
Tip: it is not necessary to change the lock assembly. It is cheaper to find the cause of the breakdown and limit yourself to replacing one part, for example, a contact group.
Ignition switch Lada Granta - removal, disassembly and maintenance
The main purpose of the Lada Granta ignition switch is to supply and disconnect power to the main electrical consumers of the car in various operating modes. In other words, the ignition switch can be considered the main power distributor, the condition of which largely determines the normal operation of the car.
Among other things, the Lada Granta ignition switch is combined with a mechanical locking device, a key position sensor and an immobilizer antenna control unit.
The operation of the locking device and the contact group of the switch is synchronized to provide control from the ignition key.
It should be admitted that the Lada Granta ignition switch is quite reliable, however, due to the high workload of this element, it is possible that sooner or later it will need to be dismantled for the purpose of replacement or, at least, prevention.
How to disassemble the ignition switch of a LADA Granta
To disassemble the ignition switch, follow these steps:
After disassembling the lock, it is necessary to inspect the condition of the contact group and terminals on the wires and clean them with fine sandpaper or replace them with new ones.
Assembling the ignition switch and installing it on the LADA Granta is performed in the reverse order of disassembling and removing it from the car.
Removing the ignition switch, replacing the contact group and immobilizer coil of Lada Granta
Tools:
- Ratchet wrench
- 10 mm head
- Medium Phillips screwdriver
- Small flat screwdriver
- Driver for socket attachment
- 8mm wrench attachment
- 24mm wrench attachment
- Chisel and hammer or electric drill
- Long nose pliers
Parts and consumables:
- Sandpaper (fine grit)
- Return spring (if necessary)
- Microswitch (if necessary)
- Contact plate on light guide (if necessary)
- Ignition switch contact group (if necessary)
- Bolt with shear head M6 - 4 pcs.
Notes:
Remove the ignition switch to replace it if its cylinder mechanism fails, to replace the contact group of the ignition switch, and also if it is necessary to replace the immobilizer coil.
Removing the ignition switch
1. Disconnect the wire terminal from the negative terminal of the battery.
2. Remove the steering column covers and left steering column stalk as described in this article.
Note:
For ease of operation, you can remove the steering wheel and the spiral cable drum device.
3. If the ignition switch O-ring did not come off when removing the steering column covers, remove the O-ring from the ignition switch.
4. By pressing the block latch, disconnect the ignition switch contact block from the instrument panel wiring harness.
5. Using a thin screwdriver, pry the edge of the wiring harness block and disconnect the immobilizer coil wiring block from the instrument panel wiring block.
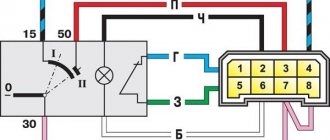
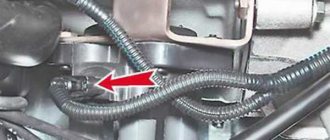
6. The ignition switch is secured with bolts with shear heads; these bolts are tightened until the heads come off. After this, use a chisel and a hammer to tear off the lock fastening bolts, as is clearly demonstrated in the second photo below.
Shear head bolt:
1 – threaded part;
2 – round head;
3 - turnkey head.
7. When the caps are already loose enough, you can unscrew them using long-nose pliers.
8. When all the bolts are unscrewed, remove the clamp securing the ignition switch to the shaft, and then the switch itself.
Disassembling and assembling the ignition switch
1. Remove the three screws securing the bracket to the switch body.
2. Remove the bracket from the case.
3. Remove the ignition switch microswitch drive.
4. Press the plastic latch and remove the microswitch from the bracket.
Note:
To replace the microswitch, you need to unsolder the wires from its contacts.
5. Disconnect the wire block from the backlight lamp socket.
6. Using a screwdriver, unfasten the latch on one side of the ignition switch.
7. Then unfasten the two latches on the other side.
8. Remove the plastic cover from the switch housing.
9. Using a screwdriver, unfasten the two latches on both sides of the cover.
10. Remove the contact group and light guide from the cover.
11. Clean the oxidized or burnt contacts of the plate on the light guide with fine sandpaper.
12. If the contacts are severely damaged, replace the contact plate on the light guide. To do this, turn the contact plate so that its internal protrusions fit into the slots of the light guide and remove the plate along with the return spring. Replace a broken or cracked return spring.
13. Using a screwdriver, remove the immobilizer coil (if present).
14. Install the spring and slip ring onto the light guide in the reverse order of removal. Please note that the protrusions on the inner surface of the light guide should be opposite the wide outer protrusion of the plate.
15. Clean oxidized or burnt contacts with fine sandpaper. If the contacts are severely damaged, replace the contact group. To do this, you need to unsolder three wires from the contacts.
16. When assembling the switch, first install the light guide with the contact plate on the base of the contact group so that the long protrusion of the plate is opposite the stop on the base.
17. Place the cover on the base so that the top of the light guide fits into the hole in the cover. Secure the base to the lid with latches.
18. Install the cover with the contact group on the switch body in the reverse order of removal. Please note that the protrusion on the lock cylinder must be between two protrusions on the inner surface of the light guide.
19. Install the microswitch in the reverse order of removal, making sure that the cracker does not fall out of the groove in the bracket.
20. Carry out further assembly and installation of the ignition switch in the reverse order.
21. Install new ignition switch mounting bolts. Tighten the fastening bolts evenly until their heads come off.
The article is missing:
- Photo of the instrument
- Photos of parts and consumables
- High-quality photos of repairs
Installing the ignition switch
A new lock on Granta can be purchased at a price of 1,800 rubles. This is the cost of the kit with all the door cylinders and trunk lid. Installation is carried out in reverse order. We first install it on the shaft and try on the casing so that the lock sits exactly in the hole. After which you can finally tighten the fastening bolts.
It is necessary to tighten until the head of the bolt comes off when a certain torque is reached.
After which you can install the casing in place, having previously connected all the power wires.
When the problem is spark plugs
The ignition switch is not always the reason the engine refuses to start. In such an unpleasant situation, you should start troubleshooting by checking the spark plugs. What kind of spark plugs should be equipped with the Lada Kalina engine? The manufacturer recommends “A17DVRM” elements. As an analogue, you can install “A15DVRM”. You can also resort to installing products from foreign manufacturers. The cost of the kit is small (does not exceed 500 rubles), so there is no point in saving, but it is recommended to purchase high-quality products.
The design of the candles may vary slightly. This concerns the number of electrodes. For LADA Kalina, it is recommended to use products with two electrodes: central and side. The service life directly depends on operating conditions and fuel quality. It is recommended to replace spark plugs after 30,000 miles. To perform the replacement procedure, you will need to stock up on a special spark plug wrench. How to remove and also how to replace spark plugs? The process itself is quite simple and looks like this (motor cooled):
- We wipe the adjacent areas around the spark plug wells with a rag to prevent debris from getting inside the combustion chambers.
- We remove the ends of the high-voltage wires from each spark plug.
- We unscrew each of the spark plugs one by one and inspect the electrodes (image No. 4).
- We screw in the new products using the appropriate tightening torque.
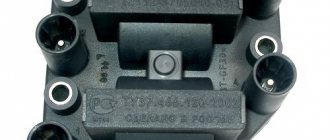
Pinout of the ignition switch for LADA “Grant”
The number of ignition switch connector terminals on the Grant has been reduced to three:
- contact “30” (“plus”, connected to the ignition switch);
- contact “15” (circuits powered when the ignition is turned on);
- contact “50” (power supply for the starter solenoid relay).
The ignition switch has three positions: “ignition off”, “ignition on” and “starter”. Accordingly, the power circuit is either open or supplied to the ignition or to the ignition and the solenoid relay at the same time.
Activation of the electronic anti-theft device
The Lada Granta immobilizer is installed on all models, starting with the standard configuration. The Granta became one of the first domestically produced cars to be standardly equipped with an immobilizer. And the first problem that the owner of a new Grant faces after he finds out what the “immobilizer” is for is activating the anti-theft device. As a rule, the controller is activated by specialists from the car sales center in the presence of the owner.
If the buyer refuses to activate the immobilizer, a note about this is written in the service book. When the owner, some time after purchasing the car, changes his mind and decides to activate the device, he will have to do it himself. The main thing is to strictly follow the activation algorithm to avoid possible problems. Lada Granta is delivered to the owner with a set of keys, including two for the ignition, one of them is marked in black, the other in red.
The black key is used for everyday use; it must be entered into the immobilizer memory for smooth engine starting. The red key, the so-called training key, is designed to enter the initial code into the controller’s memory. After activation has taken place, it should be hidden in a safe place and taken out only when necessary. If the red key is lost, all warranty obligations of the seller become void.
Problems with the immobilizer (APS)
Often the Lada Granta does not start due to improper operation of the APS. If it is activated, the key is read and the engine starts. The immobilizer (APS) identifies the “native” key by reading the code from it.
If it is incorrect, then the APS blocks the operation of all vehicle systems. Here it is necessary to immediately clarify that APS is not activated upon sale in all trim levels. Lada Granta sedan is equipped with an anti-theft alarm in models 023, 024 and 050.
Lada Granta liftback in the 711, 713, 750 and 751 configurations. Many car dealers cheat when selling and say that the immobilizer cannot be activated. But by law they must do this at the request of the car owner.
If the key is not registered, the indicator lights up continuously for about 20 seconds. without blinking, and then goes out. During training, blinking occurs at a frequency of 5 Hz, at the end of training at a frequency of 10 Hz. When problems arise in the system, a sound alert is added to the light indication; it appears at the 10th and 20th second.
Decoding signals:
1 signal + flashing indicator – the code from the key cannot be read, possible reasons:
- problems in the communication coil circuit. In this case, you need to check the resistance and inspect the circuit;
- There is no transponder in the key. To eliminate the problem in the training key, you should check the presence of the transponder and its markings; if it is missing, then use a “clean” key and the CSUD to retrain the entire system;
- The transponder (located in the red key, you need to remove the red head) may be broken. In this case, for a training key, you need to retrain the system with a clean key, and for a working key with a remote control, you need to replace the remote control with a new one and train the system again;
2 beeps + flashing indicator – the relationship between the APS and the ICS is broken, possible malfunctions:
- There was a communication failure on the w line. In this case, it is necessary to eliminate violations in the chain between the APS and the ICS;
- violation in the APS and KSUD chain. It is necessary to replace them one by one to identify where the malfunction occurred;
- there is no voltage on the APS and KSUD power supply. In this case, you need to check and restore the voltage.
3 beeps + intermittent indication - “foreign” key or APS. In this case, it is necessary to carry out training using a “clean” key and a “clean” KSUD. For APS, you need to configure the system using a training key native to the ICS.
4 signals + flashing indicator – the controller does not provide confirmation to start the engine. This suggests that the KSUD has already been trained with another system; it needs to be changed to a clean one and retrained.
To find out exactly the cause, it is necessary to make a diagnosis. If the controller is broken, it must be replaced and re-learned.
If there is an APS, then you need to replace it and train it along with all the working keys, since structurally in the Lada Granta the APS is located in the instrument cluster.
If there is a suspicion that the keys have been read, then retraining should also be done.
Step-by-step instructions for training the immobilizer and working keys:
- close the driver's door tightly;
- turn on the ignition using the red key;
- turn off the ignition and remove the key, the indicator flashes at a frequency of 5 Hz;
- quickly (within the next 6 seconds) turn on the ignition using the black key;
- further: we hear 3 beeps and after 6 seconds - 2 beeps;
- turn off the ignition and remove the key;
- if you need to train several more working keys, then you need to repeat steps 4 to 6 (the maximum number for training is 4 keys);
- over the next 6 seconds, turn on using the red training key;
- then: 3 beeps, after 6 seconds - 2 beeps;
- turn off the ignition, after 6 seconds we hear 1 signal;
- the indicator starts blinking very quickly (with a frequency of 10 Hz);
- turn on the ignition - we hear 3 beeps, the indicator goes out, the learning process is completed;
- turn off the ignition;
- Now you need to check the immobilizer: to do this, you need to turn on the ignition with a working or training key, if the indication does not light up, then everything went well, we try to start the engine.