I remember quite a long time ago, about 5 years ago, when I didn’t have Kalina, I read an article in the magazine “Behind the Wheel.” And there they called the signal one of the sore points of our car.
- Journalists called the first drawback of the Kalina signal its difficulty in removing it, and moreover, to dismantle it, according to them, it was first necessary to remove the front bumper.
- The second problem was again related to the location of the signal. They said that due to dirt, water and snow, it constantly breaks down.
I would like to make a refutation of all these “blunders” of the editors of this publication. I don’t know how it is with them, but my Kalina has already safely covered almost 50,000 km and so far there have been no problems with this device. As for withdrawal, here they are also far from right. You can do this very simply and without unnecessary problems on your own. I’ll tell you below if anyone doesn’t know yet.
Tools for this repair will be needed to a minimum, namely:
- Socket wrench size 13 (open-end wrench as a last resort)
- crosshead screwdriver
How to remove the signal without touching the front bumper
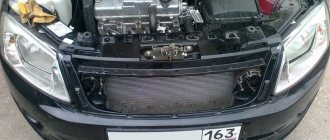
To do this, you need to remove two radiator grilles, upper and lower (which is located under the license plate). First, remove the bottom; the photo shows the approximate location of the fastening screws:
In addition to the bolts, it is also secured with latches that need to be bent down a little. When you shoot, I think you'll figure it out.
Next, remove the top grille, which is attached to three self-tapping screws and also to two side latches. You can read more about this here.
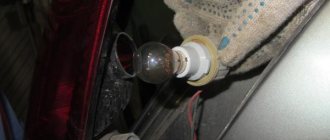
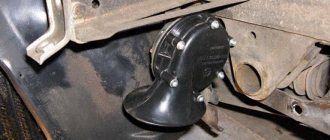
After this, you can freely reach the sound signal through the upper hole. To avoid any doubt, the photo below shows everything clearly:
To remove the signal from Kalina, you need to unscrew the top mounting nut with a size 13 wrench. Of course, there is not a lot of space to work, but you won’t have to make any special efforts, so you can easily do it.
After which you can easily remove the signal from the stud of its fastener:
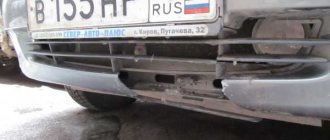
And we release it out through the lower hole where we removed the lining:
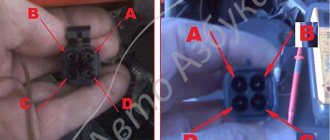
Now it is enough to disconnect the plug by simply pulling it lightly:
And all the repairs. The signal is safely removed, and is installed in the reverse order if it needs to be replaced.
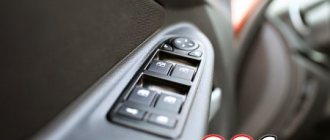
If you need to adjust the sound tone, there is a small bolt on the back that can be tightened in any direction to achieve the desired result.
Personally, in my case, I had to loosen this bolt a little and the signal began to work louder. And before that it was buzzing like an old lawn.
Replacing the sound signal on Kalina
For some reason, there is an opinion among car enthusiasts that to replace the sound signal, you will need to remove the front bumper of the car. In fact, it is possible to get by with a little “blood” without resorting to dismantling the bumper, but limiting yourself to removing just two radiator grilles. To carry out all the work you will need: a long screwdriver, a key “13”.
To make the whole process clearer, it can be divided into 5 steps:
- First, unscrew the radiator grille. To do this, you need to open the hood, unscrew the three upper mounting screws holding the grille. Then, using a long flat-head screwdriver, release 2 latches on the right side and 2 on the left. Pull the grill towards you and remove it from its fastening points.
- To carry out work safely, disconnect the negative terminal from the battery.
- To remove the lower grille, you only need to unscrew two screws, which are located at both corners of the upper part of the grille.
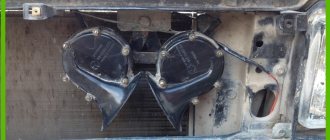
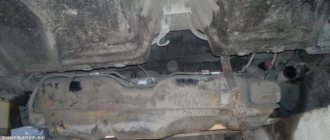
- Between the radiator and the body we find the horn itself. Using a “13” wrench, unscrew the fastening nut. Disconnect the contacts (pull out the contact plug) and remove the device.
- Installation of a new product is carried out in the reverse order of the removal process.
If you want to adjust the volume and tone of the sound signal of the horn itself, then on the back of its body there is a special adjustment bolt that must be turned using a Phillips screwdriver.
A non-functioning horn on a car is a very dangerous malfunction. The most unpleasant thing is that they find out about this breakdown just when the signal is needed most - in a dangerous situation on the road. What could cause the signal to fail?
Tips for motorists
Voltage is supplied to the audio signal terminals on the Lada Kalina through the K3 switching relay located in the mounting block, and the electrical circuit is protected by a 20-amp fuse F6. This electrical circuit is controlled by the horn button located on the steering wheel.
If the sound signal fails to work, with the engine turned off, try turning it on; if you hear the click of the sound signal activation relay, then you can assume that fuse F6, the relay and the power button are in good condition. You can check this assumption by opening the mounting block and making sure that fuse F6 (20A) is intact.
Next, you will have to remove the upper and lower radiator trim to get to the horn installation location. It should be noted that it is located in a bad place, and it is inconvenient to get to it and, apparently, water gets on it when operating the car, which is why many Kalina owners have oxidized contacts on the horn plug. It is these contacts that need to be checked.
Types and causes of malfunctions
Statistics show that 70 percent of Lada Kalina car owners, to one degree or another, encounter problems associated with incorrect operation or complete failure of the horn. The fact is that the horn itself is installed between the radiator and the car body, so it is exposed to increased negative effects of an aggressive environment (dampness, high temperature, cold, icing). The main, main reason for the failure of the unit is the oxidation of contacts and conductive elements.
The most common reasons affecting performance:
- failure of the viburnum horn relay;
- rust of the internal elements of the speaker, which appears as a result of condensation;
- lack of contact on the movable ring of the power button;
- faulty viburnum horn fuse.
Diagnosis of the causes of the malfunction
If your sound signal does not work on Kalina, it is best to start checking its functionality with the fuse and relay, which are located in the mounting block. After the functionality has been checked, it is necessary to inspect and test the contacts of the horn itself using a multimeter. Quite often, the device for sending sound signals has various oxidations and contaminations, and before replacing it with a new product, it makes sense to disassemble and thoroughly clean all the component parts of the unit, especially in the places where the contact wires are connected.
How to fix a car horn, instructions for use
According to the Russian Federation Traffic Regulations and the list of faults presented therein, it is prohibited to operate a vehicle with a non-functioning sound signal.
An ordinary situation, let's say. Early morning, you are driving your car to work and suddenly, unexpectedly and shamelessly, you are “cut off” by a neighbor in the flow of traffic, wedging into your lane. Your further actions are naturally predictable, you immediately hit the brakes and hit the horn with your palm as hard as you can. But bad luck, instead of a powerful signal escaping from the depths of the car’s hood, there is deathly silence. Of course, you managed to avoid an accident, but you failed to warn the boor or just a sleepy, unwary driver. The morning didn't start out well as you had planned.
Of course, there are options and situations that are much worse, when a non-working sound signal led to truly tragic consequences. An inattentive pedestrian running onto the road, or a cyclist running out onto the road, or worse, any teenager or a very small child... A terrible situation, what is there to hide, which might not have happened if the car’s sound signal were working at that moment.
In this article, dear readers, we will figure out how to fix the signal yourself. Let's get started.
As a rule, the circuit of such a sound signal consists of the following elements: - the signal itself, the switch, the fuse and the relay. Battery voltage is supplied through the fuse to the relay coil and contacts. When you press the sound signal, the relay is activated and the electrical circuit is closed, and then the sound signal is activated. Some vehicles do not use such a relay, which means the voltage is supplied directly through the horn switch directly to the horn. In this article, dear friends, we will look at the possibilities of how you can check and repair each of the components of this simple system yourself.
Why the sound signal stopped working: where to look for the reason
Hi all! I can’t say that car horn malfunctions occur very often and everywhere. But we cannot exclude a situation in which the signal does not work.
Car horns are safety features. Moreover, they must be present in all vehicles and be in good condition. This will allow you to give a timely signal to other road users, inform about the approach, and prevent collisions and other dangerous situations.
But at some point it happens that the sound signal located on the steering wheel suddenly stops working. It is necessary to address the issue of diagnostics as soon as possible, since it is dangerous to continue operating the car with a non-working horn.
How it works
Before looking for reasons and finding ways out of the current situation, it would be useful to understand the principle of operation and structure of the signal.
Structurally, the horn includes a fairly extensive list of elements, among which are:
- anchor;
- kernel;
- core;
- tungsten contacts;
- frame;
- capacitor;
- relay;
- activation button;
- resonant disk;
- membrane;
- contact relays, etc.
When the driver presses a special button, current flows through the winding, thereby magnetizing the core and tightening the armature. Together with the anchor, the rod moves, bending the membrane.
Due to a special nut, the contact group opens and the electrical circuit breaks. Next, a number of horn elements return to their original position. At the same time, it closes the contacts again, and current flows to the winding. Opening occurs the moment the driver presses the button.
For the driver himself, everything is much simpler. He just presses a button and the machine emits a loud, characteristic signal.
Similar systems, having different signals, but identical operating principles, are used:
- on Niva;
- on Gazelle;
- VAZ 2110 cars;
- VAZ 2107;
- VAZ 2114;
- Renault Logan;
- Renault Sandero;
- Lada Priora;
- Daewoo Lanos;
- Lada Kalina;
- Chevrolet Lacetti;
- Skoda Fabia, etc.
If the sound signal suddenly stops working, or shows obvious signs of malfunction, action should be taken immediately.
The motorist should know what the signs of problems are and the main reasons for the horn’s failure to emit warning sounds.
Symptoms of problems
How can you even determine that the horn is not working or has some kind of malfunction? It's actually extremely simple.
There are 2 main signs of problems with a car horn:
- The signal doesn't work at all. When you press the button, the driver, like other road users, hear absolutely nothing. This is a clear indication that the system has failed;
- The signal appears periodically. There is also a slightly different situation when the horn does not go off with every press. That is, they pressed it once, everything works, but when you try to honk again, the horn goes silent, there is no reaction to the press. Then the situation repeats itself.
There is nothing complicated or unusual in determining the nature of the malfunctions. But now we need to understand why this happens and where to look for the reasons.
How to fix a broken horn
1. Purchase the necessary tools. To fix the signal on your car you will need the following: - a digital multimeter or a regular multimeter, protective gloves, a quick-release connection, a repair manual for your car, safety glasses, crimping pliers and wire strippers (can be replaced with a regular knife), and of course spare ones wires.
2. Locate the fuse box. First of all, you need to check whether the fuse or the relay itself has failed. The location of the fuses and their diagram can be found in the user manual. Typically, one fuse box is located in the dashboard on the driver's side and another one is located under the hood of the car.
Tip: -if you don’t have a car manual at hand, you can enter the model and year of your car in an online search, and then find circuit diagrams and manuals for fixing the signal on the Internet. There is a high probability that you will find what you are looking for there.
3. Finding the right fuse. Examine the diagram on the back of the fuse box and find the fuse number that matches the horn circuit.