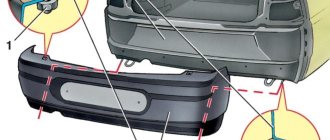
In a VAZ-2114 car, the rear bumper is a decorative part that enhances the body. Its main component is plastic, easily destroyed by the slightest collision. A small accident and the owner of the brand is forced to think about how to remove the rear bumper on a VAZ-2114, what is required for this, and what to do with the damaged spare part. Let us consider possible nuances regarding the dismantling and subsequent installation of the structure.
Rear bumper VAZ 2114
Is it possible to do the replacement yourself?
Experienced motorists know that replacing the rear bumper of a VAZ-2114 is sometimes a more profitable investment than the cost of repairs. Especially if you plan to entrust the repair of the part to specialists. The price of the spare part can be called affordable, and there are no complications with the purchase either. The question here is one: is it possible to carry out the replacement yourself?
If you need to replace a worn or damaged product, it is not necessary to seek specialized help. It is quite simple to dismantle and then install the elements yourself. The only point you have to figure out is the step-by-step instructions for removing and installing the part.
Important! If you do not have minimal knowledge regarding car repairs, it will be better if the bumper is replaced at a specialized auto repair shop.
Useful video
It is easy to notice that there are no difficult moments in the removal and subsequent installation of the structure. Even novice car enthusiasts can do everything. Finally, it is worth mentioning the last nuance - it is better to carry out the work of replacing the rear bumper on a VAZ-2114 with a partner, this greatly simplifies the task. But even without support, you can do everything on your own.
Published January 22, 2018
“No one is insured against road accidents” - these words can often be heard from different people. The most common reason is failure to maintain distance, especially in big cities. This factor influences damage to the rear bumper of the VAZ-2114. The article will tell you how to dismantle a part for repair or replacement.
Removal stages
To carry out dismantling, you do not need to resort to the services of specialized lifts. Ordinary jacks can easily cope with the assigned task. Removal of the rear bumper of the VAZ-2114 begins by placing the car on a flat surface. Then you should support the front wheels with stops and raise the rear part of the body with jacks.
The next item is removing the wheels. This opens up access to the fender liners, which will also need to be removed. This is also a good opportunity to clean out the dirt that has accumulated there. Therefore, it will not be superfluous to additionally stock up on a brush.
We remove the wheels of a VAZ 2114
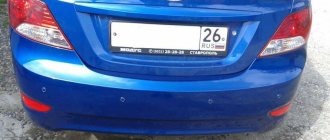
Next is the turn of the license plate lighting system. All electrical wiring is disconnected and the lamp itself is removed. After this, you can detach the license plate itself.
After this, you can begin to directly dismantle the spare part itself.
Rear bumper mount
The nuance here is that attaching the rear bumper of the VAZ-2114 to the car body is carried out in several stages and in order to remove the part, a certain sequence is necessary:
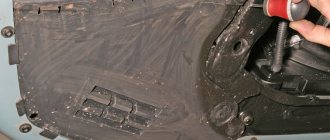
- Removing the 2 linings that secure the spare part (a 10 mm wrench is required).
Cover fastening nuts
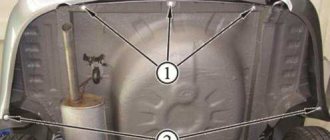
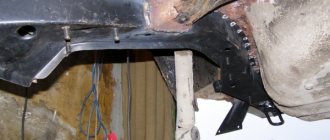
- Unscrewing the 3 bracket nuts holding the reinforcing beam.
Bracket Attachment
- Removing the freed bumper.
Removing the bumper
With regard to the first point, it becomes clear why it was necessary to remove the fender liners - the nuts securing the linings are located in the wheel arch, and it will not be possible to get to them without removing them. Do not forget to lubricate all fixing elements.
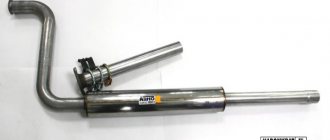
Upon completion of the dismantling work, you will have a bumper in your hands with an amplifier screwed to it. If desired, these two elements can also be separated, since they are held on by ordinary screws.
Important! Do not rush to throw away the reinforcing beam if there are no signs of damage on it; perhaps in your situation, repairing the device will be preferable to replacing it.
Bumper VAZ 2114
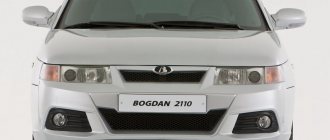
Front bumper VAZ 2114
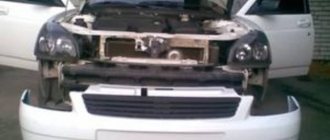
The simple design makes it easy to dismantle the front bumper with your own hands, and then fix the repaired or purchased one in its original place. However, from an economic point of view, it is cheaper to restore an old cracked bumper than to purchase a new one. Structurally, the front bumper is quite simple. It is a plastic protective and decorative structure that is attached with nuts to the reinforcing beam, and then to the front part of the car body.
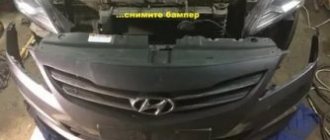
The front bumper is easy to remove with your own hands
Replacing the front bumper of a VAZ 2114 will not cause problems if you study in detail the technological instructions for dismantling and attaching the bumper. Let's look at the technology for removing the front protection and the features of installing the bumper.
How to remove the 2114 bumper from the front of the body
Before removing the front bumper on a VAZ 2114, it is advisable to familiarize yourself in detail with the step-by-step instructions for performing the work. Agree, there is no need to go to a car repair shop and involve other specialists in performing the work if removing the front bumper of a VAZ 2114 can be done independently in a personal garage in a fairly short time. After all, the whole job will take no more than one hour.
Remove the front protective and decorative element of the machine according to the following algorithm:
- First, we independently remove the wheel protection, which is secured with self-tapping screws. To do this, use a screwdriver to unscrew 3-4 screws securing the front fender liners;
- then we remove the wheel arch liners and free access to the inner surface of the bumper. Next, you will need to unscrew two locking nuts 10 on each side of the bumper. It is necessary to pull each side of the bumper so that the mounting studs come out of the holes in the brackets;
- You will also need to remove your license plate number. After all, under it there are two 10mm fixing bolts. They will need to be unscrewed, as well as a couple of screws located in the cavities under the license plate.
Don’t forget to disconnect the fog lamp wires, remove the trims and unscrew the headlight mounting screws if they are attached to the car’s bumper. After performing these operations, all that remains is to carefully remove the front without applying much effort.
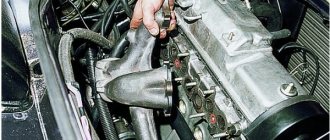
The bumper on a VAZ can be removed without much effort
After dismantling the bumper, check that there is no deformation on the metal amplifier. If there are cracks or dents, the amplifier will need to be restored to its previous condition by welding, straightening or replacement.
To replace the amplifier, you will need to unscrew the fastening nuts with a 13 mm socket. After restoring the power bracket, its position should be adjusted to the required height, ensuring equal gaps between the wing and the reinforcement bracket. The grooves make it easy to complete the task.
Fastening the VAZ 2114 bumper - installing protection on the front of the car
Installation of the front bumper of the VAZ 2114 is carried out according to the above algorithm, but in the reverse order.
Follow the specified procedure when attaching the front bumper of the VAZ 2114 after repair:
- screw the fog lights with covers to the bumper using self-tapping screws;
- align the holes in the front part with the seats in the car body;
- tighten the bumper fixing nuts, ensuring equal clearance on both sides;
- screw on the license plate and secure the left and right fender liners in the arches with self-tapping screws.
Even if you lack the skills, installing a bumper on the fourteenth VAZ model is not difficult.
Even an inexperienced person can handle installing the bumper
Damage analysis
Any emergency situation that results in the rear bumper coming into contact with an obstacle is a reason to remove the structure for damage analysis. It may seem that a small dent in the plastic is nothing to worry about, but it is not. Such little things often become the primary source of corrosion that spreads to the body part.
Therefore, it is better to remove the rear bumper on a VAZ-2114 car to assess the condition of the spare parts. Most minor damage can be easily repaired with putty and painting. In more serious cases, repair work becomes less cost-effective than replacement. Upon completion of the analysis, proceed with repairs or go to the store for a new product. The last stage awaits you - reassembling the bumper.
Reasons for dismantling
Dismantling work on the rear bumper can be carried out for several reasons. Let's look at them in more detail.
| Reason for withdrawal | Explanation |
| Violation of the integrity of the bumper | The plastic element is damaged, which does not create the best appearance for your car. Therefore it is better to remove and solve the problem |
| The appearance of cracks and chips | A common reason for dismantling and replacement. Such damage does not affect the operation of the car, but the aesthetic side is significantly impaired |
| Body deformation | This is a hidden type of body damage that can lead to undesirable consequences. Therefore, the bumper must be removed and the condition of the body itself inspected. |
| Damage to the paint layer | Scratches, abrasions, cobwebs and other external defects may appear on the bumper covering. This ruins the attractiveness of the car, which is why many people decide to remove the bumper and repaint it. |
That is, damage in the case of the rear bumper can be divided into two types:
- Deformation, violation of integrity, external changes in the bumper itself;
- Problems, damage under the bumper.
- If you damaged the bumper itself, if it can be either replaced or repaired. It depends on your wishes and financial capabilities. If you don’t have the money or desire to change the element yet, be sure to repair the cracks and paint over the damaged areas.
- If this is hidden damage, the situation is much worse. Sometimes even small impacts from the rear can lead to damage to the integrity of the body. This is where dents appear, the active process of corrosion begins, and rust appears.
Rear amplifier
Even if you were not hit hard from behind or you drove into some object while moving in reverse, be sure to remove the bumper and inspect the condition of the body. The presence of irregularities and cracks in the metal indicates the need for urgent intervention in the situation.
Installation steps
Removing and installing the bumper
Installing the rear bumper on a VAZ-2114 is the reverse procedure of removing a car part:
- attach the amplifier to the bumper;
- screw the amplifier to the base;
- attach the plastic part;
- install lighting;
- replace the fender liners and wheels;
- lower the car to the ground.
We install it in place
After the rear body kit has been repaired or replaced, it must be put back in place. All procedures for installing the rear bumper on a VAZ are performed in the reverse order of removal.
Didn't find the information you are looking for? on our forum.
If you find an error, please select a piece of text and press Ctrl+Enter.
We recommend reading:
Exhaust for VAZ 2110 8 valves What kind of oil to fill in a VAZ 2109, when to change, which one to fill, how to fill High engine speeds at idle VAZ 2109 injector Knocking in the rear suspension when driving over bumps, VAZ 2110 Wiring VAZ 2109 injector, 8 valves, with description VAZ 2107 injector , idle speed floats, reasonsCarburetor for VAZ 21099Changing oil in a VAZ 2114 engine, 8 valves, 16 valves
Necessary tools for removing and installing the bumper
If you are planning to remove the VAZ 2114 bumper on your own for restoration or replacement, and then put it in its original place, you should prepare everything necessary to perform dismantling and installation operations. As a rule, car owners have everything they need in their garage.
A Phillips screwdriver includes a list of tools for removing the bumper
The list of tools includes:
- a screwdriver with a cross-shaped working part or an electric screwdriver with a similar attachment;
- open-end wrenches or sockets for unscrewing nuts with a width of 8, 10 and 15 mm;
- stops under the slopes of the machine to ensure the immobility of the vehicle during work;
- universal aerosol preparation WD-40 to facilitate unscrewing rusted fasteners.
It is more convenient, of course, to remove and install bumpers on a car lift. However, at home, you can use a pair of car jacks to simplify and speed up the work. Also prepare grease or lithol for application to the threaded surface of the fasteners when screwing the bumper.