The Tomahawk TZ 9010 differs from older models in the new antenna unit, plus the appearance of the key fobs themselves has changed slightly. Other features and functions remain virtually unchanged.
Self-installation of Tomahawk TW 9010 alarm system
Before installing this model of security system yourself, it is recommended to check its functionality. Before installation, the Tomahawk 9010 alarm components must be connected to each other in one circuit, which is powered by a 12-volt power source. This will allow you to check the operation of the “alarm” before it is installed directly on the car.
Connection diagram and wire designations
Wiring diagram for connecting the main microprocessor module
When making connections to the main connector of an installed car alarm yourself, the user must be guided by the following data:
| Color | Purpose |
| Black | "Ground" or negative pole. It must be connected directly to the battery or to any standard bolt screwed into the body. It is important that it is fixed as firmly as possible. |
| Blue | Cable for connecting the interior lighting system. It is also possible to connect the contact to the window lift motor. When the protection is activated and disabled, the current on the line should be no more than 300 mA. |
| Red-black | Contact connecting to the ignition switch with output IGN3 |
| Yellow-black | Cable for connecting the starter lock relay |
| Red-yellow | Contact for implementing a second additional channel used to control electrical equipment |
| Black-gray | Output for connecting the tachometer cable or the engine fluid pressure controller in the lubrication system |
| Red-blue | Positive input for connecting door and hood sensors |
| White-orange | Negative output for door lock controllers |
| Violet | Contact for implementing the “Anti-robbery” option. The function should be turned on when a negative signal appears on the line. |
| Black-green | Power cable for side optics or light signaling. The circuit must be protected by a fuse device rated at 7.5 amps. |
| Yellow-green | A similar contact for connecting external lighting devices |
| Black and white | Programmable additional powertrain locking |
| Grey | Contact for connecting siren power supply |
| Blue-yellow | Cable for implementing a third additional channel or two-stage opening of door locks |
| Black and yellow | Contact for remote opening of the tailgate |
| Purple-orange | Wire for connecting to the parking brake lever sensor. If the car is equipped with a manual transmission, then the contact is connected to the negative signal of the handbrake. If you have an automatic transmission, the connection is made to the brake light circuit. |
| Black-blue and gray-orange | Contacts for connecting door and hood controller inputs |
One of the main nuances that must be taken into account when installing and connecting yourself is connecting the contacts on the autostart connector:
| Color | Purpose |
| Yellow-black | Contact for connection to the starter mechanism. This element must be connected to the output on the ignition switch, where a 12-volt voltage is generated when the key is turned to the “Starter” position. Used to start the power unit, it is necessary to make a connection in the area after the blocking relay. |
| Blue | Output pulse for auxiliary devices and equipment. It must be connected to the ignition switch contact, which generates a 12-volt voltage when the key is in the “ACC” mode. |
| Red (thin) | System power cable. Must be connected directly to the positive terminal of the battery. The electrical circuit must be protected by a 10 amp fuse device. |
| Red (thick) | Power supply contact for remote start power lines. It also needs to be connected directly to the battery. But this circuit must have a 40 amp fuse installed. |
| Yellow | Contact element IGN1. It must be connected to the ignition switch, to the output where a 12-volt voltage is generated when the key is switched to “ACC” mode. It is important that the load on the line does not disappear in the “Starter” position. |
| Green | Contact element IGN2. Must be connected to the contact on the lock, where voltage appears in the "ACC" mode and disappears in the "Starter" |
Selecting the location of the main blocks
Correctly determining the installation location of the component elements is necessary taking into account the design features of the car:
- The control module of the Tomahawk 9010 automotive system is installed in the vehicle interior, in the most hidden place and protected from external influences. It should be placed with the connector facing down to prevent liquid drops from running down the wires and moisture from getting inside. It is possible to install the device behind the instrument cluster; it must first be dismantled and turned off.
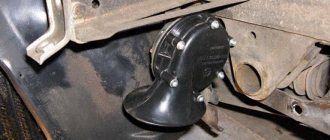
- In accordance with the Tomahawk 9010 operating manual, the siren is installed under the hood of the car. The wires from the device must be routed to the control unit in the passenger compartment; electrical circuits must not be accessible from under the bottom of the car. The siren should be placed in a hidden place, not exposed to elevated temperatures. If an autonomous device is used, then it is necessary to ensure free access to its well.
- Door triggers must be embedded in places protected from moisture. When these body parts are locked, the limit switches should not be accessible. Wiring from the devices is routed to the microprocessor.
- The shock and sensitivity controller is installed inside the car. Ideally, its installation should be done in the central part of the body. The device is fixed on a flat surface using glue or self-tapping screws.
- All high current lines must be protected with safety devices of a certain rating. Available in the form of a wire for connecting marker optics, power supply for alarm systems, and central locking.
Is it worth installing it yourself?
Having at hand instructions on how to connect a Tomahawk alarm system, there is a desire to do the work yourself. But remember that installing a security system has many nuances, so it’s unlikely to be completed in one day. In the future, you may not have time to finish, and then the machine will remain disassembled for a long time. At the service station, the process is streamlined and the work is guaranteed to be done within a day.
In addition, in the absence of experience, the risk of mistakes is high. You can break some circuit or even damage an expensive device. In this case, no one will return the money. It is also worth remembering about the warranty, which most likely will not be available if you install it yourself.
How to connect an alarm without auto start
The absence of an automatic engine start function greatly simplifies the installation procedure of the anti-theft system. To connect, the user will need contact elements for the door position as well as the ignition switch.
Preparing the device
To prepare the system, perform the following steps:
- An additional relay and a safety device are installed in the ignition circuit.
- A microprocessor alarm control module is installed.
- The shock controller and transceiver are being installed.
- Pulses from the ignition switch and door positions are connected to the Tomahawk 9010 control module. The light signaling power lines are connected in parallel to the siren.
Working with ignition
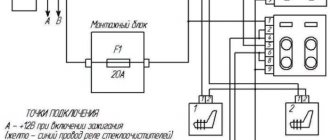
If an ignition system blocking relay is used, then when connecting you need to use the electrical diagram:
Engine starting circuit using a blocking relay
Low current circuits and main connector
The installation of low-current power lines of the Tomahawk 9010 anti-theft system is carried out as follows:
- The power in the car turns off; to do this, you need to de-energize the battery.
- The main elements are connected to the microprocessor device. Available in the form of a transceiver with an antenna adapter, an LED, and a sensitivity controller.
- The contact elements of the hood and door sensors are connected to the main block of the control unit.
- The electrical circuits of the engine fluid temperature and pressure controller are connected to the instrument cluster. The contacts of the corresponding sensors are used for connection.
- After the connection is completed, all circuits are checked using the tester.
Photos of diagrams and detailed descriptions
Diagram of the security system control unit in pictures:
Download the official instructions.
Use the following data to independently connect the main connector of the control unit.
We pay for photo reports on car repairs. Earnings from 10,000 rubles/month. Write:
In this article we will look at how to install the TOMAHAWK 9010 alarm yourself.
How to program important options
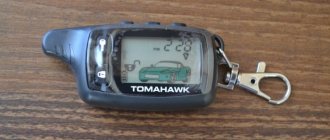
Before using the anti-theft system, you must install a working battery in the communicator. The power supply is installed in a special compartment hidden behind the back cover. When installing, polarity must be taken into account. After removing the old battery and installing a new one, the user must press the button on the remote control with the open trunk indicator.
Key fob programming
Using all the functions of the Tomahawk 9010 car alarm is possible only after linking the communicator to the control unit.
The procedure for programming the key fob is as follows:
- The key is inserted into the ignition and turned to activate the ACC position. The car engine does not start.
- The button to enter the emergency maintenance mode “Override” is pressed and held for several seconds. You can release the key after the alarm siren sounds four beeps.
- Then the buttons on the key fob are pressed and held in the form of an open trunk and a crossed out speaker. A siren will sound to confirm the binding. If no programming action is taken within 6 seconds, the alarm will exit the menu.
Features of settings. Start the engine
The daily start action in TZ is possible even if the key fobs are missing. The same applies to warming up in automatic mode. You must enter programming mode to configure other settings related to the autorun feature. But the hourly engine start is easiest to do when you still have the Tomahawk key fobs.
- This option is activated by pressing two keys.
- Depending on the data in special tables, select the mode in which autorun is carried out.
The TZ 9010 system can estimate temperature values using one of the following methods. The temperature in the cabin is estimated if there are no external sensors. If there is an external sensor, its readings in this area are also taken into account.
Video
User Olzhas Zhailaubay showed in his video how the automatic engine start option works on a car with a Tomahawk 9010 alarm system installed.
This is my second experience installing an alarm in a car, you can read about the first here Self-installation of a Leopard LS50/10 PLUS alarm
When I bought the car, it already had a simple (open-close) non-working alarm system, which significantly simplified the installation process (there was no need to install drives, and almost all the main connection points were already installed in the place I needed). It’s strange that alarm installers also charge an additional fee for dismantling the old security system! =)
First of all, we decide on the installation locations of the security system elements:
— The electronic alarm control unit is installed inside the vehicle. — To obtain maximum range, the transmitting and receiving “RF” antenna of the system unit must be positioned as high as possible, not in contact with metal objects or electrical wiring harnesses. — The siren is installed in the engine compartment, in an inaccessible place. If you are using a stand-alone siren, provide access to the service key hole. The siren should be installed with the horn facing down, this will prevent moisture from entering. It is better to plan the wire connections inside the cabin for less oxidation. — All high-current circuits (power supply, side lights, central locking, etc.) must be protected by fuses of the appropriate rating. — The hood and trunk triggers cut into places protected from moisture that are inaccessible when the hood and trunk are closed. Triggers need to be lubricated periodically to prevent seizing and corrosion. — The shock sensor is installed in the cabin, the center of the car can be considered ideal, it is attached to the metal of the body with self-tapping screws or glued (but in experience, the sensor works better on plastic, which will be discussed below). — Contacts in places where ignition, starter, etc. circuits are broken. It is recommended to solder.
Then we cut or leave a jumper on the alarm control unit (closed - automatic transmission, open - mechanical), remove the negative terminal from the battery and connect to the car wiring, according to the CONNECTION DIAGRAMS.
In comparison with “budget” security systems, Tomahawk brand equipment has proven itself well. Now in 2015, many Tomahawk Car Alarm systems have been discontinued. The following families of alarms are still produced: Z, X, S, TZ 7010 and some others. On sale, however, you can find Tomahawk tw 9010 or tz 9030 alarm systems. The second of them is more modern, all functions in it are programmable, and that is why it is better to give preference to a simpler model. At least on the Tomahawk tw 9010 signaling, it is impossible to “accidentally” reprogram the purpose of the “ACC” terminal connected to the power wiring.
“Software neutral”: we are engaged in activation
The handbrake limit switch is connected to the 9010 alarm system if a car with a manual transmission is used. The box type is also configurable, separately from other parameters. The gearbox selection loop must be cut if there is a manual transmission. After this, the engine cannot be started without activating the so-called “neutral”.
- Apply the handbrake to stop the vehicle.
- Click “Start Engine”. It doesn't matter which keychain.
- We get out of the car, taking out the ignition key.
- We close all the doors.
The interval between the second and fourth steps should not exceed 30 seconds.
According to some reviews from 9010 users, it is better to leave the loop when installing the alarm in the car. Then there will be no need to use the Tomahawk “neutral”, but the consequences are not easy for everyone.
Standard connection tw 9010
The Tomahawk equipment manufacturer suggests connecting the alarm as follows:
Reviews tell us that the standard connection option in VAZ cars is easy to implement. You don’t have to connect the hood switch, the Anti-Hijack button, and the “blue-red” wire coming from the connector is definitely not needed. You can connect a blocking relay connected to the “black-yellow” cable if autostart is needed. In general, connecting the Tomahawk tw 9010 signaling system is a pleasure if we are talking about a VAZ-2110.
There are two connectors under the dashboard of the VAZ 10s. They are painted white and red. When making T-shaped connections, the following wires are pulled from the connectors:
- Tachometer cord connected to pin “3” of the white connector;
- Parking brake sensor wire (white connector);
- Two cords from the turn signal lamps (terminals 5 and 6 of the red connector).
Installation instructions for door switches
Door limit switches are installed in this sequence.
- If necessary, drill holes for the end switches.
- Route the wiring harness to the control unit.
- Install and connect the sensors.
- Connect the wires using a soldering iron.
- Use a multimeter to check operation with the doors open and closed.
Connection without autostart
Automatic start is needed to implement auto-warming of the engine. We will assume that the owner does not need the last option. Installation and installation of car alarms, regardless of their brand, in this case is simplified. Now we will look at how to prepare standard connectors before installing the Tomahawk alarm system. Read carefully.
Standard modules of VAZ-2110, preparation
The dashboard housing hides two electrical connectors. You will need 4 wires:
These figures were presented in text form earlier. Now let’s note that the car alarm must receive information about whether the doors are open. Therefore, you will need 4 more contacts:
On the contrary, it would be advisable to solder power cords. This is done with the “green-yellow” and “green-black” wires going from the Tomahawk alarm module to the turn signals.
Installing car alarms is not such a difficult task. But you need to know where and what is in the car. Standard connectors look like this:
Here the “blue” and “blue-white” cords are connected to the turn signals, the “yellow” cord is connected to the tachometer. You will find four “important” wires coming from the BSK module connector right away. By the way, they are not connected to the Tomahawk alarm directly, but through blocking diodes. The anodes of 4 diodes are twisted and connected to the “blue-black” cable.
Any car alarm is connected to the door switches not through ordinary diodes, but through Schottky diodes. For example, parts marked 1N4001, etc. are suitable.
If we talk about connecting the central locking, the well-known diagram is recommended by the car alarm manufacturer itself:
But reading the reviews, you can understand that everything looks simpler on the VAZ-2110. To control the central locking, a zero potential is applied to the “white” or “brown” wire:
This means that these cables can be connected to the wires coming from the 6-pin connector of the Tomahawk tw 9010:
Having implemented the simplified version, it will be undesirable to give conflicting commands: by moving the “dog” down, you cannot take the key fob and press the UNLOCK button (open).
What to do with the ignition
A blocking relay is supplied with the Tomahawk equipment. Connect it according to the diagram:
Manufacturers do not provide markings for the socket cords. But the cable connected from the lock side can be determined by the operation of the relay:
“Minus 12 Volts” is connected to the brown cord, and positive voltage is applied in turn to the power cables.
The car alarm in question is connected to the relay with one cable (“black and yellow” from the main connector). But the installation is carried out when all connections have already been made.
Here the power cord comes to the third contact of the terminal block and is broken. And the fourth contact must be connected to the “yellow” cable, to which the car alarm is connected via a standard connector.
All Tomahawk equipment has the property that if the main unit fails, the relay will still conduct current. But if you turn it off, that is, remove it from the socket, it will be impossible to start the engine. So, when performing installation, take care to securely fasten the relay socket. The latter is true not only for Tomahawk brand systems, but also for other blocking equipment.
Low current circuits and main connector
The main unit of the Tomahawk security system is equipped with several connectors:
What to do with 6-pin terminal blocks is discussed above. And to subsequently configure the system, connect the antenna unit, the Override button and the LED. Now let's talk about connecting the main terminal block.
The jumper installed on the main unit is cut to block autostart when the handbrake is on. If autorun is not used, leave the jumper. The wires of the main connector are connected as follows:
Blue crosses mark optional connections. For example, you are not using the hood sensor, but the Tomahawk system thinks it is closed.
When performing installation, disconnect the standard battery. After switching on, the alarm is in the “Open” mode.
How to program important options
To program the Tomahawk tw-9010 block you will need:
- At least one key fob perceived by the system;
- Functional Override button;
- Before performing any operations, disarm the vehicle.
Take the main key fob, press the “Lock” button. If the screen displays “locked”, press the key again.
A set of software-defined options is given in any manual for the Tomahawk signaling system. The key fobs are equipped with four buttons, and the value is set by pressing one:
Let's program the system for control “by tachometer”:
- When the alarm is disarmed and the doors are closed, turn on the ignition without starting the engine;
- Press Override 6 times;
- Turn off the ignition (a chirp signal will sound).
Now, press Override 4 times in a row. Then, select “value 3” by taking the key fob and pressing the “Trunk” button.
You won't need keychains anymore. Follow steps 1-3 by pressing Override 9 times. If an LED is connected, wait until it turns on. Start the engine, and at 1000-1500 rpm, press and hold Override. A single “chirp” will sound, indicating that the Tomahawk system has been “successfully trained.” If you hear 4 “chirps”, do the training again.
If everything is done without errors, the main key fob will correctly display the engine operating mode.
Types and models
What types of protective systems exist:
- with automatic start when the engine is running;
- with feedback;
- no feedback;
- with additional equipment.
Tomahawk models available for sale:
- Z1, Z3, Z5;
- 9.3, 9.5, 9.7, 9.9, 9.3-24, ;
- 10.1;
- X5;
- G9000;
- SL 950;
- TZ 9010, 9011, 9030, 9031, 7010, 9030-24;
- CL 550, 700;
- 7.1, 7.2;
- 8.1;
- S 700.
Variety of anti-theft systems