Replacing the Chevrolet Niva CV joint boot - external and internal
The hinge (or “grenade”) is the most important element of a car’s transmission. Replacing the boot of the internal CV joint on a Niva Chevrolet is usually caused by the need to protect bearings and other internal mechanisms from dirt and damage.
When to replace the grenade boot on a Chevrolet Niva?
As a rule, replacing the Chevrolet Niva CV joint boot is carried out after inspecting the part and detecting damage. It could be a small hole, a crack, or a large tear. Regardless of the degree of damage to the protective cover, it must be replaced with a new one. If this is not done in time, the owner will face complex and expensive repairs.
Checking the rubber protection must be carried out regularly, since parts wear out quickly if they are constantly under load. Checking is a simple undertaking. You just need to turn the front wheels to the right or left all the way and inspect the elements. There should be no traces of oil or cracks on them.
What tools will be needed for replacement?
Before replacing, you need to prepare several tools:
- set of keys, screwdrivers;
- lift;
- wooden stands;
- puller
Of course, you need to buy lubricant and a new protective cap with clamps.
Replacement procedure
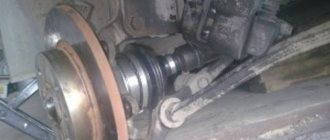
If the car owner has the skills to work under the bottom of the car, it is not necessary to completely remove the drive. There is also no need to dismantle the CV joint - the whole operation boils down to removing the hinge mechanisms. First of all, lift the car onto the pit, tighten the handbrake, and select first gear. You need to jack up the front of the Niva and remove the wheel - right or left. For safety reasons, place a wooden support under the threshold of the car.
Now you need to disconnect the hub from the suspension. You need to do the following:
- unscrew the hub nut (it is tightened with great force);
- remove the jack from under the car and install it under the ball joint;
- lift it a little, place a wooden block under the lower arm, remove the jack;
- loosen the nuts of the lower ball joint connecting the part to the steering knuckle and pull out the bolts;
- disassemble the shock absorber mount at the bottom, compress the spring as much as possible so that it does not interfere;
- move the hub mechanism to the side.
Then you will need to crawl under the car and loosen the clamps of the internal grenade case. You can even cut them off, since they will no longer be used. The inner boot must be pulled out from the outer ring, then simply cut off.
If there is a “grenade” of an old year of manufacture on the Niva, then there will be a locking ring around the perimeter of the outer clip, preventing the element from accidentally coming off. The ring needs to be pryed off with a screwdriver and removed.
To separate the inner CV joint from the structure and divide it into 2 parts, you need to pull the hub all the way to the side. Pull the shaft with the outer “grenade” and part of the inner one out from under the car. After:
- remove the elements of the inner race of the hinge: a separator with rollers (in the case of a tripoid version) or just 6 balls (Rzeppa);
- place them in a bath with kerosene, rinse thoroughly;
- put on a new boot;
- assemble the internal mechanisms of the hinge, apply new lubricant;
- install half of the “grenade” in place;
- collect everything as it was originally.
This method takes less time, but is not always feasible. Without certain skills, installing a new protective cover without removing the drive is problematic. Therefore, it is still recommended to dismantle the axle with the internal “grenade” intact. The drive from the outer CV joint will easily disengage after moving the hub with the rotary cam. The second end of the axle is fixed to the gearbox - you need to remove several nuts to remove the bracket. If necessary, the boot of the outer CV joint of the Niva Chevrolet is simultaneously replaced.
Is repair possible?
In some cases, the protective cap can be repaired. For example, if it breaks on the road, but there is no new one at hand. Restoration involves the use of rubber patches or cellophane. Both options work, they help you get to the nearest service center without the risk of ruining the CV joint.
Rubber patches must be prepared in advance. Usually they use the same ones as for a car tire. You also need to apply grenade lubricant, sealant and kerosene. The patch is glued to the boot, and for greater reliability it is filled with sealant on top. After drying, you can drive, but not for long. The restored cover must be replaced as soon as possible. It will be even better if you can carefully remove the damaged component, clean it, fill it with oil, securely fasten it with clamps, and only then install the patch.
Cellophane is used as a last resort - when the rubber protection cannot be removed. You need tape, lubricant, and a syringe. The protective cover is cleaned of dirt right on the spot and washed as much as possible. The oil is filled with a syringe through the boot into the joint. Next, the structure is wrapped in a plastic bag and with tape on top. It is advisable to use not ordinary stationery tape, but a special one - automotive, durable.
By regularly inspecting the boot, you can avoid expensive repairs. But if you do not have technical skills, it is better to contact a service center, where they will do a full diagnosis of the suspension elements. If necessary, they will change not only the cover, but also the CV joint itself.
Video on replacing Niva CV joints:
Choice
- Cardan Sickle and Hammer, Saratov. A reliable and high-quality cardan that eliminates vibrations, the car becomes silent. Recommended for city driving.
- New: Prom cardan Niva Chevrolet without elastic coupling. This CV joint driveshaft on the field makes for a comfortable ride and eliminates vibration and noise.
- JSC Kardan Syzran plant. Delivered to the conveyor belt of the Volzhsky Automobile Plant. Comfortable ride and silent. The CV joint is ideal for city driving.
- Chevrolet Niva front driveshaft. Quiet ride, but you have to watch the boots. The boot of the Chevrolet Niva Niva cardan CV joint is damaged and fails.
- On the crosspieces there is a cardan joint of JSC Syzran. VAZ crosspieces are a reliable cardan.
- Forward JSC Kardan Syzransky. Balanced. These cardans can also be used off-road.
- JSC Kardan Chernigov plant. A more reliable splined part, the crosspieces are from the Volga Gas 24. Reliable cardan. More suitable for hunting is the cardan from the Chernigov Automobile Plant. The splined part is strengthened, it wears out less and the crosspieces are powerful.
- Front Chernigov cardan on Volgov crosspieces Gas 24.
- Belarusian cardan on Moskvich crosspieces 2140. The cheapest.
Replacing the CV joint boot for Lada 2123 (VAZ 2123)
A distinctive feature of Niva cars, both the regular VAZ 2121 and Chevrolet, is the presence of CV joints on the front axle drives. In fact, the design is quite similar to any front-wheel drive VAZ.
The main symptoms of CV joint failure on Niva
As with any other car, grenade malfunctions immediately make themselves felt. And the first thing that will be a symptom is:
- the appearance of clicks when starting and suddenly stopping
- the appearance of a crunching sound when starting from a stop with the steering wheel turned all the way
- crunch even when driving straight at high speed - especially when hitting smooth bumps in the road
Do-it-yourself CV joint replacement on Niva
Many Niva owners are accustomed to entrusting such repair work to specialists at a service station, but everything can be done in a garage, having a list of necessary tools at hand.
Well, then everything is done in the following order:
- We remove the wheel by first lifting the front of the car with a jack.
- Unscrew the fastening of the ball joint to the lever to free it
- Unscrew the hub nut and remove the CV joint from the hub
- For greater accessibility, it is better to remove the drive assembly: pry the inner grenade with a pry bar and pull it out
- After this, the entire drive assembly is removed
- Clamp the drive in a vice
- Using special pliers, we free ourselves from the anther clamps (if necessary, we then replace them with new ones)
- With light blows of a hammer, we knock the desired CV joint off the drive, applying the impact force to the outer race
Usually, after a couple of light blows, the CV joint breaks down without any problems and you can replace it with a new one. Once again, it is worth noting that it is better to inspect the boot for damage and, if necessary, also replace it with a new one.
The new CV joint is driven in exactly the same way until the locking ring clicks.
It is worth noting that as a result of assembling the drives, it is necessary to push lubricant into the inside of the CV joint, such as a CV joint or lithol (as a last resort). If this is not done, wear will occur much faster than if the required amount of lubricant is available. Also, pay attention to the integrity of the protective boots of both the internal and external grenades. If you see that the boot is damaged, replacing it with a new one is mandatory.
Installation on the vehicle occurs in the reverse order of removal. Also, do not forget to install all removed parts during the repair process.
The price of a new internal CV joint is from 800 rubles, but the external one will cost almost twice as much: from 1,400 rubles. If we consider buying assembled drives, then one can cost you at least 3,500 rubles, and a pair, of course, about 7,000 rubles.
On the left is Trialli, set it and forget it. On the right is Avtovazovsky. The knock-knock-knock started when driving especially uphill and turning to the right. The sounds are getting louder. The symptom is known, we go to change it. Brief instructions for those who still doubt whether to change the studs in the bridge to bolts or not.
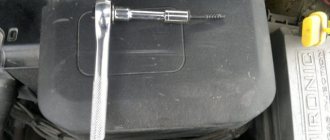
We remove the wheel, unscrew the lower ball joint, and use a suitable device to hang the fist with the hub-disc. I use a generator belt from Niva. I cling to the amma mount and 2 studs on the hub.
We unscrew the nut on the CV joint, remove the bushing to free up more thread length, and screw the nut back on. We tighten another nut on top and, clamping the nut onto the nut, unscrew the stud. I tried it, it turns out, even with the top nut half tightened. Photo for example.
Unscrew the ear mounting bolts.
Unscrew the ski from the stabilizer. We don't touch the cardan.
We need to unscrew the left ear and the ski so that we can twist the bridge a little when pulling out the CV joint. We rotate the right ear along the axis upward.
We pull out the CV joint, moving the bridge a little clockwise when looking from above and a little down.
It took me about half an hour to sort it out. Good luck to everyone on the road and off the road and silence in the cars)
Reassemble in reverse order. Long ball bolts fit perfectly in place of the unscrewed studs.
https://www.drive2.ru/l/6812746/
No comments yet
Conclusion
Knowing the features of the CV joint and how you can identify its malfunction or replace it, you can cope with such work on your own , having little experience in this work.
Replacing the outer CV joint on a Chevrolet Niva is an important undertaking, because if the breakdown is not repaired in time, the consequences can be very sad; the wire may simply jam while driving. One of the first symptoms of this problem is a slight cracking sound when the steering wheel is in the turned position at the beginning of the journey.
Replacing inner CV joint boots — Chevrolet Niva, 1.7 l., 2007 on DRIVE2
Yesterday I discovered that both boots of the inner CV joints were torn and the grease came out... I think this is due to the fact that I did not let the air out from under the boots when I assembled the inner CV joints, and I put a lot of lubricant in them...
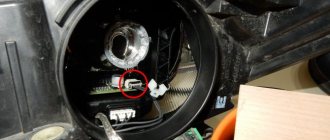
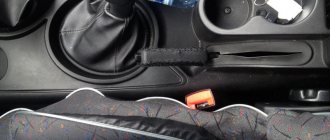
this is what it looks like
It’s good that I didn’t climb into the mud, the lubricant is clean
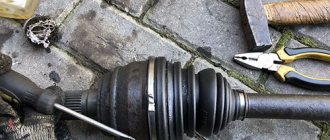
took off the clamp and moved the torn boot
To replace the inner CV joint boot, you need to remove the wheel, the hub nut, and unscrew the three lower ball bolts; Remove the hub from the drive and hang it so that it does not interfere.
Then, on the inner CV joint, remove the large clamp from the boot, move the boot aside, pick out the large retaining ring from the CV joint; and the drive can be removed!
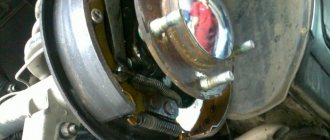
torn boot
between the shock absorber and the spring I was able to pull out the drive with the insides of the CV joint
However, then I still had to unscrew the bottom bolt of the shock absorber, because it was impossible to insert the drive back, the balls fell out...
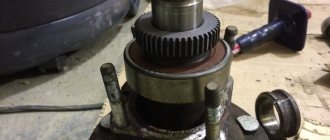
preparation for washing
disassemble and wash everything in kerosene
I put on a new boot; I didn’t remove this ring from the stick, I just dragged the boot through it, silicone grease rules!
lubricate the CV joint)
By the way, there was another epic with this drive stick retaining ring...
When forcing the CV joint race onto the drive rod, this ring broke... But there was no other... I went to the store, they didn’t have such rings for 2123 drives, they gave me a 2108 drive ring... And it’s made of some kind of mild steel... When stuffing the CV joint race, the risks remain on the ring ... I don’t know how long it will take for it to fly out...
CV joint grease
I unscrewed the lower shock absorber mounting bolt to insert the drive
Then we put a large retaining ring in the inner CV joint, put on the boot and clamps.
we place the hub on the outer CV joint and screw the lower ball joint
and here again the error... there is air left inside the CV joint
I had to remove the large clamp and squeeze out the air from inside the CV joint... The same with the second wheel... And we adjust the wheel bearings! By the way, I didn’t make any marks on the CV joints, separator and balls before disassembling... well, so that later I could reassemble it the same way as it was... Because these CV joints quite fresh, installed 2 months ago, production is low...
I passed - everything is OK! no crunches...
Good luck to all)
Price: 320 ₽ Mileage: 90830 km
Page 2
Yesterday I discovered that both boots of the inner CV joints were torn and the grease came out... I think this is due to the fact that I did not let the air out from under the boots when I assembled the inner CV joints, and I put a lot of lubricant in them...
this is what it looks like
It’s good that I didn’t climb into the mud, the lubricant is clean
took off the clamp and moved the torn boot
To replace the inner CV joint boot, you need to remove the wheel, the hub nut, and unscrew the three lower ball bolts; Remove the hub from the drive and hang it so that it does not interfere.
Then, on the inner CV joint, remove the large clamp from the boot, move the boot aside, pick out the large retaining ring from the CV joint; and the drive can be removed!
torn boot
between the shock absorber and the spring I was able to pull out the drive with the insides of the CV joint
However, then I still had to unscrew the bottom bolt of the shock absorber, because it was impossible to insert the drive back, the balls fell out...
preparation for washing
disassemble and wash everything in kerosene
I put on a new boot; I didn’t remove this ring from the stick, I just dragged the boot through it, silicone grease rules!
lubricate the CV joint)
By the way, there was another epic with this drive stick retaining ring...
When forcing the CV joint race onto the drive rod, this ring broke... But there was no other... I went to the store, they didn’t have such rings for 2123 drives, they gave me a 2108 drive ring... And it’s made of some kind of mild steel... When stuffing the CV joint race, the risks remain on the ring ... I don’t know how long it will take for it to fly out...
CV joint grease
I unscrewed the lower shock absorber mounting bolt to insert the drive
Then we put a large retaining ring in the inner CV joint, put on the boot and clamps.
we place the hub on the outer CV joint and screw the lower ball joint
and here again the error... there is air left inside the CV joint
I had to remove the large clamp and squeeze out the air from inside the CV joint... The same with the second wheel... And we adjust the wheel bearings! By the way, I didn’t make any marks on the CV joints, separator and balls before disassembling... well, so that later I could reassemble it the same way as it was... Because these CV joints quite fresh, installed 2 months ago, production is low...
I passed - everything is OK! no crunches...
Good luck to all)
Price: 320 ₽ Mileage: 90830 km
Removing the drive
The operation of dismantling the drive elements is possible if you have:
- Jack; Churbaka; Wheel key; Keys for 13, 17 and 23 (the first two varieties in double quantity); Slotted screwdrivers; Punch; A device for removing factory-made clamps or made from adjustable pliers; Anthers; Clamps; Hub nut; Grease CV joint-4M; A rag for wiping off grease; Kerosene.
With the car slightly jacked up, the cap covering the hub is removed, the hub is completely unscrewed and the wheel nuts are loosened.
The wheel is hung up and dismantled.
The lower lever smoothly lowers onto a strong block.
The nuts holding the ball joint are removed (3 pieces). The outer CV joint shaft is carefully removed from the steering knuckle by pulling the latter back and up.
The steering knuckle is secured with a wire to a suitable protrusion. The lower shock absorber mount is released from the lever, after which it is necessary to raise the jack a few more centimeters up.
Using pliers and a screwdriver, it is necessary to remove the inner CV joint boot clamps, as well as the boot itself. Then the retaining ring located inside the “grenade” body is removed, and the structure is removed from the car.
Article - Replacing the boot on a Chevrolet Niva from RTI-Promexport™ Barnaul
June 29, 2018
CV joint (or grenade) is a constant velocity joint. It is used in front wheel drive vehicles. Initially, they transmitted torque to the drive wheel using a conventional cardan. Car enthusiasts know that if knocking noises are heard in the front-wheel drive when turning, then most likely the CV joint is faulty or the inner boot on the Niva needs to be replaced. Grenades on the Chevrolet Niva are internal and external. Like any part in a car, hinges and mudguards have their own service life and periodically fail.
How to determine a breakdown
Most often, mudguards are to blame for problems with CV joints. Upon external inspection, ruptures are visible on them, and when rocking, play is felt. Sometimes traces of grease or dark spots are visible on the hinge, this means that the boot is torn. In this case, it is necessary to replace the CV joint boot on the Chevrolet Niva.
If the dirt cover is damaged, water and dust get inside, so the bearing itself often has to be replaced. The work can be done independently in 1.5-2 hours. To work, you will need a minimum of tools: pliers, a hammer, a screwdriver.
Process
To change the boot on a Chevrolet Niva, take sliding pliers and a screwdriver and remove the clamps from the dirt cover. Slide it along the shaft, remove the element using a hammer and a wooden block with gentle blows.
We disassemble the inner CV joint:
- Using a screwdriver, remove the retaining ring.
- We remove the clip, having previously made marks on the balls and grooves.
- Remove the large and small clamps.
- Before changing the CV joint boot on the Niva, we move the casing and cover along the shaft.
- We knock down the bearing using a hammer and a wooden block, applying rhythmic blows to the end of the cage.
- Remove the cover and casing.
- We wash all parts with gasoline.
- Apply lubricant to the joint.
- We install the CV joint and other removed parts in the reverse order.
Causes
Service life too long. If the car has driven 10 thousand kilometers without problems, then the anthers should be changed without waiting for a breakdown.
Sloppy driving. During sharp turns, fast driving “over bumps” and turning the steering wheel, the CV joint takes on the entire load. It can break at any moment, so every car enthusiast should know how to replace the boot on a Niva.
Water, dust and dirt. As a result of damage to the dirt cover, water and dust enter the CV joint. When mixed with lubricant, dirt acquires abrasive properties and leads to damage to the hinge.
Now you know how to change the boot on the Niva’s cardan and how to prevent damage. However, for quality repairs, we recommend turning to specialists.
Reasons why a hinge joint fails
The internal CV joint on a Chevrolet Niva is a high-quality and reliable part of the automobile chassis system. Listed below are the main reasons that provoke early wear and failure of the unit.
- Incorrect, illiterate, extreme (rapid start with inversion of the drive drive and slipping) driving.
- Lack of care for a part that needs periodic cleaning and lubrication.
- Unfair production of the hinge assembly using low-quality materials and violation of technological rules.
Several signs listed below indicate that there may be a problem with the grenade and the internal CV joint on the Chevrolet Niva needs to be replaced.
- The appearance of a crunching sound when making turns. This phenomenon occurs if the SR requires lubrication of the connections, or a mechanical inclusion, for example, dirt, gets into it.
- Interruptions in the movement of the car at the start, when the speed increases or, conversely, when it decreases.
- Increased vibration when turning, accelerating, or driving at high speeds.
To make a final diagnosis, auto mechanics have created several simple techniques.
Replacing the outer CV joint on a Niva Chevrolet
In Niva Chevrolet cars, the grenade is presented in the form of a constant angular velocity hinge. This name of this node comes from its similarity to a military node. It is also called CV joint; it transmits torque in the car, from the engine itself to the wheels, at different steering angles.
This element appeared at the time when front-wheel drive cars began to be produced, and before that, the transmission of torque to the wheels occurred through a conventional cardan. And since the joint was constantly under load, its service life was short, and this problem led to the creation of a special CV joint unit, which could transmit torque to the wheel at different angles when turning.
Content
Types of CV joints
This element helps to transmit torque evenly, while taking into account the fact that the wheel can be at different angles relative to the car. They come in two types:
These parts, like any other, wear out over time, so sooner or later the vehicle owner comes to the conclusion that they need to be replaced. Let's take a closer look at the reasons why replacing the outer CV joint on a Niva Chevrolet is necessary and why it fails.
- A common reason for failure is the longer service life of the part. As a rule, replacement is required after ten thousand kilometers, but replacement may be required earlier
- Driving on a broken road, sharp turns, the steering wheel is turned all the way at speed, at these moments the maximum load occurs on the CV joint
- If dust, dirt, or water gets in due to wear of the rubber boot, this also provokes a breakdown earlier than stated. Therefore, you should periodically check the condition of the protection.
Replacement
To change the outer CV joint, it is necessary to remove the grenade jet; it can only be dismantled together with the axle shaft; when the procedure is completed, the following steps must be taken:
- We clamp the removed unit in a vice
- Removing the old boot
- We knock down the CV joint with a hammer
- We clean all the existing teeth on the axle gear
- We install a new hinge on the axle
- We put the boot on and clamp it with clamps
- Putting everything in place
Quite often, Chevrolet Niva car owners resort to tuning the engine, as a result of which its power increases, thereby increasing the load on the CV joint and cardan shafts several times, and in order to avoid rapid wear of these parts, it is recommended to strengthen the shaft.
Therefore, if you know all the features of these parts, then you will always determine why one or another element failed, and you will be able to replace it at any time yourself.
Varieties
SR as a suspension part began to be used on cars from the mid-20th century. Thanks to the unit, it became possible to simultaneously rotate and control the rotation of the wheels at an angle of up to 70 degrees. In the automotive industry, four technical solutions for components are used:
- cam;
- tripoid;
- ball;
- twin cardan shafts.
All these types are united by the basic design, which is a rigidly connected body and holder. The car's joints are also divided into:
- internal, rotating up to 20 degrees;
- external, more mobile and transmitting without power losses.
The part works according to the following principle.
- There are grooves on the surface of the inner race. Their number is the same as the number of bearings inside it.
- The cage is held in place by bearings that separate the housing and the cam.
- The bearings move along the path of the smaller diameter of the fist and the larger diameter of the housing.
- This creates a rotational impulse that transmits torque to the driven shaft.
If you change the angles connecting the axle shafts, the bearings begin to move inside the grooves. This is how torque is transmitted.
Replacing the inner and outer CV joints on a Chevrolet Niva: how to change the right and left “grenades”
Drivers had never even heard of CV joints until cars with front-wheel drive appeared on the roads. Previously, torque to the wheels from the power unit was transmitted through the driveshaft. With front-wheel drive, the drive wheels must turn - with a cardan this is impossible.
To transmit torque, they developed a CV joint (which stands for constant velocity joint). The hinge is also found on the popular Chevrolet Niva model in Russia.
CV joints on Chevrolet Niva: what are they?
The purpose of the CV joint on a Chevrolet Niva is to uniformly transmit torque to the drive wheel, regardless of its angle of rotation. According to the design features, the parts are:
It is impossible to transfer rotation to a wheel with one CV joint on a Chevrolet Niva, so there is always a pair of them in the drive. The one located near the gearbox experiences a heavier load. It is easy to distinguish - it has large dimensions compared to the outer hinge. The external unit transmits rotation to the wheel. Its dimensions are also affected by the limited space in the area of the drive wheel.
Why does a grenade break?
The “Grenade” fails for the following reasons:
- the service life of the unit has expired;
- aggressive driving style, operation in difficult road conditions;
- entry of dust and dirt into the unit.
To eliminate the risk of premature failure of the Niva Chevrolet “grenade” (especially the outer one), you need to check the condition of the protective rubber covers more often.
How to identify a malfunction
Problems with the “grenade” are indicated by unpleasant sounds that occur when turning the steering wheel. They first appear when reversing and turning the front drive wheels - a slight crunching sound is heard. Further, it will intensify even with small turns of the steering wheel. When shocks or slipping occur in the transmission, the “grenade” will have to be changed.
Replacement procedure: step-by-step algorithm
There is no point in repairing a worn-out unit, so the outer CV joint of a Niva Chevrolet is always replaced. Replacing a damaged “grenade” is a labor-intensive operation. You will need a set of wrenches, pullers, and experience in performing plumbing work.
Outer CV joint
The damaged unit is replaced using an axle shaft with grenades removed from the vehicle. The body is raised with a car jack, a reliable stand under the car and wheel chocks are installed. This helps protect the repairman from possible injuries. Before lifting the car body, loosen the hub nut. You will need a head and an extension for the key. Next, you need to remove the wheel and unscrew the lower mount of the front shock absorber. Take it to the side and secure it with improvised means. Also unscrew the bolts on the ball joint.
Then they completely remove the nut on the hub and, pulling it towards themselves, take out the “grenade”.
The outer joint can be replaced without removing the axle shaft.
Release the boot mounting clamp and move it as far as possible on the axle shaft. A hammer with an extension is used to hit the body of the “grenade” until it is removed from the axle shaft. Before installing a new part, be sure to change the retaining ring on the axle shaft, since it is disposable. Installing the hinge is done in the reverse order.
Inner CV joint
This faulty unit on a Chevrolet Niva can only be replaced after the axle shaft with constant velocity joints has been completely removed. The “ear” and skis are released, which will allow you to rotate the bridge when removing the axle shaft. For ease of operation, the dismantled axle shaft with “grenades” should be clamped in a vice. Replacing the internal CV joint of a Niva Chevrolet occurs as follows:
- Remove the clamps securing the protective boots and move them as far as possible.
- Use a hammer and extension to remove the damaged “grenade”. A few blows are enough to dismantle the faulty part.
- Before installing a new hinge, carefully clean the splines and install a new retaining ring, since it is disposable.
- A new CV joint is installed on the axle, the protective cover is additionally filled with lubricant, and the boot is clamped with a clamp.
The axle shaft with new grenades is assembled and mounted in the reverse order. The process is fully presented in the video:
It will be possible to extend the service life of constant velocity joints if you monitor the condition of the protective covers on the grenades, avoid bad roads and use only high-quality spare parts.
Diagnostics
Experienced mechanics advise car owners to pay attention to the condition of the boots approximately every 5-7 thousand kilometers. Detection of any defects: cracks, failure of the clamp, indicates that the CV joint may be damaged. How can I check this?
- The car is placed on a lifting mechanism and engaged in first gear. A worn-out assembly will produce a sound resembling a characteristic crunching sound.
- An increase in play of one and a half tens of mm is a characteristic sign of failure. They check it by pumping the internal CV joint of the Chevrolet Niva at the output of the external drive.
You need to check the performance of the part periodically, every 4-5 months of driving on good roads. And every time after driving over rough terrain, dirt roads, potholes, etc.
Replacing the Boot of the Outer CV Joint Niva Chevrolet ~ AUTOINTERLINE.RU
All about the CV joint and how to dismantle and install it
Before you start talking about any breakdown, you need to give a specific definition of one or another part that will be repaired in the future. This also applies to repairing the CV joint. This part is one of the components of the box. In general, CV joint is an abbreviation that stands for: Constant Angular Velocity Joint. This part is popularly called a “grenade”. The reason for this name is simple; this car part has a shape that is quite reminiscent of an explosive object.
The CV joint itself transmits the torque of the motor, which is transmitted from the gearbox to the drive wheels (in most cases, the front wheels). Due to this chain, a very rhythmic rotation is carried out, and this despite the fact that there is an angle between the shafts that connect it.
There are two types of CV joints in the car - external and internal. Naturally, someday there comes a time when the service life comes to an end and it is necessary to replace this hinge with a new one. But how can you find out that it’s worth changing and, if so, how to do it?
Why is it necessary to replace the CV joint on a Chevrolet Niva and how to determine it?
The wear of the CV joint is determined quite easily. You need to drive a circle, turning the steering wheel to the very end, to the right or to the left. During such driving, this part experiences a critical load, which is precisely what is necessary to determine breakage or wear.
So, if it really is worth changing, then when turning, a crunching sound will be clearly heard - this will be a signal that the part should be changed. In this case, it is always advisable to inspect two hinges at once - first making a circle clockwise, and then counterclockwise. If a crunching sound is heard in both directions, then both joints need to be replaced.
How to change CV joint boots on Niva yourself
Independent replacement of CV joint boots on Niva and Chevrolet Niva. The simplest way.
Replacement of the front left outer and inner CV joint at the Niva
Help for the project... Replacement of the front left outer and inner CV joint at the Niva.
In addition to all of the above, it should be noted that sometimes instead of a crunch you can hear a knock - this also means that there is a problem with the hinges. You can also check for breakage by shaking the shaft by hand and if play is noticed, this will definitely signal a breakage and exit from the explication. By the way, the seriousness of the whole situation when it is necessary to change the hinges is further emphasized by the fact that when replacing it, absolutely all components will have to be changed, there is no other way.
Causes of failure
There are not many reasons why you need to replace the CV joint on a Chevrolet Niva. A breakdown can occur due to extremely careless driving, which of course never leads to anything good. Also, the cause may be the boot, which has already become old and cracked, which is why dirt gets into the CV joint, which under no circumstances should be there.
It is worth noting that the situation with a cracked boot may mean that you just need to install a new one, and the hinges may be fine, but this happens extremely rarely and most often the whole problem lies in the breakdown and wear of the CV joint.
Repair stages
- Clamp the shaft in a vice
- At the inner CV joint, it is necessary to remove the outer and inner clamp
- Slide the cover protecting against dirt and turn it inside out
- Using a drift and applying maximum effort to the joint cage, knock out the inner CV joint
We do the same with the outer hinge.
- Remove both the inner and outer clamp from the outer hinge
- We slide the dirt cover and turn it inside out
- Using only a drift, we direct maximum force onto the holder and knock down the CV joint
Nuances that are important when installing new hinges
Thus, having removed the old, worn and no longer useful hinges, you can begin installing new ones. You can replace the CV joint on a Chevrolet Niva in exactly the same way, using the steps described above, only doing them in reverse. At the same time, it is worth considering some nuances and features that are important to know when installing new CV joints.
- First of all, you need to carefully ensure that no dirt gets into the new hinges.
- Secondly, you need to remember that when replacing hinges, you must also change the clamp of the covers that protect them from dirt. The reason is simple - all such clamps are disposable. True, we must not forget that the new clamps must have the same design as the old ones.
Useful video
Watch a visual video below on how you can replace the CV joint on a Chevrolet Niva with your own hands:
When changing the angle of rotation of the drive drive on the Chevrolet Niva, the transmission of rotating torque from the engine to the wheels is carried out with the participation of a special unit - a constant velocity joint (in the future, possibly a CV joint). What is a part, what types exist for this car brand, what are the operating rules? The answers to these and other questions are contained in the material presented. Also here you will find a description of the instructions for replacing the internal CV joint on a Chevrolet Niva yourself.
Let's put everything back together.
Now you can install the joint on the shaft.
When you feel the splines, you should lower it until it comes into contact with the retaining ring located on the outside. Hit the CV joint with a hammer and force it into place. It is advisable to carry out this operation by installing a soft metal spacer on the part so as not to damage the hinge during an impact. Check the fixation of the part for reliability, do this in both directions.
Reinstall the anthers, followed by the clamps. Calculate the dimensions when installing so that when the car moves forward, the grass does not cling to the clamps. Don't be afraid to put in some serious effort when performing these operations, as this is where you really need to use force.
The work is almost complete, all that remains for you is to install the finished spare part on your Niva and enjoy its work.
Features of the design and repair of the VAZ-21213 intermediate shaft
The intermediate shaft transmits torque from the transmission output shaft to the transfer case drive shaft.
It consists of an elastic coupling, a flange and a constant velocity joint. The intermediate shaft is centered on the transmission output shaft by a rubber bushing.
An elastic coupling allows transmission of torque with minor changes in the angle between the shafts of the gearbox and transfer case, protects transmission parts from dynamic shocks and reduces noise and vibration of the driveline during operation.
The elastic coupling consists of six steel liners connected by rubber bridges.
Due to its elasticity, the clutch dampens jerks in the vehicle transmission.
The elastic coupling is attached to the secondary shaft flange with three bolts passed through the holes in the liners.
The other three holes are used to secure the coupling to the flange on the intermediate shaft. There are balancing washers located under the bolt nuts.
When disassembling, we mark their location so that later we can install them in their original places. In order not to disturb the balancing, we note the relative positions of other parts of the intermediate shaft.
A constant velocity joint is placed on the splined end of the elastic coupling flange.
Its structure is similar to the external joint of the front wheel drive. The hinge is secured from displacement by a retaining ring located in a groove on the flange shaft.
The hinge is protected from dirt by a rubber corrugated cover and a plastic plug in the rear end of the hinge body. The cover is secured to the flange shaft and the hinge body with special clamps with locks.
Under the large clamp (on the hinge body) there is a protective plastic casing.
On the first VAZ-2121 models, a cross was installed instead of a constant velocity joint.
Removing the intermediate shaft
Remove the transfer case assembly with the intermediate shaft (see Removing the transfer case).
While holding the shaft from turning with a screwdriver, use a 13mm wrench to unscrew the four nuts securing the intermediate shaft to the transfer case flange
Remove the intermediate shaft. We install the intermediate shaft on the transfer case in the reverse order.
3. Before installing the intermediate shaft assembly with the transfer case, check the condition of the rubber centering sleeve located on the flange of the secondary shaft of the gearbox
Which to choose
Depending on the year of manufacture, the Niva 2121 can be equipped with CV joints with 22 or 24 splines. Before 2002, the first version was distributed, after 2002 – the second. According to another version, 22-spline “grenades” were common until 2007.
The surest way to determine the type is to remove the hub washer and count by hand.
Operating experience shows that the best quality “grenades” for the Niva are produced by AvtoVAZ; also, if you are confident in the origin of the product, it makes sense to pay attention to the products of CORAM and Pilenga .
How to extend service life?
To prevent the rubber covers of CV joints from cracking and bursting longer, you should follow simple rules:
- When installing the boot, apply lubricant to the inside of each fold.
- Apply mobile phone or silicone sealant diluted with white spirit to the outer surface of the covers.
- In severe frosts, leave the car in the parking lot, having first leveled the steering wheel. This reduces the load on the tires.
If cracks appear on the boot, do not try to restore it. Immediately replace the part and change the lubricant in the joint. This approach allows you to extend the life of CV joints.
Removing the drive
The operation of dismantling the drive elements is possible if you have:
- Jack;
- Churbaka;
- Wheel key;
- Keys for 13, 17 and 23 (the first two varieties in double quantity);
- Slotted screwdrivers;
- Punch;
- A device for removing factory-made clamps or made from adjustable pliers;
- Anthers;
- Clamps;
- Hub nut;
- Grease CV joint-4M;
- A rag for wiping off grease;
- Kerosene.
With the car slightly jacked up, the cap covering the hub is removed, the hub is completely unscrewed and the wheel nuts are loosened.
The wheel is hung up and dismantled.
The lower lever smoothly lowers onto a strong block.
The nuts holding the ball joint are removed (3 pieces). The outer CV joint shaft is carefully removed from the steering knuckle by pulling the latter back and up.
The steering knuckle is secured with a wire to a suitable protrusion. The lower shock absorber mount is released from the lever, after which it is necessary to raise the jack a few more centimeters up.
Using pliers and a screwdriver, it is necessary to remove the inner CV joint boot clamps, as well as the boot itself. Then the retaining ring located inside the “grenade” body is removed, and the structure is removed from the car.
Intermediate shaft faults
During operation of the intermediate shaft, oil leakage may occur. It indicates that the oil seal is in unsatisfactory condition. Damage to the intermediate shaft oil seal can affect the condition of the entire gearbox, since the release of transmission oil will affect all components of the box.
Rice. General view of the secondary shaft.
Another malfunction may appear when all gears or only a certain number are engaged, most often these are the second, third and fifth. When these gears are engaged, the required transmission of torque to the vehicle's driveshaft does not occur. This indicates a weakening of the correct fit of the intermediate shaft gears. When such a problem arises, there are two ways to solve it. The first is to replace the intermediate shaft as a whole. In this case, its bearings and seals are immediately replaced. The second involves welding a weakened gear. The main disadvantage of this method is that if this gear fails, the entire shaft will need to be replaced, which is not very economical.
Structure
When is it necessary to replace the outer CV joint on a VAZ 2109
Lada Granta hatchback Logbook Failed replacement of the CV joint boot
Important! If you decide to replace the CV joint yourself completely or change its individual parts, you need to understand its design, and only after that dismantle and subsequent replacement
Replacing a CV joint is an expensive procedure, which in a service center will significantly affect the thickness of the car owner’s wallet. The part is made of heavy-duty materials that are resistant to mechanical stress and aggressive environments. Accordingly, these materials, like the part itself, are quite expensive. It is designed for long-term operation, but not always road conditions and the driving style of the drivers themselves allow all parts of the chassis to be used for many years without the slightest breakdown.
And the cost of replacing a CV joint will be approximately half the cost of the mechanism. That is why many try to replace it themselves in order to save some money on repairs. But not everyone is born an auto mechanic, so the average person must first find out what parts the mechanism consists of. Here is their list:
- separator;
- balloons;
- fist;
- frame;
- outer and inner anthers.
The anthers perform two functions at once: they protect the hinge from dust and dirt. After all, in essence, a CV joint is an external part that is located on the bottom of the car. This means that all small particles when driving fall on the hinges in the same way as on the rest of the chassis.
On each wheel drive there are two mechanisms, which have almost the same structure, only slightly different in shape and size. As a rule, left and right CV joints are interchangeable on most car models. If you are in doubt, it is better to go to a car service center and ask if it is possible to buy left-handed hinges for right-hand drive on such and such a VAZ model for installation on right-hand drive, or vice versa.
Sometimes the entire mechanism requires repair, but more often it is the outer one that is worn out, while the inner one, as a rule, is almost eternal. But sometimes it may require replacement.
The design of the mechanism is not that complicated. The separator rotates the balls, which are located in the grooves of the fist and the outer housing. All this is covered by anthers that protect the parts from dirt and dust, as well as from leakage of lubricant. When replacing, the most difficult thing is to dismantle the mechanism itself so that you can install a new one entirely or change its individual parts.