Repair of the rear spar of a VAZ 2115
Cars of the VAZ-2108-09 family are not distinguished by a strong body or durable body iron; the metal rusts especially quickly if it is not treated with anticorrosive. Over time, rust appears on the metal surface, and the rear spar often rots on either side, and cracks appear on it during use. If you drive for a long time with a rotten side member, the rear beam can tear out, which will lead to unpredictable consequences. To avoid a major nuisance or even disaster along the way, it is better to change the spar in advance; this work can be done in a car service center or with your own hands in a garage if you have sufficient experience, the necessary tools and materials.
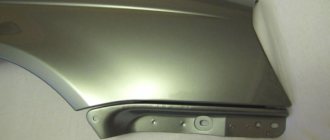
Replacing the rear right side member 2109
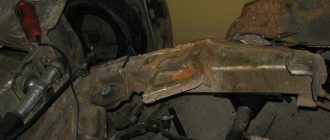
The condition of the rear spar is determined by external inspection; if the body element has traces of severe corrosion and is thoroughly rotten, it must be replaced; in many cases its repair is impractical. Even before performing work, it is necessary to inspect the car body itself; often the iron on the 2109 rots to such an extent that there is practically nothing to weld to.
To carry out repair work you will need:
- welding machine;
- electric drill with drills;
- screwdrivers;
- a set of keys;
- hammer;
- core;
- chisel;
- cleaning wheels.
You must first buy the floor spar itself (LP), the average retail price of the body element in auto stores is from 1800 to 2500 rubles, catalog number is 2108-5101372. This spare part is suitable for model 2108-09-13-14, with minimal modifications it can be installed on VAZ cars 21099 and 2115. Since when replacing a spar you basically have to work under the car, you need to think about how to make it easy to get to below. There are several options here:
- use a car lift;
- carry out work in the inspection pit, hanging the rear part of the body on “goats” or other stands;
- turn the car over on its side, using a reliable support.
Before you start drilling out the old spar, you need to partially disassemble the car and remove:
- rear seats;
- gas tank;
- rear floor trim;
- rugs;
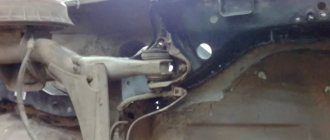
- rear beam (you will have to disconnect the handbrake cables and brake hoses).
After disassembly, you can begin to directly remove the rear LP; to do this, you need to find the attachment points, drill them at the spot welding points using a drill clamped into the drill chuck. After dismantling the body part, it is necessary to thoroughly clean the metal under the spar and prime it, remove the shipping primer from the new part (it can be removed very effectively and quickly using sandblasting). In order for the right side member to fit exactly in place, you should use measurements (there are control points for attaching units), there must be a certain distance between the elements of the front and rear suspension (between the fastening of the rear beam and the front wishbone).
Replacing the spar Lada 2114 16
So, the geometry of the body has been almost completely restored, which means it’s time to start replacing the spar. The first thing that had to be done was to cut off the old spar, since there was little point in changing it entirely. It was decided to cut almost to the very root of the engine shield, which, in fact, was done.
Next, the remaining part of the spar was opened almost to the very threshold in order to remove the remains of the internal amplifier from it.
What took the most effort and time were the weld points, which I carefully drilled out with a half-killed drill for three days on the remains of the TV and burdock (especially on the number plate).
After all this torment, no less painstaking work awaited me. Since my new spar was assembled, I had to practically cut out the part I needed from it, which, as a result, took about 10 hours of labor, and even more with all the small adjustments. And finally, the treasured part of the new spar fell into place.
By the way, it was decided to weld the new spar overlapping with the remaining part of the old one.
In order to increase the penetration area, a bunch of holes were drilled throughout the spar, in the place where it overlapped with the old one. And the whole thing was thoroughly welded at maximum current with a semi-automatic welder. It should be noted that all this was first thoroughly coated with epoxy primer.
After a little adjustment of the freshly boiled spar, the cup was boiled using the same principle. The car began to take on a more familiar appearance)
I forgot to mention that to increase the rigidity of the engine compartment, almost all the seams under the hood were thoroughly welded.
Phew... That seems to be it))) A lot of work was done, and now that everything worked out, the spar is completely welded and adjusted, I can’t help but smile)))
Installation process
Let us describe the process of replacing the front side member on VAZ 2108/2109 cars:
- Using a plasma cutter, in the absence of which you can use a hand hacksaw for metal, you need to cut off a new spar. Its size must be identical to the size of the damaged VAZ part.
- Once you have everything you need to make the repair, you can begin installation. The spar is connected to other parts, using guide templates, you can achieve precise installation.
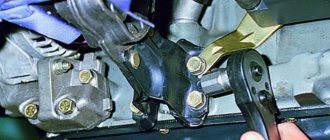
- Now you can start welding parts 2108 / 2109, but first you need to check everything carefully. Only after this will it be possible to secure the part in several places. She welds the joint to the joint using arc welding.
- Fix the side member on the front panel of the VAZ. The method of spot or through welding is used here. Please note that if you replace the spar, the second option is more reliable.
- All you have to do is go over the welding areas with a grinding machine. It will be enough to tap the new contact points between the spar and the wheel arch with a hammer to secure the result. Finally, apply primer, soundproofing and sealant to 2108 or 2109.
To completely replace the front side member you need:
- Remove sealant and anti-corrosion materials from the repair area.
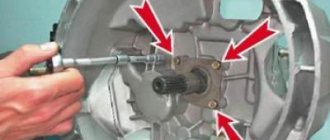
- Drill out resistance welding points (see here).
- After temporarily installing the spar, you need to measure all the distances between the control points, and also check the height position of the spar with a level (in comparison with the whole spar).
- If all distances are within normal limits, then the spar can be welded.
- Install all adjacent panels and components.
- Apply sealant and do anti-corrosion treatment and painting.
How to weld the rear spar on a VAZ 2109
About 1.4 million copies of VAZ-2109 cars were produced and it, along with classic VAZ models, became a truly people's car. Not least of all, this was achieved thanks to the high maintainability of the “nine”. In this article I would like to dwell on such an important problem as replacing side members on VAZ-2109 and 2108.
Replacing side members on a VAZ-2109
Tips for welding the side member of the VAZ 2109
When the spar cracks, a patch is placed in place of the crack. But first they weld the crack itself. At the same time, you cannot cook one place for a long time, since the metal becomes less durable. Then they put on the patch and secure it with spot welding. For welding, you can use an automatic field with carbon dioxide. Also, when welding, it is necessary to place spacers on the spar so that it does not drift to the side. Otherwise, the body will be deformed.
Replacing rear side members on a Nine in a car service center
Replacing rear LPs is a labor-intensive and quite complex job that requires care, metalworking skills, and the ability to use welding. Not every car owner undertakes to carry out such repairs on their own, so quite often the owners of front-wheel drive VAZs turn to professional technicians. The cost of replacing the rear spar 2108-09-099 can vary significantly, it depends on various factors:
- the location of the auto repair company, usually in the metropolitan region and large cities, repairs are more expensive;
- car service level;
- general technical condition of the car.
If the car body is heavily rusted, not all craftsmen agree to repair such a vehicle. I would also like to note that many auto repair shops fundamentally refuse to hire VAZ-produced cars, preferring to engage in more profitable repairs of foreign cars.
The average cost of replacing one rear spar 2108-09 is from 3,500 to 5,000 rubles; of course, car owners consider such prices to be simply extortionate. The price of body work, including materials, is sometimes a third of the cost of the used car itself, which cannot be considered normal. Private auto repairmen in garages have more affordable prices (from 2000-2500 rubles), but there are pitfalls here:
- a good repairman is not easy to find, and it is difficult to get to him, since due to high demand, repairs are carried out by appointment;
- among private traders working at low prices, there are many outright hacks;
- in garage conditions there is not always everything necessary for high-quality repairs;
- the work is carried out by repairmen with insufficient experience, technology is violated.
About the origin of the term
The term means, translated from French, movement along a load-bearing structural element. It is the power unit of modern vehicles. In the 20s of the last century, Auburn created a spar frame with an X-variant cross member. Such spar frames included two spars located in parallel, as well as several cross members. Outwardly, they were similar to stairs, which is why they were often called staircases. Currently, domestic Gazelles have a ladder frame.
Replacement or welding
If a crack forms on the spar, a patch is usually placed in this place. The crack is first welded, covered with a piece of metal and spot welded on top for reliability. Typically, a semi-automatic machine with carbon dioxide is used for this.
During welding, spacers are placed on the spar to prevent it from being pulled to the side. Otherwise, the body may become deformed. If possible, it is always better to purchase a new part, which costs more than temporary repair work. But, with a limited budget, in some cases, you can save money.
Rotten spar
For example, if the metal is rotten, then the side members (front and rear) can no longer be repaired. Even if you weld, the rot will continue around it. In addition, welding on soft metal can disrupt wheel alignment, tires will begin to wear out faster, transmission parts will begin to break, and body deformation may occur. How long will this repair last? At most, for a couple of weeks. Agree, replacement is much cheaper.
But if the crack is a consequence of a VAZ impact or collision, welding will be sufficient. But here you need to be very careful. Typically, a crack forms after an accident only if the body has also become deformed. And in this case, it will be necessary to first level it, and only then can you proceed to welding work.
Design Features
So, we figured out that the spar is a simple pipe with a rectangular cross-section. Depending on the engineers’ ideas, they:
- are located in front and behind the car.
- extend along the entire length of the housing structure.
Due to the fact that various forces are constantly pressed on the side members, they must withstand serious loads: this includes the weight of the engine, the weight of people in the car, as well as a host of other automotive parts. Also, this part is constantly subject to shock load, which is transmitted from car wheels while driving.
If you look at the photo of the inside of the car, you will see that the frame frame looks like a ladder frame, similar to the letter "P", including the rear one. Ladder frames are commonly used for SUVs, crossovers, and trucks. Passenger cars are most often equipped with a load-bearing body structure.