First stage. Removing the gearbox from the car
Repair of the VAZ 2107 gearbox must be carried out when the first signs of a malfunction appear. For repairs, it is necessary to remove the gearbox from the vehicle.
On a note. It is quite difficult to do this alone. Therefore, it is advisable to have an assistant so that everything goes smoothly.
- the first thing to do is to lift the vehicle above the pit or onto an overpass;
- disconnect the wire with a minus sign that goes to the battery;
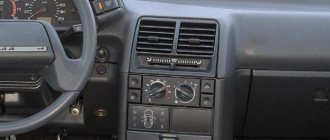
Do not forget that on VAZ cars, for repairs, the radio panel must be removed.
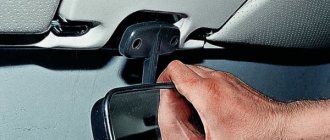
- press the box lever;
- a screwdriver is inserted into the marked hole. It has a bushing that is of the locking type;
- the screwdriver needs to be moved down;
- remove the sleeve from the rod;
- we separate this rod located on the RPP.
- the rubber bushing of the damper is removed from the rod using pliers;
- then you need to unclench the petals that grip the damper bushing, then you need to remove them from the lever (see the figure).
- then the damper spacer bushing is removed;
- the floor upholstery moves;
- the bolts that secure the cover covering the hole are unscrewed;
- the lever is removed simultaneously with the foam rubber seal;
- the receiving pipe is removed from the device releasing gas;
- we climb under the car;
Read the latest news from the world of sedans here, you will learn everything about tuning here.
- the starter is removed;
- the “cross” is removed;
- the support cross member of the power device is disconnected;
- it is necessary to remove the flexible shaft, which is connected to the speedometer drive;
- The hydraulic drive cylinder must be separated from the crankcase. Important! The hose attached to it does not need to be touched;
- remove the bolts securing the clutch housing cover using a ten key;
- it is necessary to install a support under the gearbox;
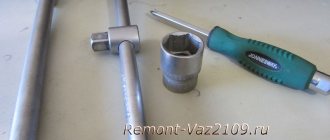
- you need to take an extension cord and put it on a 19 socket type key;
- using a key and a “cross” hinge, you need to unscrew the bolts securing the cylinder block with the clutch;
- using a screwdriver that was inserted into the gap, it is necessary to press the clutch away from the cylinder;
- remove the starter from the directional bushings;
- the input shaft of the VAZ 2107 gearbox must be removed from the driven disk hub;
- we displace the primary shaft from inside the bearing ring located in the crankshaft;
- and finally, remove the gearbox from the car.
Difference between 4-speed and 5-speed gearboxes
As noted, the VAZ-2105 was equipped with two gearboxes - 4 and 5 speeds. At the same time, they took the 4-speed version as the basis for creating a 5-speed gearbox and modified it a little. Therefore, the gear ratios of the five-speed gearbox up to 4th speed are identical, but the added 5th speed has a gear ratio of 0.82. That is, this direct box still has 4th gear.
Let's take a more specific look at the differences between the five-speed and the four-speed on the VAZ-2105, and there are several of them:
Since the 4-speed version was the basis for creating the 5-speed gearbox, it is quite possible to upgrade the 4-speed gearbox yourself at home, for which you should replace and add the specified gearbox components.
As for the control of the VAZ-2105 gearbox, the switching pattern is no different from the VAZ-2106 or any other modification with a 4-speed gearbox. In a 5-speed gearbox, to engage the last speed, it is enough to move the gearshift lever as far as possible to the right and push it forward, that is, in the direction opposite to the rear speed. Below are shown the switching diagrams for both gearbox modifications:
In general, the KPP-2105 is very reliable and can operate for a long time without any maintenance. In addition, it has good maintainability and repairs are not so difficult. Replacing the 2105 gearbox is usually done in case of wear of the bearing seats in the housing or if it is damaged - breakdown, cracks. In case of other breakdowns (wear or damage to gears, bearings, shafts, etc.), the functionality of the unit can be restored by replacing the broken elements. Also, replacement can be carried out in the case of installing a 5-speed modification instead of a 4-speed one, in the case where the unit was purchased as an assembly, and not only those elements that allow you to modernize the old gearbox.
But in any case, whether it’s a replacement, modernization or repair, nothing can be done while the gearbox is installed on the car. In any case, the unit will have to be dismantled, and you need to know how to remove the box.
Second phase. Disassembly and direct repair
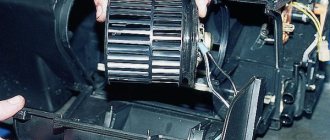
Before starting repairs, it is necessary to clean the outer part of the gearbox using a brush and rinse it with kerosene. Now we can begin. The fork that disengages the clutch and the release bearing in the clutch is removed from the gearbox. We separate the secondary shaft from the propeller shaft and disconnect the edge of the EF from the secondary shaft. Then we separate the entire power unit block. We remove the speedometer drive.
- It is necessary to remove the cuff from the ball joint;
- Unscrew the three fastening nuts that secure the shift lever to the rear of the crankcase;
- The sealing gasket is removed from the stud;
- Using a socket-type wrench, loosen the nuts that secure the supports (bracket) of the exhaust pipe;
- This support is removed and the bolt that is located between them is removed;
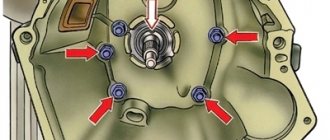
- The nuts that secure the cover from the back must be unscrewed using a thirteen wrench;
- Using a 10mm socket wrench, unscrew the 10 nuts securing the bottom cover of the box;
- After which the cover is removed and the gasket is removed from under it;
If the nuts are turned out at the same time as the studs, it would be wise to use fixing glue. Before applying it to threaded holes and studs, they must first be washed with solvent. After completing this procedure, you need to take a 30mm wrench and unscrew the nut that secures the back cover. You can see it inside the crankcase itself.
Then you need to remove the back cover. Important! It is necessary to put in second gear. We take out the plug made of plastic, which is located on the back of the lid; using tweezers or tweezers, you need to remove the thrust ring. And finally, we take out the secondary shaft ring, which is located inside.
Sometimes it becomes necessary to replace bearings. So, replacing the VAZ 2107 gearbox bearings will be carried out according to the following algorithm:
- The retaining ring is removed from the holder located outside;
- Using a puller, the ring is removed;
- Then we take out the old bearing and insert a new one, after which we put the retaining ring in place.
This completes the disassembly of the VAZ2107 gearbox. Now you can replace all unusable parts.
The vehicle's transmission helps transmit the required torque to the vehicle's wheels in accordance with the vehicle's speed. In this article we will look at what a gearbox secondary shaft is, and also touch upon such important parts as the bearing, secondary shaft oil seal and their replacement.
VAZ-2107 input shaft bearing: number, price, which one is better to buy, size (5 mortar, 4 mortar)
In the “Classics” manual transmission, the designers provide a radial open single-row ball bearing of class 6 accuracy, which absorbs 90% of radial loads. To select this spare part, you need to pay attention to the radial and axial clearance, ease of rotation, appearance of the product (no corrosion, cracks, nicks, cavities). Before you buy a gearbox input shaft bearing for the “seven”, check out the list of recommended manufacturers. The listed manufacturers produce high-quality products at reasonable prices with exact dimensions in accordance with GOST 520-211.
- Open: 6-50706AU (replaceable without disassembling the gearbox)
- Closed: 6-180502K1US9 (replaceable with disassembling the gearbox)
Table of costs and recommended manufacturers
| No. | Manufacturing plant | Number (article/markings) | Price 2022, rub. | Set | |||
| Retaining ring | Bearing | Pressure ring | Installation instructions | ||||
| 1 | VBF (VPK) Russia Analogue | 50706АУ.P6R10.20Q6 | 270 | — | + | — | — |
| 2 | GPZ Russia Analogue | 6-50706AU | 200 | — | + | — | — |
| 3 | SPZ (3 gas processing plants) Russia Analogue | 6-50706AE1USH | 450 | — | + | — | — |
| 4 | SPZ-4 Russia Analogue | 6-50706AU | 220 | — | + | — | — |
List of a complete set of gearbox bearings for the VAZ 2107
| Shaft | Numbers according to GOST / ISO |
| Primary | 6-50706AU / 6706N |
| 6-180502K1US9 / 62202.2RS | |
| Secondary | 6-205KU / 6205 |
| 6-50306KU / 6306N | |
| 464904E / AR-491298A | |
| Intermediate | 6-92705K / 613441 (SKF) |
| 6-156704 / 616073 (SKF) |
Bearing size table 6-50706AU
| Characteristic | Unit | Value according to GOST (TU) |
| Hole diameter, d | mm | 30 |
| Outer diameter, D | mm | 75 |
| Nominal height, B | mm | 19 |
| Diameter of groove for snap ring, D1 | mm (min-max) | 71,32 — 71,83 |
| Groove position, a | mm (min-max) | 3,07 — 3,28 |
| Groove width, b | mm (min-max) | 1,6 — 1,9 |
| Radius of mounting chamfers, r | mm (min) | 1,5 |
| Dynamic load capacity, C | kH | 32,8 |
| Static load capacity, C0 | kH | 17,8 |
| Nominal speed | rpm | 10000 |
| Radial clearance | mm | 0,01-0,024 |
| Steel type | — | SHH-15 |
| Hardness of steel and balls | H.R.C. | 61-65 |
| Contact angle | hail | |
| Torque | kN*M | — |
| Ring roughness | Ra | 0.32 |
| Number of balls | PC. | 7 |
| Ball diameter | mm | 14,288 |
| Weight | G. | 400 |
| Working temperature | degrees | +/-50 |
Additional videos on transmission repair on the “Classic”
Video of replacing the bearing on the input shaft on a VAZ 2107
Video of replacing the intermediate shaft bearing on a VAZ 2107 gearbox
There comes a time when you urgently need to change the bearing of the input shaft of the VAZ 2107 gearbox. How soon this need will occur to you depends on many reasons. And some models are determined by your personal properties.
The exception may be the initial quality of the bearing, and even when purchasing it, you can be quite meticulous and picky in order to provide your own car with an ordinary spare part. Other reasons for rapid failure of the input shaft bearing include, first of all, driving style.
Operating principle and design of the secondary shaft of the gearbox?
The gearbox consists of many parts that are connected to each other, allowing them to interact and ensure reliable transmission of torque. Initially, the torque is transmitted from the clutch disc to the gearbox input shaft. The primary shaft has a short length and a common fastening device with the secondary shaft. However, there is no rigid mechanical connection between these two parts, and they rotate independently of each other. The third element of the transmission is the intermediate shaft, which is located under the primary and secondary shafts.
All these elements have a large number of gears, each of which, paired with the other, forms a gear ratio, and the pair, in turn, forms a gearbox stage. The intermediate shaft provides connection between the primary and secondary shafts through certain gear ratios. It is on it that the gear ratios change and, as a result, the gear changes when driving.
The output shaft plays a concluding role in the gearbox. It transmits the converted torque to the shank, and then it goes to the driveshaft of the car. Thus, the secondary shaft provides connection between the gearbox and the chassis of the car, and the level of its operation determines whether the car will move or not.
Causes and symptoms of bearing failure in manual transmissions
Bearing units in a manual transmission perform the function of rolling bearings, therefore, if the rolling bearing is faulty, there will be difficult rotation of the elements, an imbalance will appear, as well as radial and axial runout, backlash, noise, and knocking.
— The bearing is humming, the noise increases when the clutch is disengaged; — Difficulty switching gears; — Spontaneous transmission shutdown; — A knocking sound is heard when pressing the clutch pedal.
- Expiration of product service life;
- Poor quality ball bearing;
- Wear or runout;
- Aggressive driving style and gear shifting;
- Insufficient amount of lubricant or its absence;
- Dirt or abrasive particles getting inside the ball bearing;
- Malfunction of adjacent components (releaser, clutch, secondary or intermediate axle).
After removing the axle from the axle, you need to make sure that the part is faulty. To do this, check the ease of rotation of the part, and also do a visual inspection, namely, the presence of damage to the rings, cage, as well as defects in the raceway. If the product is in good condition, it is advisable to take measurements of the axial clearance and radial clearance, as shown in the video.
Video: “How the VAZ 2107 input shaft bearing hums”
Video: “Bearing play in the input shaft of the VAZ 2107 gearbox”
Replacing the bearing and oil seal of the secondary shaft of the VAZ 2107 gearbox
The bearing of the secondary shaft ensures free rotation of its end in the place where the shaft already leaves the gearbox. From the inside, the bearing is filled with a lubricant, which facilitates the rotation of the part.
The gearbox secondary shaft oil seal is installed in the same place. The oil seal is a rubber O-ring that fits onto the shaft and fills the gaps between the shaft and the transmission housing. The oil seal is designed to prevent oil leakage and ensures the tightness of the system.
Over time, both the seal and the bearing are subject to natural wear. Parts of the bearing are destroyed and begin to loosen the shaft. Gradually, the friction between the parts increases, and the bearing begins to disrupt the shape of the shaft. The balancing of the shaft becomes unbalanced over time and it begins to vibrate. The very first to suffer is the oil seal, which will lose its shape and will no longer be able to hold oil in the gearbox. The oil gradually disappears and the lubrication of gearbox parts is disrupted. In addition, the oil seal may fail due to wear, which occurs in any case. The fact is that a rubber product has a certain service life, which is determined by mileage and the oil seal begins to crack and also lose its sealing properties.
You can diagnose a seal malfunction visually. To do this, it is enough to look from time to time at the junction of the cardan and the secondary shaft. If traces of transmission oil are found there, then we can confidently say that the oil seal has become unusable and needs to be replaced.
Bearing failure is quite difficult to determine. To do this, you need to have good hearing and know your car perfectly. When driving in gears, a hum and vibration may appear from the gearbox; when the clutch is depressed or the gear is disengaged, the hum disappears, but this sound should not be confused with the sound of a faulty clutch release bearing or gearbox input shaft.
Which bearings are better for a VAZ 2107 box?
Transmissions of classic models from AvtoVAZ are distinguished by good reliability, unpretentiousness and ease of maintenance compared to foreign models, and ease of repair. However, given the advanced age of even the youngest models, many may have problems not only with the body, electrical system and other parts, but also with the operation of the gearbox. Its system contains a large number of parts, the operation of which is of fundamental importance for the system as a whole. Among these components is the bearing of the input shaft of the VAZ 2107 gearbox. This small part is responsible for the operation of the gearbox shaft itself, which ensures smooth transmission of torque and changes in gear ratios.
Similar functions are performed by other bearings in the box: the output shaft and the intermediate shaft. These parts consist of particularly strong metal housings in the shape of a circle with a large number of moving parts in the form of metal hinges, which allow the shafts to freely perform their direct functions. During the installation process, a special lubricant is inserted into this part, which not only preserves the functional properties and performance of the unit, but also extends its service life.
At the same time, the reliability of these parts is quite high; they fail only with very high mileage or when critically high loads on the gearbox occur. In addition, such parts are subject to simple diagnostics. There are many different components on the market in the form of spare parts for VAZ cars. Spare parts are produced by both domestic companies and foreign brands. Sometimes the cost also varies significantly. However, in this particular case, the optimal solution would be to focus not on cost and manufacturer, but on the originality of the parts.
Therefore, the right decision would be to choose AvtoVAZ products or related companies that produced these products while the car was on the assembly line. This reduces the possibility of purchasing an unreliable counterfeit product. In addition, when choosing, you must strictly adhere to the standard dimensions of the part, which may differ significantly from foreign competitors, which will lead to the impossibility of installation and implementation in the gearbox.
Step-by-step replacement instructions
- The car must be driven onto a pit or overpass. The most important requirement will be that he must be immobilized for safety reasons. To do this, install wheel chocks under the wheels or block the wheels using the hand brake.
- Prepare the gearbox for removal. Without this operation, replacing the oil seal and bearing is impossible. First, disconnect the ground or negative terminal of the battery. Now find the shift lever inside the car, push it down and use a screwdriver to release the locking sleeve. The lever should come out. After this, release the remote plastic sleeve using two screwdrivers, which need to be used to release the special fastening tabs. Then, go down under the car and remove the exhaust pipe, as it will interfere with further removal of the gearbox.
- In the same place, on the gearbox, disconnect the special block of the two wires that are responsible for turning on the reverse lights. Unscrew the universal joint drive mount, the starter mount, release the clutch release hydraulic cylinder, but do not unscrew the hose from it to avoid subsequent bleeding of the clutch, and remove the flexible speedometer cable.
- Now the most important thing: unscrew the fastenings of the cross member holding the box at the back, and place any support under the gearbox so that it does not collapse when unscrewing the fastenings to the engine. Unscrew the corresponding fasteners and remove the gearbox from the support.
- Disassemble the gearbox, but before doing this, all the oil must be drained from it. Once the transmission is completely disassembled, locate the bearing mounted on the shaft and press it out using a puller. After this, install a new bearing in the same way and change the oil seal.
By the way , the oil seal can be replaced without removing the gearbox; to do this, just unscrew the crosspiece and simply replace the rubber seal with a new one. Don't forget to also drain the oil before carrying out repair work.
- Reassemble the gearbox in reverse order and install it on the car.
At this point, the replacement of the oil seal and bearing of the secondary shaft of the VAZ 2107 gearbox is completed. If you are not fluent in tools and do not understand the structure of a car transmission at all, then it is best to entrust this task to professionals from the field of car maintenance.
Gearbox device
In general, the concept of “remaking” the box is not entirely correct, since the design of the VAZ-2105 gearbox with 4 speeds was practically no different from the same gearbox 2101. The 2105 gearbox has a three-shaft layout, with constant gear meshing and manual control. Externally, the Kopeika and Pyaterki checkpoints can be distinguished almost only by the markings on the body of the box.
The VAZ-2105 gearbox diagram with 4 stages is presented below, and structurally it does not differ from modifications 2101 and 2106:
| 1 | Bottom cover; | 40 | Needle bearing of the front end of the secondary shaft; |
| 2 | Filler and inspection plug; | 41 | Synchronizer spring thrust washer; |
| 3 | Intermediate shaft second gear gear; | 42 | Fourth gear synchronizer ring gear; |
| 4 | Intermediate shaft third gear gear; | 43 | Sliding clutch for synchronizer of third and fourth gears; |
| 5 | Intermediate shaft; | 44 | Third and fourth gear synchronizer sliding clutch hub; |
| 6 | Front intermediate shaft bearing; | 45 | Synchronizer retaining ring; |
| 7 | Clamp washer bolt; | 46 | Synchronizer locking ring; |
| 8 | Intermediate shaft front bearing clamp washer; | 47 | Synchronizer spring; |
| 9 | Intermediate shaft constant mesh gear; | 48 | Third gear synchronizer gear and ring gear; |
| 10 | Constant mesh gear of the input shaft; | 49 | Second gear synchronizer gear and ring gear; |
| 11 | Spring washer; | 50 | Secondary shaft; |
| 12 | Retaining ring; | 51 | First gear synchronizer gear and ring gear; |
| 13 | Rear input shaft bearing; | 52 | First gear gear bushing; |
| 14 | Input shaft oil seal; | 53 | Secondary shaft intermediate bearing; |
| 15 | Transmission front cover; | 54 | Intermediate bearing lock plate; |
| 16 | Bearing mounting ring; | 55 | Secondary shaft reverse gear; |
| 17 | Clutch housing; | 56 | Elastic cushion for gear shift lever damper; |
| 18 | Gearbox input shaft; | 57 | Damper rubber bushing; |
| 19 | Reversing light switch; | 58 | Damper spacer; |
| 20 | Intermediate shaft reverse gear; | 59 | Damper locking sleeve; |
| 21 | Reverse intermediate gear; | 60 | Inner gear shift lever cover; |
| 22 | Reverse fork; | 61 | Secondary shaft rear bearing oil seal; |
| 23 | Gear shift lever release spring; | 62 | Flange of the elastic coupling of the propeller shaft; |
| 24 | Tension spring bolt; | 63 | Screw; |
| 25 | Gear shift lever guide cup; | 64 | Centering ring seal; |
| 26 | Ball joint of the lever; | 65 | Centering ring retaining ring; |
| 27 | Spherical washer; | 66 | Centering ring; |
| 28 | Spring; | 67 | Rear secondary shaft bearing; |
| 29 | Gear shift lever; | 68 | Drain plug; |
| 30 | First and second gear shift fork; | 69 | Mud deflector; |
| 31 | Third and fourth gear shift fork; | 70 | Speedometer drive gear; |
| 32 | Fork rod for first and second gears; | 71 | Speedometer drive; |
| 33 | 3rd and 4th gear fork rod; | 72 | Rear gearbox cover; |
| 34 | Locking blocks; | 73 | Reverse idler gear axis; |
| 35 | Reverse fork rod; | 74 | Rear intermediate shaft bearing; |
| 36 | Rod lock ball; | 75 | Intermediate shaft first gear; |
| 37 | Retainer spring; | 76 | Gearbox housing; |
| 38 | Retainer cover; | 77 | Sliding clutch for synchronizer of first and second gears. |
| 39 | Breather; |
Since the box from the VAZ-2105 is structurally similar to the 2101, the kinematic diagram of the gearbox is the same. But the gear ratios are different; on 2105 gearboxes they are:
- 1st – 3.67;
- 2nd – 2.10;
- 3rd – 1.36;
- 4th – 1.00;
- Rear – 3.53;
As for the differences in the design between gearboxes 2105 and 2101, they mainly come down to different numbers of teeth on different gears. So, on the intermediate shaft of the gearbox, a 1st speed gear with 14 teeth is used (15 for 2101), and their inclination angle is greater. The constant mesh gear of this shaft has 28 teeth (29 for 2101). The input shaft uses an 18-tooth gear (19 for 2101). Because of these features, the shafts with gear blocks of these two gearboxes are not interchangeable if you try to install them separately. But in the case of a complex replacement - the input shaft along with the intermediate shaft and all gear blocks, then installation is quite possible. As for the secondary shaft, modification 2105 differs from shaft 2101 in the first gear gear (its teeth have a different angle, although their number is the same, and its diameter is also slightly larger).
Repair of a new VAZ 2107 gearbox (5 speed, t
I bring to your attention an article on repairing a 5-speed gearbox of a new type (the so-called “torn package”) Some of the photos of the process will be repeated, please do not kick too much, the photos were mainly taken during assembly, since the gearbox and parts were washed, and the camera remained clean: ). What additional tool will be required? A retainer for the input shaft (I made it from an old clutch disc hub), a high 30" socket for loosening the output shaft nut, a pair of powerful screwdrivers, a circlip remover, an impact screwdriver with a hammer and, ideally, a torque wrench.
It’s unlikely that anyone will have a special stand at hand for repairing a gearbox; in principle, you can sort it out on a table, or you can also carefully clamp it in a vice. So, we drain the oil from the gearbox, remove the gearbox from the car, remove the elastic coupling, the rear gearbox mount along with the yoke and remove the clutch fork with boot and release plate. We thoroughly clean the gearbox from dirt using a metal brush, a suitable tool such as a screwdriver, and ideally blow it out with a compressor.
Even though the oil has been drained, there is still some oil left in the gearbox, so we take this fact into account when disassembling. Remove the lower gearbox cover.
We remove the rubber boot of the coupling from the secondary shaft, the stopper from the secondary shaft, using a suitable drift we knock out the centering sleeve of the coupling. If you cannot “pick up” the sleeve, then unscrew the secondary shaft nut as much as possible and screw it back. At the same time, the bushing will almost come off its place. We engage any gear, fix the input shaft, and unscrew the secondary shaft nut to “30”. Remove the conical spring washer.
If you don’t have a primary shaft lock at hand, you can use an aluminum spoon by inserting its handle between the gears of the primary and intermediate shafts. Don't be afraid for the gears, the luminaire won't harm them. Remove the flexible coupling flange.
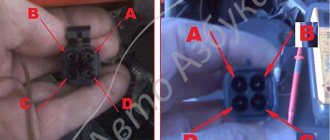
Turn off the reverse light switch. Be careful not to lose the copper sealing washer.
Unscrew the nut and remove the speedometer drive
We engage second gear and remove the gear shift lever housing by unscrewing the three nuts along the outer radius.
Unscrew the two nuts securing the trouser bracket to the gearbox
We remove the bracket and take out the mounting bolt with a square head located under it.
Unscrew the five nuts securing the rear cover on the outside and one on the inside.
We remove the back cover, sometimes you have to tap it lightly with a hammer. The bearings may become separated, part of the bearing remains on the shaft, part in the back cover, no problem.
Remove the inner bearing race (hereinafter referred to as P) from the secondary shaft, then remove the speedometer drive gear. AHTUNG! There is a small ball under the drive gear, don't lose it!
We remove the oil deflector washer. We inspect it; there was a case when the washer came off the bushing.
Using a screwdriver, set the 1-2 gear shift rod to the neutral position. We fix the input shaft and use the “17” head to remove the bolt securing the gear block. Then it will move by hand, but do not unscrew it yet.
Now you need to remove the clutch cover (aka bell). We unscrew one nut to “13” and six nuts to “17”.
We remove it and put it aside. A spring cone washer remains on the input shaft or in the bell. We inspect it for wear and cracks. Sometimes, instead of a cone washer, there may be a thick ring.
Holding the input shaft with the clamp, unscrew the front bolt of the intermediate shaft (hereinafter referred to as the washout) with the head set to “19”.
We unscrew the two bolts of the plate that holds the springs of the gear shift rod clamps.
Under the plate there are three springs, two of the same length (for the 1-2 and 3-4 gear rods) and one longer (for the 5th gear and reverse rod). We take out the springs.
There are three balls under the springs; they are in oil and do not fall out on their own, but still keep an eye on them during further disassembly.
Now unscrew the gear block bolt and remove it. Now we take out the gear block. Move backwards and sideways. The 5th gear gears move back a little.
A spacer ring is installed between the gear block and the rear shaft shaft. It sometimes sticks to the gear block and falls off at the most inopportune moment.
We remove the 5th gear assembly from the secondary shaft with the 5th gear shift rod, the Z.H. gear, and the clutch.
Remove the spacer ring.
Using a suitable thin object, push the retainer ball out of the socket. I use a tube from VD 40, it is flexible.
Now, using pliers, we open the retaining ring of the 5th gear synchronizer clutch hub and remove it.
Remove the hub from the secondary shaft of the gearbox.
Remove the spring washer. It faces the Z.H. gear.
Removing the reverse gear
Now you need to remove the wash shaft. To do this, you need to remove the front bearing. Sometimes it is enough to catch the locking ring with screwdrivers and the P. will come out.
Sometimes it doesn’t want to come off, then you have to screw the bolt a few turns into the groove and, creating a stop with a screwdriver, lightly tap the bolt with a hammer and move the bearing out of place. Sometimes the bearing is disassembled, no big deal, it can be reassembled.
Now we remove the rear P. shaft by pushing it out of the housing with a screwdriver.
We unscrew the bolt securing the 3-4 gear fork to the 3-4 gear shift rod with the head set to “10”.
We take out the rod and at the same time pull out the plug.
AHTUNG! There is a small locking block located in the shift rod. When the rod is pulled out, it may fall out.
Then remove the locking block from the gearbox housing.
We take out the locking ball.
We unscrew the bolt securing the 1-2 gear fork to the 1-2 gear shift rod with the head set to “10”.
We take out the rod and at the same time pull out the plug.
Then remove the locking block from the gearbox housing.
We take out the locking ball.
We remove the needle bearing. We inspect the friction surfaces of the needle bearing inside the input shaft and on the secondary shaft. If there are traces of chipping, the shaft will have to be replaced.
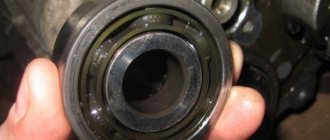
We wash the bearing and carefully inspect it; the treadmill and balls should not have any signs of chipping or pitting. The oil-lubricated bearing should rotate quietly, without jamming or noise. This is what a worn out treadmill looks like - the cause of the noise
If there is a need to replace the bearing, then: Remove the retaining ring from the outer race of the bearing
Using a puller, remove the retaining ring; if it does not come off, then knock it down with a drift and remove the spring washer.
We press out the bearing and press on a new one. We press the retaining ring into place using a punch along the shaft
Using an impact screwdriver and a hammer, pry it out of place and unscrew the three screws of the locking plate.
If there is no damage, the screws can be reused, but we always install new castle washers during assembly. Remove the locking plate.
We remove the bearing from the gearbox housing complete with a lock washer.
Holding the gears on the shaft, pull out the secondary shaft assembly from the gearbox housing.
This is what the removed secondary shaft assembly looks like.
We remove the 3-4th gear clutch from the shaft and inspect the clutch. There should be no nicks on the teeth. Now we disassemble the secondary shaft to inspect 1st and 2nd gears. All parts are simply removed from the shaft. Sometimes the hub of 1-2 gears can fit quite tightly, a couple of light blows to the 2nd gear gear and the hub will come off. This is what the 1st and 2nd gear parts removed from the secondary shaft look like.
If you need to gain access to the 3rd gear gear and the blocking ring, then disassemble the shaft in the following order: Clamp the shaft in a vice through a rag.
It is not possible to release the stopper; we knock it out of place with a drift and the ring will pop out on its own.
Remove the 3rd gear gear assembly.
We put the gear, hub, and spring ring in place.
Using a circlip remover, place the circlip as close as possible to its location on the shaft.
Using a punch, strike from above and along the perimeter of the ring to push the retaining ring into place.
We inspect the gears, the teeth should not have nicks, the edges should be sharp
We inspect the gears; chipped teeth are not allowed. When purchasing a new gear, pay attention to the teeth of the gear itself - there should be no nicks or other defects. There were new gears with nicks, which caused noise. We inspect the synchronizer blocking ring; there should be no marks on it from the coupling (notches along the ring or an annular groove) In the photo on the left there is a worn ring, on the right there is a new one
To replace the locking ring, press the ring against the gear (compressing the spring) and use a puller to release the locking ring.
Remove the stopper and locking ring
We put a new ring, put it back together, check the ease of movement, it shouldn’t stick.
We inspect the coupling-nicks on the teeth; there should be no signs of wear in the groove under the fork. Worn coupling
We inspect the shift forks. Wear on the working surface of the fork is not allowed. For comparison - new and worn fork
We change the input shaft oil seal. From the clutch side, through the hole in the guide sleeve of the release bearing, use a drift of a suitable diameter to knock out the oil seal.
We thoroughly clean, degrease, lubricate with a thin layer of sealant, and put the oil seal in place using a 32 socket.
We examine the supporting “soldier” of the clutch fork for wear. We inspect the spring thrust washer (wear of the supporting surfaces, cracks are not allowed).
We apply a little lithol to the seat of the washer and put it in place. With the help of lithol, the washer is “glued” and will not fall out during assembly.
Let's now work on the back cover. As a rule, the race of one or two bearings remains in it. And the oil seal also needs to be changed. We knock out the plug using an extension cord.
We knock out the oil seal using a screwdriver.
Using a screwdriver and a hammer, knock out the bearings from the rear cover housing.P. They sit without tension, so they come out easily.
We wash the body, degrease the oil seal seats and plugs. We apply sealant to the seats of the oil seal and plug. Press in the oil seal and plug.
Removing the gearbox from the car
In fact, dismantling the gearbox from a VAZ-2105 is not a very difficult operation and it is quite possible to do it yourself, having only a basic tool:
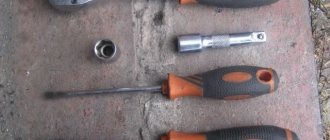
- Sets of wrenches (open-end, socket), heads with knobs, extensions;
- Screwdrivers;
- Rags;
- WD-40 product;
- Wooden block;
- Jack;
Removal of the box must be carried out on an inspection hole or overpass - there is no other way to dismantle it. It is noteworthy that the removal technology is identical for all modifications of this car - with a 5-speed gearbox or 4-speed, carburetor version or VAZ-2105 injector.
The sequence of actions is as follows:
And then the unit is replaced, modernized or repaired. In the last two cases, the VAZ-2105 gearbox is disassembled, worn elements are replaced, a 5th gear gear block is added, etc.
To put the gearbox in place, perform the described steps in reverse order. In this case, before seating the box, it is recommended to lubricate the splines of the input shaft with a thin layer of Litol to make it easier to fit into the driven disk.
When installing it back, if the gearbox does not go into place, you need to push it back, turn the shaft and try to seat it again. You may have to do this several times to get the shaft splines to line up with the splines in the disc.
| Video - VAZ gearbox repair | Leisure - tuning the five |
To repair a VAZ 2107 gearbox, you will need glue, an impact screwdriver, a puller, oil seals for the primary and secondary shafts, gaskets, and a torque wrench.