14 February 2018 Lada.Online 90 345 10
AVTOVAZ first began installing side mirrors of the new SE model (with heating, electric drive and turn signal indicators) on the Lada Granta liftback. Then they began to be equipped with Luxe trim levels of the sedan. The following describes how to install and connect standard liftback mirrors with your own hands to simpler versions of the Lada Granta sedan, as well as to the Lada Kalina station wagon and hatchback.
Heated mirrors
Autumn and winter will bring both rain and snow, or even better, both at the same time, mirrors and our
visibility will suffer. Therefore, in wet weather, in snow or when the mirrors are icy, the “mirror heating” function is indispensable, because it will literally warm them up in 4-5 minutes and dry them, just while the car is warming up.
We buy special mirrors
Installation:
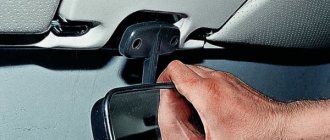
1. Remove the rear mirror trim and the mirror element - this is the most difficult and important thing.
2. Next, unscrew the 3 bolts from the interior and disconnect the mirror from the bracket.
3. Now you need to pull the wires through the special holes where the adjustment cables pass.
4. Assemble the mirrors in reverse order.
A special feature of the Lada Granta Liftback is a new modification of the side-view mirrors. By default, they are included as standard, unlike the Lada Granta Sedan, Priora, VAZ 2109, 2108, 21099.
Due to various reasons, such as an accident, collision, impact, reflectors are damaged. The replacement process is not at all complicated; every car enthusiast can do it.
In order to provide methodological assistance to inexperienced owners of the Lada Granta Liftback, we recommend following the instructions below.
Loud music
One of the most common mistakes made by new drivers is the problem of loud music. No one forbids the driver to listen to his favorite songs or turn on the radio while driving. It’s not for nothing that all car manufacturers install appropriate audio systems even in the basic configuration.
But for beginners it is better to give up such pleasure for a while and pay more attention to driving the vehicle. It is worth turning on music when you are on the highway with a minimum number of cars around you.
In the city it is better to turn on the radio or music at a minimum volume
This is due not only to the fact that music distracts attention and sometimes makes you sing along and dance while driving. It's not the biggest problem
The greatest threat lies in the fact that because of the music, the driver does not hear what is happening around him and ignores the signals of other drivers. This is a direct threat to accidents and accidents.
If you turn on the audio system, then only at a volume that will not drown out signals and sounds from outside. This will allow you to slow down or make the right maneuver in a timely manner.
And it’s not only beginners who are guilty of this. Many drivers, who have been driving for many years, often turn on the music at maximum speed, thereby endangering themselves and other road users. There are already a number of initiatives introducing large fines for playing music in cars that is too loud. And for many objective reasons this will be the right decision.
Sequence of actions when replacing a side view mirror yourself
- We place the car on a level platform and provide unobstructed access to the front door from the side where the replacement will be.
- We unscrew the two screws that secure the door card trim and pry the plastic clips around the perimeter.
- From the back side, disconnect the block with wires from the electric drive control unit, disconnect the speaker terminals, and remove the card.
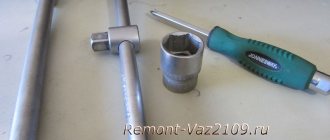
- Using a Phillips-head screwdriver, unscrew the three screws and remove the side-view mirror from its seat.
- We replace the block with a new one and screw it into place. We lay the block with wires and connect them to the sockets. We assemble the structure.
We indicate specific skills and abilities in the resume
Now imagine that you are writing a CV for a specific position in which you have a keen interest. Then the list of core skills should be treated as a list of specific, rather than general, skills.
Read the announcement very carefully. What do you need to be able to do to be hired for this position? Do these requests match your skills and experience? This must be indicated in the “Skills” column.
However, simply rewriting the requirements on your resume and framing them as your own skills is a bad idea. The recruiter will immediately guess that you have decided to take a “let it go” approach to your resume. Change this information, make it more specific, add something that was not specified by the employer, but could benefit this company.
For example, if you see a requirement - fluency in English, then mention the ability to organize obtaining a visa for the boss (if this is the case, of course). After all, if the employer and his assistants correspond in English, this may indicate that there are business partners from other countries, and in this case, the ability to organize a visa will arouse the interest of a possible boss.
Also remember that nowadays a recruiter will probably look for candidates using keywords, so you need to write a description of skills so that it contains phrases that are in the text of the job description.
In conclusion, I would like to recommend you an interesting article about why working on the Internet at home without investment is so attractive and how much you can earn by working on the Internet.
For details on how to write a resume correctly and what mistakes to avoid, watch the video:
I have prepared a small gift for you - a standard resume template, which you can download below:
| Standard resume template (doc, 44 Kb) | Standard resume template (doc, 46 Kb) |
PS I will be very grateful if you use the buttons:
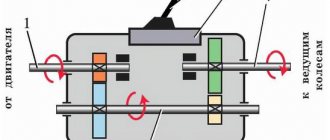
Wiring diagram for mirrors on Grant Liftback
There are six pins in total, of which:
- No. 1 – horizontal adjustment;
- No. 2 – —/— vertically;
- No. 3 – weight of the control unit;
- No. 4 – heating;
- No. 5 – turn signal repeater;
- No. 6 – general “minus”.
Connection diagram by wiring color
- blue – left side;
- white – side lights;
- blue – right side;
- white – black – “plus”;
- black – “minus”;
- green – common on both sides of the mirrors;
- red – general.
Wiring diagram for Lada Granta Liftback mirrors on the control unit
- gray - black and blue - black - control unit on the driver's side;
- black - “minus”;
- white-black - “plus”;
- pin No. 7 - not used. Connect third-party contacts;
- white - dimensions;
- green, orange - control unit on the passenger side.
If you want to connect Grant Liftback mirrors to a VAZ, purchase a control unit from a Lada Kalina or a VAZ Niva. The standard unit is not intended for installation on other VAZ models. The pinout of the terminals occurs according to the following diagram:
- blue – left and right side;
- black – “minus”;
- yellow – common on both sides;
- red is a plus.
How to quickly clear ice from a mirror?
There is really only one way out in this situation - heated side mirrors. It’s good for those owners who have such an option provided with their car. But what about the owners of a Lada Granta car in standard or norm configuration, where such convenience is not provided? The answer is also very simple - you need to deliver. That’s what’s good about our cars, and this is their main advantage - they are construction kits that can be assembled and disassembled as you wish. The situation is the same with heating. You have standard mirrors - buy only mirror elements with built-in heating - connect, remove the button and you're done. Yes, at first glance it may seem difficult. But there is nothing difficult about it. If you do not have knowledge of cars, you can always contact a service center where, again for a small fee, such work will be done quickly and efficiently. Buttons are always sold separately, as well as wires. The main thing is not to confuse the mirror elements in shape with their mirrors. You can approach the issue more globally - completely replace the standard mirrors with new, luxury ones. Thus, you purchase a complete connection kit, which will include assembled side mirrors, possibly even with a turn signal - a convenient thing. The kit will include power buttons, wiring, and a relay. This pleasure is relatively inexpensive, which means you get an excellent option for little money.
The situation is different if you live in a hot region and your car is not in danger of freezing in winter. No heating needed. But you will always need a consumable such as the mirror element itself, even without heating. This one can also be purchased separately, even one piece at a time, without changing the whole mirror. It costs a penny, which means that if you break or damage the glass on the mirror, you can replace it without any problems. Convenient, fast and cheap.
Reviews
| № | Positive |
| 1. | Vitaly: There were no problems connecting the reflector. I installed it myself, the scheme is quite simple and intuitive. |
| 2. | Kirill: in winter the mirror on the left side cracked, I replaced it myself with a new one. There were no difficulties with disassembly, the design is quite simple, the connection diagram consists of two blocks. |
| 3. | Vasily: after a side impact, the right side mirror cracked. I had plenty of free time, so I installed the new one myself. At the same time, I replaced the rubber seal; it was deformed and moisture penetrated inside. |
| 4. | Alexander: after two years of operation of the Lada Granta Liftback, the insulation in the doorway on the wiring was worn out. Replaced the entire block with wires. Now the line is completely new. |
| 5. | Konstantin: when the reflector burst, I didn’t contact the experts, I installed a new one myself. The procedure is simple, the case is held on by three screws, the block with wires is connected to the standard connector. |
| 6. | Victor: the housing on the left mirror was cracked, I bought a new one at the car market. I transferred the filling myself, it turned out to be very simple. I didn’t contact the specialists at the service station, I did everything with my own hands and I advise you. |
| 7. | Gennady: the right turn signal suddenly stopped working, so I disassembled the reflector myself. The reason was poor contact at the terminal. I pressed it with pliers and everything works fine. |
| Negative | |
| 1. | Ignat: the design of the side reflectors is not perfect; they do not fit tightly, despite the presence of a rubber seal. I decided to buy a reflector block from Renault Logan, it has an identical mount. |
| 2. | Vasily: the quality of the wire insulation is poor; after two years of use, Granta replaced it with new wiring. Insulation cannot withstand freezing temperatures. |
| 3. | Sergey: I changed the left side mirror adjustment cables for the second time in a year. Low quality components. |
Conclusion The process of independently replacing side-view mirrors on the Lada Grante Liftback is not at all difficult. The design is fixed with three screws, connection to the power circuit is carried out by two blocks with wires. Following the recommendations given in this manual, replacing a new mirror will take no more than 10 minutes. Negative reviews from some owners are unfounded and are caused by violation of the operating conditions of the technical equipment and failure to comply with maintenance schedules.
Weather
An extremely common mistake made by novice drivers is that they forget about the difference in the condition of the road surface depending on the weather. Due to such mistakes by motorists, other road users may also suffer.
It is important to understand and remember that dry and wet asphalt is perceived differently by cars, adhesion to the road surface changes, and the braking system works differently. The driver must adapt to current weather conditions by choosing his driving style
Weather influences a number of factors. Namely:
The driver must adapt to current weather conditions when choosing his driving style. Weather influences a number of factors. Namely:
- acceleration;
- braking;
- clutch operation;
- braking distances;
- slip;
- distance;
- use of headlights.
When a car moves on dry asphalt, the braking distance is one distance. But if the road gets wet, this distance will increase by 1.5 times. On winter and icy roads, braking distances can increase several times. And if the driver does not take this into account, then there is a high probability of an accident and getting into a traffic accident.
Weather conditions dictate how a driver should behave while driving. The way you drive a vehicle largely depends on the condition of the road surface, the presence of precipitation, and ambient temperature. Therefore, in summer and spring, motorists adhere to the same style, but in winter and autumn they noticeably change their driving style.
Moisture, ice and puddles are very dangerous in nature, since here you can encounter such phenomena as aquaplaning, skidding, loss of control, etc. If you even hit an icy area with one wheel, the car can lose control. Driving on such roads requires extreme concentration and competent actions from the driver.
Beginners forget about this or have simply never personally felt the difference between the behavior of a car on a summer and winter road. That’s why a large number of accidents happen, sometimes for very trivial reasons.
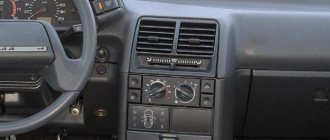
Installation of heated mirrors on Granta
| The option “heated rear-view mirrors” is a very useful thing not only in winter, but also in summer in rainy weather. Installing heated mirrors on a Lada Granta with your own hands is not difficult, the main thing is to figure out in advance how to disassemble the mirrors, prepare a wiring diagram and the necessary tools. |
Required:
- Elements of heated mirrors from the company (for example, Salina at a price of 550 rubles)
- Wire 0.75-1mm2 several meters 50r.
- Terminal “small mother” (2 pcs). 10 rub.
- Terminal ring “ground for screw” (2 pcs). 10 rub.
- Clamp terminal (1 piece). 5 rub.
- Fuse holder (1 piece). 28 rub.
Connecting heated mirrors Lada Granta
- We fasten the two negatives from the heated mirrors onto the ground screw above the fuse block.
- We solder two positive wires to the fuse holder (15A) and connect them to the gray wire under the carpet. There will be two gray wires in the harness (one is the fuel pump), and the second is the heated rear window. Using a multimeter or test light, we find +12V, which appears after turning on the rear heated glass.
Thus, we connected the Granta heated mirrors through 2 fuses and a relay.
All that remains is to connect the mirror elements to the terminals and check the operation. If you want to connect heated mirrors to a separate button, you can use the following diagram:
Now we perform the assembly in reverse order. In total, this modification of the mirrors took about 3 hours of time. By the way, along with installing heated mirrors, you can immediately make noise insulation for the doors.
Similar materials
Other options
For some users, a more acceptable option is to use a separate toggle switch. In this case, you should make sure that the current limit through the switch, which is usually marked on the housing, exceeds the current consumed by the heating system.
For those who want to install electric adjustment at the same time as heating, the best option would be to use mirrors from the Lada Kalina. Grant's original glass is large and clear. Electric mirrors from Kalina are slightly smaller, so this method is a good option for those car enthusiasts who do not like enlarged mirrors. Other drivers should be reminded that their smaller size makes up for their much greater operating comfort.
The first step is to remove the old mirrors. They are secured with 3 screws, which can be accessed after removing the decorative trim. Next, new parts are installed and wires are pulled, as described above. A wiring diagram is included with the set of new electric mirrors. The control unit should be mounted above the buttons of the power window control module.
All connections are made taking into account the algorithm described above, as well as instructions for new parts. The result is a Granta with the required option - electric drive and heated exterior mirrors.
How to equip a Lada Granta with heated and electrically adjustable mirrors?
This work requires a little more skill than, for example, installing a spoiler. Therefore, having a little skill in handling car electrics, or an assistant with such, is welcome.
Heating improvements
So, if you just need heating, then it is better to use a standard part, replacing the glass with the same one with a thermoelement, or install it yourself.
Precautions before starting work:
- Be sure to turn off the voltage of the vehicle's on-board network! (remove battery terminal)
- To prevent accidental damage to the wires when the door is accidentally closed, install limiters.
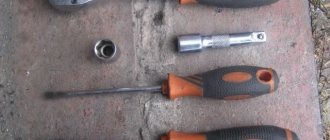
Tools and materials you will need:
- Branded mirror elements of heated mirrors;
- Insulating tape;
- Several meters of 0.75-1 mm2 wire;
- 2 terminals “mother small”;
- 2 ring ground screw terminals;
- 1 screw terminal;
- 1 fuse holder;
- Round needle file, soldering iron, set of screwdrivers, heat shrink.
Wiring
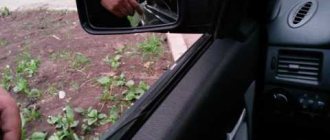
The next step is wiring. To install the wiring, you will need to remove the front door trim.
When the door is disassembled, the wires are pushed into the door through the fastening hole, and the interface block is disassembled. Through it and the corrugation, the electrical wiring is pulled into the housing. In order to simplify the task, you can drill an unoccupied contact in the block, and thus thread the plus and minus. To pull the wiring through the door corrugation, it is more convenient to use wire. Important (!) - for your own convenience, it is better to throw in extra wires.
Correct compilation of a basic list of skills and abilities
In the main version of the CV, suitable for most positions, skills should be listed as follows: the “Skills and Achievements” column is the completion of the “Work Experience” column, i.e. skills are a consequence of professional experience.
Let's say you worked as a marketer and are now looking for a vacancy for this position, you need to write a list of the benefits that the new boss will receive by hiring you for this position.
Professional skills and abilities for a resume example for a marketer:
- conducting marketing research;
- analysis of the market situation and consumer desires;
- ability to develop ideas for assortments.
Heated mirrors on Granta
1. Elements of heated mirrors from a company (for example, Salina at a price of 550 rubles)
2. Wire 0.75-1mm2 several meters 50r.
3. Terminal “small mother” (2 pcs). 10 rub.
4. Terminal ring “ground for screw” (2 pcs). 10 rub.
5. Clamping terminal (1 piece). 5 rub.
6. Fuse holder (1 piece). 28 rub.
9. Round needle file, heat shrink and electrical tape.
It is worth noting that on our website there is already a similar publication about heated mirrors on the Lada Kalina, which you can install yourself.
Connecting heated mirrors Lada Granta
To install the wiring, you will need to remove the front door trim. Now we push the wires through the mirror into the door and disassemble the connection block. We pull the wires through the block and corrugation into the interior. In order not to suffer, you can drill a free contact in the block and thread the positive and negative wires through it (it is still better to connect the ground in the cabin than on the door - the contact will be better).
We pull the wires through the corrugation of the door using wire. We do similar work on the passenger side.
It was decided to connect the heated mirrors in Grant to the heated rear window (this is the most popular method, which is also used on foreign cars).
1. We screw the two negatives from the heated mirrors onto a screw with ground above the fuse block.
2. Solder two positive wires to the fuse holder (15A) and connect to the gray wire under the carpet. There will be two gray wires in the harness (one is the fuel pump), and the second is the heated rear window. Using a multimeter or test light, we find +12V, which appears after turning on the rear heated glass.
Thus, we connected the Granta heated mirrors through 2 fuses and a relay. All that remains is to connect the mirror elements to the terminals and check the operation.
If you want to connect heated mirrors to a separate button, you can use the following diagram:
Key skills and abilities for a resume
The correct approach to filling out this section of your resume will allow the employer to understand, even without personal communication, that you are exactly who he needs.
There are no common core skills that are suitable for any job or profession. Those who cannot formulate their own professional strengths can indicate the following skills and abilities:
- abilities for interpersonal business communication;
- organization and planning of working time;
- attention to detail;
- analytical skills necessary to find solutions to problem situations;
- showing flexibility;
- management skills
- business leadership skills.
Don't forget that an employer may only require some of these skills, which he usually specifies in his own job offer. It is much easier to reformulate the employer's requirements into your key skills.
Heated mirrors – Lada Granta tuning and repair
Random photo
Tuning grants
On a modern car, heated mirrors are a necessary and irreplaceable thing, and Granta is no exception: you can make heated mirrors with your own hands!
We purchase heated mirror elements “Salina”, the cost is about 500-600 rubles.
- Wire with a cross section of 0.75-1.0 mm (10 meters) - 150 rubles.
- Small female connector (2 pcs.) - 10 rub.
- Ground ring connector for screw (2 pcs.) - 10 rub.
- Clamping connector (1 pc.) - 5 rub.
- Fuse block (1 pc.) — 30 rub.
- Soldering iron
- Sample
- Thin and regular screwdrivers
- Round needle file, heat shrink, electrical tape
We take the end of the wire that was pushed into the door out of the door. This is where a needle file comes in handy: we firmly attach the wire to the needle file with wire, and pull the file through the corrugation
We attach the minus to ground (I attached it to ground above the fuse block). We combine the “pluses”, connect them to the fuse through the block, and cover the exposed areas with heat shrink.
There are two gray wires in the wiring harness: one is the power supply to the fuel pump, the other is the heated rear window. Using a probe, we determine which of them goes to heated the rear window (“plus” appears on it only when the rear window heating button is turned on). We connect the fuse block with a continuous clamp to the found rear window heating wire
We connect power to the mirror elements (using female connectors). We put everything back together in reverse order.
We enjoy the excellent performance of the heated mirrors on the grant!
Tags: heated mirrors on the Lada Granta, heated mirrors with your own hands on the grant
Add a comment
Lada Granta FAQ - Guide to Lada Granta - tips, modifications, tuning, styling, photos © 2013-2015
What you need
To make a heater you only need:
- Nichrome wire;
- Double-sided and regular tape;
- Wires;
- Sealant;
- Soldering iron;
- Multimeter;
Having all this, you can start equipping the mirrors with heating. But first, let's deal with nichrome wire.
A wire with a cross section of 0.4-05 mm and a length of 1-1.3 m is suitable for the heater. For normal functioning of the heating system, the resistance of the piece of wire must be 12 Ohms. This is exactly what a multimeter is for. That is, we took a section of 1.5 meters and measured the resistance. If it exceeds the specified value, cut off 10 cm and measure again. Thus, we select the desired segment.
Useful video
You can get more information from the video below:
Good day to all!
Finally, the court decision came into force and I received the long-awaited payment for the accident. I waited a long time, but it was worth it. Many thanks to my lawyer Lyuba, she did everything competently and the result pleased me, although it all dragged on from 01/11/2016 to 08/08/2016 In general, if something “ugh, ugh” happens, contact me, I’ll introduce you to a good lawyer)))
In general, the repair of the ass amounted to 42k, the insurance payment was 113k (but that’s not all, because we will be sued further for a penalty). Part of the payment amount went to repay debts (repairs + insurance + small items) and the rest, of course, went to the car, well and bought my wife some goodies.
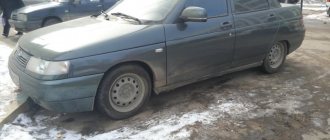
Well, the actual changes: 1. Mirrors from Granta SE and their control unit2. A little used strut (stock) and technospring springs -50 muzzle and -70 ass (new)3. Muffler and resonator (in 5 years I have never heard a current exhaust on it)4. Brake drums and brake cylinders5. Spark plugs, wires, filters (well, that's not interesting)6. Front fenders (not yet installed)7. The hood has been sent for revision (everything is incognito for now; I’ll write about how it’s done)8. Covers replaced
Let's start with mirrors. For a very long time I wanted something interesting and one day I was flipping through the page of Authority and saw grant mirrors on his 08. I immediately wanted to do the same for myself, especially since I have never seen Samara with such mirrors in our city. As soon as I saw it in the store, I immediately bought it. The installation was fun, because the fastenings are different, but it doesn’t matter, we have a drill))) and one more nuance, all the mirrors installed on the Samara that I looked at were modified in the triangle area, a part was cut off and puttied and painted. I was afraid to screw up and decided to try installing the mirrors as is, in principle it worked)) The installation is not finished at the moment, the control unit is not connected, but everything is ready for this (so far I have only connected the turn signals (for dimensions) By the way, all the necessary connectors are sold at Kuzbass market. In general, I’ll write down everything in detail later on the mirrors.
AvtoVAZ first began installing side mirrors of the new SE model (with heating, electric drive and turn signal indicators) on the Lada Granta liftback. Then they began to be equipped with Luxe trim levels of the sedan. The following describes how to install and connect standard liftback mirrors with your own hands to simpler versions of the Lada Granta sedan, as well as to the Lada Kalina station wagon and hatchback.
Don’t confuse the description of your abilities and personality traits
Punctuality, communication skills and responsibility should be indicated in the “About yourself” column. The “Skills and Achievements” column is needed only for information related to job obligations.
In the “Professional skills” section, you must indicate the basic skills acquired at your previous job or at a university. Here you can indicate your achievements. The section should reveal you as a specialist. In other words, this section should describe your “Qualifications”.
If you describe your skills, you will make your CV more attractive. After reading this section, the potential boss should clearly understand that the company needs you and you definitely need to be called for an interview. You need to attract him with your knowledge and abilities. If you want this to happen more often, listen to our advice:
- The “Qualifications” item should be placed exactly after the “Education” item. This is at least logical.
- This section must be modified for any new vacancy. You only need to record abilities that are suitable for the position you are looking for.
- You shouldn’t make yourself a one-man orchestra, carefully indicating the entire list of your advantages. Indicate a few (4-8) key ones, that's enough. If you want to express some skills, you will have to sacrifice others.
- Initially, describe those abilities that are most consistent with the position you are looking for.
- Write the list in a way that is easy to read.
- You need to use the same definitions and phrases used by the potential boss in the ad.
- When describing skills and abilities, you need to start phrases with the words “have experience”, “know”, “possess”, etc.
- There is no need to write about your features; there is a special section for them in your resume.