Painting a car with your own hands, according to many car enthusiasts, is a very difficult task and inaccessible to mere mortals. Meanwhile, almost anyone can paint a car well at home, if they have the desire and some experience. In this article we will talk in detail about how to paint a car yourself after repair.
Painting a car body, like other elements of a “tin can”, consists of several stages following each other:
- Preparing the car for painting (cleaning, priming, puttying);
- Painting of the body, doors, hood, bumpers and other parts;
- Grinding and polishing.
In addition to these instructions for painting cars, on our website you can read and view the following materials:
- Everything about painting a car with liquid rubber.
- Removing scratches on a car body without painting.
- Repair and remove dents without painting the car.
- DIY bumper painting.
- Do-it-yourself painting of alloy wheels.
- Automotive paint codes and colors.
To paint a car with your own hands in the garage, some craftsmen use a regular vacuum cleaner. But you can’t paint the whole car with a vacuum cleaner, so we still recommend renting or buying a compressor for painting cars.
We also recommend stocking up on two spray caps. It is useful to add several spare tubes with smaller and larger nozzle diameters, corresponding rubber plugs and O-rings to the kit of each of them (see the example in the video at the end of the article).
Technologies used
To obtain a high-quality multi-layer coating that will provide body protection from corrosion and a presentable appearance, enamels and varnishes of various compositions are used. Cellulose, nitrocellulose (glyphthalic), acrylic, alkyd, even powder paints - all of them have found application in automotive painting. Each has its own pros and cons, but we are not talking about that, but about the technologies used. High-quality paintwork is obtained only by spraying paint on the surface of the car body. Moreover, various technologies are used in the work.
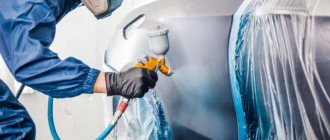
Pneumatic painting
The most common method in which paint is transferred using a jet of compressed air. From the tank, the enamel enters the air flow by gravity or due to ejection. When passing through the nozzle of the gun, a finely dispersed mixture of paint and air is formed, forming a rather soft torch. Equipment of this class was the first to be used for both manual and automated painting. The advantages of pneumatic painting include:
- The coating is applied in a thin and even layer, while a wide range of settings allows you to adjust the thickness of the paint laid on the body within significant limits.
- It is used to work with various paints and varnishes, and the complexity of the surface configuration does not matter.
- Affordable cost of a set of equipment (excluding compressor).
- High painting speed.
But there are also disadvantages associated with the use of compressed air. And not alone:
- A powerful air flow contributes to raising dust in the painting area, which affects the quality of the paintwork.
- Not all of the finely dispersed mixture reaches the surface to be painted. Most air guns have paint transfer rates of less than 50%. That is, half of the expensive material turns into a cloud of colorful fog, which settles everywhere, but not on the car.
- Careful adjustment of the gun operating parameters is necessary. With an increased paint spray, drips form on the metal; if the spray is insufficient, the number of required passes for painting increases.
- Possibility of blowing already laid but uncured paint with an air flow.
To some extent, these shortcomings have been eliminated in models of spray guns of the HVLP and LVLP classes, improved in design, characterized by reduced pressure at the outlet of the nozzle. But even they don't remove the colorful fog.
Airless spray
More advanced technology that eliminates the use of compressed air. But let’s immediately note that the quality of paint spraying depends on the features and cost of the selected set of equipment. When purchasing frankly cheap models, do not count on additional advantages compared to pneumatic spray guns.
Pneumatic painting equipment
The principle of operation is based on increasing the pressure of the paint itself, so compressed air energy is not required to transfer it to the surface to be painted. A high-pressure piston pump (in professional equipment up to 250 atmospheres) supplies paint through a specially designed nozzle. Due to a sharp decrease in pressure at the outlet, the material flow is dispersed. Passing through the surrounding air, the torch loses its propagation speed, which ensures a soft laying of the paint and varnish coating on the surface being treated.
This technology has the following advantages:
- You can use paint with a high viscosity index.
- The material transfer coefficient exceeds 60–80%, due to which the intensity of ink mist formation is significantly reduced. Losses are reduced by 20–30% compared to pneumatic equipment.
- The size of paint droplets with airless spraying is increased. Due to this, the thickness of the applied coating has increased, which reduces the number of necessary passes for painting the surface and increases equipment productivity.
- The torch made of paints and varnishes has clear boundaries, so the painting process is controlled with high precision.
- Eliminating compressed air prevents dust from being kicked up and paint that has already been applied but not cured from blowing up.
These advantages ensure the expansion of the scope of application of equipment for airless painting. Most factory lines are equipped with just such complexes, and in services, manual equipment of this class is becoming more and more common.
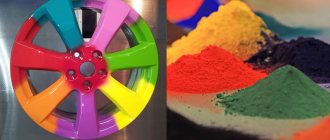
Powder painting
The technology makes it possible to obtain coatings that are resistant to mechanical damage and atmospheric influences. Complete painting of the car body is rare, but rims, metal body kits, and sills are being coated with polymer powder compositions more and more often. The advantages of this method of applying protective and decorative coatings are as follows:
Powder coating gun
- Powder-type paintwork is characterized by increased resistance to mechanical damage.
- The coating does not change color under the influence of ultraviolet radiation and atmospheric influences.
- With proper organization of production, material losses do not exceed 1–5%, that is, the paint transfer coefficient reaches 95–99%.
- Complete coverage is achieved in one pass.
The technology itself is based on reliable fixation of magnetized powder on the surfaces being processed. Positively charged material is sprayed onto a grounded body element. The paint is applied in an even layer. To start polymerization, a thermal effect on the coating is necessary. To do this, the processed part is placed in an oven at a temperature of 150–2000 degrees and held for 10–20 minutes. As a result, the powder granules are sintered into a homogeneous film, which serves as reliable protection for the metal.
The disadvantages of the technology include the impossibility of tinting the powder. The choice is limited only to formulations prepared by the manufacturer. But for the sake of fairness, we note that the number of options is constantly growing; now even metallic paint is applied in a similar way.
How to paint a car with a spray can or spray gun
Disadvantages and advantages of spray cans.
Do-it-yourself spray painting of a car has its advantages
- Anyone can do this.
- Apply to any surface: irregularities, bends, joints.
- The paint is distributed in an even layer.
- No additional equipment required: roller, brushes, compressor, spray gun.
Flaws
Unregulated pressure, drop size, torch size, Inability to dilute with a solvent and make the paint thinner, Inability to work with two-component materials, small volume. And all this for 4-5 euros per 150 g of paint in a can.
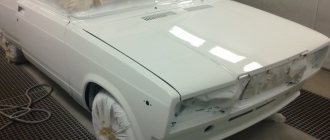
Complete car repainting
A fundamental solution that is used for global body repairs, updating damaged coatings, changing colors, and tuning. The advantage of this option is that you don’t have to bother with choosing paint or organizing transitions. The downside is a significant amount of work and a correspondingly increasing cost. But in this case you also get more reliable protection of the body from corrosion than in the case of local painting.
We pay attention to the conditions in which complete repainting is performed. If the master’s qualifications allow, then partial painting is also done in a garage. But with a global update, you shouldn’t take such risks. If you want to get a uniform coating without drips or dust, paint in a chamber.
Complete repainting is a multi-step process, and each of them affects the durability of the coating and the appearance of the car. Cleaning and degreasing, filling and sanding, priming, paint and varnish. And after this, we must not forget about maintaining the temperature required for drying. For these purposes, it is advisable to use infrared equipment that provides favorable conditions for the formation of a damage-resistant coating.
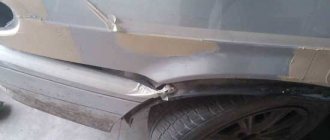
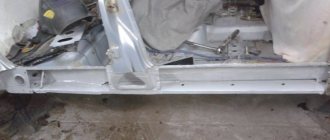
Leveling the surface
After removing deep dents and filling large cracks, automotive putty is used. All irregularities are removed, making the body perfect.
There are 2 main types of putty for cars:
- Fiberglass (reinforcement) demonstrates resistance to shrinkage. The material is used when a thick layer is required.
- Polyester putty smoothes the surface more.
Priming is necessary for better adhesion of the paint to the surface of the body. The following types of soil are distinguished:
- Acrylic primer is suitable for metal and plastic.
- Epoxy primer helps the metal fight corrosion. Makes a good base for painting.
- Acidic soil reliably protects against corrosion by eating into the metal.
After leveling and priming the surface, paint should be applied.
Types of car paints
The choice of paint should be decided in advance. There are several types of paints for cars:
- Metallic. Inexpensive and high-quality paint that requires careful puttying of the body before application. It has many different shades and shimmers beautifully in the rays of light.
- Acrylic paint. It also has a low price color palette is almost twice as . An excellent budget option, which also does not require additional varnishing.
- Alkyd enamel is the cheapest of paints. Because of this, the quality of painting may suffer, and the paint takes quite a long time to dry .
- Matte. It's just gaining popularity. Basically, on the roads you can only see tuned cars painted with matte paint. There is still little demand for it.
- Powder paint. This species is distinguished by its unusual structure - it consists of tiny dry particles. These particles are magnetized and they stick to the body after spraying. Under the influence of pressure and high temperature, they fuse with each other, creating a strong, uniform layer. This approach makes powder paint the safest.
- Water based paint. This species is the newest , and appeared on sale only a few years ago. Using water instead of harmful solvents, manufacturers have achieved high environmental friendliness of this product. The very small size of the pigment particles allows them to better cover the surface, even if the paint layer is very old.
Cleaning up defects
Before applying paint, the car must be thoroughly inspected, identifying all defects. Chips and cracks are first cleaned with sandpaper of about 60-180 grit, but not more than 200 grit for rough surface treatment.
Materials with grits from 240 to 480 capture small irregularities. Sandpaper from 600 to 800 units is used for finishing grouting, and 1000-1200 units give the surface a shine.
Dust after sanding work is wiped off with a wet cloth. When cleaning, you should also cover the space around the deformed area: the transition from “healthy” paint to new paint should be as smooth as possible.
Car enthusiasts often wonder: is it necessary to remove the old layer of paint or is it enough to clean the damaged elements? Experienced painters always strive to preserve the factory coating due to its high quality, so you should not remove all the paint. To remove old paint, they resort to several life hacks:
- The mechanical method involves gradually stripping the old coating with sandpaper or sanding discs. Using paper is much cheaper, but the process will be labor-intensive.
- The thermal method is heating the car paint to a high temperature, when the coating begins to swell and gradually separate from the base of the frame. The “crust” formed by the old paint is removed with a spatula. When carrying out such work, safety measures must be observed: the body heats up to several hundred degrees, and the paint emits toxic substances, so it is necessary to protect the respiratory system.
- When chemically stripping, special solvents (lye, acetone, turpentine) are used to remove paint. It is necessary to observe safety measures and protect internal organs from the toxic effects of chemicals.
- Industrial methods allow the use of laser and acid baths. These technologies are not available in a regular garage.
Car paint schemes
Before starting the paint application procedure, it is important to decide on a staining strategy. This is not only the number of layers and the sequence of their application. This is, first of all, a car painting scheme: what to paint first, apply enamel element by element or as an assembly with the body, can be done in one day or spread out the operation over several days.
Professional painters prefer to paint the entire body at once. This is difficult, but the advantages of this approach are obvious: the same shagreen and shade on all body panels. These facts are undoubtedly important for any color, but are especially noticeable on light metallic colors.
Advanced "hobbyists" use a similar idea. In one day, but with interruptions, the roof, left side, right side, trunk and hood are painted. The result is almost identical to the professional approach. However, for a beginner and a painter who is short on time, such a technique is not feasible.
For inexperienced motorists armed with “painting” enthusiasm, step-by-step painting in four days is suitable:
- The first day. Roof + body with internal panels.
- Second day. All doors + front fenders, laid out according to the left side/starboard side principle.
- Day three. Hood + trunk.
- Day four. Install the attachment parts on the body and paint the rear fenders.
The advantage of a step-by-step approach is high-quality painting of hidden surfaces. The main difficulty is to paint the rear wings in the same tone. An important condition is to use equally diluted paint at all stages.
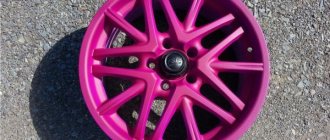
How to paint car rims with your own hands
If you have learned how to professionally use a car spray gun or are at least good at painting body parts with a spray can, then painting car rims will not cause you any difficulties.
Dye.
First of all, we need a primer in cans and acrylic paint. It is advisable to choose the varnish from the same manufacturer as the paint. Why acrylic and not powder? Without a doubt, powder paint is an ideal solution, but the technology for its application requires special equipment.
Brush painting process
“Vika”, “Gravitex” paints, “Raptor” car painting and a number of other compositions can be applied manually. This has several advantages:
- ease of work;
- good adhesion of the substance;
- painting parts with complex geometric shapes.
At the same time, manual painting with a brush also has disadvantages - uneven distribution of the composition. The main thing when painting locally is to choose a car enamel color identical to the old one. This is done in one of several ways:
- using a computer and special programs that determine the shade of enamel from a photo;
- using the VIN code or paintwork name, which is located on the packaging or sticker on the body.
Applying paint with a brush is a very labor-intensive process.
To understand how to apply paint with a brush, remember a number of recommendations:
- move the brush with a slight pressure in a back-and-forth manner;
- dip it into the paint and varnish mixture up to a third of its length;
- prevent materials from drying out on the brush;
- hold the brush at a certain angle, otherwise the thickness of the layer on the surface will be uneven;
- the remainder of the enamel is squeezed from the brush against the edges of the container with paint;
- when using slow-drying enamel, apply it in strips and then blend it, rubbing it a little into the substrate, getting an even surface area;
- After finishing work, wash the brush in solvent, and then in water and soap.
Car enamel for rust
Surely few people have ever heard of this. But nevertheless, the auto paint market today offers such a high-quality product that copes with its task very effectively.
Sometimes rust paints are used to paint corroded car parts. It can literally be applied directly onto the rust. In this case, there is no need to completely remove corrosion from the metal surface with further priming of the cleaned surface. It is enough to simply rough the surface to remove loose layers of rust, and then you can apply paint directly to the metal.
Anti-rust paint contains fatty acids that neutralize rust and tempered glass particles that protect the metal surface. Silicones are also added to the paint, which have a water-repellent effect. Manufacturers of rust paint offer a very wide range of colors to choose from.
Painting can be done in various ways, either using a regular brush made from natural materials, or using a spray can or airless spray gun. The paint is applied in 2-3 layers. The paint dries in 1-1.5 hours, but complete hardening occurs after 14 hours.
We recommend reading: How to change the alternator belt tensioner pulley with your own hands
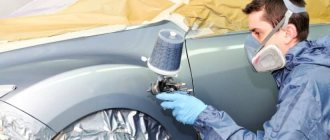
Spray painting
Applying Raptor paint and varnish to cars is popular among motorists due to convenience, efficiency and high quality of work.
The principle of any sprayer is to eject tiny droplets of enamel onto the surface under medium or high pressure.
The composition enters the sprayer head from a special glass, which is located at the bottom, top or side of the device. Experts believe that 90% of painting success depends on following the following rules:
Car painting technologies are probably the most important part when carrying out body repairs.
- the distance from which the enamel is applied is 35 cm;
- the composition is applied in parallel horizontal stripes, each edge of which overlaps the previous ones by 0.5 cm.
To properly paint a car, dilute the materials correctly and adjust the air flow. When there is not enough car enamel, it will be sprayed in jerks, which will not ensure high-quality application. If there is not enough air on the surface of the body, you will see large splashes. To prevent problems with the operation of the spray gun, perform the following manipulations before starting work:
- check the shape of the torch;
- adjust the air hoses;
- test the spray quality on a flat area.
To prevent unnecessary areas from being painted, cover them with stencils, but remove only after the substance has dried.
At the end of the work, disassemble the sprayer, wash its components, wipe them, and lubricate the metal parts in the pump with oil.
Incorrect spray technique
- Too narrow a torch can lead to streaking when painting with metallic paint.
- The same problem can be caused by placing the spray gun at the wrong angle to the surface.
- Improper overlap of passages will cause uneven paint film thickness, visible streaks and smudges.
- If the distance from the spray gun to the surface is too small, the speed of the blown air can affect the freshly applied paint film. Too close a distance can cause the appearance of large shagreen (orange peel), smudges and streaks when painted with metallic paint.
- If the distance is too large, the paint will reach the surface dry, which can even affect the shade of the color. A large distance also affects the loss of paint and varnish material during painting due to over-pollination.
- A slow thinner will allow you to vary the distance of the spray gun from the surface, but may cause smudges if you paint too close to the surface.
- If the gun is turned at the end of the paint pass, this will cause an uneven paint film and dusting along the edges of the painted panel. In addition, 65% of the paint material is lost.
What is included in a full cycle repair and painting of a car?
If you had to deal with serious damage, which was also not repaired in a timely manner, you will most likely have to carry out a full cycle of repairs followed by painting. This process will be longer (especially if you need to remove rust) and requires the following materials:
- Epoxy primer
- Putty
- Corrosion-protective primer
- Ground leveler
- Finishing coating – enamel
- Finishing coating – base paints under varnish
Do not forget that the selection of products for preparing the surface of a car for painting also depends on the material from which the part being repaired is made (steel, galvanized steel, aluminum or plastic) and on the type of old paint coating (hard or soft).
Currently, many manufacturers make their car bodies from galvanized steel and aluminum. This provides higher corrosion resistance and durability, but at the same time requires the use of special materials for repairs. There are a number of products suitable for application to galvanized steel and aluminum.
Any type of body repair requires careful and correct execution of a certain sequence of operations. A missed or incorrectly performed operation can lead to various defects in the paintwork.
Once again about the little things
In painting, even a small detail can affect the result. For example, with the correct system settings, an incorrectly selected distance from the spray gun nozzle to the part will put an end to the job. You should also be careful with such things as pressure and wiring speed. It is most convenient to regulate the thickness of the spray precisely by the speed of the reciprocating movement of the gun. To do this, you should practice on unnecessary details.
Putty
Using putty, you can easily eliminate defects such as scratches and chips. It serves as a good preparatory material for further painting of the body. The putty has a paste-like composition, including varnish, pigments and filler in the form of ordinary chalk.
A spatula is used to apply the material. If you need to treat a large surface, you should use a paint sprayer with a large nozzle. When using this method, the putty should be diluted with a thinner.
Dyeing process
Before applying varnish to the surface, there are several preparatory steps to ensure high quality work:
- washing and removing dirt;
- dismantling removable parts (hinged elements) that prevent the components from being completely and evenly painted, which, in turn, causes corrosion;
- definition of the work area. Look for all scratches, corrosion, dents and chips. Mark, level and polish to avoid uneven coverage and paint blistering or peeling;
- pasting of adjacent areas. Apply adhesive tape to them to prevent paint from getting on them, which will ruin their appearance and require repainting;
- selection of enamel and its application to individual areas or to the entire car with a brush or spray gun;
- assembly of removable components. It is carried out after the composition has completely dried after 1-2 days.
It is not recommended to wash the car for a week to fix the composition.
Choosing paint
When partially painting a car, the paint is matched to the main color, except for the desire to place accents on certain details using a contrasting color (bumper, hood, roof). When completely changing the color of the car, the color is selected based on the wishes of the owner.
Options for choosing paint colors:
- removing the gas tank cap and computer color selection based on an existing sample (the most accurate method);
- on the right pillar, in the trunk or under the hood (depending on the make of the car) there is a Service Parts Identification plate with the car’s parameters, including the color number, but often there are several shade options;
- visual selection of shades based on the painted car part and cards with shades in specialized stores (the least reliable selection option).
Nuances that help to select the right paint coating:
- the sample should be polished and the oxide layer removed so that the selection is based on the natural color without natural fading of the outer layer;
- based on the data from the identification plate, a suitable shade is selected;
- With the help of specialists in stores specializing in the sale of paints and varnishes, and a special program, a paint recipe with its volume and shades is displayed.
Reference. You cannot mix materials from different manufacturers due to their different composition, which can give an unpredictable result.
Car disassembly
At this stage, all parts that will interfere with painting are removed. For example, when painting the front fender, you should remove the protective fender liner and lighting fixtures (headlight and turn signal, moldings, if any).
When painting the entire body, you should remove windows, door handles, headlights, moldings and other elements. Pre-paint disassembly is a purely individual process, which depends on the make of the car, the part and the area of the surface being treated.
Puttying
At this stage, the body is leveled to its original shape.
The following materials are usually used for this:
- epoxy resin with fiberglass;
- fiberglass putty;
- soft or liquid putty.
Basically, restoring the original appearance of the body begins with the use of epoxy resin, with the exception of minor damage.
Before each stage of puttying, the area to be treated is dried (usually for an hour at positive temperatures), sanded with sandpaper of the required grain size, and the surface is degreased.
The work is carried out using rubber and metal spatulas with dimensions corresponding to the diameter of the damaged areas.
Reference. The thickness of each layer of putty should not exceed 5 mm. Thorough drying of the layers ensures reliable fixation, eliminating the appearance of subsidence, cracks or peeling. Addition of hardener and drying time must be carried out in accordance with the manufacturer's instructions.
Preparing the surface for putty
| Sanding before applying putty | Stripping to metal - circles P120, then smooth the border edges P220 |
| Shaping the putty | Sheets P120-P180 for grinding with dust extraction |
| Preparation for leveling soil | Wheels P220 – P280 – machine processing |
| Preparing a new panel for wet-on-wet primer | Wheels P320 – machine processing |
| Sanding before applying paint | Waterproof sanding paper P1000 – manual processing Dry sanding paper P320 – P500 – machine processing |
Improper preparation of the surface for putty can subsequently lead to defects in the paintwork such as contouring
. This can be avoided by following the following technology:
- Clean the degreased surface down to metal using P80 sanding paper;
- Smooth the edges of the repair area with a finer P180 abrasive.
Basic rules for applying putty
- Apply putty only to bare metal surfaces or epoxy primer.
- Observe the correct proportions when mixing with hardener (maximum 3% hardener) - otherwise, if there is an excess of hardener, molecules will remain that do not react with the putty.
- Mix very thoroughly with the hardener.
- Never sand the putty “wet”, because... it is hygroscopic.
- Application of primers.
Car wrapping
To protect the body from contact with substances used for priming and painting, it is necessary to protect the parts. To do this, use film, paper, and masking tape to block off everything that does not require painting.
Applying primer and matting it
After leveling the body parts, you should remove the gloss from the part using fine-grained sandpaper (No. 360), degrease the part and prepare a primer mixture according to the requirements of its manufacturer. It is recommended to apply the primer with a spray gun with the required nozzle diameter.
The first layer should be made very thin to avoid smudges. If necessary, you can apply an additional 1-2 layers and dry the car, usually one day is enough for this. After the soil has completely dried, it should be treated with an iron and sandpaper (No. 500,600) with water.
There are different types of soils:
- Fillers are used to final level the surface and ensure high-quality paint application.
- Anti-corrosion, used to protect metal body parts. If there are traces of rust, as well as after welding work, treatment with such a primer is mandatory.
- Epoxy, which form a protective layer, but do not have anti-corrosion characteristics. They are used to preserve the body and as insulation.
After the primer has dried, a mat should be applied to it, sanding it alternately - 260-480 for acrylic and 260-780 for metallic.
It is recommended to carry out matting with water, since in addition to increasing the processing speed, it reduces the consumption of sandpaper and air dust.
Re-pasting
At this stage, it is necessary to replace protective papers and films on parts that do not require painting, since elements left over from previous work may get onto it during paint application. Before painting, it is more convenient to protect the car with film.
Do-it-yourself car painting
From this moment you can start painting . The paint should be used according to the instructions - mix correctly with the solvent and achieve the desired thickness. Density is determined as follows: you need to lower a thin metal rod (1-2 millimeters thick) into the solution, and after lifting it, the liquid should drip at a speed of 3-4 drops per second.
The painting process begins with the roof of the car . It is necessary to paint in at least two or three layers. Between applying each layer, you need to wait about fifteen minutes to fix the previous one. There's no need to rush. It is important to remember that the depth of color will not be achieved immediately, but only from the second layer.
At room temperature, the car will dry for about one and a half to two days.
It is necessary to carry out painting work only with a respirator and gloves, and the room must be well ventilated. However, smoking indoors is strictly prohibited.
Coloring
Before applying paint, the surface to be treated should be degreased, for example by removing silicone. Paint must be applied using a paint gun in accordance with the manufacturer's instructions. The diameter of the spray gun nozzle should be 1.1-1.3 mm. In most cases, the paint coating is applied in 3-4 layers. If acrylic paint was used, then you can proceed to drying.
How many coats of paint should I apply?
Depending on the color of the car and the type of paint itself, the number of layers will vary. When using varnish and two-component paint, which is applied without varnish, 2-3 layers are usually applied with drying between layers.
Low coverage colors and metallic colors are usually applied in more layers.
First comes a thin binder layer, which provides a good base for subsequent layers and reduces the likelihood of smudges. It will be better if it remains a little sticky. It usually dries in 1-2 minutes. Thicker wet layers are then applied.
Recommended layer thickness of acrylic enamels and varnishes
To provide the coating with the necessary strength, anti-corrosion and decorative properties, almost all paint and varnish manufacturers recommend applying transparent varnish or acrylic enamel with a thickness of 50-70 micrometers .
During the spraying process, this thickness is gained in one and a half (for HS materials) or two (for MS) layers. An attempt to apply such a thickness in one pass risks the occurrence of two main paintwork defects: smudges or boiling and clouding of the varnish (we are not talking about single-layer UHS/VHS materials now).
Thus, one recommended layer of varnish on average should be approximately 30 micrometers. Then two layers - 60 microns - are just within the normal range. But three layers is already a lot - as much as 90 microns. What does this mean?
The dangers of exceeding the recommended layer thickness
And the fact is that horizontal surfaces can and will be able to survive such an excess, but the risk of varnish boiling on them also increases significantly. And boiling, as you know, is a tricky infection - it is also accompanied by a deterioration in shine. No matter how much you polish the varnish, it will still become dull after a while.
What do you want? The molecular chains were stitched together incorrectly, the hardness was lost, and without hardness there can be no talk of good gloss. This phenomenon most often occurs on cheap varnishes with low solids and a large amount of solvent in the composition.
In addition, the likelihood of sagging on horizontal areas (for example, along the perimeter of the hood) increases significantly. On vertical surfaces it’s even worse: due to excess thickness, the layer can shift over the entire plane, which will lead to smudges and/or a worse change in the texture of the coating after drying.
Well, don’t forget about interlayer aging. If there are more layers, we will spend extra time on the pause between them - the total repair time will increase. It’s even worse if we rush and apply an additional layer without sufficient exposure.
Why are the recommended intervals between layers needed? To allow volatile solvents to evaporate from the layer. An attempt to apply a subsequent layer with insufficient or no pause leads to the formation of a large number of tiny pores on the surface (that is, “boiling”).
This is a consequence of the intense release of a large amount of fast solvents remaining in the lower layer. At the same time, the coating loses its shine and becomes cloudy, and smudges may appear. The adhesive properties of the coating also deteriorate.
Finally, by applying an extra layer, we will spend more time on the overall drying of a coating of this thickness. And by taking longer to dry, the varnish will absorb more debris, which will cause unnecessary problems during polishing. There will be more solvent in a thick layer, which means its hardness will be lower. Well, was it worth the effort?
Varnishing
After the paint has completely dried, remove debris and dust from the surface to be treated using a sticky cloth.
The surface treated with metallic does not need to be degreased. The surface can be varnished 25-35 minutes after applying the final coat of paint.
The varnish coating should be applied based on the requirements in the manufacturer's instructions. Typically, a spray gun nozzle with a diameter of 1.35-1.5 mm is used.
Drying
After applying the final layer of varnish or paint (acrylic), it is necessary to thoroughly dry the treated surface. The usual drying time for the treated surface at positive temperatures occurs within a day.
Drying time can be reduced by adding quick hardeners to the paintwork or by increasing the external temperature. In this case, the body dries within 3-6 hours.
Maximum polymerization of paints and varnishes occurs within 7-14 days. Before this, the surface will be completely dry, but the strength parameters of the coating will be noticeably lower.
Interlayer drying
After applying each layer, you need to wait the required amount of time for the solvent to evaporate. If you wait too little time, the solvent will remain in the bottom layer of paint and after the top layer has dried, it will begin to come out, which will lead to the appearance of defects.
Manufacturers of paints and varnishes indicate the required drying time at a certain temperature. If the ambient temperature is lower or there is poor air circulation in the room, then the interlayer drying time must be increased.
Car assembly
After the paint and varnish coating has dried, it is necessary to very carefully return to its place all the parts removed before painting.
Polishing
Even when painting indoors, it is possible that dust and other unnecessary substances will get onto the freshly painted surface.
To remove such errors, you should manually rub the wet part with sandpaper No. 800, 1000, 1500 until the surface becomes matte and smoother.
Final polishing of surfaces is carried out using a special abrasive paste, after which you should apply a finishing polish to increase shine. It would not be superfluous to treat the body with a preservative polish to protect the paintwork from external factors and increase shine.
Reference. Polishing of the body must be carried out no earlier than 14 days after painting, after complete polymerization of the fresh coating.
Before painting your car yourself, you should calculate the cost of the work, including the purchase of materials and tools, and compare it with carrying out similar work from professionals.
In many cases, it is cheaper to entrust such important work to qualified painters, especially if straightening is required, since it requires many tools and devices, the purchase of which will cost a lot of money.
Enamel
A product such as enamel is distinguished by a variety of attractive shades, shine, resistance to weather conditions and a long service life.
When painting passenger car bodies with enamels, as a rule, the following is used:
- Synthetic;
- Melamine-alkyd;
- Nitrocellulose.
Drying painted products
The process of drying painted products is carried out naturally in special production facilities equipped for this purpose, and artificially - in special drying chambers. Intensification of the drying process can be carried out in various ways:
- hot air supply (convection drying);
- irradiation with infrared rays (thermoradiation drying)
- and etc.
In farm workshops, mobile infrared drying units USPO-1 or “Kvant” should be used for drying paint coatings.
Primer
Preparation for painting a car at home ends at the stage of priming the body. Some car enthusiasts skip this stage of preparation for painting work. And it’s completely in vain: neglecting this procedure will significantly shorten the service life of the new paint. The primer creates good adhesion for the paint. In addition, it exposes defects in the putty that were not noticeable. It's not too late to fix them.
The choice of primers is quite large. Recently, acrylic primers have become popular; they provide good protection against corrosion.
So, using a compressor or spray gun, a liquid primer is applied, usually in two layers. Next, sanding again. And again, checking the quality of the putty: a so-called developing layer (enamel diluted with a solvent) is applied to the primed surfaces, which will show pores and irregularities on the treated surface. We fix everything, sand it until smooth, so that you don’t feel the transition from the painted surface to the putty surface.