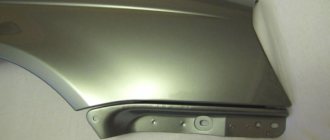
People love not only to look, but also to touch. It is because of this that the front panel of the car - the dashboard - becomes a victim of gentle and not so gentle touches. It loses its luster not only because of frequent “stroking”, few people stand on ceremony with it and carefully put their things there, more often they throw it away.
And after this, the objects do not end their destructive effect; they continue to crawl unsecured along the soft surface of the panel, causing even more damage to it.
Let us reassure you, you don’t have to buy a new torpedo; sometimes it’s enough to properly paint it. How and with what, let's see below.
About tools and materials
Before starting work, you will first need to find out what material the front panel of the machine was made of. It is worth noting that in the vast majority of cases, these are different types of plastic. So, open the technical passport of your car and find the information you are interested in. It will be necessary in order to choose the right coloring composition.
- The simplest and most economical of them is to use a concentrated solution of laundry soap.
- The second method is to use white spirit or another solvent.
- The third way is to purchase sponges or wipes for removing dirt, soaked in special substances.
A small removable element of a car is best repainted using an aerosol can. Having decided what to paint the torpedo with (usually an acrylic or rubber composition), as well as the color of the paint, purchase one or two 150 ml containers.
This will be enough for you. For high-quality sanding of a part, you will need five types of sandpaper, with grit: P100, P200, P450, P650 and P1000. Or you can use a small sander. To prime the surface of the front panel, you will need a special composition in an aerosol can designed for plastic. It contains a plasticizer. Also purchase varnish in a can.
How to paint a car dashboard? Step-by-step tips + useful review »
How to paint a car dashboard? Step-by-step tips + useful review
It is in plain sight in the car interior. Both the driver and passengers quite often have physical contact with the torpedo. As a result, the paintwork (or other) coating of the spare part fails, and unpleasant roughness and scratches appear. Sometimes the cause of such flaws can be unsuccessfully thrown objects, snags from metal parts of gadgets, pens, or keys.
How to paint a car dashboard
, if all sorts of similar defects are observed on this spare part? After all, you must admit, it looks, at least, ugly! The matter can be improved by purchasing a new torpedo. But, firstly, for older models of cars that have already been discontinued, it can be really difficult to find this spare part. And secondly, it will cost you a pretty penny. Well, and thirdly, why spend extra money when you can correct the situation on your own and paint the dashboard yourself!
Before you start painting work, it is important to find out what material the part on your car is made of. Therefore, any painting should begin with studying the material
Since different types of plastics consist of components that are different in structure, and, as a result, have excellent properties. The first thing that comes to mind is to look into those. machine passport. But this is if it has been preserved. After all, used cars are often bought without it.
Firstly, you will need primer and putty to seal the scratches and then sand them. Today, the auto cosmetics market offers a fairly wide selection of primers, both those that dry instantly and those that require some time for this process. The primer must not come into chemical conflict with the base material of the torpedo. As for the rest, the choice of the manufacturer’s brand is yours (if you are not quite sure, you can additionally consult with a specialist selling you the product or on the Internet).
Of course, you will need the right paint. The conditions are the same as when selecting a primer. Addition: so that it doesn’t bubble, doesn’t peel off (in light of this, don’t skimp on it too much). Also, choose a color suitable for the overall tone of the interior trim. You can order a lighter tone - this way, according to experts, your eyes will be less tired on long journeys.
For the final coating you will need a varnish (urethane and two-component). Especially, it can be used for surfaces that often come into contact with parts of the body. This can significantly extend the life of the paint itself.
Sandpaper (coarse and fine), sanding machine for large jobs.
Spray gun or compressor. At worst, you can use a vacuum cleaner equipped with a special attachment. No, well, you can still try to paint with a brush. But, most likely, it won’t work out so evenly and well. Stripes and bumps may appear, but do you need this?
That, prepared for painting. Otherwise, the coating, applied again, can easily peel off after some time. You can degrease the surface with either an ordinary soap solution or special means (for example, napkins). Here the choice is yours - according to your budget and to your liking.
- We dismantle the dashboard. This must be done as carefully as possible, especially on older cars. We disconnect everything and remember how it was - it will be useful during assembly;
Wash the spare part thoroughly;
Wipe dry and remove fat;
We carefully sand large scratches and cuts. We remove dust generated during work;
We produce a primer (spraying in thin layers). There should be at least three layers (let each dry for 15 minutes;
After the primer has completely dried, apply paint (also in several layers, allowing it to dry). We check hard-to-reach places;
We open it with varnish and let it dry for quite a long time.
Do-it-yourself painting of plastic car interior parts
The fresh look of an old plastic car interior part is the result of not only painstaking work on applying restoration products. This is, first of all, their correct selection. Look at the pictures of a bad painting experience, when the owner simply applied paint to one of the interior elements, and it immediately crumpled up. And yet, negative experiences should not discourage you from painting yourself. After all, doing this is no more difficult than removing scratches from windshield wipers from a car window with your own hands. The Autostadt.su team offers to get acquainted with all the intricacies of the technology of painting plastic elements, and analyze the main mistakes that beginners encounter.
Additional recommendations
To create a dense and uniform coating, you must use only high-quality inks. Experts recommend buying products in small bottles with a sprayer. This will reduce the consumption of the substance. Work should be performed with gloves and closed clothing to avoid contact of the product with exposed skin.
Restoration of interior plastic
Important! The optimal distance to the surface during spraying is 25-30 cm. Compliance with this rule will prevent the appearance of streaks.
Results of do-it-yourself interior plastic restoration
It is not difficult to use restorative products, so if you want to improve the condition of your car’s interior, then you don’t have to go to a car service center and overpay. You just need to choose an effective remedy, trying not to save too much, and also allocate some free time. And you're done! The salon looks like new again!
Applying paint
To paint the panel you will need appropriate paint in pressure cans. For high-quality coverage, two standard-sized cylinders will be enough. The paint is applied in several passes. First, the first layer is applied - it should be thin and sprayed from a greater distance. After applying it, you will be able to clearly see all the defective areas that were missed during sanding and priming. If there are any, then they are processed again either with an abrasive or a primer.
The second and third layers are applied more thickly from a standard distance. At the same time, you need to keep an eye on it. So that the paint does not leak and lies on the surface of the panel in an even layer. After this, the panel is left for some time to crystallize the applied coating. Existing defects are immediately removed and repainted.
Varnishing
If you decide to get a glossy effect, then the panel is additionally varnished. This is painfully easy to do. It is better to choose the varnish of the same brand as the paint and primer. This will provide more guarantees that the materials will not conflict with each other and will provide reliable coverage.
Varnishing takes place in two steps. First, apply the 1st layer with a small spray. The final one is applied more thickly, on the verge of drip.
Since the varnish is transparent, special attention should be paid to inspecting the treated surfaces. Here it’s not at all difficult to not see smudges or missing areas with individual lighting
Plastic restoration products
You can restore the interior plastic using degraders. These are special products for restoring plastic elements. Below are the most effective blackeners from different manufacturers.
Plastic restoration products
Table. Review of plastic restoration products.
| Product name, photo | Description |
| DoctorWax | An excellent ink designed to restore not only plastic interior elements, but also the car body. DoctorWax can be applied to paintwork. |
| Sonax | German restorer for rubber and plastic surfaces from a German manufacturer. Sonax also has a glossy effect. |
| Runway | Polish in the form of milk from the famous American manufacturer NOWAX. The product is very easy to use. It is enough to spray it on the surface to be restored and treat it with microfiber. |
| Meguiar's | Another representative of the American market. Meguiar's can be used for restoration of plastic and rubber. The product is also effective in restoring vinyl. |
| QuickWax | Black polymer for plastic restoration. In addition to the blackening effect, QuickWax is also able to protect the surface from moisture. |
On a note! The average cost of a reducing agent in a 500 ml container is 600-750 rubles. But if you buy 330 ml, the price will be lower - within 300 rubles.
Painting sequence
The dashboard of a car can be painted by dismantling it or without interfering with the structure. Let's look at the sequence of painting the panel without the need to disassemble the entire dashboard.
Cover with tape all small parts that you do not plan to expose to paint. You can use masking tape or other suitable material. It doesn't hurt to think about the windshield, as well as the ceiling, because splashes and drops of paint can fly in all directions, depending on your accuracy; Next, degrease the surface you will paint. You need to apply the solvent to a suitable cloth or sponge, and then wipe the plastic of the panel. Wait a bit until the surface dries; After the acetone has dried, apply primer to the panel. Do not apply paint without first taking care of the primer, otherwise you will not get the desired result; Make a strong decision about the color before you paint the panel in your car. Changing it in the future will be more difficult than before painting. Classic black matte paint is well suited for a car of the same color
But if the car is not dark, pay attention to light colors: pale blue, light purple or light green tones. This will be even more interesting for a girl who is a car enthusiast; Paint the panel according to the instructions written on the paint package; If you haven't thought about how to polish a panel in your car, it's better to do it right now
After you apply paint to the dashboard, painting the panel is not yet complete. Wait three days until everything is dry, and then carefully treat the surface with a soft cloth to add shine.
Also, if you are using regular paint, coat it with varnish on top.
The described method is suitable for people who are not very knowledgeable about cars, but have enough self-control and steady hands to apply paint directly inside the car.
car interior with panel
If this doesn't work for you, you'll have to remove the dash in order to paint the dashboard without any problems. Here's the sequence:
- Place the car on a flat surface and turn on the handbrake;
- After opening the hood, remove the negative terminal from the battery: this will prevent accidental short circuit;
- Remove the dashboard plugs and decorative elements;
- Find the screws that hold the panel in place and remove them;
- In accordance with the instructions that came with the car, remove the steering wheel;
- After removing the steering wheel, turn the dashboard towards you: the dashboard in the car, in addition to the screws, is also held in place by wires that transmit readings to the sensors. Carefully disconnect these wires and remove the panel completely;
- As in the situation when the instrument panel paint was applied in the interior, wash the part, dry it and apply a coat of solvent. To be sure, it is also better to go over the panel with very fine sandpaper to remove minor defects and make the dashboard smooth;
- Car dashboard paint usually dries completely in three days. After this period, apply the varnish, wait until it dries, and return the instrument panel back to the car. If necessary, use the assembly instructions.
When you ask yourself what to paint your car dashboard with, you are faced with a wide range of colors to choose from. Many people would like to paint it in the color that is now in fashion. Well, it should be noted that many people tend to choose anthracite color for the instrument panel.
Previously, they were painted silver, but now there is no such trend. Titanium-look paint for car panels is popular, but it requires the application of varnish. Treat the surfaces well with varnish, especially those that will often come into contact with your hands, because the paint may remain on the skin.
https://www.youtube.com/watch?v=scXws-BMdaA
In general, when painting, try not to overdo it with colors. Everything should look restrained, neat, but not colorful or vulgar. Before you pick up a spray gun, read a couple of articles about design, see how others paint toolbars. And then you will be able to handle even such a difficult task, at first glance.
Next article: Do-it-yourself local car painting. Previous article: DIY spray booth, video and photo.
Do you want to know everything about car painting? Read more useful articles:
- We put stickers on the car. They are so different.
- Camera for painting cars price. This thing is expensive.
- Powder painting. All technology.
Dismantling and preparing the dashboard
Before painting, the torpedo must be dismantled. If the employee has not performed this work before, he is advised to review the technical manual for the dashboard. It shows where the fasteners are located because they are usually hidden. If a worker does not find at least one hidden part and tries to forcefully rip out the panel, he may irreparably damage it.
After studying the manual, the worker first dismantles the steering wheel and switches, if the design provides for this possibility. Next, remove the instrument unit and disconnect it from the electrical wiring. Removes plugs under which fasteners are hidden. Then he unscrews the parts themselves and carefully lays them out. At the last stage, he separates the torpedo and pulls it out of the car through the driver's door.
Expert opinion
Zakharova Irina Yurievna
Cleaning professional with 15 years of experience. Our best expert.
Ask a Question
It is important to mark the parts that have been removed and laid out so that they can be reattached correctly later. It would be a good idea for an inexperienced worker to take photographs of the stages of work in order to use the photos as clues.
The dismantled torpedo must be thoroughly washed with detergent and dirt and dust deposits must be removed. Next, remove scratches and other minor defects that have formed during use. Abrasive sandpapers are used for grinding: first coarse-grained, then medium-grained, and finally fine-grained.
Large cracks found must be sealed. After sanding, all that remains is to brush off the dust and degrease the surface of the panel using a degreaser that does not corrode the plastic.
Painting
You can paint the torpedo using special paints for plastic or coloring compounds for car bodies. The paint is sprayed using a spray gun from a distance of 20 cm from the surface of the part. Restoring a car dashboard with paints in aerosol cans is rarely done, since they cannot be used to achieve uniform coloring. Such compositions are usually used for touch-up of individual panel elements.
Painting is carried out in a ventilated area, protected from dust and direct sunlight. The paint is applied in three layers:
The dashboard can be matte or glossy. Experts advise not to open the dashboard with varnish, as the glare of light creates an additional load on the driver’s vision and distracts him from the road.
If you want the surface of the devices to be shiny, varnish it. The varnish is applied in 2 layers, 20 minutes after painting. For plastic parts in contact with the hands of the driver and passengers, two-component polyurethane varnishes are suitable
They form a smooth, glossy surface, but do not leave fingerprints on them, which is important for a part that often comes into contact with the hands of the driver and passengers.
It takes several days for the dashboard to completely dry. After this time, it is inspected, defects that appeared during painting are eliminated and installed in the salon.
Popular colors
Designers advise painting the dashboard in the same color as the interior, choosing a slightly lighter shade. This reduces the strain on the driver's eyes. To make the interior of the cabin original, you can use one of the current colors: anthracite (charcoal color with a dusty effect) or titanium (golden hue with matte or dazzling glossy effects).
Repairing a car dashboard using “liquid rubber” paint is popular. When dry, this composition forms a smooth, rich matte surface, pleasant to the touch and resistant to negative influences.
Restoring a torpedo after an accident or in case of loss of appearance during long-term use can be done with your own hands. The most popular methods of restoring this part are painting, vinyl wrapping, or reupholstering the dashboard yourself.
Applying paint
To paint the panel you will need appropriate paint in pressure cans. For high-quality coverage, two standard-sized cylinders will be enough. The paint is applied in several passes. First, the first layer is applied - it should be thin and sprayed from a greater distance. After applying it, you will be able to clearly see all the defective areas that were missed during sanding and priming. If there are any, then they are processed again either with an abrasive or a primer.
The second and third layers are applied more thickly from a standard distance. At the same time, you need to keep an eye on it. So that the paint does not leak and lies on the surface of the panel in an even layer. After this, the panel is left for some time to crystallize the applied coating. Existing defects are immediately removed and repainted.
How to paint car interior plastic
- Sand it.
- Degrease.
- Find out whether it needs to be primed or not.
- Restore texture if necessary.
- Paint it the desired color.
How to sand
To matt interior plastic under primer, red Scotch-Brite is usually sufficient. It is a felt-based abrasive material, similar to the hard side of a dish sponge. The advantage over fine-grained sandpaper is its softness, which allows this tool to efficiently process various bends and indentations.
How to degrease
Experienced painters advise using only anti-silicone. The fact is that classic solvents in the form of white spirit or solvent can ruin a plastic unit. For example, after using organic matter, stains form that are difficult to hide even with painting. By the way, we have already recommended abandoning white spirit when performing the technology that describes how to remove tar from a car body without damaging the paint.
Do you need primer on plastic or not?
The reason for fresh paint clumping and peeling is that no primer was applied first. This is a composition with a special formula of various additives and plasticizers, which improves the adhesion of paint to the surface. However, not all plastics require primer treatment. To determine whether to prime the interior plastic or not, you need to conduct two experiments:
- Set fire to a piece of the product being processed.
- Immerse the part in water.
It is important to choose the soil wisely. So ordinary automotive compounds are not suitable - the paint peels off instantly
You need a special primer designed specifically for plastic.
When is structural paint needed?
If you have ever touched a black plastic bumper or a dark side mirror housing on an inexpensive car, you probably felt that the tactile surface seemed to be covered with small pimples. The matte rough effect is structural plastic. The paint in question recreates this same effect and is typically used to cover up scuffs and light scratches.
What about the paint itself?
First decide what kind of coverage you want to get. Here are some examples:
- Soft-Touch. Usually used for dashboards. The surface is slightly silky and rubberized. This coating is applied to the panel from the factory.
- Normal, rough. Apply to hard plastic. For example, the side parts of the center console, lower trims on door cards or handles for closing doors.
- Glossy. Used for finishing interior levers intended for opening the door.
Then find out for yourself which shade to choose. If you plan to paint the interior exclusively in a restoration manner, then take the trouble to find a company catalog with the distribution of interior and exterior colors by VIN numbers. The original paint, selected according to the factory catalog (for example, for VW it is ETKA), will preserve the monotony of the overall picture of the interior. This will be because there will be no noticeable difference between the painted and unpainted parts.
For your information. For restoration work, it is better to order original paint and only from the car manufacturer.
If we talk in terms of the examples given, then it is better to purchase the Soft-Touch aerosol can through the official line. To get a regular rough layer, it is enough to use classic paint paired with structural paint. Here are examples for common shades:
- Black. The VAZ black Cosmos (code 665) will do.
- Grey. The VAZ decorative (graphite) intended for bumpers fits perfectly.
However, the color and origin of the paint are purely individual things and are selected solely according to one’s own preferences. Continuing the conversation about rough coatings, it is appropriate to mention the well-known RAPTOR U-POL, a protective coating for the exterior of a car, and its similarity - HB BODY.
We recommend painting plastic parts of the car interior only with a spray can. When applying enamel with a brush, there is a risk of drips. In addition, such a layer takes much longer to dry, which means that the likelihood of catching dust particles is much higher.
Liquid vinyl treatment
Liquid vinyl is a modern product that is successfully used for painting car parts. A thin layer of this coating decorates and protects many suitable surfaces well. This is a high-tech product of excellent quality. Treatment with liquid vinyl will increase the resistance of the panel to the influence of bright rays of the Sun, ice, frost or other harmful compounds. The beauty of this substance is that after prolonged use it comes off easily. And this fact does not reduce its strength qualities.
Painting with liquid vinyl is a simple and understandable procedure for everyone. The processed part will become matte and clean. Liquid vinyl is usually sold in cans. Before use, you need to shake it, it is advisable to do this for at least a minute. The paint and solvent must mix well. Do not touch liquid vinyl until it is completely dry. Otherwise there will be stains.
The process takes place in several stages. The initial level is connecting. They try to make it translucent. This makes it possible to bond the paint to subsequent levels. The first layer will dry for about 30 minutes, this time must be maintained. The number of layers applied depends on you. The more there are, the more durable the coating will be. The recommended quantity is five. Distance from the can to the torpedo: 7 - 9 centimeters. If you did not dismantle the torpedo and sealed parts that were not to be painted, remove the tape and protective material immediately after painting, before the vinyl hardens. The complete drying time for vinyl is 3.5 hours. All this time it is necessary to protect the drying surface from dust and other bodies.
Restoring the appearance of the front panel of a car with your own hands
Now we have come to the final stage of our work - painting the car dashboard. This process is also mentally divided into several parts:
- Applying a base layer of paint (another name for enamel is developing). She will point out to you the mistakes that were made earlier. If something is discovered, feel free to repeat the previous steps and prime again.
- Applying the second coat - after waiting fifteen minutes, spray the second coat of paint evenly. If this is not enough - the third one. Do not forget to clean the surface every time with napkins from dust that has settled during the repair process.
- Varnishing – this stage is similar to painting a panel. Usually two layers of varnish are enough to achieve the result.
Then just leave the dashboard to sit for several days in a clean room until it dries completely. After this, carefully polish any smudges found, if any. That's it, the front panel can be returned back to the car.
Preparatory work before painting yourself
1. The first stage is to remove the front panel from the car. It is highly recommended not to carry out work directly in the salon. It is possible that you will stain other decorative elements and also saturate them with an unpleasant chemical smell that will not disappear for at least another six months. By the way, working in such conditions is not very convenient.2. The second stage is removing the steering wheel and decorative elements. At this step, you need to carefully remove the parts, find the screws and remove them. Automotive plastic does not tolerate neglect; with sudden movements, the clip-latches can break. Remember that all work must be performed at a positive temperature, preferably indoors.3. After freeing the panel from excess elements, it is time for the third stage - cleaning and degreasing. To do this, use a water solution of laundry soap, thoroughly treat the surface, then rinse with water and dry. Next, start degreasing it, which - see above.4. One of the key points is cleaning the panel. The appearance of the dashboard will directly depend on how you do this. Don't rush, spend enough time on each area, otherwise, after painting you will notice unevenness and obvious stripes. To carry out the work, sanding paper is used: from the coarsest to the finest.5. The fifth stage is priming the surface. Here, as was said in the previous paragraph, haste is unacceptable. Carefully spray the first coat of primer in a minimal layer, wait a little (15 - 20 minutes) and apply the second coat.6. Final degreasing before painting.
Price
The pricing policy for car panel painting is determined based on a number of indicators. The cost of paint, the complexity of the work, possible repairs during painting work, and the responsibility when painting luxury cars are taken into account. In monetary terms, everything starts from 1500 rubles and above. If there is competition, there is not much difference - a provincial town or a metropolitan car service center.
Most often, inside a car, its owner and passengers come into contact with the front panel - the dashboard. People simply call it a torpedo. Due to extreme operating conditions, it loses its aesthetic appearance over time. The causes of defects, in this case, are usually various kinds of objects carelessly thrown onto the panel; they damage its surface when the car moves. Painting the torpedo will help you get rid of all the bumps and scratches on this element.
Tips for painting a torpedo
For beginners, choosing the right paint for a torpedo seems quite difficult. It’s not worth saving on paint and varnish material, because a poor-quality coating can peel off or bubble. When buying paint in spray cans, you should immediately purchase a couple of packages so that the product does not run out at the wrong time.
When choosing a shade, you need to take into account that a dark tone will be more difficult to paint over later. Experts advise making the panel a little lighter than the interior trim - this way your eyes will be less tired during a long drive. You should not decorate the panel too brightly, because it will look provocative.
The use of special automotive paint will allow you to update an important element of the car with your own hands. With strict adherence to technology and accuracy, the torpedo will look stylish and modern without extra costs.
How to update the appearance of your car's dashboard?
- The first method is to paint the car panel. This is one of the most common and simplest methods. But, despite the fact that it is the most common, it is fraught with a lot of complex nuances that should definitely be known and taken into account. First of all, this is due to the fact that the surface of the dashboard cannot be called absolutely hard and this introduces some difficulties into the process called painting the car panel. To be completely honest, paint often doesn’t look as chic as we would like. But this type of interior renovation can always be done in such a way that it will be very worthy.
- The second method is covering with vinyl film. This method has not yet gained as much popularity as the previous one, but it should not be discounted. As for the films themselves, they are quite diverse. They come in matte, glossy and carbon-fibre finishes. You can choose any color according to your taste and color that harmonizes with the interior trim and the car itself. This method has both its advantages and disadvantages.
The advantages of this method include:
- application of the film as a single whole surface;
- excellent appearance;
- durable in use;
- unpretentious in care.
The disadvantages include the difficulty of applying the film. This is due to the fact that some torpedoes are made of plastic, which does not adhere to the film, so it is impossible to cover it.
- 3. The third method is covering with leather or leatherette. This method is the most expensive compared to such a method as painting a car panel, but, at the same time, the most luxurious. You will need to try very hard to implement this option, but the result will exceed all your expectations. It will be truly amazing.
- 4. The fourth method is flocking. The good thing about this method is that it is inexpensive. The quality of the coating is quite good and will delight you with its aesthetic appeal for many years.
Methods for restoring the dashboard
Self-recovery of a torpedo is carried out in one of three ways:
- Painting a torpedo with your own hands.
- You can cover the car dashboard with polyvinyl chloride film. The advantages of vinyl finishing include a wide selection of textures and colors of PVC films, their wear resistance and strength. The disadvantage of this method is that not all polymers that are used to make dashboards form good adhesion to polyvinyl chloride, so after some time the film peels off from the surface.
Disassembling the machine panel
Reupholstering the instrument panel with leather is an expensive finishing method. Leather (natural or artificial) is a durable, wear-resistant material that makes the interior luxurious. Reupholstering a torpedo with your own hands requires experience from the performer, since working with leather has many nuances. In order not to spoil expensive material, it is better to entrust this robot to an experienced craftsman.
A popular way to independently restore the appearance is to paint the dashboard, so let’s look at it in more detail.
Torpedo restoration options
We can briefly consider the available methods for restoring a car dashboard. These include the following methods:
- paint with acrylic enamel and varnish;
- matte enamel painting;
- paint with a rubber-containing compound;
- pasting with vinyl film;
- finishing with leather or its substitute.
As mentioned above, the easiest and cheapest way to return a decent appearance to a torpedo with your own hands is painting and applying a layer of varnish. Some people prefer matte enamels, since deep gloss can cause glare from the sun and interfere with driving. It all depends on the shape of the torpedo and the taste of the owner of the car. In most cases, preference is given to a glossy surface.
Instructions for painting plastic in a car
The plastic element of the car that requires painting can be new or dismantled old. We recommend an article about painting a car dashboard. Moreover, the painting procedure will be different depending on whether this element is primed. First, it’s worth presenting the stages of painting a part without a primer layer.
Working with plastic without primer
Before you begin painting, the surface must be prepared. The stages will be as follows:
- Washing. For work you will need: a container of hot water, car shampoo and a brush (an alternative is a sponge, rag). Washing is necessary in order to get rid of the lubricant that is used to separate the finished part from the mold.
- Evaporation. It involves heating the part in a chamber for half an hour at a temperature of 60 °C, followed by degreasing the surface. It is difficult to carry out such a procedure in a garage, so it is better to immediately purchase primed plastic elements of the car. You can skip the evaporation procedure.
- Degreasing. Involves the use of branded products that also provide an antistatic effect. The part with the static charge removed is less likely to adhere to adhesion-reducing dust. White spirit is also used for degreasing.
- Grinding. The abrasive materials used are P300-P400 sandpaper, red or gray Scotch-Brite (for hard and soft plastic, respectively). Plastic can be sanded dry or using water (“wet” sanding). After treatment, the surface must be degreased again.
- Padding. A responsible procedure that solves the adhesion problem. Plastic primer (primer) is used for initial processing of the material. It should be applied in a thin layer, for which it is better to use an aerosol can. An important nuance is that the treated surface retains good adhesion for 15-20 minutes. Therefore, painting should begin without delay.
Primer for plastic
Technology when working with a primed part
Before painting, it is necessary to evaluate the quality of the primer applied to the plastic. To do this, apply a cloth soaked in solvent to the surface for two minutes. A softened coating is a sign of a poor primer, which must be removed with fine-grained sandpaper or Scotch-Brite before painting. If the coating remains unchanged, then the process looks like this: degreasing, matting, re-degreasing, painting. Damaged primed surfaces are sanded, puttied (putties for plastic are used), sanded again, then primed. The roughness of the abrasive for processing should not exceed P180.
Surface cleaning
Staining procedure
When the surface is completely prepared for painting, the most critical stage begins. Mistakes will negate all previous steps (paint drips, for example, will not make the part aesthetically pleasing). At home, using a spray gun is not always convenient, so it is better to use spray cans or an ordinary brush. The room in which work is carried out must be ventilated. Paint for plastic is applied in an even, thin layer so that no drips form. The surface needs to be treated with 2-3 layers. The interval does not exceed 25 minutes. When spraying paintwork from a can, the distance to the part should be 20-30 cm. The varnish gives the surface a glossy tint and enhances protection from subsequent exposure
Upon completion of the work, the part is left to dry naturally. When using acrylic paints on plastic for cars, it is important to add a plasticizer to the composition. Without it, the coating will not cope with the bending load and will become cracked.
Add a plasticizer in accordance with the manufacturer's instructions. The drying time of paint with additives increases. Adhesion reaches normal levels after a few days. It is better not to pressure wash painted plastic for a month.
Parts dry after painting
How to paint interior plastic without the paint peeling off
Let's start by analyzing the main mistake: why does the enamel layer peel off?
The reason is that the material has nothing to cling to, that is, weak adhesion of the paint layer to the primer or plastic. The fact is that before applying any type of paintwork on the surface to be treated, it is necessary to create small grooves and scratches, that is, grind. This improves the adhesion of the new coating to the base, making it durable and resistant to peeling. What else is sanding useful for? During treatment with Scotch Brite, stubborn dirt that is difficult to remove with anti-silicone is removed.
Hard plastic painting technology
We have already outlined the main stages of restoration work in the selection of materials. Now let's look at the technical part of each operation.
- Sand it. According to painting terminology, this transition would be correctly called matting. The bottom line is that you need to moisten red Bright tape in anti-silicone and rub it on the plastic part.
- Degrease. Soak a cloth in anti-silicone and walk over the treated surface.
- Prime. Apply 3-4 layers of special primer for plastic and wait until it dries.
- Sand it. Treat the primed surface with Scotch Brite.
- Paint it. Apply 2-3 layers of paint of the desired color. If there is a need to restore the structure, then structural enamel is applied before the main painting. The places where it is sprayed are determined by location: this is either the entire surface of the part, or some of its sections. If the goal is to obtain a varnished surface, then 20-30 minutes after receiving the painted coating, apply varnish in 1-2 layers.
When painting interior plastic, follow the well-known rules for working with aerosol cans:
- Place the part in a closed room with an exhaust hood to prevent dust from entering the processing area.
- Cover untreated surfaces with newspaper, cardboard or thick fabric, securing it around the perimeter with masking tape.
- Shake the can for 1 minute to obtain an even layer.
- Try spraying paint on some cardboard. Check the color match and prepare the can to spray evenly.
- Apply paint/primer to the surface with quick but smooth and non-stop longitudinal movements. Drying time between layers at a temperature of +25°C averages 20-30 minutes. Complete polymerization occurs after 24 hours. When painting, shake the can periodically.
- Turn the can over and press the button. This is relevant if there is paint left in the container. This is done to ensure that the material does not freeze in the sprayer.
Working with Soft-Touch coating
We have already noted that the above painting technique is relevant for hard interior plastic. Plastic with a soft coating, such as dashboards or door cards, requires special treatment:
- The old soft-touch layer must be completely removed. If this is not done, the new paint will peel off again. To easily remove the coating, the part should be soaked in 646 solvent.
- When using original Soft-Touch paints, plastic is usually not primed, and one layer of coating is enough to successfully close the issue of restoring interior elements.
Preparation for restoration work
Before starting work, it is advisable to acquire all the necessary materials and accessories. After all, the car will be disassembled, and it will be very difficult to quickly go to the store for the missing piece of sandpaper. To paint a car dashboard, you need to prepare the following materials:
- means for degreasing the surface before painting;
- detergent for cleaning the car dashboard from dirt and dust deposits;
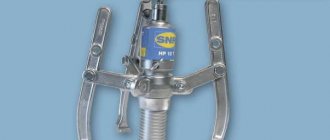
- tools for dismantling the panel;
- sandpaper of different grits from P500 to P2000;
- special primer for plastic parts;
- paint of the desired color;
- varnish;
- abrasive polish for working with a layer of varnish.
Additionally, you should take care of the room in which the car dashboard will be painted, where there should be no dust or large drafts. A normal temperature regime is also required, which is indicated on cans of paint and varnish. It would be a good idea to ensure uniform lighting, so as not to be upset later by defects discovered when leaving the garage.
Torpedo dismantling
Painting begins with dismantling the torpedo. If this procedure is being done for the first time, then it would be a good idea to first read the instruction manual for the specific model. This is necessary in order to find out the locations of fasteners, which in most cases are carefully masked. There were many cases when, due to one fastening, a torpedo was dismantled by force, resulting in irreparable damage.
When the location of the fasteners has been studied, the steering wheel and all switches on the panel are dismantled, if their design allows it. Next, the instrument panel is removed and disconnected from the wiring. After removing all the plugs hiding the panel fastenings, they are turned out and neatly folded with marks. When everything is ready, the torpedo is removed from the latches and removed from the cabin through the front passenger door.
When dismantling the panel, it is very important to mark the removed fasteners so that there are no unnecessary parts later. Some people practice taking step-by-step photographs of the dismantling process, so that in case of hiccups there are basic clues.
You need to be especially careful with the plugs and branded torpedo mounts, since if they are lost or damaged, they can be very difficult to get.
So that there is no problem of choice
When choosing paint for repainting the interior, you need to focus on the following parameters:
Chemical composition. It is best, of course, to use acrylic compounds
It doesn’t matter in what form this car paint is made - cream or paste, or in spray cans. Such compositions will not only be cheaper, but also safer, since when heated (especially in the summer), acrylic materials do not emit odors and do not evaporate harmful toxins. Consistency. If painting time is of fundamental importance to you, it is recommended to use aerosol cans
The surface repainted with their help dries completely within 1-2 hours after the end of the procedure, while pastes and creams require longer drying - at least 12 hours
If painting time is of fundamental importance to you, it is recommended to use aerosol cans. The surface repainted with their help dries completely within 1-2 hours after the end of the procedure, while pastes and creams require longer drying - at least 12 hours.
Color scheme You need to pay attention to this parameter if you are painting only certain parts of the car’s interior - steering wheel upholstery, dashboard surface, panels, etc. An incorrect selection of colors will lead to a completely predictable result - the old car paint will not “make friends” with the new one, and they will contrast against each other. If you decide to repaint the entire interior, or want to redecorate it in a “sporty” style, choose a color scheme will depend only on your own tastes
For example, for painting the seats you can use yellow (as in sports cars), for the steering wheel - black, white or red, and for other parts made of leather and plastic - absolutely any color (up to blue or even pink - if the car is driven by a woman ).
Masking plastic defects with carbon paper
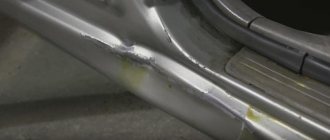
Step 1. During use, such scratches appear on the car doors. They are especially active on budget car models, where manufacturers use hard plastic.
Scratches on the door plastic
Step 2. Prepare several sheets of tracing paper and rubber gloves for work. Gloves are necessary because tracing paper can get dirty.
Tracing paper for plastic restoration
On a note! Before work, be sure to clean the surface of the plastic. To do this, you can use a soap or foam solution.
Step 3. Place a sheet of carbon paper on the surface to be treated and begin to intensively press the plastic.
Rubbing plastic with carbon paper
Step 4. Rub surfaces in different directions. As work progresses, small scratches become less noticeable.
Changes after a few seconds of work
Step 5. Treat all problem areas on the plastic surface. If necessary, take a new sheet of carbon paper.
Treatment of problem areas
Step 6. The plastic has been restored and is not much different in appearance from new. One door requires 5 to 10 minutes of time.
Plastic restored using tracing paper