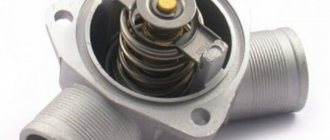
The VAZ 2106 thermostat is a device whose main task is to control the normal temperature regime of the internal combustion engine. Used with a liquid cooling system. When the engine is cold, the engine cooling liquid does not circulate through the heat removal lines. When the engine reaches 95 °C, the thermostat allows coolant to circulate. Thanks to this temperature regulator, the car's power plant warms up much faster, which allows you to extend the service life of parts of the crank and gas distribution mechanisms, as well as elements of the cylinder-piston group.
Purpose of the thermostat on the VAZ 2106
The thermostat must control the degree of heating of the coolant and react in a timely manner when the antifreeze temperature becomes too high or, conversely, too low.
The device can direct coolant through either a small or large cooling circle, thereby preventing the engine from overheating, or, conversely, helping it quickly warm up after a long period of inactivity. All this makes the thermostat the most important element of the VAZ 2106 cooling system.
Thermostat location
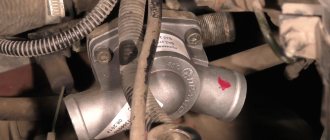
The thermostat in the VAZ 2106 is located to the right of the engine, where the pipes for discharging coolant from the main radiator are located. To see the thermostat, simply open the hood of the car. The convenient location of this part is a big plus when it becomes necessary to replace it.
Principle of operation
As mentioned above, the main task of the thermostat is to maintain the engine temperature within specified limits. When the engine needs to warm up, the thermostat blocks the main radiator until the engine reaches the optimal temperature. This simple measure can significantly extend the life of the engine and reduce wear on its components. The thermostat has a master valve. When the coolant reaches a temperature of 70 °C, the valve opens (it should be noted here that the opening temperature of the main valve can be higher - up to 90 °C, and this depends both on the design of the thermostat and on the thermal filler that is in it used).
The second important element of the thermostat is a special compression cylinder made of brass, inside of which there is a small piece of technical wax. When the antifreeze in the system reaches 80 °C, the wax in the cylinder melts. As it expands, it presses on the long rod connected to the main thermostat valve. The rod extends from the cylinder and opens the valve. And when the antifreeze cools, the wax in the cylinder begins to harden, and its expansion coefficient decreases. As a result, the pressure on the rod weakens and the thermostatic valve closes.
By opening the valve here we mean moving its leaf by only 0.1 mm. This is the initial opening value, which consistently increases by 0.1 mm as the antifreeze temperature rises by two to three degrees. When the coolant temperature rises by 20 °C, the thermostat valve opens fully. The full opening temperature can vary from 90 to 102 °C depending on the manufacturer and design of the thermostat.
Design and functional properties
The materials for the manufacture of parts of the body and filling of the thermostat of the VAZ 2106 car are brass and copper. The working process of the thermostat is as follows:
- A spherical piece of wax is placed in the cylinder of the device, which begins to melt when the engine reaches a temperature mark of 82 ° C.
- Having a significant coefficient of expansion, the wax begins to press on the end of the rod connected to the inlet valve.
- When the valve opens, coolant begins to circulate through the heat removal lines of the engine, cooling it.
- As the temperature drops, the wax begins to harden and shrink, which leads to a decrease in pressure on the rod, which returns to its place under the action of the return spring.
Problems with the thermostat arise when the engine is operated in incorrect operating modes: frequent overheating, prolonged driving with engine hyperthermia, or mechanical deformation of the thermostatic device.
If the valve jams in the closed position, severe overheating of the power plant occurs even at negative ambient temperatures. When the valve is partially opened, overheating still occurs, but under gentle operating conditions this will not lead to the engine boiling.
When the shut-off valve of the car thermostat is in the fully open position, the engine cannot warm up to the temperature required for normal operation. In this case, the wear of parts of the crank and gas distribution mechanisms increases, the required degree of expansion of the cylinder-piston group is not achieved, which leads to insufficient sealing of the combustion chamber and a decrease in the degree of compression.
Types of thermostats
The VAZ 2106 car was produced for many years. And during this time, engineers made a number of changes to it, including thermostats. Let's look at what thermostats were installed on the VAZ 2106 from the release of the first cars to the present day.
Single valve thermostat
Single-valve thermostats were installed on the very first “sixes” that rolled off the VAZ assembly line. The operating principle of this device has been described in detail above. To date, these devices are considered obsolete, and finding them on sale is not so easy.
Electronic thermostat
An electronic thermostat is the latest and most advanced modification that replaced single-valve devices. Its main advantages are high accuracy and reliability. Electronic thermostats have two operating modes: automatic and manual.
Liquid thermostat
Thermostats are classified not only by design, but also by the type of fillers. Liquid thermostats were the very first to appear. The main component of a liquid thermostat is a small brass cylinder filled with distilled water and alcohol. The operating principle of this device is the same as that of the wax-filled thermostats discussed above.
Solid thermostat
The filler in such thermostats is ceresin. This is a substance similar in consistency to regular wax, which is mixed with copper powder and placed in a copper container. The cylinder has a rubber membrane connected to a rod, also made of dense rubber that is resistant to high temperatures. Ceresin, expanded from heating, presses on the membrane, which, in turn, acts on the rod and valve, ensuring the circulation of antifreeze.
Which thermostat is better
Today, thermostats based on solid fillers are considered the best option for the VAZ 2106, since they have the optimal combination of price and quality. In addition, they can be found in any auto store, unlike liquid single-valve ones, which are practically no longer on sale.
Possibility to do without removing the device
Next, we’ll figure out how to check the thermostat on VAZ cars. Let's start with the "classics". Here are the instructions for the VAZ 2106 car.
- Initially, you need to determine that the coolant level is normal, that the temperature arrow on the instrument panel works, and that the belt driving the antifreeze pump (pump) is tensioned normally.
- Next you need to start the engine and warm it up. If more than five minutes have passed and the temperature needle has not risen above 70 degrees, you should touch the return pipe from the radiator. If it is slightly warm, it means that the coolant immediately enters the large system circuit. Consequently, the valve of the device is constantly open.
- If the engine overheats after five minutes or more, you need to touch the upper radiator hose. Suppose it turns out to be cold - this means that the valve of the device being tested is jammed.
This instruction describes how to check the serviceability of a thermostat that has not been removed from the car.
But the following describes the procedure - how to check a removed thermostat at home.
- Make sure that the unit valve is closed at room temperature. If not, the device is faulty.
- Hang the device under test using a harness on some bracket, and the device should be inside a container of water, without contact with the walls. After heating the water, just before boiling, the valve should open. Its incomplete opening is acceptable.
- Allow the device under test to cool. In this case, the through element must be closed.
If the device turns out to be broken, it is better to replace it completely.
This instruction describes how to diagnose the operation of a dismantled device. However, to complete the picture, let’s add a few words about dismantling the unit. To do this, use a screwdriver to loosen the clamps of the three pipes suitable for the device. Then pull out the pipes and dismantle the necessary device, placing the container under the antifreeze leak.
During reinstallation you will have to add coolant.
Next, let's talk about front-wheel drive VAZs. First of all, let's figure out how to check a suspicious thermostat on a VAZ 2109. This device should allow antifreeze access to a large circle when it reaches a temperature of 87 degrees.
- To diagnose the element directly on the car, you first need to start the engine and wait until the panel arrow shows 90 degrees.
- Then you also need, as has already been indicated, to touch the pipes - the one going from the element being tested to the radiator, as well as the one going from the radiator to the engine. They should be equally warm. If the hose from the unit being diagnosed to the radiator is cold, the device is faulty.
- But suppose the tubes are warm and the piston unit overheats, you need to look at the radiator fan switch and pump - are they working properly?
- It's another matter if the engine does not reach 90 degrees. You should also feel the hoses. If the pipe from the device being tested to the radiator is warm, the device being tested is faulty, and the antifreeze constantly circulates in a large circle.
Sometimes other troubles happen. Let's describe it using the example of a more modern front-wheel drive Lada. We will enclose the information within the framework of instructions on how to check a thermostat that has not been removed on a VAZ 2114:
- Let’s assume that the temperature arrow on the panel shows more than 90 degrees, and a little time has passed since the engine started;
- we open the hood, first of all we remember how to check whether the thermostat is working or not, after which we touch the pipe going from the device being diagnosed to the radiator;
- we find out that the pipe is warm, in addition, the pipe going from the radiator to the engine is also warm;
- turn off the engine, let it cool, determine that the pump drive belt tension is normal, start the engine again;
- we find out that the tube from the element being diagnosed to the grid cooler is cold;
- wait for the fan to warm up and start working;
- we conclude: the car’s temperature sensor on the cylinder block is faulty.
It remains to add that the description of how to check a thermostat that has not been removed on a VAZ 2110 will be similar to the previous instructions. So we'll leave it out here.
Now let’s look at how to check the thermostat on Kalina yourself.
- You must first start the engine. This method shows how to check the thermostat on Kalina without even removing it. However, the method is identical to those previously described - you just need to touch the pipe from the element being diagnosed to the cooling grid assembly. Up to 90 degrees it should be cold, after 90 - warm.
- For more accurate diagnostics of the device, we remove it from the car.
- To dismantle, first drain the antifreeze from the system.
- We remove the recirculation valve and the mass air flow sensor.
- Remove the air filter housing.
- Having loosened the clamps, we remove 4 pipes from the system link we need.
- After unscrewing the nut, remove the ground wire.
- Having unscrewed the fastenings, we remove the device under test from the mounting socket.
Next, we’ll figure out how to check whether this Kalina thermostat is working at home. To do this, it is enough:
- lower the device inside a large volume of water in the pan, so that it does not touch the walls;
- turn on the stove, heat this water;
- when boiling, the valve will open;
- Allow everything to cool; when the device cools down, the valve will close.
If any of the above does not occur, the unit is faulty.
Methods for checking the thermostat
There are four main ways to test the thermostat's functionality. We list them in increasing order of complexity:
Video: checking the thermostat
We independently change the thermostat on a VAZ 2106
Before starting work, you should select tools and consumables. To replace the thermostat we will need:
It should be noted here that the thermostat cannot be repaired. The reason is simple: inside it has a thermoelement with liquid or solid filler. It is the one that fails most often. But such elements are not sold separately, so the car owner has only one option - replacing the entire thermostat.
Sequence of work
Before performing any manipulations with the thermostat, you need to drain the coolant. Without this operation, further work is impossible. It is convenient to drain antifreeze by placing the car on an inspection hole and unscrewing the cap of the main radiator.
Video: changing the thermostat yourself
So, the owner of a VAZ 2106 does not need to go to the nearest car service center to replace the thermostat. Everything can be done with your own hands. This task is entirely within the capabilities of a novice driver who has at least once held a screwdriver in his hands. The main thing is not to forget to drain the antifreeze before starting work.
Source
Replacing the thermostat VAZ-2107
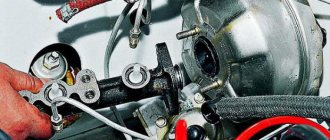
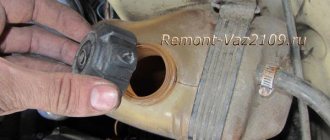
First, the antifreeze is drained from the cooled engine. Using a slotted screwdriver with a thin blade or pliers, loosen the clamp securing the hose supplying antifreeze from the radiator to the thermostat pipe. Disconnect this hose.
Use a Phillips screwdriver or an 8 mm socket wrench to loosen the clamps securing the hoses to the pipes of the cylinder block and pump. Remove the thermostat along with the hoses.
Disconnect the hoses from the thermostat pipes and put them on the new thermostat. Instead of the tape clamps that were on the hoses, they put on worm-drive clamps without tightening them.
The lower pipe of the thermostat is connected to the hose from the radiator. Connect the remaining hoses. All clamps are tightened. Fill in coolant. Start the engine and check for antifreeze leaks and the operation of the new thermostat.
Lada 2106 Clover › Logbook › Adjustable thermostat
Hi all. I got confused with the cooling system. But more on that later. It came down to the thermostat. During the experiments, the old Soviet one stopped closing tightly. I already wanted to buy a new one, I walked around the market and was amazed. They sell crap and it’s expensive, and anything that’s a little better (Luzar, AvtoVAZ) looks like a fake. In general, I wanted the Metal Incar 83C in a metal version. It's not fate to find it. For that, there was already a new Fenox bought for 500 rubles, which opened at 65 degrees and cooled the coolant. That's where it came in handy. I couldn't afford to throw it away.
For modification, you can use a ready-made crane axle box or two bolts. I chose the second option because I need to drill a larger hole for the axle box, and I don’t have a step drill yet.
Next I drilled a hole in the thermostat. I cut the bolts to the required length with a grinder. I drilled a crooked hole in a large M5 bolt and cut an M6 thread. The bolt is screwed into one another onto a fum tape.
Next, drill a hole in the thermoelement support with an M4 drill
Since this thermostat opens early, it is necessary that when the thermoelement heats up, its rod climbs into the drilled hole in the support and rests against the bolt at 85 degrees. This moment is picked up on the fly. At the beginning I tightened the bolt “by eye”, I saw the temperature arrow hovered at 80 degrees while driving. I unscrewed the bolt a quarter turn and it went to 90.
Thermostat VAZ 2106
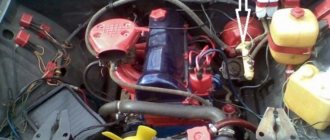
An element of a vehicle’s liquid cooling system, such as a thermostat, is a device with which the vast majority of passenger cars are equipped. It is located in the engine compartment in the space around the engine in the pipeline network between the power plant and the radiator. Externally, it is a sealed cylinder made of light alloy materials with holes, to which the cooling system pipes are connected.
Replacement
To replace the thermostat on VAZ 2106 cars, you need to drain some of the coolant by unscrewing the drain plug on the cylinder block. It is also necessary to remove the battery, which will interfere with our ability to carry out repairs to replace the thermostat. Next, loosen the clamps securing the hoses to the thermostat and disconnect the hoses, then remove the thermostat.
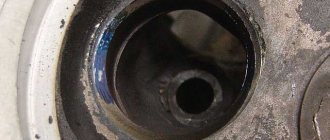
After removing the thermostat, it must be checked for functionality; to do this, lower it into a container with water heated to 78-80 degrees and, with constant stirring, continue to heat the water to 87-90 degrees. The thermostat valve should slowly begin to open; if this does not happen, the thermostat must be replaced. Install the new one in reverse order. Fill with coolant.
How to change the ignition switch follow the link.
How to check
Before removing and checking the functionality of the thermostat, make sure that engine cooling problems are not due to insufficient coolant or low drive belt tension. Make sure the indicator located on the instrument cluster is working properly.
If you notice that the engine takes a long time to warm up to operating temperature (according to the indicator), the thermostat may be stuck open. In this case, the thermostat should be replaced.
On the other hand, long warm-up times may be due to the lack of a thermostat. This could have been done on purpose or unintentionally (they forgot to install it after repair). Do not use a car without a thermostat. The engine management system will keep the engine in warm-up mode for a longer period of time. During this time, the engine will consume more fuel, and the exhaust gases will contain more harmful impurities.
If the engine is overheating, touch the upper radiator hose. If it is not hot and the engine is overheated, the thermostat may be stuck closed. The liquid does not enter the radiator and circulates in a small circle. In this case, replace the thermostat.
If the upper radiator hose is hot, this means that the thermostat is open and fluid is circulating normally through the system. In this case, read the recommendations given in the Fault Diagnostics Section.
Checking by removing the thermostat
Remove the thermostat (see Section Removing and installing the thermostat).
If the thermostat is open at room temperature, it is faulty and must be replaced.
To make a rough test of the thermostat's functionality, hang it on a piece of twine in a container of water. The thermostat should not touch the walls of the container. Start heating the container.
As the water heats up, the thermostat should open (this happens just before the water boils). Since the boiling point of water is 100°C, the thermostat may not open completely (refer to Specifications). Remove the thermostat and let it cool. As it cools, it should close completely.
If the thermostat does not open when heating or does not close when cooling, replace it.
When installing the thermostat, pay attention to the following points:
a) Thoroughly clean the mating surfaces and replace the O-ring;
b) Place the thermostat in the housing, oriented correctly;
c) Tighten the cover mounting bolts using the required force;
d) Install all hoses in their original places, then fill in coolant (refer to the Chapter Routine care and maintenance);
e) Start the engine, warm it up to operating temperature and check for leaks.
How to change
To replace the thermostat on the “six” you need a minimal set of tools - essentially one screwdriver. First you need to drain the coolant (but not all, only part). To do this, you need to unscrew the plug from the fluid drainage system in the cylinder block. After this, proceed to remove the battery. The thermostat itself is very easy to remove - you just need to loosen the three clamps that secure the pipes to the thermostat, disconnect the pipes themselves and remove the thermostat.
Before installing a new device, you need to check it - put it in hot water (about 80 degrees), after which the water needs to be heated and stirred constantly, thereby bringing it to about 87 degrees. If the main valve opens, then the thermostat is working.
Diagnosis of problems
To diagnose a thermostat malfunction, several steps must be taken.
- Warm up the car engine to 95-100 °C (when the thermometer needle slightly does not reach the red mark).
- Turn off the engine. Open the hood lid and find two radiator hoses.
- It is necessary to check their temperature, either by touch (extremely carefully) or with any instrument. If one of the hoses is cold, this indicates a malfunction of the thermostatic device and the need for its urgent replacement.
There is another way to check if the thermostat is working properly, but it involves completely removing the device from the car. The vehicle's thermostat is located in a container, which is filled with water heated to boiling water (100 °C).
After a short period of time, the shut-off valve should move to the open position. With this option, it is revealed that problems in the heat removal system are located in another node. If this does not happen, then the condition of the thermostat is determined to be unsatisfactory and requires replacement.
The operating temperature of the thermostat varies over a fairly wide range. Therefore, in order for the replacement to bring the expected results, you need to clarify the structural, technical and temperature characteristics of your vehicle before directly purchasing a temperature controller. Otherwise, the correct operation of both the engine and the thermostat itself will be called into question.