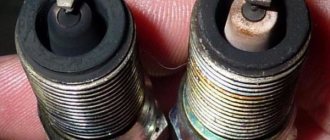
How does a mechanic diagnose a P0342 code?
First, the mechanic reads all stored error codes using an OBD-II scanner. He will then check and, if necessary, repair or replace all damaged wires, connectors and other electrical components of the system. The mechanic will then clear the error codes from the PCM memory and recheck the system. If the error code appears again, the mechanic will check the battery charge and also inspect the starter motor. It will then clear the error codes from the PCM memory again and check the system to see if P0342 appears again. This procedure must be performed every time after repair work is performed. This will help determine if the problem is resolved.
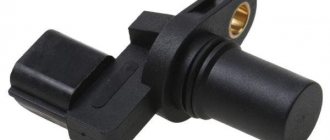
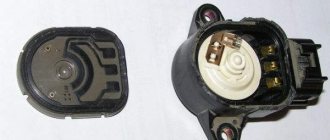
What is a phase sensor used for?
To understand possible malfunctions of the phase sensor, it makes sense to briefly dwell on the question of what it is, as well as the principle of its design.
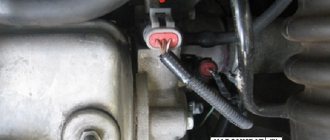
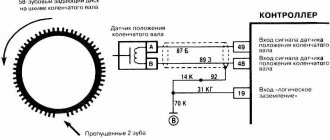
Thus, the main function of the phase sensor (or DF for short) is to determine the position of the gas distribution mechanism at a specific point in time. In turn, this is necessary so that the electronic engine control unit (ECU) gives the command to inject fuel at a certain point in time. In particular, the phase sensor determines the position of the first cylinder. The ignition is also synchronized. The phase sensor works in conjunction with the crankshaft position sensor.
Phase sensors are used on engines with distributed phased injection. They are also used on engines that use a variable valve timing system. In this case, separate sensors are often used for the camshafts that control the intake and exhaust valves.
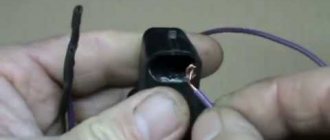
The operation of modern phase sensors is based on the use of a physical phenomenon known as the Hall effect. It lies in the fact that in a semiconductor wafer through which an electric current flows, when it moves in a magnetic field, a potential difference (voltage) arises. A permanent magnet is placed in the sensor body. In practice, this is implemented in the form of a rectangular plate of semiconductor material, to the four sides of which contacts are connected - two input and two output. Voltage is applied to the first, and a signal is removed from the second. All this happens on the basis of commands coming from the electronic control unit at a specific point in time
There are two types of phase sensors - slot and end. They have different shapes, but work on the same principle. So, on the surface of the camshaft there is a mark (another name is a benchmark), and during its rotation, a magnet included in the sensor design records its passage. A system (secondary converter) is built into the sensor body, converting the received signal into information “understandable” for the electronic control unit. End sensors are designed in such a way that there is a permanent magnet at their end, which “sees” the passage of a benchmark near the sensor. In slot sensors, the use of the letter “P” shape is implied. And the corresponding reference point on the distribution disk passes between the two planes of the housing of the slotted phase position sensor.
In injection gasoline engines, the master disk and the phase sensor are adjusted in such a way that a pulse from the sensor is generated and transmitted to the ECU at the moment the first cylinder passes its top dead center. This ensures synchronization of fuel supply and the moment of spark supply to ignite the air-fuel mixture. Obviously, the phase sensor has a direct impact on the operation of the engine as a whole.
Additional comments for troubleshooting P0342
The camshaft position sensor is an integral part of the system that allows the vehicle to operate reliably, smoothly and quietly. If the sensor does not operate properly, symptoms will occur indicating a problem. If the problem is not solved for a long time, it can lead to more serious problems. Therefore, if a P0342 error is detected, it is recommended that you contact a qualified technician as soon as possible to diagnose and resolve the error.
It should also be noted that if this error code is stored in the PCM and the Check Engine Light illuminates, the vehicle will most likely fail an emissions test.
Symptoms of malfunction
The main driver symptom of P0342 is the MIL (Malfunction Indicator Light) illumination. It is also called Check engine or simply “check light”.
They can also appear as:
- The “Check engine” warning light on the control panel will light up (the code will be stored in the ECM memory as a malfunction).
- Decrease in engine power.
- Possible misfires in the engine cylinders. The car engine may also become unstable.
- Floating speed, as well as attempts to stall at idle.
- The engine stalls or has trouble starting.
- Increased fuel consumption.
The vehicle will most likely run with this trouble code. But it may be difficult to start, and there may also be a drop in power and unstable engine operation. To avoid damage to other engine components, if this code is detected, it is recommended that the problem be repaired as soon as possible.
Self-diagnosis
The easiest and most common way to diagnose error codes on a VAZ Kalina is to search using the on-board network. The procedure looks like this.
Insert the key into the lock cylinder. Next, hold down the RESET key and, without releasing it, turn on the ignition. In this case, the device will automatically switch to diagnostic mode. At the same time, all the indications will light up, and the instrument arrows will make a full circle.
You should pay attention to the arrows and indicators - if any diode does not light up, you need to check the device for which the element is responsible. On the right steering column lever there is a button for scrolling through the options - you need to scroll to the required position (error codes). Next, the display will show the general error number; to reset the index, you need to hold RES for three seconds.
Note! The indicated sequence is relevant for Lada Kalina of the first and second modifications.
The position of the error codes will show one of the indices on the display:
- “2” – there is a surge in the BS power supply – a possible short circuit in the wiring;
- “3” – rupture of lines, or failure of the float inside the gas tank;
- error 4 Lada Kalina says that the coolant temperature sensor is broken or malfunctioning;
- “5” – the thermometer has gone astray, the element may be damaged or the circuit may be broken;
- “6” – exceeding the maximum permissible temperature of the internal combustion engine block, while the acoustic alarm is working;
- “7” – exceeding the permissible pressure thresholds inside the oil line;
- “8” - on a Lada Kalina car, error 8 appears when there is a malfunction of the calipers or a breakdown in the hydraulic drive line;
- “9” – critical voltage drop in the battery;
- “E” – incorrect reading or display of the EEPROM information module.
To return to the original part, it is enough to hold RES for 30 s. The disadvantage of this method is minimal accuracy - the procedure shows in which direction to look for a breakdown, but not a specific node. So, it is possible to understand exactly where the failure occurred only by the following method.
Deciphering codes, checking devices
Mistake No. 2. Overvoltage. Error No. 3. An error has been detected in the fuel sensor level; it occurs if the circuit is broken.
Error No. 4. Coolant temperature sensor error. Error No. 5. The outside temperature sensor has failed. Error No. 6. The motor has overheated. This happens if the engine overheating alarm is triggered. Mistake No. 7. Oil pressure is in poor condition. Happens if the alert bell is triggered. Mistake No. 8. Problems with the brakes. Happens if the alert bell is triggered. Mistake #9: The battery is dead. Happens when the alert bell is triggered.
To reset all types of errors, press and hold the reset button until all data on the display is cleared. Testing of devices and their combinations is carried out in accordance with technical specifications using special equipment (pulse generator, from a stable power source, etc.). If a short circuit suddenly occurs in existing devices (less than 40-50 Ohms), the maximum temperature indication must prevail.
Before buying a car, I recommend checking the errors of the on-board computer to be sure of the iron horse. If you have identified any problems, we give you the opportunity to familiarize yourself with the error code of the on-board computer.
First of all, you need to watch the video.
The process of launching the instrument panel diagnostic mode, I think, became clear from the video, and below we will now look at the main error codes that may appear on your on-board computer display: Lada Kalina on-board computer error codes
2
- increased voltage of the vehicle's on-board network
3
- error in the fuel level sensor (if an open circuit of the sensor is detected within 20 seconds)
4
- error in the coolant temperature sensor
5
- error in the external temperature sensor
6
- engine overheating (the criterion for triggering the acoustic signal is met)
7
- emergency oil pressure
8
- brake system defect
9
- battery discharged
In the video above, it was clear that I was displaying errors 4, 6 and 8. With four, everything is clear, as I read many reviews, this error always appears on a cold engine. As for number 6, here most likely there is data in the memory of the on-board computer about the engine overheating alarm that once tripped. If my memory serves me correctly, this happened when I had to trail behind a scraper at a speed of 10 km/h for a couple of kilometers in 40 degree heat. But fortunately, immediately after the signal went off, I was able to drive onto a repaired section of the road and quickly cool down. Regarding the defect in the brake system, I can say the following: the warning lamp for insufficient brake fluid level came on quite often at the same time, and I wrote about this problem here: the brake fluid level lamp is constantly blinking.
Fortunately, my Kalina did not have the rest of the errors listed above. Resetting the readings is very simple, again by pressing the daily mileage button.
Attention! If you decide to buy a used Kalina, then be sure to go through the diagnostic procedure and look at the errors that the computer shows. Surely not every owner knows about this and will reset them
And the information may be very useful for you. For example, the car’s engine has already overheated or the engine pressure warning light has tripped, and this is already a serious reason to refuse to buy such a car.
If you decide to carry out maintenance on your car, I advise you to read the article about replacing the fuel filter on a Lada Kalina with your own hands.
Diagnostic methods
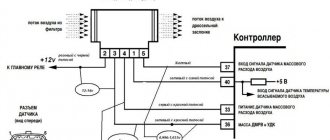
If error P2135 is recorded in the ECU memory, you should check the functionality and serviceability of the sensor. After all, it is the controller that determines the position in which the throttle assembly, that is, the damper, is located, is the culprit in this situation.
The whole point of diagnosing error P2135 comes down to checking the position sensor. To do this, it is recommended to perform the following operations:
- Arm yourself with a multimeter, select the dialing mode and connect to the contacts on the position sensor connector.
- By simulating the movements that the throttle makes, you should check how the sensor will react to these changes. The damper should be moved to its extreme positions. If wheezing appears on the multimeter, this indicates a malfunction.
- Additionally, the resistance of the sensors should be checked. Each car has its own optimal performance. They are specified in the technical documentation. Most often these values are around 10 kOhm.
- The resistance can be checked without removing the sensor from the throttle assembly. Here you need to disconnect the controller block and turn on the ignition. Now the plus of the multimeter is connected to the power wire in the sensor harness block, and the minus is placed on engine ground.
- In this case, numbers in the range from 4.8 to 5.2 V should appear on the measuring device (multimeter).
- Turn off the ignition and perform the same resistance test as suggested with the sensor removed.
- When the damper closes, the resistance should be less. When the damper is fully opened, the resistance increases.
- To check the sensor on a car with an electronically controlled throttle, the gas pedal is pressed to the floor, and then the voltage readings are checked with a multimeter. The sum of the readings from the first and second sensor should be about 5 V. This is considered a reference value indicating that the sensor is working.
If the sum values differ, this indicates a malfunction. It is also believed that the difference between the readings on two sensors when the gas pedal is held down should be about 2 V. For example, when one sensor has 4.2 V, the second sensor will have 2.1 if the unit is working properly.
This is possible in case of damage to the wires and violation of the integrity of the insulation. Usually a damaged wire can be noticed by visual inspection.
Motor Master Club
- ANNOUNCEMENTS, INFORMATION
- ↳ RULES
- ↳ Announcements
- ↳ Articles
- TECHNICAL SUPPORT
- ↳ Installation and update of “Motor-master” software
- ↳Motor-scan (scanner)
- ↳ Archive (questions about the scanner)
- ↳ Motor-Loader (loader)
- ↳ DiSco, DiSco-Express, Motor Tester, Test Master
- ↳ History of changes
- ↳ Other devices and sensors
- ↳ Alphameter ALC
- ↳ Archive (Questions to the manufacturer)
- MOTOR-MASTER
- ↳ Disco (oscilloscope, recorder, etc.)
- ↳ Motor-Tester (ignition systems)
- ↳ DiSco-Express (express diagnostics)
- ↳ Test Master (testing sensors and MI)
- ↳ Motor-Loader (loader)
- ↳ General questions
- ↳ Chip tuning VAZ, GAZ, UAZ
- ↳ Chip tuning of foreign cars
- ↳ Odometers (odometer programmer)
- ↳ General questions
- ↳ Removal and disassembly of instrument panels
- ↳ Help for newbies
- DIAGNOSTICS
- ↳ Diagnostics VAZ, GAZ, UAZ, ZAZ
- ↳ VAZ
- ↳ GAS
- ↳ UAZ
- ↳ ZAZ
- ↳ Diagnostics of foreign cars
- ↳ Europe
- ↳Japan
- ↳ Asia
- ↳America
- ↳ Diagnostics of diesel engines
- ↳ “Iron” questions
- ↳ Engines
- ↳ Power systems (hardware)
- ↳ Chassis
- ↳ Transmissions
- ↳ Body
- ↳ Exhaust system
- ↳ Lubricants
- ↳ Tools and consumables
- ↳ Selection of spare parts and components
- ↳ Diagnostic devices
- ↳ Electrical and electronics
- ↳ Autoelectrics
- ↳ Alarm and music
- ↳ Repair of ECU and other units
- ↳ Miscellaneous
- ↳ Section for beginners and car owners
- AUTHOR'S MATERIALS and PROGRAMS
- ↳ Section information
- ↳ Vijar
- ↳ kdv
- ↳SAW
- ↳ DataLook (program for configuring firmware)
- ↳ sts1968
- COMMERCIAL FIRMWARE
- ↳ About the Motor-Master Chip firmware store
- ↳ Articles and materials for beginners and more…
- ↳ Chip tuning
- ↳ Diagnostics
- ↳ Devices and accessories
- ↳ Information materials
- ↳ Representatives of Motor Master
- ↳ VAZ
- ↳ UAZ
- ↳ KOREA
- ↳Kefico 797
- ↳ Kefico M(G)798 Kia-Hyundai
- ↳ Bosch ME17911(12) Kia-Hyundai
- ↳Bosch ME17921
- ↳ RENAULT
- ↳EMS3132
- ↳ Valeo 40/42
- ↳EMS3120
- ↳EMS3125
- ↳CHEVROLET
- ↳ Simtec 7.6
- ↳ Announcements
- GENERAL ISSUES
- ↳ General questions
- ↳ Site operation
- ↳ Communication
- ↳ Flea market
- ↳ Car services (offer of services)
- ↳ All about our work
- ↳ Computers, laptops, etc.
- Moved topics