An element of the car, such as the crankcase ventilation system of the VAZ 2114, serves to remove unexhausted gases and re-supply them inside the engine for afterburning, as a result of which the toxicity of the exhaust is sharply reduced. But, during the operation of the car, this system becomes clogged, resulting in problems with the engine. Today we’ll talk about what crankcase ventilation includes and how to clean it with your own hands.
Crankcase ventilation system
Design and principle of operation
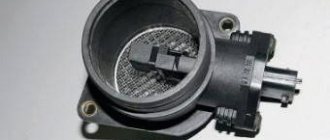
As was said at the very beginning, the ventilation system removes crankcase gases from the VAZ 2114 back into the engine, preventing unburned fuel oil mixture from entering the atmosphere. It includes a pair of pipes through which gases are removed, and a filter that traps solid particles and clots.
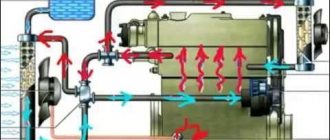
The whole system functions as follows:
- the fuel mixture entering the engine burns and forms exhaust gases, most of which are discharged from the engine into the exhaust line;
- a small part of the gases leaks through the piston rings and enters the lower pipe of the ventilation system;
- From the lower pipe, gases enter the filter (made in the form of a multilayer mesh), after which, already purified, they return to the engine, where they burn out.
Why does oil get into the filter?
There are the following reasons why lubricating fluid can get into the air filter of carburetor and injection versions of VAZ 2109 cars:
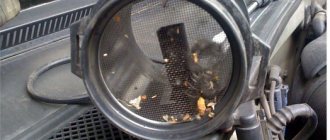
- The crankcase gas exhaust hoses are clogged. This leads to the fact that excess gases containing oil particles cannot escape beyond the throttle valve and end up on the filter walls.
- The air cleaning device is dirty. As a result, the engine does not have enough air and it sucks it from the crankcase along with oil particles.
- Damage to the cylinder head gasket. This is the reason why oil begins to leak, getting into the coolant, cylinders and filter.
- Valve failure. If this element is damaged or worn, lubricant under pressure will flow into the cleaning device.
- Worn engine compression rings. As a result, combustion gases enter the crankcase from the cylinders. Because of this, excess pressure is created, under the influence of which the lubricant is squeezed out through the valve and oil deflector into the filter.
The author of the video, Sasha Radchenko, will talk about the reason why oil gets into the air filter of a VAZ car.
How often should cleaning be performed?
If the ventilation system is clogged and its filter is unable to clean the mixture passing through it, then not only unburned gases, but also oil particles and other pollutants will enter the engine. All this will ultimately have a negative impact on both the operation of the engine and its remaining service life.
The frequency with which the crankcase ventilation of the VAZ 2114 should be cleaned directly depends on the condition of the engine. So, if the car just recently came off the assembly line, and its engine has not clocked up 50,000 km, you shouldn’t even think about cleaning it, since the piston rings are still new, and there is practically no leakage of gases through them.
The first cleaning (as recommended by AvtoVAZ itself) should be performed after the car has covered 60,000 km. And all subsequent cleanings should also be performed after every 60,000 km.
Many owners of domestic cars with extensive experience say that 60,000 km is too much, and cleaning should be done at least every 30,000 km - this will help avoid many problems with the engine and extend its life. In this case, the first cleaning should be carried out after the first 60,000 km.
Purpose
What is an engine breather? Before answering this question, it is important to understand what it is intended for. This is directly related to the principle of its operation. The main task of this device is to reduce the pressure in the engine crankcase. When the power unit operates, various gases collect in the crankcase. Gradually they accumulate and create quite a lot of pressure. If you do not bleed them, the engine may stop, the pressure will back up the pistons.
In this case, the gas will seek an exit through any available hole. To prevent this from happening, a breather is installed. This device is also used to ventilate the crankcase. Unnecessary gases are removed from it. Thus, the temperature inside the engine is slightly reduced. The engine breather has two tasks: ventilation and releasing excess pressure. In some cases, the operation of the breather can indicate the presence of problems in the engine. If the rings are stuck or the piston is damaged, gray smoke characteristic of the exhaust will fly out of the hose. This way you can diagnose these faults without disassembling the engine. In normal condition, a slightly noticeable transparent smoke comes out of the breather.
How to clean
To begin work, you will need to prepare the necessary tools, namely:
The crankcase ventilation of a VAZ 2114 is cleaned as follows:
- Loosen the fastening clamps of both pipes and then remove them.
- Inspect the pipes for cracks or chips - if the latter are present, replace the pipes with new ones of the same diameter.
- If the pipes are in good condition, clean them outside and inside with a damp cloth.
- Disconnect the throttle cable from the sector.
- Remove the pair of mounting bolts securing the throttle body to the receiver.
- Remove the bracket along with the cable.
- Unscrew the two bolts securing the cylinder head, and then remove the washers and rubber bushings located on them.
- Remove the cylinder head cover itself.
- Find the oil separator on the cylinder head cover and unscrew the mounting bolts that hold it.
- Remove the housing cover, and then remove the oil separator itself.
- Thoroughly rinse the filter mesh (oil separator) in gasoline (it is recommended to use highly purified gasoline for this) or kerosene.
- Clean the cylinder head cover from oil and adhering dirt (this is best done using a rag soaked in kerosene).
- Install the oil separator filter back into the cylinder head cover.
- Reassemble in exactly the same order, but in reverse order.
To avoid possible injuries, all work on dismantling the cylinder head cover and cleaning the ventilation system should be carried out only with the engine completely cooled.
It should be noted that when performing operations to clean the ventilation system, it is worth paying attention to the condition of the rubber bushings that fasten the cylinder head, as well as the gasket. If they are worn out or covered with cracks, they should be replaced immediately, without waiting for serious damage.
At the end of today's conversation, it is worth mentioning a situation where cleaning the crankcase ventilation system does not actually help improve engine performance. This happens when the engine is very worn out, and the secondary vapors entering it to burn out actually “choke” all its work.
There can be two ways out of this situation - either carry out a major overhaul of the power unit or remove the ventilation system to the external environment (in this case, unburned gases will not enter the engine, but into the atmosphere). True, at the same time, the environmental friendliness of the car will noticeably decrease, and it will no longer meet the high Euro standards. For this reason, such a decision should be postponed until the last resort.
Difficult to eliminate causes of oil leakage from the gearbox
To eliminate an oil leak, you will have to spend time and sweat. The reasons require the participation of car repair specialists, but if you set a goal, you can cope without them.
Replacing oil seals.
If the obvious causes of oil leakage have been eliminated, but leaks continue to appear with enviable frequency, the seals are examined.
Special rubber seal in a metal frame. Serves to prevent leaks and oil on the moving elements of the engine and gearbox.
Long-term use of the oil seal wears out the rubber base. Oil pressure does not hold. If the oil seals have been replaced recently, you need to think about the quality of the oil used.
The replacement procedure is as follows:
- oil is drained;
- the wheel bearing mount is dismantled;
- the bolts securing the ball joint are unscrewed;
- the steering knuckle is retracted;
- the axle shaft is dismantled;
- remove the oil seal using a regular screwdriver;
- Before installation, the oil seal is lubricated with oil;
- Installation of the cuff is carried out by lightly tapping the hammer through the mandrels.
It is better for two people to carry out the work, as the process of replacing oil seals is accelerated. It takes about two hours to complete the job.
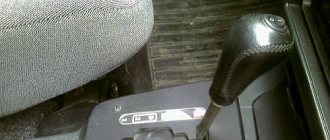
Replacing the breather.
The purpose of the transmission breather is to remove excess pressure. Formed during transmission operation. Allows you to maintain the pressure inside the transmission at an optimal level.
The main problem with the breather is that as a result of prolonged use, the channels for removing excess air become clogged.
The effectiveness of releasing excess pressure is reduced. The pressure cannot be released, and the oil begins to attack the sealing elements. To eliminate oil leaks, the breather is cleaned and the throughput is restored.
Procedure:
- Removing the valve cover. The gasket is removed and replaced. The breather is fixed to the cover with three bolts. It is not necessary to dismantle for cleaning.
- Cleaning the breather. Copper wire is used to clean the excess pressure outlet hole in the breather. You can use a compressor. Compressed air will blow out the hole in the breather.
Lada 2114 1.5 (8 valves) › Logbook › Crankcase ventilation system
Igor' Nenashev, 28 years old I drive Lada Vesta euro69 (before: Lada 2114) Berezovka, Russia
If you follow my blog, you know that I recently changed the oil dipstick. Everything would be fine, but after a short trip, looking under the hood, I discovered that the dipstick was not seated tightly, as if it had been squeezed out of the mounting hole.
Having pulled out the dipstick with the car running, I felt that there was a decent amount of air blowing from there. In principle, as far as I know, it should blow in any case, but there is a limit to everything. Upon closer inspection, the dipstick also turned out to be of poor quality (crooked, rubber too soft). I bought another dipstick in the store (it has stronger rubber and harder metal), it fit tightly and was no longer squeezed out. By the way, the new probe turned out to be a little shorter than the standard and low-quality probe, this one made by AVTOVAZ (so they said in a large store and the marking was appropriate).
Lada 2114 0-day › Logbook › Do-it-yourself oil catcher.
Hi all! There have been no posts for a long time. I will slowly improve. I’ll probably start with a note about “oil in the trash.” At high speeds, a lot of pressure is created in the “head” and it carries oil through the breather into the air filter, which is not good. As a result, the mass air flow sensor begins to suffer and the throttle becomes clogged (the speed fluctuates). Well, as they say, why not make this product for yourself. — Power steering reservoir from the Volga (metal). — Two “L”-shaped fittings for the level. — Drain tap. — 4 metal sponges. — 2 hoses.
I sanded off the excess solder with a file and then sandpaper.
I made a drain valve in the bottom cover.
Everything was ready with the tank. All that remained was to make the mount. Since I have an adsorber on the right, I had to do it from the opposite side. I cut out two plates from a 2mm piece of iron and welded them to each other.
Then all that was left was to prime and paint the whole thing.
Well, here is the finished version, fully assembled.
Then I filled the tank with sponges, glued bitoplast and splen around the mount and at the points of contact with the body.
Then I took the whole thing to the car and installed it safely. I also installed a fuel filter on the small circle, I will monitor the changes.
After a trip to Saratov, 3 days after installation, I had to redo the mount and strengthen it.
I change the small circle filter every 1000 km, during which time several drops of oil accumulate in the filter, and the filter itself begins to deform from the manifold. There is also a little oil on the large circle, but just a little at the bottom. So it’s a completely working thing, because oil doesn’t fly into the intake.
After assembly, I went to the track and turned the engine properly. I arrived home, the tank and fuel filter are dry at the moment. The positive thing I have found so far is that the revs have become more even. Thank you all for your attention and good luck on the road!)
Schemes for upgrading the crankcase ventilation system
Schemes for modifying the crankcase ventilation system, as well as a description, are provided by IgorRV.
For LADA cars with manual transmission and AMT (“robot”), scheme No. 1 “Crankcase ventilation scheme with PCV valve for E-GAS and cable throttle” is suitable:
installation of a PCV valve in the crankcase ventilation system of a VAZ installation of a PCV valve in the crankcase ventilation system of a VAZ (cable throttle) installation of a PCV valve in the crankcase ventilation system of a VAZ (E-GAZ)
It is necessary to install a PCV valve (article 94580183, price about 400 rubles) from a foreign car into the small crankcase ventilation circuit. When connecting the PCV valve to a small circuit on an E-GAS, use a new hose (petrol-oil-resistant 8 mm without fabric reinforcement). On a cable choke, connect to the receiver, not to the choke.
As a result, the valve will shut off the circuits in transient modes, which will allow:
- Accept the load without jerking or dropping engine speed (for example, when the compressor is running, heated windows, seats, etc.).
- Reduce vibration load at idle
- Increase traction from the bottom (noted by owners of automatic transmission with VAZ-21126 engine, manual transmission with VAZ-21227, 21126 and 11186 and AMT with VAZ-21127).
- Get a sharper response to the gas pedal and faster shifts (on AMT). Perhaps due to the fact that the valve does not allow the engine to slow down, maintaining a more optimal switching algorithm.
- Reduce oil consumption through ventilation.
The valve replacement period is 40,000 km.
For LADA cars with automatic transmission (Jatco) and AMT (“robot”), scheme No. 2 is suitable:
Description of scheme No. 2: The pressure reducing valve is connected in series to a large ventilation circle. Thus, it regulates the flow of crankcase gases at high speeds and during transient processes. This allows:
- Exercise full control over the flow of crankcase gases between the small and large circuits.
- Improve engine operating mode.
- Reduce vibration load.
- Reduce oil release into ventilation.
For LADA cars with automatic transmission (Jatco) and AMT (“robot”), scheme No. 3 is suitable:
ventilation diagram with PCV valve, pressure reducing valve and ejection pump
ventilation diagram with PCV valve, pressure reducing valve and ejection pump
Description of scheme No. 3: To improve the operation of the braking system and facilitate the process of holding the car on the brakes in mode “D”, an “Ejection Pump” was used. Due to the flow of crankcase gases from the small circuit, the vacuum in the tube leading to the vacuum booster increases. This happens at low speeds, which is very helpful when driving in traffic jams. Keeping your foot on the brake all the time is not very easy, but this pump makes the task easier.
- Getting rid of vibrations, failures, transmission shocks.
- The engine begins to operate more calmly and softly.
- The force on the brake pedal becomes less.
- The air conditioner turns on almost imperceptibly.
- ejection pump (article 10793 VIKA, price 546 rubles);
- pressure reducing valve (article 1117701500 JP GROUP, 422 rubles);
- PCV valve (article 94580183 GENERAL MOTORS, 400 rubles);
- clamps (about 10 pieces, 600 rubles);
- thin, petrol-resistant 8 mm hose 50 cm (100 rubles);
- standard ventilation pipe.
By the way, there are other ways to modify the crankcase ventilation system. Are you ready for such modernizations? Let us remind you that modification of the ignition system (installation of capacitors in the ignition coils in the harness) is also common among owners of LADA cars.
Troubleshooting
- The first thing you need to pay attention to is the color of the exhaust, blue or black smoke, a sign of burnt valves or problems with rings.
- Next, you should check the compression in all cylinders. The value on gasoline internal combustion engines should be within 11-13 MPa.
- Disconnect the pipes from the valve covers, air vent and breather. Assess the degree of contamination. If the pipes are very dirty or clogged with oil deposits, use gasoline to clean them or a special carburetor cleaner.
- Check the condition of the oil separator. Unscrew the required bolts to get to this unit. Remove the oil separator and assess its condition. If necessary, clean or rinse followed by drying.
- Inspect and, if necessary, flush the breather valve. There are situations when the valve gets stuck, resulting in exhaust gases entering the crankcase and creating excess pressure. Remove the part and wash it; in most cases, this will resolve the issue of squeezing oil out of the breather.
Helpful advice! To distinguish stuck rings from a burnt-out valve, it is enough to perform several manipulations. After checking the compression in the cylinders, determine the cylinder with the lowest value. Then inspect the spark plug of this cylinder; if the rings are lodged in this cylinder, the spark plug will be covered with a thick oil layer. If the valve is burnt out, the spark plug will appear normal without any major abnormalities.
Finally…
The problem of oil escaping through the breather worries many motorists and causes a lot of trouble, but if the problem is detected in a timely manner and the right approach is taken, serious consequences can be avoided. It is important to ensure that the oil level is normal; as soon as you find that the engine is taking oil, monitor its level and constantly monitor it so that it does not fall below the permissible level. Also pay attention to the breather and filter; oil on the air filter in large quantities also does not bode well. Regularly monitor the condition of the engine and all systems, and also promptly correct any malfunction. This will save you from engine overhauls and unnecessary waste.
Why is heating of the VAZ 2114 bad? Troubleshooting Tips
Device and purpose
A good unit should ensure unhindered air circulation in all of the above elements. But what if it does not heat the VAZ 2114 (injector, 8 valves)? The reasons may vary. Let's look at each of them.
Electric fan not working properly
In this case, it is necessary to perform parsesting. You must first start the car and turn on the system to the maximum operating level. If there is no noise, the cause of the malfunction is the electric fan. Experienced motorists recommend replacing it with a mechanical one. It is considered to be more reliable in this regard.
Thermostat
Airlock
Faucet malfunction
It happens that the heater does not heat the VAZ 2114, the damper is open, and salt drips into the interior. The cause of the malfunction is depressurization of the seals (most often on the tap). If there are clamp connections, they must be tightened. We also carefully look at the condition of the injectors themselves. They should be soft, without cracks or other signs of wear. Otherwise, you need to purchase a repair kit and completely replace the attachments (it is best to buy new clamps, as the old ones will be sour).
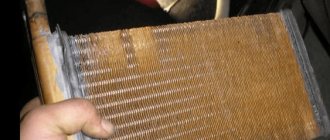
Radiator clogged
Debris and dirt can accumulate in its honeycombs, causing very little warm air flow into the cabin.
The solution is to wash the element with citric acid or anti-shock agents.
Radiator failure.
If the honeycomb is damaged, the circulation of antifreeze will deteriorate significantly. In this case, only replacement. And it must be strictly replaced with a new one. Never buy a used radiator.
water pump
It happens that the furnace stops functioning due to low pressure in the system.