What does the VAZ 2114 cooling system look like and what components does it consist of? This is exactly what you will learn from our article. It would not be superfluous to mention that the cooling system on cars, starting with the VAZ 2108, is almost the same. There are minor differences, but they are not very significant. But let's take a closer look at the design.
Circulation scheme
Like any other modern car engine, the VAZ 2114 has liquid cooling with forced circulation. Antifreeze is used as a liquid (the domestic analogue is antifreeze). The liquid is driven by the impeller of the pump. The cooling system pipes of the VAZ 2114 provide the connection of all elements. So, a thin pipe goes from the engine block to the heater radiator. With its help, hot antifreeze is supplied to the interior for heating. The operation of the entire system depends on the temperature of the liquid in the thermostat:
- Less than 85 degrees - circulation only in a small circle.
- More than 85 degrees – the liquid moves in a large circle.
The only difference between the large and small circle is that when moving along the first circle, antifreeze enters the main radiator.
Briefly about the car
The VAZ-2114 hatchback is a fairly popular car that can still be found both on domestic roads and on the roads of the entire post-Soviet space. It was produced by AvtoVAZ OJSC from 2003 to 2013 and was one of the variants of the restyled series of the Samara-2 (VAZ-21093) family of cars.
During mass production, various engines with the same type of cooling systems were installed on it, which operate on the principle of internal heat exchange using a special cooling mixture of the “Tosol” type.
Cooling system diagram
Liquid pump (pump)
On a VAZ 2114 car, the engine cooling system works due to the fact that the antifreeze is in motion and under pressure higher than atmospheric pressure. The movement is created using a pump installed on the right wheel side directly in the engine block. Driven by a timing belt. Examination:
- Drain the antifreeze from the system (there are two holes for this). This should only be done on a cooled engine!
- Unscrew the three bolts securing the plastic cover to the engine block.
- Use a key set to “17” to loosen the roller nut. This allows the timing belt to loosen.
- Remove the belt and look at its condition. If it is “eaten” from the outside (by 1-3 mm), then this indicates that the belt is slipping due to the pump being worn out.
- Take the pump pulley with your hands and try to move it, rotate it in different directions. If there is play or jamming, the pump must be replaced. Otherwise, the cooling system of the VAZ 2114 (injector or carburetor, it doesn’t matter at all) will not work correctly.
Pump replacement
To replace the pump, you need to unscrew the three bolts that secure it to the engine block. But you need to take into account that some difficulties may arise during removal. Very often the body just gets stuck. Therefore, it is advisable to lightly tap the pump housing, trying not to damage the important elements that make up the cooling system of the VAZ 2114.
After removing the pump, you need to thoroughly clean the entire surface in the engine block so that there are no problems when installing a new one. You can use silicone sealant, which is applied to the paronite gasket in a thin layer on both sides. Pay attention to the package. In addition to the pump, the kit should contain bolts with engraving washers, as well as a gasket.
Is it possible to replace the radiator of a VAZ-2114 stove without removing the control panel
With the onset of autumn cold weather, many owners of VAZ cars complain that the interior heating works very poorly and does not provide a comfortable temperature.
There are many reasons for this problem, but the most basic of them is a clogged stove radiator, which gets dust, small stones, poplar fluff, etc. How to determine that this is the case? Diagnostics is quite simple - you just need to put your hand on the supply and discharge pipes of the device for a few seconds. If their temperature is noticeably different (the inlet pipe is hot and the outlet pipe is cold), then you will need to replace the radiator of the VAZ-2114 heater. Otherwise, you should pay attention to such details as the temperature sensor (thermostat), pump impeller and others.
Bleeding the system
After all the replacement work has been completed, you can pour antifreeze into the cooling system and start pumping. To do this, loosen the clamp that fits to the injector (and more specifically, to the throttle valve). It is by this that you will judge how well you got rid of traffic jams. But, in fairness, it is worth noting that on the engines used in the VAZ 2114, pumping is very simple.
Pour antifreeze into the expansion tank, you need to maintain the level between the marks. Then start the engine and warm it up to operating temperature. In this case, the plug should be closed, open as needed to add antifreeze (if the level drops). That's all, the repair is complete. Let's briefly learn about the remaining elements of the cooling and heating system of the VAZ 2114.
Malfunctions in the cooling system
As a rule, due to malfunctions in the cooling system, the engine overheats, and this leads to engine failure. Any of the elements may be faulty.
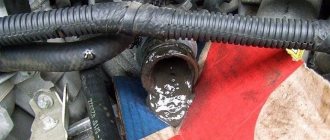
- It may leak. Possible leakage through aluminum tubes and plastic tanks. Often the plastic outlet for the return hose of the expansion tank breaks off.
- It may clog, and for this reason the engine will heat up.
Pipes. Because of them, antifreeze leaks due to the fact that the pipe:
Thermostat. Depending on how incorrectly the valve in the thermostat operates, the internal combustion engine can:
- Overheat (in this case, the antifreeze “throws out” through the expansion tank).
- Do not reach operating temperature. As a result, the car drives poorly, and in cold weather it is cold inside the car.
Water pump(three main problems):
- Noise and play in bearings. It is not worth driving with such a defect for a long time; the pump may jam or fall apart.
- Liquid is leaking through the inspection hole. It also signals the imminent “death” of the part.
- Broken impeller. With such a defect, the engine overheats very quickly.
- A faulty fan also leads to overheating of the internal combustion engine.
The clamps may be faulty or poorly tightened. It happens that thin hoses become clogged with debris (“return”, throttle valve heating).
Radiators
One is installed in the heating system (volute) of the cabin, the second - in the engine compartment. The first is necessary for heating the cabin in cold weather; it can be forcibly connected to the cooling system; for this purpose there is a tap installed in the partition between the cabin and the engine compartment. The second radiator turns on automatically, so to speak, when the antifreeze temperature reaches 85 degrees, using a special device - a thermostat. Essentially, a thermostat is a small mechanism based on a bimetallic plate and a return spring. When heated, the plate bends and moves the valve, which opens the way for antifreeze into the main radiator of the VAZ 2114 cooling system.
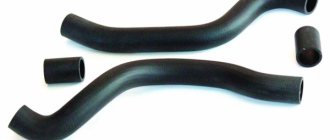
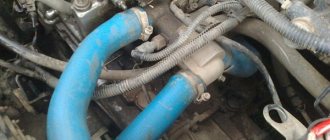
How to correctly replace pipes in a VAZ-2114
The first question that experts hear from car enthusiasts is which pipes should be purchased for the VAZ-2114? Products made from silicone are considered the most durable and at the same time ideally compatible with the cooling mechanism of the VAZ-2114. The diagram below shows the location of the pipes we are interested in:
- The short ones are mounted on the couplings of the thermostat and the pump pumping water.
- Next comes the conductive hose.
- The pipe located in the lower part is responsible for removing antifreeze from the radiator unit.
Plug, sensors and expansion tank
And a little about the little things that, as it may seem, do not greatly affect the operation of the engine. But still, if the functioning of the plug is disrupted, the engine will begin to boil. And the reason is that it has two valves that, working together, maintain a pressure of just over one atmosphere. Consequently, if the valves become clogged, the pressure in the cooling system increases sharply (the liquid expands, but the air that was in the tank has nowhere to go).
Personally, on my VAZ 2109 the tank once swelled, a little more and it would have burst! Now I’m writing and I’m surprised how things didn’t come to this. When I stopped and opened the hood, I was simply stunned - the tank was round, like a ball, seething, steam was pouring out from everywhere. Therefore, the condition of the plug is extremely important for the normal functioning of the system.
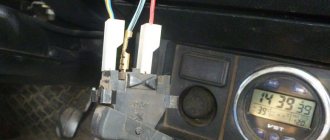
The same is true with sensors - one, which is installed near the thermostat (if the power system has an injector, such a circuit is used), serves not only to generate a signal for sending to the indicator, but also to turn on the electric fan. The signal from the sensor goes to the electronic control unit, which is responsible for promptly turning on/off the electric fan.
Which brake hoses should you choose?
In addition to the factory version, there are other analogue parts. Many people are engaged in the production of spare parts for the 4 and offer a set of flexible front hoses for 400 rubles . Part number – 1368 .
They are not much different from the handset, but due to the low price (the factory version costs about 500 rubles ) they are in demand among owners of “fours”. Strength is due to the reinforced layer and high-quality rubber covering the base of the tube. All parts intended for installation in the brake system undergo special quality control, so tubes from most manufacturers are equally good in terms of strength. Another option - reinforced brake hoses "AST" is not available in all stores, but is quite in demand due to the high strength of the product.
The price for the product is slightly higher than the factory version - about 650-700 rubles . The strength of the “AST” model is very high, so you can safely consider this analogue for purchase.
A little about prices
The average prices of all components of the VAZ 2114 cooling system are as follows:
- Pump - 800 rubles.
- Thermostat - 400 rub.
- A set of pipes - about 1300 rubles. (including heater pipes).
- Heater radiator - 800..900 rub.
- Main cooling radiator - 1600 rub.
- Expansion tank - 250..300 rub.
- Tank cap - 50 rub.
- Antifreeze - 800..1000 rub. (capacity 10 liters).
These prices for components and materials are current at the time of publication of the article. Of course, they can change at any time. Therefore, it is worth checking the price in your region.
A faulty faucet, radiator or heater fan in a VAZ-2114 does not bode well in winter - it will be cold in the car. In the warm season, each of them will bring discomfort to driving a car in its own way. Therefore, the faulty unit must be replaced.
Features of installing a new radiator
Installation of a new radiator and assembly of the car is carried out in the reverse order. At this stage, it is important not to accidentally lose the panel fasteners, and also to follow the rules listed below:
- It is better to install new clamps on the radiator pipes, which will ensure complete tightness of the heating system;
- It is advisable to lubricate the outlet and inlet fittings of the device with soap or some detergents to simplify the installation of the pipes, as well as improve their fit to the fittings;
- The central pillars of the panel need to be secured especially well, since they are responsible for the main functions of driving the car;
- after the panel is installed and secured, you need to check that the cable settings are correct, and also make sure that the faucet and valves are open to the proper level;
- When filling the system with coolant, you need to make sure that there is no air in it. After the antifreeze level has been restored, be sure to start the engine and make sure that the pipes and their connections to the radiator are tight.
If you follow all these rules, you will be able to ensure the perfect operation of the heater in your car, as well as minimize the risks of its repeated failure due to clogging of the system.
How much does it cost to replace a radiator at a car service? The price for this service is quite high, since specialists usually remove the control panel, which takes much more time and requires considerable effort. Using the method described above, you can replace the part yourself and save money.
Replacing the heater valve VAZ-2114
We drive onto a pit or overpass. We put the car on the handbrake and first gear. Drain the coolant into the prepared container. To do this, first, with the expansion tank cap closed, unscrew the drain plug on the engine cylinder block (if the tank cap is sealed and tightly screwed, then antifreeze will hardly flow). Then, instead of the drain plug, we screw in a hose (from a mixer works well) and open the reservoir cap - the coolant flows neatly into the container with minimal losses and without getting dirty on the engine.
We loosen the clamps of the pipes going to the valve from the engine. From the engine side, use a metal brush to clean the threads of the 2 bolts securing the faucet to the engine compartment bulkhead. Then we conscientiously treat these threads with WD-40 or brake fluid. This is a mandatory condition, failure to comply with which can lead to serious difficulties when unscrewing the nuts. We leave the dirt and rust on the threads to “acidify” and do not tighten the nuts yet.
We remove the pipes. Let's go to the salon. We dismantle the side trim of the torpedo in the middle at the feet on the passenger side. Loosen the clamps of the pipes at the tap. We prepare a rag to collect a small amount of antifreeze that may leak onto the carpet when removing the pipes. Disconnect the pipes. We return under the car. Using a 10mm wrench (socket or socket), unscrew the nuts of the faucet mounting bolts.
In the cabin, pull the faucet towards you. Then we remove the control cable clamp from it, and then disconnect the cable itself. We install the new tap in the reverse order.
How to determine the reason why the lower radiator hose is cold and the upper one is hot
The lower radiator hose is slightly cooler than the upper one, since the antifreeze coming from above cools down as it passes through the radiator. But, as a rule, we are talking about a relatively small temperature difference. When the outlet pipe/hose from the radiator does not warm up at all, this indicates a violation of the coolant circulation and heat exchange in the internal combustion engine.
All common reasons why a cold lower radiator pipe does not heat up normally are collected in the table.
| Possible reason | Consequence | How to understand/define it |
| The thermostat is stuck in the closed or half-closed position. | The coolant circulates in a small circle and does not cool. |
|
| The expansion tank cap valve is faulty. | The pressure in the circuit is not automatically regulated, which may cause air pockets. |
|
| The radiator channels (lines) are clogged. | Antifreeze does not pass through the radiator and circulates mainly in a small circle. |
|
| The water pump impeller is worn out. | The pump cannot create the required pressure, which causes the coolant circulation and heat transfer from the engine to the radiator to deteriorate. |
|
| There is an air lock in the cooling circuit. | Coolant circulation deteriorates, heat exchange is disrupted, and pipes may swell and rupture. |
|
Replacing the VAZ-2114 heater fan
In the cabin under the steering wheel, using a 10mm wrench, unscrew the nut securing the heater to the body and remove the fan motor ground wire terminal (in black insulation) from the stud, and then disconnect the power supply positive wire connector.
Remove the cabin air filter, located under the windshield in the middle. Using a Phillips screwdriver, unscrew the 5 screws that fasten the air supply side grilles. We remove the grates. We unscrew the 4 screws securing the protective casing, which we then remove. Unscrew the 2 screws securing the fan to the base of the heater.
We pull the electric motor power wires out of the passenger compartment through the rubber seal. We remove the fan from its housing (air supply box). Remove the seal from the fan casing. We use a flat screwdriver to pry up the latch of the casing, which we separate into 2 parts. Having released the 2 mounting brackets, remove the motor cover and remove the electric motor along with the impeller.
Installation of a new fan is carried out in reverse order.
Repair/replacement of resistor
A faulty resistor may be indicated by the fan operating in one mode, when manipulations with the switch do not affect its blowing speed. To replace the resistor, you need to prepare a screwdriver with a Phillips head, fine-grain sandpaper and a multimeter. Algorithm of actions:
- disconnect the negative terminal of the battery;
- unscrew the screws that secure the right console cover;
- Use a screwdriver to unscrew the screws securing the right cover of the center console;
- you will have access to the resistor, from which you need to disconnect all the wiring and evaluate the contacts for burning. If the contact surface is oxidized, use sandpaper to clean it down to metal;
- It may well be that the resistor has lost its functionality precisely due to burning/oxidation of the contacts, so we assemble everything in the reverse order and check whether the fan will work in all normal modes;
- in case of a negative result, again remove the negative terminal, the panel cover and unscrew the screw that secures the resistor to the body;
- We remove the resistor and use a multimeter to measure the resistance at the resistor inputs and at the inputs of both windings. In the latter case, the indicator indicating the working condition of the additional elements is 0.2 Ohm. For the entire resistor, the standard resistance should be 0.8 ohms. If the multimeter readings do not match the specified values, replace the resistor with a new one, and then reassemble in the reverse order.
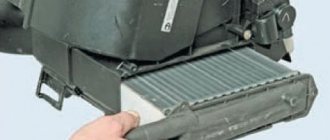
Replacing the VAZ-2114 heater radiator
We drain the coolant as described in paragraph 2 to replace the valve. We remove the glove compartment, which consists of three parts, and the side panels at the foot of the passenger seat. In this case, it is necessary to unscrew absolutely all the screws that are visible. You should not miss the fastenings to the floor (2 screws on the sides, on the left and right sides of the panel at the bottom near the ECU) and 2 screws at the passenger door pillar. Another one is hidden under a flap in the upper left corner of the panel near the buttons.
We unscrew all the screws securing the cables on the passenger side - on the right and left, closer to the middle of the cabin (here are the most “difficult” ones - 3 pieces). Gently pull the main panel on the passenger side towards you. If it goes with difficulty, then you should check whether all the fasteners are unscrewed. You can additionally remove the plastic tips from the damper and heater adjustments.
When the panel moves away from the body, you need to place an object (for example, a plastic bottle) into the gap that appears. We place some larger dishes under the radiator so as not to flood the floor with antifreeze leaking from the radiator and the system.
Loosen the pipe clamps. We free the radiator from the pipes and wait until the antifreeze stops leaking. Unscrew all the nuts securing the radiator to the body.
It takes two people to remove the radiator - you will need the help of one person. One person lifts the panel as high as possible, and the second one at this time removes the radiator - pulls it down, turns it and pulls it towards himself.
The new radiator is installed in the reverse order. After installing the radiator, do not immediately begin installing the panel and glove compartment.
First you need to check the tightness of all connections - fill the system with coolant and start the engine.
If everything is fine, then we finish replacing the radiator.
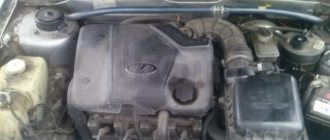
The cooling system of the VAZ 2114 is of great interest to motorists. Model 2114 machines have a hidden cooling system based on the use of a special cooling mixture. The movement of the cooling mixture occurs under the influence of a mechanical pump.
The assembly principle of many Russian cars is carried out rather poorly, so the performance of many mechanisms, including the cooling system of the VAZ 2114, leaves much to be desired.
To identify and carry out the necessary repair work, you need to have an understanding of the condition and method of operation of the cooling system.
How to remove a stove radiator
The process of dismantling the heater radiator on VAZ-2114 cars can be carried out in two main ways. The first involves removing the entire control panel, as well as other elements surrounding the part being replaced. We recommend carrying out repairs in this way only if you have the appropriate experience and are completely confident that after completion of the work there will be no “extra” components left. No such confidence? Then it is better to contact a car service or carry out repairs in a simpler way, which we will describe below.
It does not require dismantling the torpedo, but to perform repairs in this way you will definitely need an assistant. Work is carried out in the following order:
- remove the console and glove compartment;
- unscrew the bolts and screws that hold the front panel so that it moves freely in different directions;
- remove the cables for controlling the operating modes of the stove, which are located on the driver’s and passenger’s sides;
- remove the radiator cap;
- dismantle the rubber radiator pipes. It is advisable to first place a basin or other container under the device so as not to spill antifreeze on the floor;
- We hire an assistant. His task will be to carefully move the torpedo to the side, which will allow the radiator to be removed. In this case, you need to be extremely careful not to break anything or tear out the front panel of the car by the roots.
Disadvantages in the cooling system
The VAZ 2114 engine cooling system has a big drawback, because... requires constant monitoring, frequent maintenance and necessary repairs.
Cooling diagram for VAZ 2114 : 1 – element in the form of a plug for the expansion tank; 2 – expansion tank; 3 – hose for draining liquid from the pipe; 4 – hose passing between the radiator and the expansion tank; 5 – hose leading from the radiator; 6 – tank to the left of the radiator; 7 – aluminum tube; 8 – plug systems; 9 – tank to the right of the radiator; 10 – drain plug; 11 – middle of the radiator; 12 – casing for electric fan; 13 – plastic wings of the electric fan; 14 – electric motor; 15 – toothed pump pulley; 16 – pump impeller; 17 – camshaft drive belt; 18 – engine block; 19 – pump pipe; 20 – radiator hose with supply function; 21 – heater radiator hose with drain function; 22 – hose supplying coolant to the throttle pipe; 23 – exhaust pipe; 24 – hose for refilling; 25 – heater radiator hose with supply function; 26 – thermostat; 27 – coolant temperature sensor; 28 – coolant level indicator sensor.
Instructions for replacing the cooling system pipes of the VAZ-2114
Step-by-step replacement of cooling system pipes in a VAZ-2114 car looks like this:
- Remove the battery cable that comes out of the negative socket.
- Carefully drain the old coolant, but wait until the engine has cooled completely before doing so. Otherwise, there is a risk of getting burns from the coolant.
- Remove the following components: set aside the upholstery that provides sound insulation, the fan, the trim going to the windshield frame, the facing material.
- Now your goal is to get to the air collector; to do this, unscrew the brackets in the form of springs and the screws responsible for fixing them. A screwdriver is ideal for spring clips; for screws, you need a wrench.
- To loosen the clamps, remove the front housing, and then remove the old hoses from the fittings.
- All that remains is to install new silicone hoses in a specially designated place; it is preferable that the parts are manufactured abroad - they will last longer.
- Reinstall the other components by following the reverse order of this step-by-step instruction.
Operating principles of the 2114 cooling system
The performance indicator is based on the internal heat exchange effected by the cooling mixture. This option is the most effective.
The movement of the cooling mixture is carried out by force under the influence of a pump operating from a drive belt. The cooling mixture is filled into the system by pouring into the expansion tank. The volume of the VAZ 2114 cooling system depends on the engine size.
An electric fan is installed on the shaft of an electric motor; its operation is based on sensor readings, thanks to which it begins to perform its functions or stops them.
The thermostat valve is considered an important component of the system; it is equipped with valves: main and additional. It also includes a storage device that senses changes in temperature fluctuations in the air.
When the coolant temperature reaches approximately 87 degrees, it activates the main valve, which releases liquid into a large circuit. When the temperature reaches 102 degrees, the valve stops at 8mm.
Reviews of silicone pipes for the VAZ-2114 cooling system
Drivers of the VAZ-2114, who replaced the usual factory rubber pipes with silicone ones, note the following advantages of the new components:
- Long service life, and all thanks to the increased wall thickness and dense reinforcement, consisting of several layers of material.
- Silicone hoses work successfully and efficiently, regardless of the temperature and weather conditions outside.
- When the silicone pipe is tightened, a force is felt, so overtightening and damaging the hose, like a rubber one, will not work in any case.
- The engine compartment can be painted any color you like.
Among the disadvantages of silicone pipes built into the cooling system of domestically produced VAZ-2114 cars, drivers note:
- high cost of parts, one set is approximately 1.5-2 times more expensive than rubber analogues;
- the manufacturer does not provide any warranty, so if you bought a defective product, it is impossible to replace it and you will again have to spend money on a new set of hoses.
In order not to pay extra, VAZ-2114 owners prefer to order silicone pipes in online stores, where they are found in 2 types:
- with reinforced thread;
- Along with silicone there is a rubber component.
Despite the possible negative nuances of silicone hoses, the owners of the VAZ-2114, who took the time to modernize their car and changed the pipes in the vehicle’s cooling system, note that the modification is worth the money - the engine is cooled like clockwork, no major comments are made.
As for the service life of new hoses, on average it is 2 years longer than that of rubber pipes, but only when it comes to reinforced silicone components.
The following video clearly shows how to change antifreeze and flush the cooling system of a VAZ-2114: https://www.youtube.com/watch?v=CGGDk3F1hNY.
The difference between a rubber hose and a silicone hose is explained in the video:
Changing the coolant strictly according to the maintenance regulations
It is important to change the coolant frequently to prevent engine damage, because Over time, it loses its properties and is subject to heating.
To carry out work on changing antifreeze or antifreeze, you need to know the important components:
- Know the period during which you can use cooling liquid, antifreeze for 2 years, antifreeze for 5 years.
- Monitor the mileage for fluid changes, usually from 20,000 to 40,000.
- Check the condition of the fluid, paying attention to the color; if the color has changed after use, the fluid must be replaced.
Of course, the best choice would be antifreeze as a coolant, because... It has a longer shelf life, unlike antifreeze, and the system wears out less. But the price indicator for antifreeze is much cheaper.
When flushing the cooling system, you must:
- Drain all coolant from the system, tighten the plugs tightly and fill with distilled water to the maximum mark.
- Start the engine and warm up until operating temperature is reached.
- Let it run at about 3000 rpm. Be sure to monitor the movement of the engine temperature scale to avoid overheating.
- Then turn it off and leave it for 7 minutes, after which we pour the water out of the system. In case of water contamination, repeat the procedure until the effect of clean water is achieved.
Subtleties of filling new antifreeze
Before you start filling in new coolant, you need to drain the old one, and also thoroughly clean the entire cooling system of contaminants. To do this, it is better to use a special cleaning agent that can be purchased at a car enthusiast store. Make sure that all taps and plugs of the VAZ-2114 are open. You can determine whether the system has been flushed or not based on the color of the antifreeze flowing out.
The plugs and tap are closed only when the product becomes transparent. If the manufacturer describes in the instructions the specifics of using the cleaning mass, follow these rules for effective cleaning. As for the level of antifreeze filling, some drivers prefer to fill to the limit mark, others deliberately do not top up, and later, after a successful test, add more fluid.
After the antifreeze has been replaced, all that remains is to close the expander and start the car engine. The motor should idle until the furnace fan starts running.
Why is the cooling system malfunctioning?
The main malfunction of the cooling system occurs as a result of incorrect operation of the thermostat. In a particular case, the only solution will be to replace it.
Before you begin work on replacing the thermostat valve, it must be checked for serviceability by starting the engine while it is cool. When the engine warms up to about 90 degrees, touch the pipe at the bottom of the radiator, it should be warm, this indicates the serviceability of the valve; if the pipe is cold, the valve must be replaced.
VAZ 2114 car models have an aluminum radiator; it is equipped with two additional tanks; the left one has a partition.
The cooling system is quite simple, so you can carry out repairs yourself. The radiator is the main component of the car’s cooling system, its main function is to prevent engine overheating by removing warm air from the engine to the outside.
The radiator consists of:
- The radiator itself.
- Bottom tank with pipes.
- Top tank with pipes.
Instructions for replacing the cooling system pipes of the VAZ-2114
In cars of domestic manufacturers, engine cooling occurs using a cooling system; in the VAZ-2114, this task is performed by antifreeze. Only with the right choice of antifreeze can you ensure efficient operation of the cooling system:
- Factory antifreeze fluid is worse; due to the smaller amount of additives, the thermal protection of the vehicle suffers significantly. Antifreeze was developed specifically to cool vehicle parts and components, so it is exceptionally useful.
- Factory fluid has one big drawback - it quickly spoils the pipes, which in turn leads to fluid leakage and radiator defects.
Having convinced himself of how important it is to use high-quality antifreeze, the driver of the VAZ-2114 begins to replace the old fluid with a new one. In this case, after a couple of weeks an antifreeze leak is detected, what’s the matter? The owner of the car did not take into account that along with the antifreeze, the pipes through which leaks occur must also be replaced.
Experience shows that old hoses are absolutely unusable; antifreeze corrodes them very quickly. Therefore, it’s time to learn how to replace pipes, and finally close the question of the correct operation of the cooling system. Service station specialists will tell you how to implement your plans.
Radiator replacement
- Initially, the plug from the expansion tank is unscrewed, and the radiator plug and cylinder are also removed.
- The cooling mixture is poured into a clean container.
- The radiator ventilation system is disconnected from the power supply.
- We disconnect the rubber tubes from the radiator system and expansion tank.
- All bolts are disconnected from the surface of the casing.
- Carefully holding the radiator, we take out the casing along with the fan.
- At the end of the work, the radiator is completely free and can be removed.
Before you begin, remember that when removing and subsequently installing the radiator, the engine must be in a cold state.
After replacing the radiator or repair work, it is installed in place and secured in the same way, but in reverse order. After installation, be sure to start the engine and check the result.
Replacing the stove tap
It often happens that a part such as a faucet breaks (it is worth noting that on the 2114 it is not very reliable). When replacing it, you should simultaneously replace the pipes, even if they are in good working order (the location of the pipes of the VAZ 2114 stove was described above).
All faucet replacements are performed in the following order:
- place the car in the pit and secure it;
- unscrew the screw plug and drain the coolant;
- using a screwdriver, loosen the clamps on the pipes located in the engine compartment, and then remove them;
- find the tap in the passenger compartment on the passenger side (located under the panel), loosen the clamps of the pipes suitable for it, and then remove them;
- Using a 10mm wrench, unscrew a pair of nuts screwed onto the studs and securing the valve body;
- from the interior side, pull out the tap and disconnect the control cable from it;
- install a new (similar) faucet in its original place;
- perform assembly in the same sequence, but in reverse order.
Before disconnecting the pipes (especially those located in the passenger compartment), you should place a cloth under them in case of coolant leakage.
Many car enthusiasts who carry out such a replacement are sometimes interested in how to properly connect the pipes to the VAZ 2114 stove? After all, by mistake or forgetfulness, you can connect them incorrectly, which will disrupt the normal circulation of coolant.
In order not to make a mistake, it is worth remembering that the connection diagram for the connection pipes of the VAZ 2114 stove is as follows: the pipes located in the engine compartment are connected: the first - from the tap (inlet) to the hole in the cylinder head, the second - from the tap (outlet) - to "saxophone". The connections in the cabin are connected: the first - from the tap to the thermostat, the second - from the tap to the pump inlet.
DIY engine radiator repair
The main problem as a result of which the radiator needs to be replaced or repaired is leakage of the cooling mixture, as a result of the presence of a hole or defects in the system.
Liquid usually leaks at the joints of plastic and metal parts. If the leak is small, just pour a special mixture into the radiator along with the cooling liquid, and under its influence the leak will disappear on its own.
If the leak is large enough, the radiator will have to be replaced.
Before proceeding with replacement, check the radiator for leaks; to do this, you must:
- Fill the bathtub with water.
- Plug the holes in the pipes tightly.
- The radiator is released into the water approximately 30-40 cm and a pressure of 0.2 MPa is applied.
- See if bubbles appear or not.
The radiator must be replaced after an accident in the event of a frontal or side impact.
Maintenance
Regular maintenance of the cooling system comes down to checking the level of the coolant mixture in the expansion tank and monitoring its color. It is recommended to check before each trip or, in extreme cases, regularly every 500 - 600 km.
The level of the coolant mixture in the tank must constantly exceed the minimum level by 2...3 cm. Checking the level and adding fluid must be carried out only on a cold engine. The mixture intended for topping up must be of the same type as the liquid poured into the system. Mixing different types is not recommended.
IMPORTANT! In the event of an emergency, you can add clean water to the liquid, but the cooling ability of the mixture deteriorates, and the presence of water contributes to corrosion on metal parts. In addition, in winter, the diluted mixture can freeze and damage both the radiator and the engine. Therefore, the coolant mixture diluted with water must be drained as soon as possible and, after repairing and flushing the system, it must be filled with the recommended coolant.
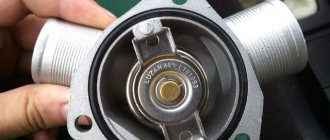
Thermostat repair
The thermostat sensor also serves to maintain the set temperature norm. It blocks the movement of the cooling mixture into the radiator until the engine heats up to the desired temperature of approximately 90 degrees. Liquid begins to flow through the thermostat when Celsius reaches 95 degrees. Using a thermostat, the engine takes minimal time to warm up. The thermostat is located between the engine and the cooling radiator.
Common problems:
- The valve is closed - the engine, when not warmed up, holds speed very poorly and may stall.
- With the valve open, you can drive during frosts, or turn on the heater to maximum mode, otherwise the engine will overheat.
When carrying out repair work on the thermostat, it is allowed to lightly tap the housing with a screwdriver to move the valve.
If it is necessary to completely disassemble the thermostat, it is important to tightly close the pipes to avoid antifreeze leakage, only then disassemble the thermostat. At the end of the repair, it is better to replace the antifreeze.