In some cases, when starting the engine, smoke and a gas smell may appear from under the hood. Most often, this indicates that the exhaust manifold may have burned out, and on the VAZ 2110 it needs to be replaced, since the metal has burned out. And here you should not delay replacement or repair, since all these problems can adversely affect the operation of the engine as a whole. You can replace the part yourself; there is nothing difficult here.
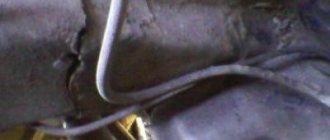
Usually the burnout site is practically invisible, but with the engine running you need to open the hood of the car. And then consider where the exhaust gases come from; if they pass with a whistle, then they go past the exhaust pipe, and go through the burnt-out place.
Exhaust manifold VAZ 2110 - replacement and repair
In some cases, when starting the engine, smoke and a gas smell may appear from under the hood. Most often, this indicates that the exhaust manifold may have burned out, and on the VAZ 2110 it needs to be replaced, since the metal has burned out. And here you should not delay replacement or repair, since all these problems can adversely affect the operation of the engine as a whole. You can replace the part yourself; there is nothing difficult here.
Usually the burnout site is practically invisible, but with the engine running you need to open the hood of the car. And then consider where the exhaust gases come from; if they pass with a whistle, then they go past the exhaust pipe, and go through the burnt-out place.
Signs of trouble
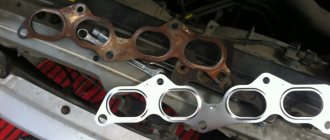
Exhaust manifold gasket
One of the main signs of a leak in the system is a “sporty” growling sound when the engine speed increases. This may be a symptom of various exhaust system problems. To check, it is better to take an assistant and go to a garage with a pit or to an overpass. Most often, you can determine by eye whether the problem lies in the muffler, resonator or exhaust.
Gasket wear may become apparent during planting. Open the hood and start the car - white or grayish smoke rising from the manifold during warm-up indicates a leak for this reason. VAZ car owners usually encounter this problem once every 3-4 years. When using low-quality spare parts and before. The solution may be to manufacture a custom-made steel gasket. It can last as long as the entire collector.
Service specialists, when attracting clients, like to tell scary stories about the explosion of the exhaust manifold on VAZ 2114 cars due to cracks. In reality this is nothing more than a myth. But the real problems are no less serious, so there is no point in putting off repairs.
A cracked exhaust manifold or worn gasket can cause your engine to run rough.
1) A lambda probe is installed in the exhaust manifold, which affects the operation of the injection system. Strong air suction disrupts the oxygen mass content in the exhaust; the lambda incorrectly adjusts the quality of the mixture, causing tripping, uneven idling, loss of power, and “black” spark plugs.
Self-replacement
Replacing the exhaust manifold of a VAZ 2110
- the car needs to be driven into the garage;
- hang a lamp with a safety light under the hood;
- before starting repairs, antifreeze must be drained from the tank;
- disconnect the battery terminals;
- take it out;
- put on a rack;
- disconnect the vacuum booster hose from the receiver;
- also disconnect the hoses of the electric pneumatic valve cover and the ramp pressure regulator;
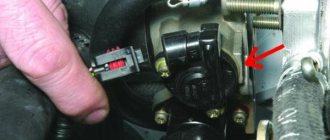
- disconnect the chips of the throttle sensor, idle air control;
- disconnect the throttle valve cable;
- loosen the clamp on the air supply hose to the air flow sensor housing;
- disconnect it;
- loosen the clamps for attaching the hoses to the throttle pipe and ventilation of crankcase gases on the cylinder head cover;
Replacing the cathode collector for a VAZ 2110
- remove the hoses in pairs;
- loosen the crankcase ventilation hose clamp;
- remove it from the throttle assembly;
- In the same way, carry out further work with the coolant inlet and outlet hoses.
Note. Use a 13mm socket to make the work easier, unscrew the 2 nuts from the throttle assembly from the studs. The throttle assembly is attached to the receiver.
- loosen the clamp;
- disconnect the adsorber purge hose;
- remove the throttle assembly;
- remove the sealing gasket.
Note: these nuts must be unscrewed using a number 13 wrench.
The receiver must be removed together with the throttle assembly. In addition, it is necessary to disconnect all inlet and outlet hoses and idle speed sensor chips from the assembly. Carefully check to make sure that all fastenings are completely loosened.
Note: it is recommended to remember all the attachment points; you can use threads of different colors. To prevent incorrect connections during assembly.
Note: place the parts in a container so that during assembly you do not have to look for missing spare parts.
Unscrew the 2 nuts for attaching the fuel supply and outlet pipe bracket to the receiver. The same - 1 nut for fastening the receiver to the bracket, 5 pieces for fastening to the intake manifold. Remove the receiver, remove the gasket.
silicone sealant
The restoration work took about an hour. For good access to the repair areas, it was necessary to remove the individual ignition coils. The sealant and a bottle of cleaner cost 300 rubles. The repeated test for air leaks after the seal had dried was successful - the speed stopped floating!
The nuts securing the catalytic collector to the Priora cylinder head are difficult to access. In addition, the collector flange is sealed with a metal-reinforced gasket. The sealing gasket must be replaced every time the connection is disassembled. Before removing the catalytic converter, it is necessary to remove the intake manifold - this will facilitate access to its mounting.
- 1. Remove the decorative engine cover (see “Removing and installing the decorative engine cover for the VAZ 2171”).
- 2. Remove the wire from the negative terminal of the battery.
- 3. Disconnect the exhaust pipe of the additional muffler from the catalytic collector by unscrewing the nuts securing the exhaust pipe flange to the catalytic collector flange and remove the exhaust pipe flange from the studs of the VAZ 2170 catalytic collector flange (see “Replacing the additional muffler”).
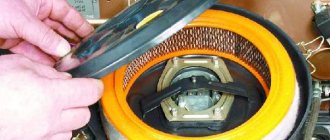
- 4. Remove the air filter (see “Removing and installing the air filter”).
5. Remove the air supply hose and three hoses of the crankcase ventilation system of the VAZ 2170 (see “Cleaning the crankcase ventilation system”).
6. Disconnect the four connectors of the ignition module wiring harness and move the harness to the side. Remove the ignition modules (see “Removing and installing ignition coils”).
7. Remove the throttle assembly.
8. Remove the intake manifold of the VAZ 2172 (see “Replacing the cylinder head cover gasket of the Lada Priora”).
9. Disconnect the wiring harness blocks of the control and diagnostic oxygen concentration sensors from the engine harness...
10. ...and disconnect the holders of the wiring harnesses of the control and diagnostic oxygen concentration sensors from the heat-insulating shield of the steering mechanism
11. Unscrew the three nuts securing the thermal insulation shield of the Lada Priora steering mechanism to the engine shield and remove the shield.
- 12. Unscrew the two nuts securing the water pump supply pipe bracket, unscrew the bolts securing the catalytic collector to its mounting bracket, unscrew the eight nuts securing the catalytic collector to the Priora cylinder head and remove the catalytic collector. Disconnecting the catenary collector from the cylinder head and troubleshooting it is described in detail in the subsection “Replacing the catenary collector gasket”.
- 13. Remove the sealing gasket of the catenary collector from the cylinder head studs.
- Be sure to replace the sealing gasket of the catalytic collector and inlet pipe with a new one every time you disassemble the connection.
- 14. Clean the flanges of the block head and catalytic collector from the remains of the old gasket and carbon deposits.
- 15. Unscrew both oxygen sensors from the VAZ 2171 catenary collector and install them on the new VAZ 2172 catenary collector.
- 16. Install the cathode collector and all removed parts and assemblies in the reverse order of removal.
To prevent the gasket from sticking and to improve its tightness, we recommend lubricating the gasket on both sides with a thin layer of graphite grease before installation.
Lubricate the mounting studs of the Priora exhaust manifold with graphite grease.
- high noise level;
- exhaust gases entering the cabin;
- increased fuel consumption;
- reduction in engine power.
Ramp
Replacing the cathode collector on a VAZ 2110
The ramp is removed as an assembly with the fuel pressure regulator:
- It is necessary to disconnect the vacuum hose from the regulator.
- Using 2 open-end wrenches 17, unscrew the fittings securing the gasoline supply pipes to reduce pressure.
- Disconnect the ramp voltage connector.
- Using a screwdriver, unscrew the screw of the bracket for fastening the gasoline supply and outlet pipes and disconnect it.
- Using a No. 5 hexagon, unscrew the 2 screws for fastening the ramp.
- Pull the ramp in the axial direction of the injector from the seat, remove the ramp towards the left side of the hood.
Note: follow the direction of travel of the vehicle.
Replacement cathode collector for VAZ 2110
- Unscrew the nut from the left intake manifold bracket and loosen the lower bolt.
- Remove the bracket from it.
- Perform the same operation with the right bracket and remove it.
- Unscrew the 2 nuts from the eye stud.
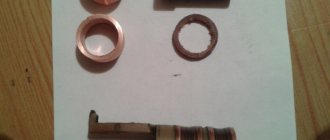
Removing the eye
- Unscrew the 3 nuts from the receiver bracket and remove it.
- Carefully remove the bushing from the intake manifold stud.
- Disconnect the exhaust air intake pipe and remove it from the lower intake air studs.
- Unscrew the top nut and loosen the bottom nut a little on the bar.
Note. It holds the antifreeze pump tubes for cooling. The bar at the bottom has a through slot; carefully remove it.
Replacement cat collector for VAZ 2110
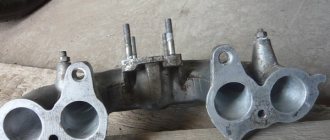
- The intake manifold is mounted on studs, so you need to unscrew one nut on top and 2 on the side. To remove the exhaust manifold, you need to unscrew an additional 2 nuts. You need to carefully inspect the connection point, since 2 gaskets are installed between the manifold and the block head.
Note. When dismantling the intake manifold, pay attention to the gaskets. If the gasket burns out, antifreeze can get into the cylinder block. There may be holes drilled by antifreeze on the head of the blocks, and there may also be holes in the gasket.
Replacement cat collector for VAZ 2110
- Antifreeze may leak into valves and cylinders. In this case, you need to remove it from there using a syringe. Unscrew the spark plugs (see Replacing spark plugs on a VAZ 2110 on your own) and crank them with the starter to remove any antifreeze that gets there. If grooves are found on the surface, the collector must be replaced.
- At the bottom, the exhaust manifold is attached to the exhaust pipe. Then it is connected to the exhaust pipe. Unscrew the three bolts and disconnect the pipe. Remove the collector. You need to unscrew them from the inspection hole and first tap the heads. Use a metal brush to clean the nuts and threads.
- During assembly, replace all gaskets with new ones one by one. It is advisable to tighten the nuts during assembly using a special wrench. Also replace the injector O-rings with new ones.
Gaskets are sold in sets, the cost of one is from 300 rubles. The cost of the exhaust manifold is 1,700 rubles. If the replacement is carried out at a service station or car service station, the repair will cost around 3,500 rubles plus the cost of a set of gaskets and a manifold. When doing your own repairs to replace the exhaust manifold, you must carefully and scrupulously read the instructions. Also view video clips and photos.
Note: photographs must be arranged in order of work. As repair processes are completed, fold them in reverse order. Once you've finished disassembling, turn the stack of photos over. Reassemble in reverse order. Before assembly, the nuts must be lubricated with graphite thread lubricant, and the threads of all bushings must also be lubricated. Thoroughly clean the installation areas of the gaskets from inclusions and foreign contents.
By doing the work yourself, you can save a lot of money, because the price of repairs in special workshops and service stations is very high and not everyone can afford to pay the cost.
Add to cart Add to cart
Availability in stores: > 10 pcs.
How much does a repair at a service station cost?
How much will it cost to replace the exhaust manifold gasket? The price for this type of work depends on the type of engine (carburetor, injection, 8-valve, 16-valve), the model of the seal itself, as well as the prices of the service station where you plan to repair your car.
On average, the work itself, together with the seal, costs somewhere around 1,500 rubles.
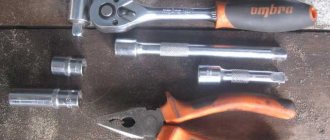
But you don’t have to spend money on work. Replacing the VAZ exhaust manifold gasket can be done on your own without much difficulty. Especially if you have a set of hand tools and you have even the slightest idea about the design of your car’s engine.
Self-replacement
- the car needs to be driven into the garage;
- hang a lamp with a safety light under the hood;
- before starting repairs, antifreeze must be drained from the tank;
- disconnect the battery terminals;
- take it out;
- put on a rack;
- disconnect the vacuum booster hose from the receiver;
- also disconnect the hoses of the electric pneumatic valve cover and the ramp pressure regulator;
- disconnect the chips of the throttle sensor, idle air control;
- disconnect the throttle valve cable;
- loosen the clamp on the air supply hose to the air flow sensor housing;
- disconnect it;
- loosen the clamps for attaching the hoses to the throttle pipe and ventilation of crankcase gases on the cylinder head cover;
- remove the hoses in pairs;
- loosen the crankcase ventilation hose clamp;
- remove it from the throttle assembly;
- In the same way, carry out further work with the coolant inlet and outlet hoses.
Note. Use a 13mm socket to make the work easier, unscrew the 2 nuts from the throttle assembly from the studs. The throttle assembly is attached to the receiver.
- loosen the clamp;
- disconnect the adsorber purge hose;
- remove the throttle assembly;
- remove the sealing gasket.
Note: these nuts must be unscrewed using a number 13 wrench.
The receiver must be removed together with the throttle assembly. In addition, it is necessary to disconnect all inlet and outlet hoses and idle speed sensor chips from the assembly. Carefully check to make sure that all fastenings are completely loosened.
Note: it is recommended to remember all the attachment points; you can use threads of different colors. To prevent incorrect connections during assembly.
Note: place the parts in a container so that during assembly you do not have to look for missing spare parts.
Unscrew the 2 nuts for attaching the fuel supply and outlet pipe bracket to the receiver. The same - 1 nut for fastening the receiver to the bracket, 5 pieces for fastening to the intake manifold. Remove the receiver, remove the gasket.
1 Topic by Aleksandr.21124 2016-04-28 16:31:36
- Aleksandr.21124
- Brother-in-law
- Inactive
- Registration: 2014-08-11
- Messages: 392 Thanks : 169
- Car: VAZ 21124
Topic: Installing a 4-1 or 4-2-1 exhaust manifold on a VAZ.
Exhaust manifold (Spider)
Most of the exhaust losses occur in the exhaust manifold. In sports and tuning, the standard manifold is replaced with a so-called “spider”, which differs in the shape and order of connection of the exhaust pipes with the exhaust windows. “Spiders” come in “short” and “long”. If we take a 4-cylinder engine, then the “long” pipe diagram is built according to the formula 4-2-1, and the “short” one is 4-1. The “long” spider has a 2-1 coupling, the “short” one has a more complex geometry.
The 4-1 manifold provides additional power only in a very narrow rev range, above 6000 rpm, and is usually used for high-boost engines with wide timing camshafts, that is, sports cars. Modification 4-1 is suitable for engines with high afterburner, speed range from 6 to 10 thousand per minute. Typically, these “spiders” are installed on engines with camshafts with a phase of more than 285 degrees.
4-2-1 manifolds are suitable for amateur tuning, as they provide a certain increase in power and torque over a fairly wide speed range. It is believed that short versions of the 4-2-1 model are effective at revolutions above 4500 per minute, and long ones at average speeds from two and a half to four thousand per minute. The physics of how parts work is complex, and without delving into the weeds, we’ll simply answer the question: how many horses will arrive? Few! For VAZ engines it is usually 3-5%, and even if the intake is modified - no more than 7% (this is generally a difficult maximum to achieve). In a direct-flow system, intermediate straight pipes of increased diameter and resonators of reduced resistance are also used. Instead of rigid connections, “corrugations” (bellows) or ball joints are often installed. The latter do not create parasitic resonance frequencies, but are short-lived.
The movement of exhaust gases in the exhaust pipe is an oscillatory process that can be experimentally coordinated with the oscillatory process of movement of the combustible mixture in the suction tract in such a way as to improve the cleaning of the cylinder from exhaust gases and its filling with a fresh mixture. The pressure in the exhaust pipe is subject to sharp fluctuations throughout the entire exhaust period. At the first moment after the opening of the exhaust valve, combustion products rush into the exhaust pipe at a very high speed, exceeding the speed of sound. The rapid removal of 50% of combustion products entails the formation of a vacuum in the cylinder, which can reach up to 0.5 kgf/cm2. In the same way, periods of low pressure are formed in the exhaust pipe.
Experiments with exhaust pipes have proven that the length of the pipe does not affect the efficiency of cleaning the cylinder in the first stage of the exhaust process, but with increasing pipe length, within certain limits, the duration of the period during which the vacuum is maintained increases.
With a change in rotation speed, the period of low pressure in the exhaust system not only changes in duration and magnitude of the vacuum, but also shifts along the angle of rotation of the crankshaft. Therefore, each engine operating mode corresponds to a certain optimal length of the exhaust pipe.
There are two processes in the exhaust system of an internal combustion engine. The first is the gas flow through the pipes, damped to one degree or another. The second is the propagation of shock waves (sound) in a gaseous environment.
Both processes affect the cylinder filling ratio. With the first one everything is simple and clear. High resistance to gas flow (plug the exhaust pipe!) will cause a decrease in the quality of purging and loss of power. It is absolutely clear that the shorter and larger the diameter of the pipe, the lower its flow resistance. In real life, for a one and a half liter engine operating at speeds no higher than 8000, a diameter of 45-50 mm with a length of 3-3.5 meters is sufficient. A further increase in diameter does not cause a significant decrease in dynamic resistance.
If we turn to foreign practice, it turns out that specialists in the field of exhaust systems can get an increase in power of more than 12-15 horsepower. This significant increase in power is obtained by replacing all parts of the exhaust system (pants, catalytic converter, resonator, tip).
Athletes get a big boost, but due to the fact that their hands are not tied by exhaust volume - a sportbike has a sound pressure of about 120 decibels (the officially permitted limit is 100 dB).
A group A muffler can give an increase of 30 horsepower, but driving around the city will be impossible. By the way, any serious intervention in the exhaust system requires adjustment of the power system. Based on this, tuning a 16-valve engine through the exhaust gas system is one of the most important things in its improvement.
Engine 2112 characteristics
Years of production - (1997 - 2004) Cylinder block material - cast iron Power system - injector Type - in-line Number of cylinders - 4 Valves per cylinder - 4 Piston stroke - 71mm Cylinder diameter - 82mm Compression ratio - 10.5 Engine displacement 2112 - 1499 cm cube Engine power 2112 – 93 hp. /5600 rpm Torque - 128 Nm / 3700 rpm Fuel - AI95 Fuel consumption - city 8.8 l. | track 5.5 l. | mixed 7.2 l/100 km Oil consumption - 50 g/1000 km Weight of the VAZ 2112 engine - 127 kg Overall dimensions of the 2112 engine (LxWxH), mm - Oil for the VAZ 2112 engine: 5W-30 5W-40 10W-40 15W40 How much oil in engine 2112: 3.5 l. When replacing, pour 3.2 liters.
Composition of the output unit
The exhaust system for a VAZ 2110 car consists of the following elements:
- Exhaust manifold;
- Lambda probe;
- Receiving type pipes;
- Neutralizer;
- Two mufflers: main type and additional.
Not all exhaust components are disassembled; some parts, such as the converter, as well as both mufflers, are replaced entirely.
Description of individual components
To make the structure of such an element as the discharge system clearer, it is necessary to give a detailed description of all components:
- Neutralizer. A unit designed for effective purification and suppression of emissions of harmful substances into the environment. When driving, a car produces substances such as non-combustible hydrocarbons, oxide compounds of nitrogen and carbon. The work of this system is aimed at eliminating them. The design itself is a combination of two ceramic-type components. The surface of these components is coated with special afterburning catalysts, which include rhodium, palladium and platinum. These substances make it possible to purify exhaust gases emitted into the environment by almost 100%;
- Lambda probe. It is a special sensor whose task is to control the composition and amount of fuel that enters the engine. The lambda probe thereby controls the purifier. If the lambda probe does not work properly, then the entire output assembly will quickly become unusable, after which it will have to be replaced;
- Reception pipe. Designed for forced removal of exhaust gases from the cylinders of a power unit. The pipe is made of stainless steel, and its fastening to the collector is carried out using special pins, of which there are four in total. The studs guarantee reliable fastening of the two outlet pipes and the element. In order to combine the exhaust pipe and the neutralizer, as well as an additional muffler, hinged fasteners are used;
- An exhaust manifold. A component that is cast from pure cast iron. The manifold is secured with four studs in the exhaust pipe. Heat-resistant gaskets reinforced with metal are installed between the manifold and cylinder heads.
- Silencers. Necessary for effectively suppressing the exhaust rate of burnt gases. This is necessary in order to significantly reduce the noise level in a type of transport such as the VAZ 2110. The distribution device in this part of the unit is carried out as follows: the additional one is followed by the main one. These two components are connected to each other by clamps and sealing rings and are covered with a special casing on top.
Nuances of operation
There are some points that need to be taken into account when operating the VAZ 2110 system:
- Under no circumstances should the vehicle be refueled with leaded fuel, as this will cause damage. It is very sensitive to lead compounds;
- When operating a VAZ 2110 car, you also need to monitor the proper, precise operation of the ignition, since its poor-quality operation leads to the neutralizing part being removed from its working condition. Fuel that does not burn when a spark passes during ignition enters the converter and burns out there. For this reason, the ceramic coating of the component quickly deteriorates;
- Frequent malfunctions will sooner or later lead to complete or partial blockage of the output system, in turn to the failure of the engine and its repair or replacement will be required.
Troubleshooting
The operation of a machine is always associated with the occurrence of malfunctions in parts and mechanisms. If some parts become unusable, then they need to be replaced or repaired yourself.
To replace the additional muffler in the exhaust unit:
- unscrew the two bolts that secure the clamp, for this you need a 13mm wrench;
- remove the clamp itself;
- remove the ring;
- disconnect the additional suspension cushions;
- remove the unit.
After this, a replacement is made, it is mounted in place in the reverse order. These are basic troubleshooting repair steps.
In addition to replacing standard faulty components with the same ones, but only new ones, you can modify individual components of the exhaust system, or tune the entire assembly.
If you find an error, please select a piece of text and press Ctrl+Enter.
Reasons for gasket burnout
There are few reasons why a cylinder head gasket burns out, but with a new engine there is only one – overheating. Even a short time of engine operation at temperatures above normal can cause this malfunction. In this case, the gasket may burn out quite a bit, and inexperienced motorists will not notice the first symptoms that appear. With further operation, the burnout increases, and the symptoms become more pronounced. Due to the fact that many car owners turn to specialists not after overheating, but after some time of operation, when the malfunction becomes a clear fact, they do not connect the burnout of the gasket with the recent overheating and demand from motorists other explanations why the cylinder head gasket burned out.
If the volume of coolant is insufficient, you may not notice a slight overheating of the head, since the liquid, circulating in the system, manages to cool in the radiator, but does not have time to remove heat in the required amount. Instruments in a car show the temperature of the coolant, not the temperature of the engine parts. Thus, when operating a car with an insufficient level of antifreeze, you can burn the gasket without realizing that the cause was overheating.
Burnouts occur due to poor-quality gaskets, but this mostly applies to engines after repair. This happens extremely rarely on new cars. Even on repair engines, the cause of such a malfunction may be factors related to the quality of the repairs performed:
- unsatisfactory condition of the mating surfaces (remains of the old gasket, shells or scratches on the surfaces are poorly cleaned, head deformation);
- incorrect tightening torque of the cylinder head bolts;
- the order of tightening the cylinder head bolts is incorrect;
- the thickness of the gasket is incorrectly selected (on engines where they come in different sizes).
Composition of the output unit
The exhaust system for a VAZ 2110 car consists of the following elements:
- Exhaust manifold;
- Lambda probe;
- Receiving type pipes;
- Neutralizer;
- Two mufflers: main type and additional.
Not all exhaust components are disassembled; some parts, such as the converter, as well as both mufflers, are replaced entirely.
Exhaust system of VAZ 2110
Content
Actions in emergency situations Daily checks Operating instructions Warnings and technical rules Basic instruments, measuring Engine and its systems Transmission Chassis Steering Brake system Vehicle electrical equipment Body Interior ventilation and heating system Applications Fault codes Electrical diagrams
Sources
- https://expertvaz.ru/2110/premer-komplektatsii-tsena.html
- https://videoremont-mashin.ru/remont-kpp-vaz-21108/ustanovka-konditsionera-v-vaz-2110-ot-priory-svoimi-rukami/
- https://monolith.in.ua/predohraniteli-lada-2110/
How do sellers determine the price?
Manifolds for the VAZ 2110 are sold in many places in Russia. Their prices vary widely. When determining the cost, sellers usually take into account the following:
- What condition is the auto part in?
- Which company made the part? How popular and reliable is it?
- What is the level of competition in the sales region?
- Is the spare part original?
- Are there any promotions currently running?
- What type of auto part?
- Is delivery required, how and where?
Each store adheres to a certain pricing policy. Some companies give discounts to regular customers and organize profitable promotions for various holidays.
Exhaust manifold for VAZ 2110
Lada Kalina (8, 16 valves): replacing the catalyst with a spider or flame arrester
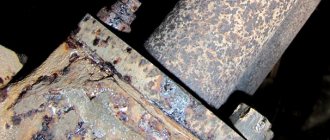
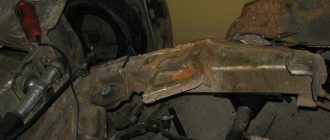
These are: fuel system, exhaust gas recirculation system. After a run of 80-100 thousand km, the metal housing of the exhaust manifold begins to crack at the seams.
Flange connections are torn away from their seats.
Replacing a catalyst with a spider, as a process, is divided into several stages.
So, division into stages: collecting data on the number and location of catalysts in the car; preparation of spare parts in each specific case for modification;
Exhaust manifold (spider) 4-1 VAZ 2110, 2111, 2112 16cl Stinger
By installing a tuning exhaust, an increase in car power is achieved.
Characteristics:
- Diameter 51mm
- Barrel diameter 120mm
- Barrel length 480mm
Applicability:
- VAZ 2110
- VAZ 2111
- VAZ 2112
It's easy to place an order on our website. Simply add the selected items to your cart, then go to the Cart page, check that the items you ordered are correct, and click the “Checkout” or “Quick Order” button.
The “Quick Order” function allows the buyer not to go through the entire ordering procedure on their own. You fill out the form, and after a short time the store manager will call you back. He will clarify all the conditions of the order, answer questions regarding the quality of the product and its features. It will also tell you about payment and delivery options.
What does the muffler consist of?
The main part of the exhaust system serves to absorb noise. On the Lada Kalina car, this function is performed by a pipe, which includes the muffler itself and its resonator.
The thickening is the resonator, the end is the muffler itself
The pipe has a completely sealed body, which is manufactured using the rolling method, that is, without the use of a welding machine. Thanks to this, the muffler is durable and does not corrode. And the resonator, which is also located in the pipe, consists of several closed chambers. These chambers are connected to each other by small tubes with holes in them. Thanks to this structure, the resonator can quickly smooth out all acoustic vibrations. In the latest modifications of the Lada Kalina, the inside of the resonator is lined with sound-absorbing material.
Delivery by transport company
Delivery by one of the transport companies with a representative office in your city. Delivery time: 2-10 days depending on the distance of your locality from Togliatti. The most convenient and fastest way to deliver orders of different sizes. Delivery cost from 250 rub. depending on weight and delivery distance.
Orders are sent by transport companies based on 100% payment for the order. Dispatch by transport companies PEK, KIT, Baikal-Service is carried out on Wednesday, Thursday and Friday.
Intake manifold removal process
Dismantling the intake manifold is carried out with the car cooled down for safety reasons. So, this operation can take about an hour and will require some knowledge of the car’s design, namely the injection system. So, let's consider the sequence of actions for dismantling the unit:
- We dismantle the throttle. To do this, it is not necessary to disconnect all the pipes and pipes; it is enough to disconnect the unit from the manifold and move it to the side. Of course, at the same time, it is still recommended to remove the throttle valve completely for cleaning.
- Disconnect the throttle cable from the intake manifold.
- Disconnect the wires from the ignition coils. This is easy to do; you just need to disconnect the connectors.
- Disconnect the camshaft position sensor wires.
- Disconnect the wiring harness from the absorber purge valve.
- Disconnect the brake booster hose from the intake manifold.
- Unscrew the clamp and disconnect the crankcase ventilation pipe.
- Unscrew the self-tapping screw securing the guide tube of the oil level indicator.
- We take out the dipstick along with the guide tube.
- Using a socket or a 10mm wrench, unscrew the nuts securing the intake module and the ignition coils of cylinders 1, 2 and 3.
- We dismantle the ignition coils of cylinders 1, 2 and 3.
- Now, you can unscrew the direct fastenings of the intake manifold to the cylinder head.
- Move forward and remove the manifold.
It is worth noting that installation of the intake manifold is carried out in the reverse order and does not require any additions or changes.
Priora fuel system
• gas tank;• pump and filter located in the tank;• fuel line;• pressure regulator;• fuel rail;• four injectors;• throttle valve;• intake manifold;• electronic engine management system.
The work is based on the fact that when the ignition is turned on, the electric fuel pump starts working, which builds up pressure in the rail. Further, when the engine is cranked by the starter, the electronic control unit opens and closes the injectors, the air-fuel mixture enters the combustion chambers, according to the operating diagram.
After fuel enters the combustion chamber, a spark is formed between the electrodes of the spark plugs. The fuel ignites and the engine starts. The injectors are electromagnetic valves, and the control unit is responsible for their operation. He is also responsible for the quality of the mixture, the ratio of air and gasoline. Sometimes problems arise and you have to disassemble the fuel system for repairs.