The VAZ 2106 intake manifold itself is not difficult to remove, but before doing this, you will first have to perform the following procedures:
To perform this repair you will need the following tools:
- Pliers
- head 13, regular and deep
- crank and ratchet handle
- extension cords
After the air filter, its housing and carburetor are removed from the car, you can proceed directly to the intake manifold. The first step is to remove the two hoses, which are shown in the picture below:
Now we unscrew the fastening of the air intake housing, which is screwed to the manifold on the left side:
Now you can unscrew the nuts securing the manifold to the cylinder head of the VAZ 2106. First, unscrew the two upper ones, which are located at the edges:
The most convenient way to do this is with a ratchet with a head:
And then unscrew the three nuts securing the intake manifold from below. Two are visible in the photo, and the third is in the center, but it is not visible.
Here you will need a long extension cord with a ratchet handle, otherwise you will have to suffer for a long time:
Now the only thing left to do is to pull the collector body with a certain amount of force and remove it from the studs. This operation is clearly demonstrated below:
Then we finally remove it from the studs and remove it from the engine compartment:
If necessary, we replace this part. The price of a new manifold for the VAZ 2106 and other Zhiguli models of the classic family is around 1,500 rubles.
Installation proceeds in reverse order.
Preamble.
A number of tuning camshafts allow their installation in a serial cylinder head. This is where most people begin their journey of fine-tuning the internal combustion engine. The next logical step is to install a tuned exhaust system and a tuning receiver. The very idea of “put it in and go” without the need for modifications (in particular modifications to the cylinder head) is attractive in its simplicity, but it is also the reason for making an error: the diameter of the channel in the cylinder head is smaller than the diameter of the manifold of the tuning receiver - a step is formed at the junction; The situation is the same with the exhaust manifold.
Chapter 1. Release.
On the exhaust side, the presence of a step at the junction is not so critical; the diameter of the manifold pipe is larger than the diameter of the channel in the block head, so the exhaust gases flow, as they say, “through the wool”. Moreover, having a step can be helpful. As is known, the “spider” manifold is tuned to a certain range of engine operating frequencies, upon reaching which, due to resonance effects, a vacuum jump appears near the exhaust valve, performing useful work. However, at a frequency half that of the resonant frequency, instead of a vacuum, a wave of increased pressure comes to the valve, which greatly impairs the purging of the combustion chamber from residual gases. * Therefore, there is a noticeable “dip” in the torque and power graphs, which, however, can be reduced by some design solutions. One of them is the deliberate creation of a step at the junction of the exhaust manifold and the channel in the cylinder head. The step reduces the influence of the high pressure wave by creating an obstacle for it. However, this is “not free”; the step affects the rarefaction wave in the same way.
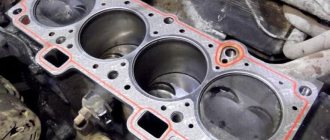
Many people mistakenly consider the presence of a step to be a factory defect (or an intentional flaw to save labor costs) and remove it. But complete combination of channels is justified only on single-mode engines that constantly operate in a rather narrow speed range (exactly in the range where a tuned exhaust system is effective, and where, with other modifications, maximum torque is ensured). These are engines for exclusively sports cars that are not used in cities with traffic lights and traffic.
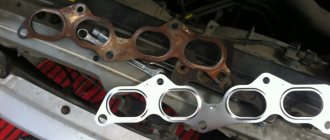
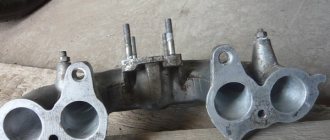
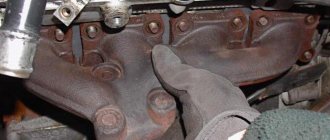
You don’t need to look far for an example: even on a modified cylinder head of an engine of the classic VAZ family (channel porting up to 29mm **), the step at the junction is preserved even with a standard cast-iron manifold, the diameter of which is 30mm (see photo). When installing a customized “spider” collector, the internal cross-section of the pipes of which, as a rule, is 35 mm, it is also advisable to leave a step, while the exhaust channel must be modified so that a step 1..1.5 mm wide is at the bottom of the channel, and in the upper sector should be aligned.
* a detailed discussion of the principle of operation of a tuned exhaust system is beyond the scope of this note ** about the configurations of modified cylinder heads, read the article “Refinement of the cylinder head”
Chapter 2. Inlet.
The intake step has an extremely negative effect. Due to its presence in the air flow, parasitic vortices (turbulence) are created, which, with increasing engine speed, “lock” the channel more and more, creating a so-called “air plug”. Therefore, combining channels when installing a non-standard receiver is mandatory. The exception is receivers installed on a standard manifold and having a similar internal diameter of pipes (for example, receivers for a 16V cylinder head installed on factory aluminum “horns”). When modifying the channel in the cylinder head in order to align it with the manifold, a small reverse difference in diameters is allowed (i.e. the channel in the cylinder head is 1..2 mm larger than the channel in the manifold), which does not lead to disruption of the air flow, since its movement occurs “along the fur” "
On AvtoVAZ engines, the receiver (intake manifold) is mounted to the cylinder head without guides, so it has a fairly large degree of freedom relative to the studs (this problem is especially acute on 8V engines, both front-wheel drive and rear-wheel drive VAZ). A step at the junction will arise again if, when installing the receiver, you involuntarily take advantage of this “freedom” and shift the centers of the channels relative to each other, which reduces all efforts to align to nothing. The correct solution would be to install additional pins that will center the receiver during its installation, ensuring the alignment of the channels.
Signs of a burnt gasket
The easiest way is for the owner of a car with an injection engine, the operation of which is monitored by an ECU (electronic control unit). It sends a signal about a gasket failure to the dashboard, where the Check light comes on. This means that the lambda probe, which is usually equipped with the manifold, detected a change in the volume of oxygen in the exhaust, informing the ECU. The engine begins to operate in emergency mode until the defect is eliminated.
“Symptoms” of a burnt gasket:
- the engine is unstable;
- makes an uncharacteristic sound during operation;
- The cabin smells like exhaust gases.
ATTENTION! The fact that the exhaust manifold gasket has burned out is indicated by a recognizable chirping sound created by gases that break through the seal. Motorists often say that the engine “cuts”
Exhausts through ventilation and heating systems quickly penetrate into the cabin, which is fraught not only with a deterioration of the microclimate, but also with negative consequences for health. This is why replacing the exhaust manifold gasket becomes a forced but necessary measure.
Operating principle of a catalytic converter
This element of the exhaust system is also often called a neutralizer or catalyst. Its design is a bunch of ceramic cells, each of which is coated with a small layer of an alloy of iridium and platinum.
The essence of the work, as in the case of the collector, is quite simple. When exhaust gases come into contact with the converter, they are reduced to oxygen and nitrogen oxides, which further improves the efficiency of the internal combustion engine. Eventually, after passing through the converter, carbon dioxide and nitrogen end up in the vehicle's exhaust pipe.
Causes of malfunctions
The gasket is placed between the exhaust manifold and the cylinder head. The stamped asbestos gasket is resistant to high temperatures, can be compressed (creating the necessary impermeability) and has increased strength. To enhance the latter quality, the exhaust manifold gaskets are additionally reinforced with steel.
IMPORTANT! The main task of the gasket is to prevent exhaust gases from penetrating under the hood, where they can cause ignition of parts/assemblies of the engine compartment. The gasket is recognized as the most vulnerable point of the exhaust manifold, which operates under extreme loads in both temperature and pressure
It is not surprising that gaskets have to be changed not only on cars with a significant mileage, but also on almost new cars
The gasket is recognized as the most vulnerable point of the exhaust manifold, which operates under extreme loads in both temperature and pressure. It is not surprising that gaskets have to be changed not only on cars with significant mileage, but also on almost new cars.
Gaskets need to be rotated for several reasons:
- poor factory quality;
- engine overheating due to intensive use;
- engine repair (a used gasket loses its properties when dismantled).
Let's summarize.
Correct installation of gas equipment is the key to smooth and flawless engine operation. During installation, everything is important, from small things to serious nuances. The insertion of fittings into the manifolds is also a very important point; failure to comply with the insertion rules is fraught with problems during operation, as well as disturbances in engine operation. Only correctly selected gas equipment and compliance with installation rules can provide a good result.
That's all, I hope you found it interesting. Thank you for reading to the end, see you again at HBOshnik.
Removing and replacing the intake manifold
In case of damage, it is necessary to remove the VAZ 2106 intake manifold and replace it with a new product. For this purpose it is necessary:
Disconnect the vehicle from power by removing the wire from the negative terminal of the battery. Drain the antifreeze from the cooling system into a specially prepared container. Remove the air purification filter on cars of early production years, and in modern vehicles, also disconnect the air supply hose from the filter. Next, we carry out similar actions with the vacuum tube and the ventilation hose going to the crankcase from the air supply chamber
Having removed the fasteners, we dismantle this camera with the hose. Disconnect the fuel supply hose, while paying attention to stopping the flow of gasoline. Remove the throttle cable fastening bracket, the sealing ring and disconnect the cable from the throttle valve lever. We put marks on the antifreeze supply hoses from the body of the air damper of the automatic operating principle. We exclude the leakage of antifreeze from the removed cooler pipes. We put marks and disconnect the vacuum tubes from the front of the carburetor along with the electrical wires and the quarry ventilation hose (if any). We dismantle the fasteners and unscrew the brake booster vacuum hose from the intake manifold. On some modifications, it is necessary to remove the installed wiring from the connector block coming from the temperature sensor. We dismantle the fasteners of the generator device from above to the intake manifold of the “six”. On some modifications, it is necessary to disconnect and dismantle the crankcase ventilation hose from the aft part of the cylinder head. We visually inspect the disconnection of all components of the vehicle systems from the intake manifold and dismantle it.
Installation of the intake manifold is carried out in the reverse order of removing the product, taking into account the following features:
When dismantling the carburetor device, the product is installed with a new gasket. When removing the mounting of the generator electric machine, the mounting of the fasteners is carried out before installing the intake manifold of the “six”. Its installation is carried out on a cylinder head with an updated seal, and fastening is carried out with a torque wrench with a fixed torque. Check the correctness of all connections. We fill in the coolant, install and adjust the throttle cable, and if the carburetor settings are violated, adjust the idle speed and carbon monoxide concentration. We connect the intake manifold cooling outlet hose from the system.
The necessary modifications to the intake manifold are carried out to ensure a more uniform flow of the gasoline-oxygen mixture through the cylinders of the power plant. The mixture of fuel and air “pulsates” in the cylinders due to incorrect placement of the carburetor valves above the intake manifold of the “six”. If some of the partitions on neighboring highways are removed, then the result is the elimination of design errors in standardizing the linear dimensions of highways. In addition, a volumetric space is formed under the carburetor device, where the diffusion of the fuel-air mixture occurs before distribution along the highways.
Another way to modify the intake manifold is to completely coaxially combine the carburetor windows, holes and cylinder head. Obstacles in the form of steps at the joints of the products create strong air flows that prevent the correct flow of fuel aerosol into the engine cylinders, and the vehicle loses its aerodynamic properties. It is necessary to remove these internal elevations and polish the internal planes of the cylinder head and intake manifold, which will make it possible to increase the value of the torsional moment and the maximum dynamics of the car. At higher engine speeds the result will be more noticeable.
Dismantling
There is only one difficulty in this process - the inaccessibility of some fasteners. It is best to carry out this “operation” in a viewing hole or on a lift. Of course, this is not necessary, but it is much more convenient.
Work order:
- First you need to remove the negative terminal from the battery or turn off the mains switch.
- Next, it is recommended to drain all the antifreeze into a container prepared in advance.
- Next, you need to disconnect the fuel pipes. If the coolant is not drained, at this stage it will go into the cylinders.
- Now you have to find the throttle position and idle speed sensors, and then remove the wires from them.
Reasons for removing and replacing the exhaust manifold Lada Kalina
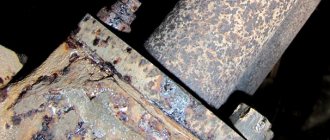
The exhaust manifold is made of cast iron, which is very resistant to temperatures. However, a critical temperature - 800-900 degrees - can render the distributor unusable. In addition, there are many other factors that negatively affect it. This list can include:
- Mechanical damage;
- Loss of tightness at the junction with the cylinder head (cylinder block);
- Inoperative condition of the gasket between the BC head and the manifold;
- Due to constant overheating, cracks or warping may occur.
Sometimes replacing the exhaust manifold on Kalina 8 valves is necessary in order to install a more advanced and high-quality part.
Important! The exhaust manifold gasket is created from pressed reinforced asbestos and is necessary to create a tight connection between the BC head and the distributor. The fact is that the BC head is made of aluminum, and the manifold is made of cast iron. Therefore, under the influence of temperature, these two elements expand and contract differently
And asbestos allows you to coordinate the difference in thermal expansion. The main threat to the gasket is constant exposure to high temperatures.
Therefore, under the influence of temperature, these two elements expand and contract differently. And asbestos allows you to coordinate the difference in thermal expansion. The main threat to the gasket is constant exposure to high temperatures.
There are a number of symptoms that will tell you that you need to replace the exhaust manifold of your Lada Kalina:
- In any operating mode, the engine makes an unpleasant characteristic sound;
- Exhaust gases enter under the hood or even into the interior of your car;
- The engine loses power due to a mismatch between the BC head and the manifold.
Adjustment and repair of the unit after checking the vacuum brake booster
In general, adjusting the VUT comes down to adjusting the free play of the brake pedal. To set it correctly, you need to adjust the length of the rod. The adjustment bolt controls the gap/protrusion. Correctly adjusting the position of the bolt itself will allow you to set the ideal timing of the valves.
When the leak test is completed, do not forget to adjust the free play of the brake pedal. Adjusting the rod length creates a gap that determines the amount of pressure on the brake cylinder
Therefore, it is very important to set the rod length correctly and set the appropriate gap. The free play of the pedal when the engine is not running should be from five to fourteen millimeters
This gap is controlled by a bolt located above the plane of the vacuum brake booster. A small gap leads to jamming of the working cylinder, resulting in rapid wear of the pads and increased fuel consumption of the car. In addition, the car begins to slow down randomly, as if you were driving with a handbrake. A large gap, on the contrary, leads to an increase in pedal travel, which indicates a violation of the tightness in the assembly
The free play of the pedal when the engine is not running should be from five to fourteen millimeters. This gap is controlled by a bolt located above the plane of the vacuum brake booster. A small gap leads to jamming of the working cylinder, resulting in rapid wear of the pads and increased fuel consumption of the car. In addition, the car begins to slow down randomly, as if you were driving with a handbrake. A large gap, on the contrary, leads to an increase in pedal travel, which indicates a violation of the tightness in the assembly.
Above we described how to check the operation of the brake vacuum device and adjust its operation if necessary. Now let's say a few words about its repair.
To ensure your own safety if your amplifier breaks down, take immediate action to repair or replace it. And if you can replace vacuum hoses in gasoline cars or pumps in diesel cars yourself, without resorting to the services of a car service, then it is recommended to entrust more serious work to professionals.
Of course, it costs some money, but when your own safety is at stake, it is better not to skimp. Contact the specialists. They will not only carry out the inspection competently, but also perform all the necessary work efficiently and with a guarantee.
It should be noted that after repair, it is important to synchronize the wheels when braking and check the ABS/ESP system. This requires a diagnostic stand and specialized equipment.
There are times when it is more expensive to repair a vacuum cleaner than to purchase a used amplifier that is in good condition. Therefore, it is recommended to look for the device at a disassembly site if necessary.
If you feel confident in your own abilities and, after checking, decide to repair the faulty vacuum booster yourself, then proceed as follows.
To begin, remove all the upholstery in the engine compartment and remove the windshield trim. Do not remove the tubes leading to the GTZ. This may allow air to enter the system.
Next, unscrew the cylinder from the vacuum booster and carefully tilt it forward to prevent deformation of the brake pipes. Before doing this, the vacuum transfer hose must be removed from the amplifier fitting
Carefully study the recommendations given by the manufacturer and proceed to dismantling the amplifier. Unscrew the mounting bolts and disconnect the terminal of the wire going to the brake light.
Only then remove the pedal using a special tool. If you are well versed in the design of the car, you can cope with checking and repairing the VUT. However, it is better to first go online and find instructions with an amplifier circuit. This will significantly speed up the implementation of the task and increase your chances of success.
Choosing a resonator for VAZ 2107
Four types of resonators are installed on the VAZ 2107:
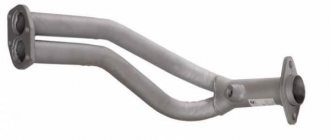
- Long section with one tank. Installed on all classic carburetor VAZ 2101-2107 with an engine capacity of no more than 1.3 liters. Catalog number - 2101–1202005.
- Long section with two tanks. Installed on carburetor and injection VAZ 2106-07, complying with Euro 0 standards, with an engine capacity of 1.5-1.6 liters. Catalog number - 2103–1202005.
- A shortened pipe with one tank and a front mounting flange with two mounting bolts. Installed on injection VAZ 2106-07, meeting Euro 2 requirements. Catalog number - 21073-1200020.
- Short section with one barrel and a front flange with three mounting bolts. Installed on injection VAZ 2106-07, meeting Euro 3 requirements. Catalog number - 21074-1200020.
The choice of resonator depends on the specific modification of the VAZ 2107. When purchasing, you need to keep in mind the following recommendations:
- On the carburetor version with a 1.3 liter engine, you can easily install a long section with one (VAZ 2101-07) or two (VAZ 2106-07) tanks. In the second case, the sound of the running engine will become quieter, but the power will drop by about 3-5 hp. With. Shortened resonators will not work.
- Both long resonators are suitable for carburetor and injection VAZ 2107, corresponding to Euro 0. When installing a part with one tank, the exhaust noise will increase and the engine power will increase slightly. Short pipes cannot be installed.
- The exhaust system for Euro 2 is equipped not only with a catalyst, but also with an oxygen sensor (lambda probe) mounted in the exhaust pipe. For such cars, the original shortened resonator with a two-bolt flange or any long section is suitable. However, such a resonator is not suitable for the VAZ 2107 Euro - it is connected to another catalyst and differs in length.
- The exhaust system of the VAZ 2107, manufactured in accordance with Euro 3 standards, has two oxygen sensors. On the VAZ 21074 you can install the original short resonator or a long one, but with some modifications.
Once it was possible to modernize a 1.3 liter engine by increasing the displacement to 1.7 liters by replacing the crankshaft and boring the cylinders to size 82 mm. After which it was necessary to replace the “native” resonator with one barrel, because with an increase in engine power, the exhaust pipe began to roar more strongly, especially at speeds above 2500 rpm.
Installing long sections on the VAZ 2101-07 that comply with Euro 2 and 3 standards is advisable in cases where it is necessary to discard a failed catalyst. The latter is quite expensive, and not every car owner is ready to make a full replacement. In this case, after installing a long resonator pipe, you will have to install a snag instead of the second lambda probe or reprogram (reflash) the engine control controller.
Crankshaft pulley
The generator and water pump on the VAZ 2106 are driven by a belt from the crankshaft pulley
When carrying out repair work on the engine, attention should also be paid to the condition of the pulley: is there any visible damage (cracks, scuffs, dents). If defects are found, the part should be replaced
When repairing an engine, carefully inspect the crankshaft pulley for damage. If defects are found, the part must be replaced
During the installation process, the pulley should sit smoothly on the crankshaft, without distortion. Despite the fact that the pulley fits quite tightly on the shaft, a key is used to prevent rotation, which can also be damaged. A defective part must be replaced.
To protect the crankshaft pulley from turning, a key is used. The part may break over time, which indicates the need to replace it.
Crankshaft marks
In order for the engine to work flawlessly, after installing the crankshaft, the correct ignition setting is necessary. There is a special casting on the crankshaft pulley, and on the cylinder block there are three marks (two short and one long) corresponding to the ignition timing. The first two indicate an angle of 5˚ and 10˚, and the long one - 0˚ (TDC).
There are marks on the crankshaft pulley and on the cylinder block by which the first piston is installed at TDC for correct ignition adjustment
The mark on the crankshaft pulley is located opposite the length of the marks on the cylinder block. There is also a mark on the camshaft sprocket that must be aligned with the casting on the bearing housing. To rotate the crankshaft, use a special wrench of the appropriate size. According to the marked marks, the piston of the first cylinder is at top dead center, while the slider on the ignition distributor must be installed opposite the contact of the first cylinder.
Despite the fact that the crankshaft is a critical component of any engine, even a novice auto mechanic can repair the mechanism, with the exception of the grinding stage. The main thing is to select the elements according to the dimensions of the shaft, and then follow the step-by-step instructions for assembling it.
Problems when paying with bank cards
Sometimes difficulties may arise when paying with Visa/MasterCard bank cards. The most common of them:
- There is a restriction on the card for paying for online purchases
- A plastic card is not intended for making payments online.
- The plastic card is not activated for making payments online.
- There are not enough funds on the plastic card.
In order to solve these problems, you need to call or write to the technical support of the bank where you are served. Bank specialists will help you resolve them and make payments.
That's basically it. The entire process of paying for a book in PDF format on car repair on our website takes 1-2 minutes.
If you still have any questions, you can ask them using the feedback form, or write us an email at
Exhaust system functions and parts replacement intervals
Despite its apparent simplicity, the exhaust system performs several important functions:
- removal of fuel combustion products;
- reduction of noise level from the exhaust;
- maintaining air balance in intake and exhaust systems;
- ensuring ventilation and cleaning of cylinders;
- reduction of CO content (in the presence of a catalyst).
Exposure to high temperatures, moisture, fuel and oil combustion products leads to through corrosion of exhaust system parts. This is aggravated by the external influence of gravel, sand and salt solutions that are used to treat roads in winter. Therefore, parts of the system have to be changed. The frequency of replacement depends on the following factors:
- car use activity;
- frequency of machine operation in bad weather (rain, snow);
- fuel quality;
- quality of exhaust system parts.
Tip: You can extend the life of the exhaust system by treating the installed parts with graphite lubricant. All that remains is to start the engine and warm up the exhaust system. The parts will heat up and the lubricant will burn out, leaving a thin layer of film that reliably protects against corrosion. Another option is to purchase an aluminum, rather than steel, resonator, muffler and “pants” of the VAZ 2107. They will cost more, but aluminum is less susceptible to corrosion and will last much longer.
How to remove the exhaust manifold? We do it in 3 steps
Every VAZ owner needs to know how to remove the exhaust manifold, and these difficult movements have to be done in order to change the gasket on the car - that is, quite often.
However, if you do not pay due attention to it, the gasket will burn out, the exhaust will rush under the hood, and the sound of the engine will become loud and intrusive (of course, some may even like this, since the engine begins to roar abruptly, and the power of the engine itself, at first , increases slightly). If you continue to ignore the gasket burnout process, you can expect poisoning right in the driver’s seat. And how “glad” your passengers and those standing next to you in a traffic jam will be “happy” to the growl of the engine! Colleagues, as a rule, tend to call such unfortunate drivers the worst possible words - cultural and not quite.
To avoid all of the above, the need for repairs is very, very urgent. So what should we do first?
How to remove the exhaust manifold?
This part of the process is quite simple, but before you begin, you will have to remove additional components. After all, the designers of some models tried very hard: sometimes, in order to reach something in the car, you have to disassemble half of the car. So, let's proceed directly to the process itself, described in stages.
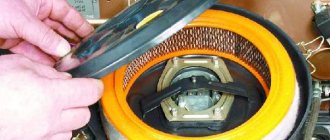
Without this you won't be able to get to the exhaust manifold. The good news is that the removal process itself is not too difficult or troublesome. If the engine is a carburetor, 3 holders on the filter cover snap off, the screw located in the center is unscrewed, and the cover is removed. The air filter itself is removed and set aside. 4 nuts are unscrewed from the body, it is raised - and you get access to further work.
On an injection engine we proceed differently: unscrew the screws (4 pieces), remove the cover. If she is stubborn and doesn’t want to leave, you will have to disconnect the mass air flow sensor connector
. The filter is pulled out, the fasteners are unscrewed from the housing, it is removed - move on to the next step.
Those who have an injector can immediately proceed to the last stage. Owners of carburetor engines, after removing the air filter, plug the holes with a dry rag - to prevent foreign objects from falling into them (in particular, loose nuts and other small things - then there will be no trouble if something falls there). The wire from the EKXX valve is disconnected, the clamps are unscrewed and both fuel hoses are removed. The suction cable is loosened and removed. The end of the spring is removed from the throttle control rod, after which it is completely removed.
Afterwards, the throttle valve itself is disconnected, the power plugs and the screw sensor are disconnected, and the carburetor heating hoses and vacuum tube are removed. Next, the crankcase ventilation hose is dismantled, the fastening nuts (connecting the carburetor to the intake manifold) are unscrewed, and the carburetor is smoothly and accurately, without jerking, pulled up from the studs.
Since we've removed the throttle valve, it wouldn't hurt to clean it.
At this final stage, 4 nuts are screwed off the exhaust manifold, with which it is attached to the pants (that is, the exhaust pipe). The said pants are carefully removed from the heels and moved a little to the side. The 3 nuts remaining in place are unscrewed. The exhaust manifold is retracted; at the same time, it slides off the pins holding it.
You can do what it was dismantled for: actually replacing the gasket. If it has managed to stick to the cylinder head, pry it off with something thin (screwdriver, knife) and remove it without any residue. Burn marks are removed with a special compound, which is applied to the collector for a quarter of an hour.
autoflit.ru
What to put?
Sometimes there is a need to completely replace the carburetor. Therefore, you immediately need to decide which model to buy. Today there are two most common families: Solex and Ozone carburetors.
Many car owners don’t even know what kind of device they have. Externally, these devices can be distinguished by the following characteristics.
- In Ozone, the fuel intake fitting has the shape of an oblong tube, in Solex it is a return
- Ozone consists of three parts: the throttle valve axis, the float chamber and the cover. Solex consists of only two parts: the lower part with the float chamber and the upper part - the cover in which the float is held.
- The ozone has a vacuum valve that controls the opening of the throttle valve of the second chamber.
- On a Solex carburetor, the air damper is controlled by such a large lever: On ozone, this lever looks completely different. It is also called a three-arm lever.
In the 90s, a massive hobby began to replace the standard Ozone with Solex. Taxi drivers were especially guilty of this. This was explained by the fact that fuel consumption decreased slightly, and engine dynamics became a little better.
If you install an oxygen sensor and compare its values on different models, you can understand the reason for this phenomenon. With Solex, after adjusting the mixture composition, the range in composition is no more than one. On ozone, after adjusting the mixture at the moments of braking and acceleration, the mixture acquires a very strong spread of values. At the same time, it can increase or decrease by a large value.
This is due to the fact that the jets on the Solex are located in the center of the float chamber. When the position of the car changes during sharp turns or during acceleration and braking, part of the fuel is deflected by inertia towards one of the walls of the float chamber. The central location of the jets reduces the likelihood of changes in the fuel composition at these moments.
On ozone, the device is significantly different. The jets are not in the center. Therefore, fuel moves around the float chamber in different directions, which significantly changes the spread of air proportions in the fuel mixture. In different driving modes, the engine receives a different mixture composition.
So, the Solex carburetor on the VAZ 2106 keeps the mixture more stable while driving. This is its main technical advantage.
Replacement of exhaust manifold gasket VAZ-2114 8 valves
I decided to solve the problem with the sound that was in the previous post. I stopped by the station, the man listened and said that the manifold gasket needs to be changed, there is a sound, and it’s because of the “clatter”, I asked how much it would cost to replace the gasket? They told me that the price would be 3800-4500, here I’m a bit of an ass, previously 2800-3500 for a pant liner, but now 4000 for a manifold. Okay, I understand, I went to the store, took the gasket, the price turned out to be 170 rubles, the original one, I thought it would be more expensive, but oh well. I chose a day and went to the garage, watched some videos on how to change this gasket, but everywhere they wrote that you don’t need to change it yourself, it’s very dangerous, etc. My arms grow straight, so I’ll do it myself. But unfortunately, I didn’t find a detailed example for beginners with photographs, so I decided to make one, because you never know, it will be useful for someone. Let’s start:
Attention, I will immediately warn you that when you unscrew the manifold, do not under any circumstances allow your nuts or washer, no matter what, to fall into the intake and exhaust holes!
The main signs and causes of failure of the VAZ 2114 intake manifold
- The main symptom of a failed intake manifold is a sudden loss of car engine power.
- at the same time, there is an increase in fuel consumption, with a deterioration in traction and a drop in engine performance.
It is important to determine the cause of the breakdown and eliminate it in time.
- Often a problem is indicated by a missing stud in one of the manifold flanges. It simply comes off when the collector goes “screw”, that is, due to temperature changes, for example in winter, or over time (average service life is 7 years), the collector begins to bend along the plane, and the pin simply “spits out”, pulls out .
- Due to the fact that the manifold has “leaded”, a crack may form and, as a result, exhaust gases from the engine escape, and the manifold must be replaced.
Before changing the gasket, make sure that all the studs are in place. When you remove the manifold, you also need to check the flatness of the exhaust manifold, because often these areas require grinding or replacing the entire part
Manifold flaps often fail. This happens for several reasons: low-quality material used to make these dampers, too high a temperature, and the presence of oil condensate.
A sign that oil has entered the intake manifold is increased oil consumption.
The control valve for these dampers may also fail.
How to check the vacuum booster
If the symptoms listed above occur, the vacuum unit must be checked. You can determine the functionality of the device without removing it from the car. For diagnostics, we need a rubber bulb from a hydrometer and a screwdriver (slotted or Phillips, depending on the type of clamps).
We carry out verification work in the following order:
- Turn on the parking brake.
- We sit in the cabin and press the brake pedal 5-6 times without starting the engine. On the last press, leave the pedal in the middle of its travel.
- We take our foot off the pedal and start the power plant. When the “vacuum” is working, the pedal will move down a short distance.
- If this does not happen, turn off the engine and move on to the engine compartment. We find the amplifier housing there, inspect the check valve flange and the end of the connecting hose. If they have visible breaks or cracks, we prepare to replace the damaged parts.
Replacing the intake manifold gasket VAZ-2114 injector: video
Replacing the intake manifold gasket on a VAZ-2114 car, as well as replacing the exhaust manifold gasket, is a very complex procedure and requires certain knowledge and experience. Of course, you will have to do a colossal amount of work and spend a lot of time, but this will save 4-5 thousand rubles on replacement at a car service center.
Below he will talk about replacing the receiver and manifold. During the replacement process, the intake manifold gasket is also changed:
The material will tell you how to properly replace the intake manifold gasket, and will also tell you about some of the subtleties and nuances of the process.
Gasket replacement process
Design diagram of the intake and exhaust manifolds
Since the gasket is located on the manifold studs, to replace it the unit will have to be completely dismantled. Of course, this operation will take a lot of time and effort.
Before the car enthusiast proceeds directly to the replacement process, it is necessary to collect the tools that will be needed. So, the tools without which replacement is impossible: ratchet and sockets for 17, 19; screwdrivers with flat and Phillips tips; a set of keys and the gasket itself.
The tools are assembled, now you can go directly to performing all kinds of operations. Before removing the manifold, you need to spray the bolts with WD-40, which will remove corrosion and allow you to remove the part without any problems.
Step-by-step instructions for replacing the intake manifold gasket (with photo)
Let's look at step-by-step instructions for replacing the gasket:
- Remove the negative terminal from the battery.
- We remove the throttle cable.
- We are dismantling the fuel pipes. More precisely, they need to be disconnected and taken to the side. Remove the fuel pipes shown in the photo
- Disconnect the throttle position sensor connector.
- Disconnect the idle air control wire connector.
- Unscrew the crankcase ventilation pipes and brake booster. Unscrew the pipes shown in the photo
- We are dismantling the receiver.
- Remove the wires of the injection control unit (injectors).
- We dismantle the fuel rail without dismantling the injectors.
- Remove the thermal shield from the manifold.
- Disconnect the exhaust pipe. This is the quality of nuts installed at the factory. We dismantle the exhaust pipe.
- Remove the exhaust manifold. Unscrew the fastening nuts and remove the exhaust manifold Removing the exhaust manifold
- After unscrewing the fastening nuts, remove the intake manifold. Removing the intake manifold
- We are replacing the gasket. We are replacing the gasket
- We carry out the assembly in the reverse order.
As you can see, the replacement of the intake and exhaust manifold gaskets takes place simultaneously and, by and large, is the same gasket material.
Part selection
21083-1008081 – original catalog number of the gasket for the intake and exhaust manifold. It consists of two parts or, on newer models, one. This part is produced at the AvtoVAZ plant. The average cost is 250 rubles per piece (if there are two of them) or 450 rubles (for a whole one).
One-piece manifold gasket A gasket that consists of two parts A one-piece gasket and one that consists of two parts together
In addition to the fact that there is an original part, you can also find a number of analogues that are recommended for installation. Let's consider which gaskets can be installed under the VAZ-2114 manifolds:
- Trialli GZ 102 0013 is a well-known Russian manufacturer that produces a wide range of analog parts for domestically produced cars. The cost of the gasket is 200 rubles per piece.
- AJUSA 13065200 is another domestic manufacturer that has won consumers over the quality of its products. The cost of the product is 450 rubles.
- Ukrainian also produces and supplies this gasket. But, if you look at it, the quality of the product leaves much to be desired, since the resource is designed for only 20,000 km.
Causes of malfunction
After we have considered the process of replacing and selecting a part, it is necessary to consider the main reasons for the failure of the spare part:
Wear
During operation, the car emits hot gases that destroy the surface of the gasket, as a result of which it can tear or delaminate. Since there is only one gasket for the intake and exhaust manifolds, gasoline entering through the first channel can get on the gasket, which also affects the integrity and structure of the material from which it is made.
The quality of the part is not always high, even original, so when choosing, you should pay special attention to this. Bent valves due to irregular valve timing do not threaten the 8-valve valve
Camshaft installation
The shaft installation process occurs in the reverse order using the same tools as for its removal. Additionally, you will need a torque wrench that can be used to control the tightening force. The work is carried out as follows:
- Before installing the part into the body, lubricate the support journals, bearings and cams with clean engine oil.
- We mount the product into the housing and tighten the fastening of the thrust plate.
- Checking the rotation of the shaft. It should rotate easily around its axis.
- We mount the housing together with the shaft on the studs in the cylinder head and tighten it in a certain sequence with a force of 18.3–22.6 Nm.
- We perform final assembly after marking.
Installation by marks
Upon completion of the replacement, it is necessary to align the camshaft and crankshaft to the marks. Only after such a procedure will the ignition timing be correct and engine operation stable. An additional tool you will need is a wrench to rotate the crankshaft, and the work itself consists of the following steps:
- We put the RV sprocket in place and tighten it, but not completely.
- We tighten the chain. To do this, unscrew the tensioner nut, turn the crankshaft a little, and then tighten the nut back.
- We turn the crankshaft with a wrench until the mark on the pulley is positioned opposite the length of the mark on the timing cover.
- The mark on the RV star should coincide with the ebb on the body. If this does not happen, unscrew the bolt, remove the gear and shift the chain by one tooth in the required direction.
- We install and clamp the gear with a bolt, check that the marks on both shafts match. We fix the bolt with a special washer.
- We adjust the thermal clearance of the valves.
- We install the valve cover, tightening it in a certain order.
- We install the remaining elements in their places.
When reinstalling the valve cover, I always pay attention to the condition of the gasket, even if it has recently been changed. There should be no tears, strong pressing or other damage on it.
In addition, the seal should not be “oak”, but elastic. If the condition of the gasket leaves much to be desired, I always replace it with a new one, thereby eliminating possible oil leakage in the future.
Adjustment of valves
It is recommended to adjust the valves on the “classic” every 30 thousand km. mileage or after engine repair. Tools you need to prepare:
- open-end wrench for 13 and 17;
- probe 0.15 mm.
To adjust the thermal clearances of the valves, use a special feeler gauge.
The work is carried out on a cooled engine after removing the valve covers and tensioning the chain:
- We combine the crankshaft and camshaft marks with the marks, which corresponds to the top dead center of the fourth cylinder.
- We check the clearance of valves 6 and 8. To do this, insert a feeler gauge between the cam PB and the rocker. If it fits in without effort, the gap needs to be made smaller. If it fits tight, then more.
- To adjust, loosen the lock nut with a 17 mm wrench, and use a 13 mm wrench to set the required gap, after which we tighten the lock nut.
- We adjust the remaining valves in the same way, but in a certain order, for which we turn the crankshaft.
Table: procedure for adjusting cylinder head valves on a “classic”
| Crankshaft rotation angle, o | Camshaft rotation angle, o | Cylinder numbers | Adjustable valve numbers |
| 4 and 3 | 8 and 6 | ||
| 180 | 90 | 2 and 4 | 4 and 7 |
| 360 | 180 | 1 and 2 | 1 and 3 |
| 540 | 270 | 3 and 1 | 5 and 2 |
Video: adjusting valves on a VAZ 2101–07
Some car enthusiasts use a narrow feeler gauge from the kit to set valve clearances. I would not recommend using it for the procedure in question, since if the valve lever is skewed, and the rockers can be skewed even with normal springs and good condition of the valve, a narrow feeler gauge will not allow for precise adjustment. And it’s more convenient to set the gap with a wide feeler gauge.
If there is no special feeler gauge for adjusting the valves, you can use a narrow feeler gauge from the kit
Replacing the camshaft on a VAZ 2106 does not require the owner to have high qualifications or special tools. Repairs can be carried out in a garage with a regular car set of keys and screwdrivers. If you follow the step-by-step instructions, the procedure will take about 2-3 hours, after which the gas distribution mechanism of your car will work clearly and smoothly.
Step-by-step instructions for replacing the Niva gasket and exhaust manifold
Before you begin making this repair, you will need to complete the following steps:
- Remove the air filter along with the housing and carburetor
- Unscrew and remove the intake manifold
Next, we will need the following tool to carry out this operation:
- Head for 13
- Ratchet
- Extension
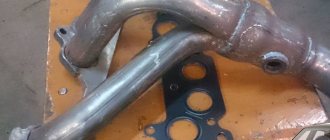
- The first step is to spray the connections between the exhaust manifold and the pants with some kind of lubricant so that the nuts can be unscrewed without any problems. And immediately unscrew the nuts from the studs in this place:
- After this, we unscrew the bolts securing the manifold itself to the cylinder head; this is where you will need an extension cord with a ratchet, since it will not be very convenient to do all this with other keys:
- Now you can remove the gasket between the manifold and the pants, separating them from each other. This is not so easy to do, but after a few minutes of effort you can do it:
- After this, you need to try to slide the pants down to release the collector and remove it from the pins. This procedure is also not a pleasant one and you will have to work a little to make it work:
- Then we replace this part in the reverse order of removal and it is also better to replace the gasket with a new one, since it is not intended for re-installation.
The price for the VAZ 2121 Niva exhaust manifold is around 700 rubles, so you won’t have to spend a lot of money on this repair.
Preparing for installation
After purchasing all the necessary spare parts, you can begin upgrading. First you need to dismantle unnecessary equipment, in particular:
- loosen and remove the generator belt;
- remove the crankshaft pulley and camshaft drive cover;
- dismantle the distributor, fuel pump and switch;
- remove the carburetor and air filter;
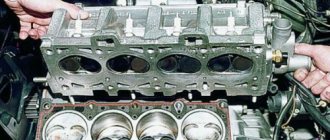
- dismantle the old cylinder head along with the manifolds;
- unscrew the exhaust manifold and coolant distributor tee from the cylinder head (located in front of the manifolds in the direction of travel of the car);
- dismantle the accelerator drive rods, the gas pedal and unnecessary wires (to the coolant sensor, ECXX, distributor);
- remove the gas tank (if it will be replaced).
Next, preparatory activities should be carried out.
- Drill a hole on the ebb of the coolant distributor tee, screw a new antifreeze temperature sensor into it and install the tee on the new cylinder head.
- Secure the TPS in its proper place in the throttle valve assembly.
- Close the holes in the block left after removing the mechanical fuel pump and distributor with plugs.
- Extend the return line to the fuel tank, if there is none.
- Attach the electric fuel pump mounting bracket in the trunk or under the bottom and embed the fuel pump into the fuel supply hose.
https://youtube.com/watch?v=XV7dU7qXgmA