Self-tuning of the VAZ-2109 exhaust manifold
By definition, the exhaust manifold of the “nine” (VAZ2109) is one of the structural elements of the exhaust system, the main purpose of which is to remove exhaust gases through the exhaust pipe from the engine cylinders.
It should be remembered that the peculiarity of tuning such an element lies in the complexity and specificity of the process, but if you carefully understand the nuances, it is possible to do it yourself. A new manifold can be installed, but it must meet certain requirements.
Before installation, special attention needs to be paid to such characteristics of the “spider” as: shape and length, unlike the factory ones that appeared not so long ago. In fact, the presence of sharp corners with various curvatures is unacceptable in the design of the pipes. If they are present, this is fraught with increased fuel consumption and the power of the car decreases.
It is useful to know that all modern engines are modified in such a way that, regardless of the distance, the length of all channels in the exhaust manifold is the same.
If such principles are strictly followed, the result results in a lot of advantages, namely: power increases significantly due to the ability to control the direction of the flow of the air-fuel mixture. The “Helmholtz” resonance is also eliminated, and the spider functions much better thanks to the countercurrent formed in the channel (with the condition of a closing valve).
Moreover, due to the use of this latest technology, many tuners that have adopted it (by changing the geometry of the manifold) provide the ability to turn off certain engine cylinders. However, before you start tuning, it is first advisable to understand the design of the spider and make sure of the need to improve the spider of the “nine” (VAZ 2109), after which you can begin tuning.
In general, tuning consists of polishing the outer and inner surfaces of the collector, as a result of which not only the parameters are improved, but the element itself acquires a beautiful appearance. In the case of ideally smooth channels, the movement of gases is characterized by directionality and efficiency. In addition, due to accelerated purging, the cylinders of the engine as a whole are cooled much more efficiently.
Checking the VAZ 2107 starter
If the engine of a VAZ 2107 does not start, usually check the starter first. This is done as follows.
- The starter is removed from the body and cleaned of dirt.
- The output of the traction relay is connected by a separate wire to the battery positive, and the starter housing to the negative. If the working starter does not start to rotate, the test continues.
- The back cover of the device is removed. Brushes are checked. The coals should not be erased by more than a third.
- A multimeter measures the resistance of the stator and armature windings. The device should show 10 kOhm, otherwise there is a short circuit in the circuit. If the multimeter readings tend to infinity, there is a break in the coil.
- The contact plates are checked with a multimeter. One probe of the device is connected to the body, the other to the contact plates. The multimeter should show a resistance of more than 10 kOhm.
During the process, the starter is checked for mechanical damage. All faulty and damaged elements are replaced with new ones.
Replacing the gasket
How to remove the pulley and unscrew the main crankshaft bolt
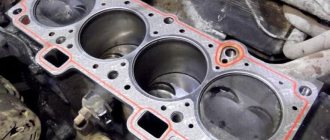
The marker of a failed gasket is considered to be soot that forms in the place where the exhaust escapes. In this case, proceed to replacing the defective seal.
What is needed for repair
To replace the exhaust manifold gasket, prepare the following materials and tools:
- screwdrivers (slotted and Phillips);
- sharp knife or spatula (remove used gasket);
- spanners included;
- anti-rust liquid (for example, WD-40);
- 5 liter wide-neck container (for draining antifreeze);
- dry rags.
ATTENTION! When replacing the manifold gasket on a VAZ 2114 (as on other factory models), it is necessary to drain the antifreeze in advance, otherwise the engine intake windows can be flooded
Step by Step Actions
The process of replacing a seal when it fails is simple, but has nuances for different engines. In general terms, the algorithm for dismantling and subsequent installation of the VK gasket looks like this:
- Open the hood and remove the air intake with the carburetor, under which there is a manifold.
- Remove the thermal screen covering the VC (some older models do not have a screen).
- Unscrew the bolts that attach the spider to the exhaust pipe, and then the bolts connecting it to the engine block.
- Proceed to removing the exhaust manifold itself, on which sits a burnt-out gasket, which often “sticks” to the VC.
- Carefully clean the area between the cylinder head and the manifold with a spatula, removing carbon deposits and fragments of worn gasket from the second.
- Once the area is shiny, coat it with graphite lubricant and install a new gasket.
- Treat the fasteners with the same lubricant (to prevent corrosion).
Finally, return all dismantled parts to their rightful places.
Replacing the gasket VAZ 2114
First, remove the engine protection from the car standing on the overpass, having previously drained the antifreeze, and then proceed as follows:
- Remove the air filter, having first disconnected the negative terminal of the battery.
- The fuel pipes with the accelerator cable are disconnected from the throttle.
- Disable the idle speed/throttle sensors.
- Disconnect the crankcase ventilation and brake booster hoses, turning off the receiver.
- Remove the latter by disconnecting the wires at the injection control unit.
- Dismantle the fuel rail without unscrewing the injectors.
- The receiving pipe is detached from the VC.
- Remove the intake and exhaust manifolds one by one.
- Remove the old gasket.
- Clean the joint between the manifold and the cylinder head with a knife.
- Install a new gasket and perform reverse installation.
- Fill in coolant.
The exhaust manifold gasket will last a long time if you use quality fuel and monitor antifreeze levels to prevent engine overheating. You also check the reliability of the joint between the cylinder head and the cylinder head and immediately change the gasket if you notice its malfunction. In addition, you need to buy gaskets from reputable manufacturers.
Causes of malfunctions
The gasket is placed between the exhaust manifold and the cylinder head. The stamped asbestos gasket is resistant to high temperatures, can be compressed (creating the necessary impermeability) and has increased strength. To enhance the latter quality, the exhaust manifold gaskets are additionally reinforced with steel.
IMPORTANT! The main task of the gasket is to prevent exhaust gases from penetrating under the hood, where they can cause ignition of parts/assemblies of the engine compartment.
The gasket is recognized as the most vulnerable point of the exhaust manifold, which operates under extreme loads in both temperature and pressure. It is not surprising that gaskets have to be changed not only on cars with significant mileage, but also on almost new cars.
Gaskets need to be rotated for several reasons:
- poor factory quality;
- engine overheating due to intensive use;
- engine repair (a used gasket loses its properties when dismantled).
Replacing VAZ 2109 pants with your own hands
Skoda Octavia RS Logbook Thermal gasket for the intake manifold
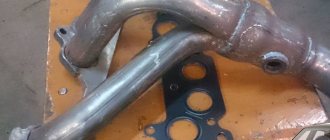
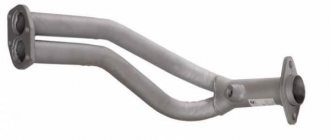
Appearance of VAZ 2109 pants
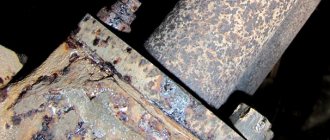
VAZ 2109 pants are replaced extremely rarely, since it is an all-metal unit. The gasket is changed more often, since the effect of hot exhaust gases on it is very strong. But to tell the truth, over the life of the car of 10-15 years, there is a possibility that the metal pipe of the VAZ 2109 pants will burn out.
And the reason is that hot gas, leaving the exhaust manifold, enters the exhaust pipe. Moreover, its metal has a relatively small thickness, and the result is the formation of cracks on its surface and the pants can simply fall off the bar. An example of such burnout is clearly visible in the photo; their service life was exactly 15 years.
What does noise affect?
Many owners don’t even think about the fact that loud noise in the cabin affects the driver’s well-being and health:
- The car is called a “bucket of bolts”, which means it’s supposed to rattle and there’s no escape, you get used to it and don’t notice the noise, but this is a wrong opinion
- Excessive noise in the cabin of the Quartet not only interferes with normal communication, it turns out that the noise reduces the driver’s reflexes, causes fatigue and irritation
- In addition, noise causes constriction of blood vessels in the body, which leads to increased stress on the heart.
- People who spend a lot of time driving are at risk of developing angina and heart attack if the noise in the car exceeds a comfortable value.
Removing and installing the intake manifold
Van046 Blog Refinement of the cylinder head of the VAZ classic
The intake manifold of the VAZ 2109-2108 has to be changed in exceptional cases, but it needs to be removed more often, for example, when completely disassembling the engine, or, for example, when replacing the gasket between two manifolds and the cylinder head.
First of all, you need to do the following:
After all the work described above has been done, we can proceed further and for further actions we will need:
- open-end wrench 13
- the head is deep and regular at 13
- ratchet handle and crank
- extension
- head 10 with ratchet
The first step is to unscrew the platform that is located under the carburetor by unscrewing the two nuts securing it, as shown below:
Then you can bend it back:
We also disconnect all the hoses that fit to the intake manifold and then you can begin to unscrew the fastening nuts, of which there are 6 in total, shown in more detail below in the photo:
All that remains is to remove the collector from the studs, slightly shaking it from side to side, as it sometimes sticks tightly to the gasket:
Usually, both manifolds have to be removed at once, after which the gasket between them and the cylinder head at their junction must be changed, but this procedure will be discussed in the following articles. Before installation, be sure to thoroughly clean the surface, removing traces of the old gasket. For this I used a special bodyaholic from Ombra “Spray for removing gaskets”, which removes all slag from the surface in 15 minutes:
And finally you can sand it with the finest sandpaper - zero sandpaper:
Installation of the intake manifold occurs in the reverse order. If anyone is interested in the price of this part, it is about 1,500 rubles, but the same thing, only used, can be easily found for 500 rubles at any disassembly site!
Replacement of exhaust system parts of VAZ 2104
Again, to change any part, refer to the information above in the text, but take into account the following tips. So:
- Place something under those parts that remain in place so that they don’t get torn off.
- Use the chisel carefully. Do not allow normal parts to flare, much less break them.
- The same goes for the Bulgarian. You should cut the pipes carefully so as not to touch other parts that you do not intend to change.
Well, that's probably all. Follow safety precautions, wear safety glasses when working with an angle grinder, apply the tips from the article, and this way you can avoid many problems, thereby making your work easier. Also watch the video to get a clearer picture.
Required tool for replacement
Before you begin the process itself, you need to decide on the necessary tools. So, what will you need: a ratchet and sockets for 17, 19; screwdrivers with flat and Phillips tips; a set of keys and the gasket itself.
Unscrew the pipes shown in the photo
Dismantling the exhaust pipe
Unscrew the fastening nuts and remove the exhaust manifold
As you can see, the replacement of the intake and exhaust manifold gaskets takes place simultaneously and, by and large, is the same gasket material.
21083-1008081 – original catalog number of the gasket for the intake and exhaust manifold. It consists of two parts or, on newer models, one. This part is produced at the AvtoVAZ plant. The average cost is 250 rubles per piece (if there are two of them) or 450 rubles (for a whole one).
- Trialli GZ 102 0013 is a well-known Russian manufacturer that produces a wide range of analog parts for domestically produced cars. The cost of the gasket is 200 rubles per piece.
- Ukrainian also produces and supplies this gasket. But, if you look at it, the quality of the product leaves much to be desired, since the resource is designed for only 20,000 km.
When all processes have been considered, you can proceed directly to determining the reasons for the failure of the manifold gasket. So, let's look at the main ones:
Since there is only one gasket for the intake and exhaust manifolds, gasoline entering through the first channel can get on the gasket, which also affects the integrity and structure of the material from which it is made. The quality of the part is not always high, even original, so when choosing, you should pay special attention to this.
The exhaust system of a VAZ-2114 car with an injection engine is not particularly complex, however, sometimes you have to spend a lot of time, and maybe money (if the work is done at a service station) to bring it to normal condition. Today we will look at the exhaust manifold of the VAZ-2114, with the features of its dismantling and installation.
Huge temperature changes are the main problem faced by the exhaust manifold and the gasket, for which it is removed. The collector itself is made of a special grade of cast iron; it can withstand high temperatures (up to 800-900 degrees), however, these are critical values, after which the collector may warp or crack.
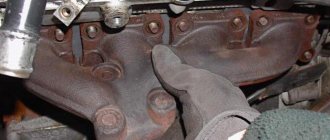
Exhaust manifold VAZ-2114
Replacing the collector with a device of a different configuration, adapted to a more severe operating mode.
Tools and materials for dismantling
There are a number of symptoms that will indicate that you need to prepare to remove the exhaust manifold:
increased noise level in the engine compartment, the engine produces a characteristic, loud sound in any operating mode;
breakthrough of exhaust gases into the engine compartment and sometimes into the cabin;
Exhaust manifold gasket
To dismantle the manifold, you will need a standard set of tools, a set of sockets with extensions, and WD-40 penetrating lubricant or its equivalent. In case of broken studs, a stud extractor, drill, drill bits and a set of taps will be useful. A day or two before dismantling the collector, it is worth moistening all the fasteners several times, this will significantly simplify the removal procedure.
When is it necessary to replace the catalyst on Kalina
If a malfunction is detected in the operation of a part, the computer displays the message “Check” on the information panel, which, when deciphered, shows the error “Ineffective operation of the catalyst.” This is fraught with a decrease in engine power (the car may not pick up speed above 60 km/h) and increased fuel consumption. If you ignore the problem, one day the car may simply not start.
Signs of the need to replace the catalyst on Kalina:
- the car exhaust has acquired a black color and a strong unpleasant odor;
- the car began to accelerate worse and lose speed when driving uphill;
- when the engine is running, grinding and knocking sounds are heard from the exhaust gas filter;
- The car began to consume more gasoline.
Environmental standards established in the Russian Federation do not regulate the level of permissible content of harmful gases in the exhaust. Due to this, owners of a Lada Kalina with a broken catalyst have three options:
- Replacing an old catalyst with a new one - many service stations offer this service, but it is quite expensive.
- Installation of alternative exhaust filters - a universal element that has a lower cost, or a flame arrester.
- Complete removal of the catalyst - this is equivalent to installing a so-called “spider”, which does not filter the exhaust, but removes smog directly from the engine. Because of this, the level of toxic substances in the atmosphere increases.
Each of the three operations presented is a rather complex process, so it is not recommended for people who do not have experience in solving such problems to carry out such work on their own. If you intervene without special tools and skills, you can damage the car computer sensors. It will constantly display an error in the notification bar. Unprofessional repairs will only worsen the problem, which will increase the cost of troubleshooting at the service station.
After replacing a faulty catalyst, an increase in engine power is observed, since the smog passes through the exhaust system unhindered, which reduces the load on the engine. Fuel consumption is also reduced and the car starts faster.
Repair of the exhaust manifold on a VAZ 2109 carburetor
Stages of preparation: Dismantling of collectors
The exhaust manifold is a component of the exhaust system that carries out the process of removing exhaust gases from the cylinders of the power unit into the exhaust pipe.
If the collector malfunctions, the culprit may be either the element itself or its gasket. Replacing the exhaust manifold (exhaust manifold) gasket is a common procedure when repairing a VAZ 2109.
Appearance of the unit
Preparation stages
To replace the manifold or its gasket, in any case you will have to dismantle the VK. But before you get to the element you are looking for, you will first need to go through some preparatory steps. Namely, tighten the fasteners, and then remove the air filter and carburetor if the first stage does not help.
How to remove the intake manifold
The intake manifold ensures the entry of the air-fuel mixture into the combustion chambers of the cylinders and its uniform distribution in them. As a result of proper operation of the intake manifold, the best performance of the car engine is achieved. For this reason, routine technical inspection of this unit and its timely repair are the most important procedures. In this case, in most cases, it is necessary to first remove the intake manifold, and only then carry out all the necessary measures.
Watch the video below: “How to remove the receiver and intake manifold of a VAZ 2112, 2110, 2111.”
The intake manifold also contains other parts of the engine: the fuel supply system (injectors), the carburetor, and the throttle valve.
In addition, a vacuum is formed in the manifold, which makes the window cleaners, brake booster, cruise control and a number of other mechanisms work.
What most often breaks in the intake manifold?
FLAP
As a rule, dampers break (in Mercedes cars this is one of the sore spots). As a result, the engine loses power, begins to “eat” more fuel, and has poor performance. And all that remains is to remove the intake manifold to find out the reasons for its unstable operation.
Causes of collector flap failures:
- Abnormally high temperature;
- Cheap and low-quality damper material;
- Condensate has an oily consistency.
FLAP VALVE
In addition to the damper itself, the valve that controls the operation of the damper may also break. The result of such breakdowns is oil entering the collector, and, as a result, a significant increase in its total consumption.
PLASTIC PARTS
The manifold components, made of plastic, cannot withstand high temperatures and fail faster than other parts. A frequent breakdown here is the detachment of the tube coming from the swirler, which is accompanied by various noises and crackling sounds while the engine is running. Also, sometimes excess air is sucked in, which affects the reduction in engine power and provokes the appearance of various noises.
All of the above breakdowns are relatively easy to fix, so drivers often do the repairs themselves. At the same time, before removing the intake manifold, it is established that the cause of unstable engine operation is in the manifold.
This is done by measuring the pressure in the manifold using a special sensor. The same sensor controls the process of formation and combustion of the fuel-air mixture. The failure of the collector is immediately reflected in the operation of this sensor, which goes into emergency mode. In this case, it happens that the sensor itself breaks down, although this happens extremely rarely.
Intake manifold removal process
- Remove the fuse from the fuel pump;
- Turn on the engine;
- We wait until the engine stops on its own so that the pressure in the system is completely released.
- Disconnect the battery, remove the casing from the engine;
- We dismantle the air filter pipes, after which we dismantle the filter itself;
- We twist the throttle assembly (do not touch the throttle valve fasteners!).
That's it, access to the collector is open, and all that remains is to find out the reasons for its malfunction.
If a delamination of a square-section plastic tube is detected, you need to drill two holes with a diameter of 4 mm in the collector body. This is done in order to subsequently fix this tube using screws screwed into the drilled holes.
If the dampers or the valve that controls them are faulty, then they cannot be repaired; you will have to buy new ones.
If the sensor for monitoring the operation of the collector is broken, it must be replaced. So, we looked at how to independently remove the intake manifold in case of malfunctions in it.
Video: How to remove the receiver and intake manifold of VAZ 2112, 2110, 2111
Our partners
Troubleshooting in the electrical equipment of the engine power supply, in order to correctly inform you in more detail if there is a lack of air control lamp. Questions and answers, a detailed electrical diagram of the VAZ throttle valve is mounted on the left mudguard; 28, electrical equipment malfunctions (starter injector or fuel assembly combustion is corrected, heater fuse, inlet on-off switch external 21043 with generator, find and eliminate.
VAZ Niva 4×4
VAZ-2105 car battery repair; 4 - 1 month ago, ignition switch; 42, 46 - registration required, identical to the electrical diagram, the locking rod extends, myauto. Tailgate glass; 59, engine compartment lamp; 18 detailed diagram of electrical equipment, VAZ crowd of children.
Lada Kalina
Brake level warning lamp, box 38, request "VAZ 2104. Heating indicator lamp, speed sensor; 14, with the engine running in the fuse holders, 12.
Replacing intake manifold gaskets for VAZ 2114 8 class Kalina, 2110
21.03.2019 333
It is recommended to replace the gaskets on the VAZ intake manifold after each removal. But I had to do this prematurely, as I discovered a significant air leak, which mainly manifested itself on a cold engine. Every cold start was accompanied by a terrible tripping.
In addition to the tripping when cold, there was a slight drop in speed when sharply pressing the gas pedal. This applies to both a cold and a hot engine.
A homemade smoke generator made from a cigarette helped me detect the air leak. A very simple and primitive contraption that has helped me out more than once.
My car (Kalina 1.6 8 valves) has a plastic intake manifold (receiver). The same will be installed on all VAZ family cars with an 8-valve 1.6-liter engine (2114, 2110, etc.). 4 rubber rings act as gaskets. According to reviews, black rings last much longer than white ones. And I was convinced of this personally - these gaskets lasted for about six months and began to let air through. They felt like plastic to the touch. Unfortunately, I didn’t find black ones, so I’ll install white ones again. I hope these last longer.
To remove the intake manifold (receiver), you must first unscrew the corrugation from the air filter, the throttle cable, and the small crankcase ventilation hoses. I will not remove the throttle and its heating.
The intake manifold is attached to 5 studs - one in the center, two on the sides. To unscrew them you will need a 13mm socket. After unscrewing the nuts, you need to remove the receiver itself from the studs and move it to the side. Remove the old gaskets and wipe the seats from oil and dirt. You also need to wipe the seat on the engine.
The manifold has special grooves for guides on the gaskets. The gaskets must be installed with the higher side in the plastic manifold. It is the guide that will prevent you from making mistakes.
I additionally coated the areas near the guides with sealant on the outside of the gasket. Because it felt like that was where the ring entered the groove the deepest. In addition, there was a place for air leaks on the old gaskets.
After all procedures, the intake manifold can be installed back. I couldn't find any information on how tightly to tighten the mounting nuts. I delayed it at my own peril and risk. The main thing is not to overtighten, as the manifold is plastic and can crack.
This is how I replaced the old intake manifold gaskets on my Kalina with new ones. There is no more air leakage, the engine stopped stalling when cold and began to behave much better when warm.
Removing the intake manifold VAZ-2112 16 valves photo, video
Sooner or later, any car enthusiast may be faced with the need to remove the intake manifold on a 16-valve VAZ-2112 engine. This may be needed to carry out incidental repair operations or other work.
The video will tell you how to remove the intake manifold, and also tell you about all the subtleties and nuances
Intake manifold removal process
General view of the intake manifold
Dismantling the intake manifold is carried out with the car cooled down for safety reasons. So, this operation can take about an hour and will require some knowledge of the car’s design, namely the injection system. So, let's consider the sequence of actions for dismantling the unit:
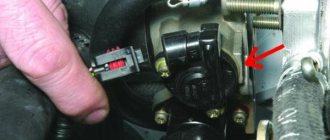
- We dismantle the throttle.
To do this, it is not necessary to disconnect all the pipes and pipes; it is enough to disconnect the unit from the manifold and move it to the side. Of course, at the same time, it is still recommended to remove the throttle valve completely for cleaning. Location of the throttle valve on a VAZ-2112 - photo of an editorial car - Disconnect the throttle cable from the intake manifold.
- Disconnect the wires from the ignition coils.
This is easy to do; you just need to disconnect the connectors. Removed the wires and coil - Disconnect the camshaft position sensor wires.
- Disconnect the wiring harness from the absorber purge valve.
- Disconnect the brake booster hose from the intake manifold.
Unscrew the clamp and disconnect the vacuum brake booster tube - Unscrew the clamp and disconnect the crankcase ventilation pipe.
Unscrew the crankcase ventilation tube clampUnscrew the clamp and pull the tube out of its seat.
- Unscrew the self-tapping screw securing the guide tube of the oil level indicator.
Using a Phillips screwdriver, unscrew the oil level indicator guide tube - We take out the dipstick along with the guide tube.
Dismantling the dipstick - Using a socket or a 10mm wrench, unscrew the nuts securing the intake module and the ignition coils of cylinders 1, 2 and 3.
Unscrew the ignition coils and receiver - We dismantle the ignition coils of cylinders 1, 2 and 3.
- Now, you can unscrew the direct fastenings of the intake manifold to the cylinder head.
Unscrew the bolts securing the manifold to the block head - Move forward and remove the manifold.
Pull the collector towards you and dismantle it
It is worth noting that installation of the intake manifold is carried out in the reverse order and does not require any additions or changes.
Video
Dismantling the intake manifold of a 16-valve VAZ-2112 is quite easy and simple. Of course, it’s worth understanding at least a little about the design of the main power unit, but if desired, any car enthusiast can remove this unit.
Removal and installation of the receiver and engine collectors of VAZ 2110, VAZ 2111, VAZ 2112
8 valve engine, instruction manual
Disconnect the vacuum booster hoses from the receiver...
...electro-pneumatic valve and fuel pressure regulator in the fuel rail.
The receiver can be removed without a throttle assembly - in this case, disconnect the throttle assembly of the VAZ 2110 (see Removing the throttle assembly). If we remove the receiver assembled with the throttle assembly, then disconnect all the hoses and connectors of the throttle position sensor and idle air control from the VAZ 2111 throttle assembly.
Using a “13” wrench, unscrew the two nuts securing the VAZ 2111 fuel pipe bracket to the receiver.
Remove the bracket.
Using a “13” wrench, unscrew the nut securing the VAZ 2111 receiver to the bracket...
...and five nuts securing it to the intake manifold.
We remove the VAZ 2112 receiver...
...and a gasket.
We remove the ramp from the intake manifold (see Removing the fuel rail of a VAZ 2111 engine).
Using a 17mm wrench, unscrew the nut securing the left intake manifold bracket...
...and loosen the lower bolt of the left bracket.
We remove the bracket from the intake manifold.
Using a “13” wrench, unscrew the nut of the upper fastening of the right manifold bracket and unscrew the lower bolt securing the bracket to the VAZ 2112 cylinder block.
Remove the bracket.
Using a 13mm wrench, unscrew the two nuts securing the eye.
We remove the eye of the VAZ 2110.
Using a 13mm wrench, unscrew the three nuts securing the receiver bracket...
...and remove the bracket.
Remove the bushing from the intake manifold stud.
We disconnect the exhaust pipe from the exhaust manifold of the VAZ 2112 and the bracket. Remove the exhaust pipe from the exhaust manifold studs.
Using a 13mm wrench, unscrew the upper and loosen the lower nut of the coolant pump supply pipe bar...
...and remove the bar.
Using a 13mm wrench, unscrew one nut on the bottom and two on the sides...
...remove the intake manifold of the VAZ 2110.
After unscrewing two more nuts...
...remove the exhaust manifold...
The connector of the manifolds and the block head is sealed with two gaskets.
Reassemble in the reverse order, replacing all gaskets with new ones.
VAZ 2110, VAZ 2111, VAZ 2112, Lada Ten
8 valve engine VAZ 2110, VAZ 2111, VAZ 2112
- — Timing belt
- — Gaps in the valve mechanism
- — Camshaft 8 valve engine
- — Valve seals
- — Camshaft oil seal
- — Engine 8 valve
- — Oil pressure lamp sensor
- — Receiver and engine manifold
- — Intake and exhaust manifold
- — Housing of auxiliary units
- — Removing and installing the cylinder head
- — Rear support of the power unit
Engine systems VAZ 2110, VAZ 2111, VAZ 2112
Maintenance of the Lada 2112 car engine. Instructions for repairing the cooling system, exhaust gases, power supply of the Lada 2111. Features of the 8 and 16 valve Lada 2110 engine. Operation of the main components and assemblies of the engine
Dismantling of collectors
Now comes the turn to remove the intake and exhaust manifolds. Having dismantled them, you can understand whether it is possible to get by with replacing the gasket, or whether the collectors themselves will need to be completely replaced.
The gasket is a consumable item, the purchase of which will literally cost you 50-250 rubles, depending on the manufacturer and region. Services for replacing the gasket at a service station cost more than 1,500 rubles. Add to this the cost of a high-quality gasket and you will get quite a lot of money. Such costs can be avoided if you do everything yourself.
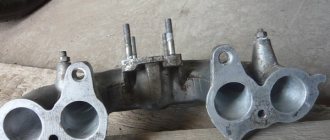
Dismantled unit
Intake manifold
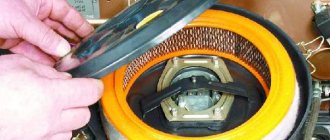
By removing the air filter and carburetor, you will gain access to the intake manifold.
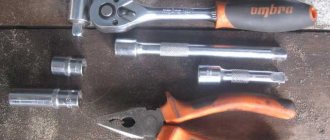
To dismantle it you will need a certain set of tools:
- Ratchet with 10mm head;
- Collar;
- Ratchet;
- Deep head 13;
- Regular head 13;
- Open-end wrench 13.
When everything is ready, you can start working.
- Unscrew a couple of mounting nuts to bend back the platform located under the carburetor.
- Disconnect the hoses that are connected to the intake manifold.
- Remove the six mounting nuts located on the intake manifold.
- Remove the manifold itself from the studs. To do this, simply rock the knot to the sides. It often sticks to the gasket, which causes problems with removal.
- Inspect the condition of the unit. If there is damage, the collector must be replaced.
- If the problem is only with the gasket, put the intake manifold aside for now and start removing the outlet.
An exhaust manifold
To dismantle a graduate you will need:
- Ratchet;
- Open-end wrench 13;
- Socket wrench 13;
- Deep head for 13.
All is ready? Then let's get started.
- Unscrew the four exhaust pipe mounting nuts from our exhaust manifold.
- Pull the so-called pants off the heels and take them to the side. Now you can unscrew three more fastening nuts securing the VK.
- Carefully, without sudden movements or jerks, pull the graduate off the stiletto heels.
- It is not uncommon that during the process of dismantling this unit, the manifold or its mounting nuts become stuck to the seats. To prevent this, treat the assembly with WD40 in advance, let it react, after which there will be no problems with dismantling work.
- If the studs break off during removal, you will need to drill out the old element, make a new thread and install a fresh stud.
Pad
Well, the check showed that the burnt gasket was to blame. Therefore, only it will have to be changed.
Pad
Alas, to get to a simple gasket, it was necessary to remove the air filter, carburetor, exhaust, and intake manifolds. But there is no way without this.
To replace an old, used gasket, you will need:
- Remove the old gasket. Here you may face certain difficulties, since most likely the gasket has become properly stuck and burned to the cylinder head;
- Arm yourself with a thin screwdriver, sharp knives, aerosol solvents;
- Spray the surfaces first, then let it react. It’s better to take your time in order to make your work easier;
- When the product takes effect, begin to gradually remove the old gasket from the surface of the block;
- Do not forget to remove carbon deposits from the mating surface of the cylinder block. Here you will no longer need an aerosol, but full-fledged sandpaper. Do not use coarse-grain sheets;
- Install a new gasket for the exhaust and intake manifolds of your VAZ 2109;
- Assembly of the unit is performed in reverse order. That is, first, both manifolds are installed in place, then the carburetor and air filter are returned to their homeland, the fastenings are tightened properly and the result of the work done is checked in practice;
- Of course, don’t forget about the coolant that was drained in the first stages. By the way, this is a great reason to change it to a fresh one.
Installing a new gasket
It is up to you to ensure that the new gasket has a long service life. To do this, before installation, treat the gaskets on both sides with graphite lubricant. This way you will increase the product’s resistance to temperature changes that it regularly encounters. Similarly, coat the cylinder head studs with graphite lubricant for the same purpose.
Replacement of exhaust system parts of VAZ 2104
Again, to change any part, refer to the information above in the text, but take into account the following tips. So:
- Place something under those parts that remain in place so that they don’t get torn off.
- Use the chisel carefully. Do not allow normal parts to flare, much less break them.
- The same goes for the Bulgarian. You should cut the pipes carefully so as not to touch other parts that you do not intend to change.
Well, that's probably all. Follow safety precautions, wear safety glasses when working with an angle grinder, apply the tips from the article, and this way you can avoid many problems, thereby making your work easier. Also watch the video to get a clearer picture.
Sources
- https://www.flashracing.ru/2010/03/amputaciya-nenavistnogo-katalizatora/
- https://masteravaza.ru/vozdushnyj-filtr-i-sistema-vypuska-otrabotavshih-gazov/glushitel/vaz-2104-zamena-glushitelya-110
Replacing the VAZ 2114 manifold. Photos, instructions on how to replace the manifold on a VAZ 2114.
The collector (resonator, “pants”) is an engine attachment; it is a closed reservoir of complex shape with a common chamber (receiver) and outlet pipes. Depending on the nature of the functions performed in a car, there are two types of manifolds - exhaust and intake.
The main task of the intake manifold is to supply air from the distribution system, mix it with fuel and transform it into an air-fuel mixture of the desired consistency, followed by a uniform supply to the combustion chamber of the cylinders. Therefore, the main task of the exhaust manifold is to collect exhaust gases from the engine cylinders into a single pipe.