Generator bearings Lada Priora: diagnostics and signs of malfunction, causes
The following circumstances may indicate that it is necessary to replace the generator bearing:
- extraneous noises during startup, possible humming or whistling;
- interruptions in the operation of the vehicle’s electrical equipment;
- constant insufficient battery charge;
- uneven shaft rotation, distinct runout.
You can diagnose the malfunction as follows:
- remove the belt;
- start the engine and listen carefully. If nothing buzzes, then the sound came from the ball bearing;
- move the pulley. If there is play, it must be replaced.
These videos will help you understand the diagnostic procedure:
The Priora generator bearing is noisy:
Whistling in the electric generator and overheating:
How the electric generator hums:
How to check generator bearings:
Hot topics of the magazine BEHIND THE DRIVE:
Where is the generator located at Priora - the device of the VAZ 2170 unit
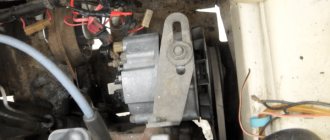
The unit itself for a car with air conditioning (or power steering) looks like this:
- Drive pulley for additional elements;
- Tension roller;
- Mounting the right side of the engine;
- Electric generator pulley;
- Air conditioning blower pulley.
If a VAZ Priora without air conditioning (or without power steering), the configuration changes slightly and looks like this.
During disassembly, you will have to disconnect the belt and remove the engine protection. The belt tensioner will need to be replaced. There is also the option of dismantling the part through the car headlight. Below we will describe in detail how to change bearings in a generator, including the process of dismantling, disassembling the electric generator itself, and installing new elements.
Maintenance frequency of car generator bearings
When servicing the unit, you need to know which bearings are on the generator, and which race of each of them is pressed into place. To extend the time between overhauls, bearings are lubricated at the time of installation at the factory or when replaced by the user. It is believed that this amount is sufficient for the entire life of the rolling elements.
The frequency of bearing replacement is determined by ear:
- if the generator is noisy, it means the clip has worn out;
- Before jamming, the generator bearing hums for quite a long time, so the owner usually has enough time not to let this happen.
Attention: It is usually difficult to determine by ear which of the two bearings has become unusable, so the rolling elements are replaced as a set - front and rear.
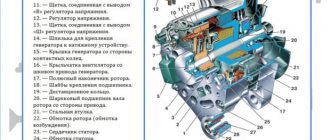
Design features of the generator are:
- one bearing is called the front bearing, since it is pressed into the corresponding (front) generator cover by the outer race;
- the second one is put on the shaft with tension on the reverse side, called the rear one, and is located near the commutator group;
- Before changing standard rolling consumables, you need to prepare a special tool;
- To get to the rolling parts, you will first have to remove the generator and then completely disassemble it.
For example, the front bearing can be knocked out, then a new rolling element can be installed in the mounting hole without a puller. It is important that the external dimensions match. It will not be possible to pull the rear bearing off the shaft in this way; a puller will be required. But you can put on a new standard product by tapping a hammer on a sleeve of a suitable size or an old bearing.
Air conditioning systems
One of the consumers is a heating device. It is part of the climate control system. A control controller works with this system. The work is automatic. The driver only sets certain parameters.
On cars, the electrical circuit of a VAZ Priora may contain air conditioning systems. After pressing the button, the relay is activated, the compressor is turned on, power is supplied to the electromagnetic clutch, and the pump is turned on. The air conditioning turbocharger begins to rotate, creating pressure, and begins to regulate refrigerant through the system.
Replacing the prior voltage regulator without removing the generator
I was tired of voltage sags when shifting gears, the low beam was already dimmed, and in general the voltage sags bothered me when the consumers were turned on. You turn on the air conditioner, and the voltage on the dashboard drops right down to 12 and a penny volts. Oh yes, the KZATE generator is 115A.
After reading and finding out about this problem on the drive, I realized that it is necessary to change the voltage regulator, like from the factory they put some Chinese crap in it that does not handle voltage sags. Well, change, change! I was not in the mood to change the brushes and remove the genes; I’m too lazy to remove them for this reason). I read about the drive, how other prior drivers change it, one person even removed the gene through the headlight, so as not to unscrew the AC compressor) Well, I found a way to still get to the brushes, moved the air filter and barely reached the gene, the most difficult, oddly enough, it turned out to be difficult to remove the plastic cover on the gene. The plastic that presses the latches of this cover broke off and it was impossible to click it in place, or rather, it was impossible to get to it from the angle from which I was reaching for it) In the end, I simply broke off this plastic cover)
How to replace Priora generator brushes
If the owner of a Priora sees that the battery is losing charge, then first you need to check the condition of the generator brushes. It is worth noting that at first the battery charge will decrease slightly, but if the problem is not corrected in a timely manner, the battery charge will soon disappear altogether. Replacing the worn brushes of the Priora generator will help correct this problem. And since this process is not so complicated, you can carry out such work yourself, taking into account advice from professionals in your field.
The most common breakdowns
There are several popular problems with the generator, most of which can be solved by simply replacing components. For example, a vehicle may have a faulty ignition switch, which will require immediate replacement. A break may also occur in the power supply circuit of the instrument devices. You will notice that when you turn the ignition on, the light will stop turning on.
When the generator light does not give any signals both when the engine is running and when the ignition is turned on, check the functionality of the instrument panel. Most likely, the battery is discharged, and the voltage regulator relay is out of order.
Also, the cause of this malfunction is oxidation of the contacts of the commutator rings and brushes, or their excessive wear or breakdown of the diode bridge. In this case, it is recommended to install new elements to replace those that have become unusable.
Even if the control light comes on, but the battery is being recharged, it is recommended to replace the voltage regulator relay. It would be a good idea to check the contact rings of the excitation trim and the contacts between electrical appliances and the generator terminals - they may have broken.
Does the voltage drop sharply, problems arise with the power steering, does the generator not charge or is it overheating? In such cases, it will also need to be replaced.
Design and principle of operation of the generator
This device converts the mechanical energy received from the crankshaft into electricity. Thanks to the generator, power is supplied to the electrical appliances of the car. It powers the ignition, recharges the battery and other systems. When the driver starts the engine, the largest amount of electricity is consumed by the starter. At this moment, power to electrical consumers is supplied only from the battery. Naturally, the battery may drain quickly. To prevent this from happening, it must be powered by a generator.
The generator consists of an aluminum housing, inside of which there is a rotor on bearings and a coil. There is a stationary stator between the back and front covers. A belt connected to the crankshaft causes the rotor to rotate. To rectify the current in terms of voltage and strength, a diode rectifier is used.
Generator device
The transmitting link is brushes - sliding contacts. They carry control current from the voltage stabilizer. Due to the stabilizer, the generator creates a voltage of about 14 Volts, regardless of the engine speed. It is important that the regulator remains in good working order, otherwise optimal voltage parameters will not be maintained. In this case, the auto electrician may fail.
The temperature of the operating generator is reduced by fans. The device is attached to the brackets using four bolts. It can be seen if you open the hood. The mounting points are located on the covers.
Appearance of the generator for Priora
It is important to promptly identify problems with the power supply. The first symptoms are the flashing of the headlights and the appearance of a warning light on the dashboard. If the generator breaks down or fails completely, the battery quickly runs out of power. In this case, it is impossible to even start the engine. The car cannot move.
practical guide
Generators from different manufacturers are installed in cars, which may differ slightly in design (rectifier unit and voltage regulator and the method of their fastening). The repair of all generators has no fundamental differences.
In cars without an air conditioning compressor, the regulator can be replaced
voltage and rectifier unit without removing the generator from the engine.
To complete the work you will need:
— power supply with adjustable voltage up to 20 V or battery charger;
— three or two-jaw puller;
— a mandrel from a cup puller set for pressing out the front bearing.
We remove the generator from the car (see above).
After releasing the three spring clips, remove the protective casing of the rectifier unit.
3. Use a Phillips screwdriver to unscrew the two screws securing the voltage regulator.
4. Disconnect the wire block from the voltage regulator terminal and remove the regulator.
5. Using an 8 mm spanner, unscrew the four bolts connecting the terminals of the stator windings to the rectifier block (remember how the insulating and thrust washers are installed).
On generators from some manufacturers, the rectifier unit is secured with screws.
6. Carefully bend the wires of the stator winding terminals into piles.
7. Use a Phillips screwdriver to unscrew the screw securing the capacitor.
8. Remove the rectifier unit along with the capacitor.
9. Using a 10 mm socket wrench, unscrew the two nuts of the contact bolt. We remove the spacer and insulating bushings from the bolt, remove the bolt from the rectifier unit and remove the capacitor tip from the contact bolt.
10. Use a marker to mark the relative positions of the front and rear covers of the generator (to simplify assembly).
11. Using an 8 mm socket wrench, unscrew the four bolts holding the front and rear covers of the generator together.
12. Use a slotted screwdriver to carefully push apart the generator covers.
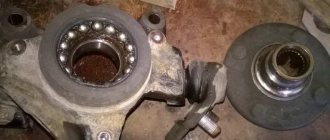
13. Disconnect the back cover together with the stator winding from the front cover.
To determine the technical condition of the rear bearing, rock it from side to side and vigorously rotate its outer ring. The bearing should not have significant play, and the ring should rotate freely without jamming or extraneous noise. A faulty bearing must be replaced.
14. Use a marker to place a mark on the stator (to indicate its position relative to the back cover).
15. Remove the stator from the rear cover of the generator.
To determine the technical condition of the front bearing, hold the pulley with your hand, rock it from side to side and rotate the front cover. If the bearing seizes, has significant play, or makes noise when the cover rotates vigorously, it must be replaced. The manufacturer recommends replacing the front rotor bearing together with the front cover of the generator, since it is rolled into the cover. But, given that the cost of the bearing is significantly lower than the cost of a new front cover and, moreover, the generator assembly, it is advisable to press out and replace the faulty bearing.
16. If it is necessary to replace the front bearing of the generator, use a 24 mm socket wrench to unscrew the pulley mounting nut, holding the pulley with sliding pliers.
17. Remove the pulley with spring 3 and flat washer 2, and spacer sleeve 1 from the rotor shaft.
18. Screw the pulley mounting nut onto the threads of the rotor shaft (flush with the end). By hitting the nut with a hammer with a rubber striker, we press the rotor out of the front bearing.
19. If it is necessary to replace the front bearing of the generator, install the front cover in a vice (soft metal pads must be put on the jaws of the vice).
20. Having selected suitable mandrels from the cup puller set, press the bearing out of the seat in the front cover.
21. If it is necessary to replace the rear bearing of the generator, secure the rotor in a vice with soft pads on the jaws. Using a universal puller, press the rear bearing from the rotor shaft.
1. Check the stator windings: a) by applying ohmmeter probes to the contact rings of the rotor, check the field winding for a break. The resistance of a serviceable excitation winding should be 5-10 Ohms;
b) by connecting the ohmmeter probes to any slip ring and to the rotor, we check the field winding for a short to ground. If the rotor winding is working properly, the ohmmeter should show an infinitely high resistance. 2. Check the stator windings: a) alternately connecting the ohmmeter probes to the terminals of the stator winding, and check the winding for an open circuit. If there is no break, the ohmmeter will show low electrical resistance (about 10 Ohms); b) by connecting the ohmmeter probes to any terminal of the winding and to the stator, we check the stator winding for the absence of a short to ground. If there is no short circuit, the ohmmeter should show infinite resistance.
3. Check the rectifier unit:
A working semiconductor diode conducts electric current in only one direction. A diode is bad if it does not conduct current or conducts current in both directions.
a) connect the probe of the negative terminal of the ohmmeter (in diode testing mode) to the common bus of auxiliary diodes 1, and the probe of the positive terminal to the terminal of the diode being tested 2. A working probe should not pass current (the resistance tends to infinity).
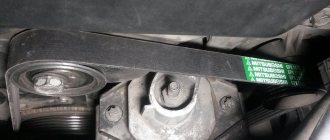
How to tension a belt and check its tension
For Priora, in addition to the original ones, similar belts from foreign brands such as Contitech, Dayco, Gates, and Flennor are recommended.
- Loosen the roller nut; you will have to hold the cage with a wrench. By then rotating this key, the clip can be turned.
- Tighten the nut against the roller. Check the quality of tension only on the long section between the pulleys. If, when pressing on the belt in this place, it bends no more than 10 millimeters, the tension is appropriate.
- If your Lada has a hydraulic booster, you should tighten it a little more. If you don't pull it tight enough, it will whistle obviously, a defect that can be easily detected by ear. Then pull it a little tighter. If you hear not a whistle, but a hum, the belt, on the contrary, needs to be lowered.
On a Priora, in a regular service, changing just the belt can cost from 300 rubles (not counting consumables). If the generator is with rollers or mounted, then the price will increase significantly to one and a half thousand rubles. Do not forget the receipt for the services provided; the warranty for the work performed must be at least six months; if the belt deteriorates due to poor installation or tension, you must demand a replacement at the expense of the service.
The replacement generator itself starts at 5 thousand rubles. The cost of removal and installation work alone will average 1000 rubles for simple models.
Priora generator repair,
Repair of the generator “Priora” by real boys))) Repair of the generator “Priora”
Generator bulkhead VAZ 8,9,10,11,12,13,14,15 Priora, Gazelle Volga, Sable
Generator bearings. How to replace.
Repair of VAZ generator (replacement of slip rings)
Repair of Lada Priora 115A generator
Priora does not have a charger. Generator repair
Diagnostics and repair of Generator VAZ, Gazelle, Volga, Sable, Lada, Priora
Lada Priora generator repair
Do-it-yourself repair of the Grant, Kalina, Priora 115 A generator. Advice from an auto electrician.
Lada Priora is one of the most common domestic cars. But sooner or later the moment comes when it is necessary to repair certain components. The electromechanical part is no exception; for example, Priora's generator bearings often fail.
In order to avoid surprises while driving, it is important to notice the malfunction in time and carry out repair work. You can learn more about how to replace a Priora generator bearing by reading this article. In this material we will consider the process of diagnosing and dismantling the VAZ generator and its parts, as well as the sequence of actions when replacing ball bearings with your own hands.
Instructions for removing the unit on a car with air conditioning
Before replacing the generator bearing on a Priora, you should stock up on a set of tools, which will include:
- universal set of keys. Heads for 7, 10, 12, 13, 17, 24 are required;
- set of hexagons;
- universal puller for ball bearings;
- minus and Phillips screwdriver;
- To diagnose serviceability, you will need a multitester;
Removing a generator on a Priora Lux, with air conditioning and power steering
If you need to replace the generator bearing on a car that is not equipped with air conditioning, then it is convenient to remove it by dismantling the right headlight of the Lada Priora. The unit is located on the left side of the engine when viewed from the radiator. The best access to the mechanism is to remove the headlight and bumper mount on the passenger side.
Note: Attention! All work related to the repair of “genes” is done with the negative terminal of the battery removed
- Disconnect the terminal.
- Remove the protective cover.
The headlight is attached to 2 bolts - one under the housing, the second from below the headlight. It can be accessed by removing the bumper mount on the right side.
- Unscrew the top headlight mount.
- Lower the right side of the bumper to gain access to the lower headlight mount.
- We unscrew the lower bolt and the headlight is removed from its mounts. Carefully disconnect the power cables and set the headlight aside.
- This is what you will see from the headlight side: access to the fasteners, pulley, and belt tension adjustment.
This is only part of the job. It is necessary to raise or lower the tubes and hoses of the hydraulic systems and dismantle everything that interferes with the removal of the mechanism. First, let's dismantle the absorber.
- Remove the absorber hoses.
- We remove the absorber. It is secured with 2 bolts: one in the picture, the second below.
The path is almost clear. The air conditioner pipes are in the way. They are attached to the bracket.
- We unscrew the bracket and the air conditioner tubes can be freely raised or lowered.
All. The path is clear. All that remains is to unscrew the mounting bolts. The top bolt is accessible.
- Unscrew the top bolt securing the unit.
You will have to tinker with the bottom bolt. There are 2 options:
Stick your hand in with a 17mm socket wrench, feel for the bolt and put the wrench on hold. 13mm bolt nut
Remember that there is a sleeve on the bolt under the head; do not lose it when you pull the bolt out. Carefully remove the electrical unit. Remember that there are wires going to it
Disconnect them as soon as possible.
Note: An easier way is if it is possible to park the car in a pit. Remove the protection from below, you will have access to the lower mounting bolt. Unscrew it without any problems. Note: After the dismantling stage, you should check the serviceability of the electric generator itself by checking the operating voltage, find out the bearing number for the Priora generator, and only then begin disassembling it.
Removing a generator on a Priora without air conditioning and power steering
Above we discussed the method of dismantling the generator through a removed headlight. Let's try to get to the electric generator from below. It is best to do this in a garage with a pit, but it can also be done outside.
Note: Attention! Be careful when working under a vehicle. Place the car raised by jacks on the supports and securely fix it
- Raise the hood and remove the negative terminal of the battery;
- We remove the protection. Unscrew the fastening bolts. They are located around the perimeter and are easy to access. First unscrew the 2 bolts at the back.
- We hold the protection from below with our hand, unscrew the last front bolt, and remove it. Access to the lower mount is free.
- Using a 13mm wrench, unscrew the nut of the lower “gene” mounting bolt. Do not unscrew the nut all the way, because you will have to tap it to remove the bolt. Don't forget the bolt bushing.
- Unscrew the belt tensioner bolt.
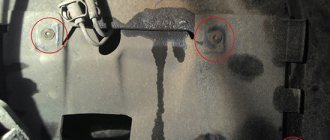
- Then remove the wires under the rubber cap and the plug (indicated by arrows)
- We disconnect the top fastening using two 13mm keys.
- We hold it by the body, remove the top bolt and remove the “genu” through the bottom.
Note: If you are working without an assistant, first remove the upper mounting bolt, and then the lower one.
Installation at the mounting location, after repair or replacement of the unit, is performed in the reverse order.
What bearings are on the Priora generator (VAZ 2170): size, price, article number
We have already figured out how to replace failed parts. Now it remains to understand which bearing is better to buy. There are different generators on Priors - 115A or 90A. The second is for a less powerful car without air conditioning and power steering. Ball bearings have a number (marking). Front element – 6303, rear – 6202.
There are a lot of both original and non-original spare parts on the market:
- Front ball bearing 6303: FAG 6303 2ZR (Germany), SKF 6303-2Z (Sweden), KOYO 6303 ZZ, CM (Japan), NTN 6303 ZZ (Japan).
- Rear ball bearing 6202: FAG 6202-С-2HRS, SKF 6202-2-RSH, KOYO 2RS, NTN; 6202LLU.
In addition to the bearings listed above, below is a table that will help you navigate the offers on the market and select the best quality part:
Selecting a generator bearing - price and manufacturers
| No. | Brand | Catalog number | Price 2022, rub. | ||
| Front | Rear | Front | Rear | ||
| 1 | ASAM Romania | 30904 | 30903 | 200 | 270 |
| 2 | Bosch Germany | 1120905533 | F00M990410 | 420 | 450 |
| 3 | NTN France | 6202-LLU | 6303-LLU | 280 | 330 |
| 4 | KOYO Japan | 140084 | 140093 | 400 | 500 |
Priora generator bearing dimensions
| Characteristic | Unit | Values according to GOST (TU) | |
| 6-180202 | 6-180303 | ||
| Inner diameter | mm | 15 | 17 |
| External diameter | mm | 35 | 47 |
| Height | mm | 11 | 14 |
| Static load capacity | N | 3550 | 6650 |
| Dynamic load capacity | N | 7800 | 13500 |
| Speed | rpm | 24000 | 19000 |
| Radial clearance | mm | 0,008-0,022 | |
| Steel type | – | SHH-15 | |
| Hardness of rings and balls | H.R.C. | 61-65 | |
| Lubricant type | – | C17, Litol | |
| Ring roughness | Ra | 0,32 | |
| Torque | H*M | – | |
| Number of rolling elements | PC. | 8 | 6 |
| Ball diameter | mm. | 5,953 | 9,525 |
| Weight | G. | 0,045 | 0,115 |
Imported or domestic
Imported analogues of bearings have a slightly different designation, namely:
Most 80-amp generators have bearings of similar sizes, at least this applies to domestic ones. If the generator has already been replaced before you, then you may be faced with the fact that a generator from a different manufacturer is installed and the bearings are of different sizes. Depending on the generator manufacturer, bearings of other sizes are sometimes found, for example, in the fairly common Bosch 14V 53-98A 0124 415 038 generator, bearings 6003-2RS (rear) are installed, the dimensions of which are 17 × 35 × 10 and 6303-2RS (front) , respectively, 15×35×14. The same bearings can be found in other imported generators. However, there are options where the rear bearing is designated as 6000-2RS, and the front bearing – 6203-2RS.
In order to accurately determine the dimensions of the bearing, it will have to be removed. If the markings on the bearing are not visible, then it is best to turn to professionals (you should not trust a caliper).
If you have decided on the size of the bearing, then to the repeated question “What bearings are on the VAZ-2110?” The answer suggests itself - original!
The quality of bearings varies from manufacturer to manufacturer; some prefer to install bearings from domestic manufacturers on their generators, while others prefer imported ones. When repairing a generator, everyone decides this issue for themselves, but after listening to numerous tips, some car enthusiasts are inclined to choose imported ones. If you focus on price-quality ratio, many experts recommend DAS LAGER Germany. But there are other suppliers of quality bearings: the French company SNR; FAG is one of the leading companies in Germany; NSK is another major bearing manufacturer from Japan; NTN – Japan; Kouo - part of the Toyota concern of Japan; Kraft or BOSCH.
We also supply bearings from Chinese manufacturers, but the attitude of motorists towards generators and bearings from the Middle Kingdom is far from flattering. A bearing is considered original if it is approved by the vehicle manufacturer for sale on the market. It usually corresponds to what is (or was previously) supplied to the assembly line. The car manufacturer guarantees that these bearings will not let you down.
If you are considering various options, then all the bearings with the corresponding markings at first glance look the same, but after opening the package, you need to pay attention to the marking, which, in addition to the designation of the bearing itself, consisting of digital and letter designations, must contain an indication of the manufacturer and necessarily the country of origin. If this is not the case, then it is quite possible that it is a fake.
In this case, the money lost will not be that big (most often up to 100 rubles per bearing). But you will lose significant time and nerves.
Selection of components
The original generator, installed on a car with a 16-valve engine at the factory, is marked with article number 5102.377. Its cost, as a rule, fluctuates around six to seven thousand.
Carefully check the generator itself and its packaging before purchasing so as not to encounter a counterfeit
It is important that the part is free from unevenness, chips and paint drips, as well as foreign markings.
To avoid overpayments, you can purchase a similar original spare part. The following devices are suitable for installation on Lada Priora:
- VAZ (power 120/115a);
- KZATE (115a);
- BATE (90a);
- BOSCH (120a).
The price of analogues can be either higher or lower than that of the original. As a rule, it is in the region of 3500-6000 rubles. We choose a generator device with a large power reserve so that it lasts longer.
Keep in mind that installing less powerful generators is unacceptable, especially if you connect several different devices to the vehicle’s on-board network (when connecting a large number of electronics, it is generally recommended to increase the current). Before purchasing, we carefully check for damage to the case and the integrity of the unit.
Bearing sizes and manufacturers
Before replacing a bearing with a new standard product, you need to buy it. The marking of these standard consumables is complex; the numbers in it are deciphered using special tables. Moreover, bearing designations according to GOST 3189 do not coincide with the markings of foreign manufacturers, so the user needs to know the following nuances:
- the marking consists of three parts (main, left, right), and blocks inside them;
- in the left and main parts the blocks are located from right to left, and in the right block on the contrary, from left to right;
- in cars, the front bearing of the generator most often has the designation of the main part 302 or 303, and the rear bearing 202 or 203;
- usually radial ball modifications with code 0 (0302 or 0202) or angular contact balls with code 6 (6303 and 6203) are used;
- therefore, for the specified parameters, you can decipher the dimensions using the table below;
- For foreign-made bearings, similar markings are used.
The suffix (right side of the marking) of imported bearings contains additional information. For example, letters and numbers can represent:
- 2RS and RS – double-sided and single-sided rubber seals, respectively;
- N and NR – groove on the outer ring without a latch and with a latch, respectively;
- J – steel holder;
- Z – sheet protection on one side without seals.
The main problem for a car enthusiast when doing self-repair is the variety of bearing sizes inside the generator:
- it is difficult to guess the markings before disassembling, when the car is still running;
- after dismantling and disassembling the generator, the dimensions and markings are known to the owner, but he has to go to the store in a different car;
- in some stores, sellers practice a convenient system - the car owner takes 4 bearings 202, 203, 302 and 303, and returns two of them back.
These modifications have dimensions:
| Marking | External diameter (mm) | Inner diameter (mm) | Clip thickness |
(mm)
In view of the variety of brands and brands of cars, different power and design of generators, it is easier to study the manual before replacing bearings. In it, the marking of these standard parts and adequate replacement options are mandatory.
The most expensive bearings are considered to be from the manufacturer FAG - 450 rubles (6303 modification) and SNR - 400 rubles (6203 ZZ). Bearings from Koyo are half cheaper - 200 rubles for 6303С3, NTN - 180 rubles for 6203ZZ and Nachi - 150 rubles for 6203ZZ. A set of standard products for the KZATE generator on the VAZ 2114 (16 V) from the Chinese manufacturer C&U costs 1,100 rubles. By default, this generator is equipped with Chinese consumables SKF 6202 and SKF 6303 (both with the suffix 2RS) at the factory.
In the old VAZ 2110, the generator was equipped with bearings 302 and 202 2RS; the new ones use a generator with a different shaft; standard products 303 and 203 are required, respectively.
Preparation and necessary tools
It is more convenient to remove the generator on a Lada Priora on an overpass or inspection hole. Before you begin dismantling, prepare the following tools:
- locksmith's crank;
- extension;
- cardan from the tool kit;
- heads for 10, 12, 13, 17;
- spanners for 10, 12, 13, 17.
- WD-40 product.
When driving onto a pit or overpass, do not forget to install chocks under the wheels so that the car does not roll spontaneously. Then disconnect the negative terminal from the battery. Apply WD-40 to the mounting areas of the generator and air conditioning compressor. Wait 10-15 minutes for the product to take effect.
Tips and tricks
Generators and brushes come in four types, depending on the year of manufacture of the Lada Priora. Typically, removing the air conditioner is required in cars with a 127 engine. In this case, the air conditioner pipes are located below the radiator. These tubes completely cover the gap between the radiator and the block. Therefore, dismantling without removing the compressor will be quite problematic. First you have to disconnect the air conditioner pump from the brackets.
It is also not easy to remove the bolt that is screwed to the generator from below. The bolt can be unscrewed if it is on the side opposite the motor. Otherwise, the bolt will be located next to the engine mount, and you will have to cut it off with a circular saw. This operation will take an extra 10 minutes. It is better to position the new fastener with the head in the desired direction so that there are no more problems when unscrewing.
If the compressor is already unscrewed, it does not need to be attached. It will cling to surrounding elements. When screwing the air conditioner into its old place, you must first install all the bolts, and only then screw them in. It is also advisable to start the engine after assembly and check how the generator operates. Only then can the bottom be screwed on.
Reasons for failure
There are many reasons for bearing failure, but there are several main reasons, which are discussed below.
Wear
Wear is a typical cause of bearing failure, since the number of revolutions of the generator rotor is huge over the Nth period of time. Consequently, the lubricant in bearings under the influence of high temperatures loses its properties and the bearing ceases to receive the required slip coefficient, which causes heating and increased clearances in the ball part of the bearing.
Belt tension
Excessive tension on the alternator belt greatly affects the life of its bearings. It is necessary to tension the belt correctly, observing all norms. The generator belt should bend under the influence of 10 kg. by 5-7 mm.
Recommendations
Comments 24
Everything was resolved - one bearing was burnt, dry and jammed, the second had a little oil but was loose. I changed the bearings to FBJ. I also changed the slip rings, they were worn out. I wanted to install a three-level regulator, but it didn’t work, which means no luck. The original tablet gives 13.4-13.6 with the low beam on, of course with the air conditioning it will also work, but the tablet is also proven and working
tensioner, take off the belt
According to the code, manufacturer BATE 21120-3701010-05 for 90A (Belarus) front bearing 302
Here are good bearings for the gene
There’s also this garbage: I changed the tensioner periodically, the problem did not go away, for 165,000 I’m already on the third pump, the second gene and the second set of timing belts, but the problem never went away, I have a feeling that until something in the internal combustion engine warms up - there is a rustling sound, it is quite possible that this is the rustling of the engine belt or timing belt. Although, of course, if you take their bearings at the service center, and after starting everything is the same, then the job is not done, if you bring your own, they have the right to say that you brought them from China, but there are no excuses here.
Take off the belt and you will understand the reason, most likely the bearing. The pump may also rustle (on your engine, oh no)
and the bearings are in the genes: the rear is always 202, and the front is 302 (old model, 15 shaft) or 303 (new model, 17 shaft)
and in front of this where is the pulley?
Yes, the front is where the pulley is, and the back is where the brushes go.
and in front of this where is the pulley?
there is a method for determining without removing the pulley and measuring, but I’ll make a reservation, it’s mine personally and if I’m absolutely sure that no one has repaired the generator before: if the RR is of the old model, without wiring, then the gene is of the old model and the front bearing is 302. If the RR is of a new model, with two additional wires, the front bearing is 303.
Oh, I'll watch it tomorrow!
there is a method for determining without removing the pulley and measuring, but I’ll make a reservation, it’s mine personally and if I’m absolutely sure that no one has repaired the generator before: if the RR is of the old model, without wiring, then the gene is of the old model and the front bearing is 302. If the RR is of a new model, with two additional wires, the front bearing is 303.
Your method is incorrect. Nothing depends on the type of launch vehicle. And it depends on the manufacturer. The rear covers of the generator are the same, the seat for the launch vehicle and the diode bridge are the same. The same generators may have one relay or another.
Method 100%. Manufacturer: factory. Rubbish like China, Ukraine, etc. In principle, I don’t consider it.
Your method is incorrect. Nothing depends on the type of launch vehicle. And it depends on the manufacturer. The rear covers of the generator are the same, the seat for the launch vehicle and the diode bridge are the same. The same generators may have one relay or another.
On generators n/o there is also a pp n/o and a reinforced front cover, respectively, bearing 303. The method is 100%, if no one has climbed into the gene, I already wrote about this.
In this case, I have only seen the “new model” generators you indicated in one Samara and one Chevy Niva. (But I often install these DM and RN myself. Instead of the usual ones)
And the rest of the cars, including those bought in a store and untouched by generator repairs, I came across with generators of both standard sizes, pulley mounting nuts, rotor shaft diameter, etc. But with a conventional LV and a nine-diode bridge. Somehow your 100% theory doesn’t work.
By the way... I repair on average from two to ten generators per week. Sometimes 3-4 a day... I’m silent about China, that’s understandable. It's complete horror.
I don’t know what kind of generators you have there, where they get them from and who installs them. I have 126 cars in my fleet, all from the factory. I don’t think it’s the leftists (those who come from the street for repairs, the so-called “shabashki”), you can ask AvtoVAZ for these genes, they’ll say the same thing as me. Well, I personally became convinced of this while repairing a car. AvtoVAZ’s letter about genes is 100% confirmed. Another thing is that the genes n/o and s/o are not linked by year - yes (n/o can be on a car produced in 2004, but on a car produced in 2007, for example, it comes from the factory with a c/o, etc. .) P.S: here only about factory genes, not about Bulgaria, China, basement kzate - of which more than half are in the stores in our city. the engraving is somehow crooked) p.s.: we have genes n/o and s/o about 50/50 on the car.
and the bearings are in the genes: the rear is always 202, and the front is 302 (old model, 15 shaft) or 303 (new model, 17 shaft)
If the pulley mounting nut is S24, then bearing 6303. If the nut is smaller, S21, then 6302.
Don’t forget about the tension roller, just stop by the service center and listen with a stethoscope, give them a hundred rubles and you’ll know exactly what to change
the sound comes from the gap between the cover farthest from the pulley - there are technological gaps there
How to tension the alternator belt
When checking whether the belt is tensioned on a Priora car, keep in mind that marks are applied to the camshaft pulleys. Rotate the crankshaft until the marks on the camshaft pulleys coincide with the cutouts on the reverse side of the drive.
With normal timing tension, the protrusion of the inner sleeve of the tensioner pulley should coincide with the opening of the outer race. If the belt is in good condition and the marks do not match 1/2 of the reach width, the tension should be adjusted.
- Loosen the bolt holding the tension roller.
- Make sure the cutout of the roller aligns exactly with the protrusion on the back of the roller bushing.
- Using wrench 15, tighten the tensioner pulley bolt.
- Simply put, to tension the belt, the generator roller needs to be turned in the opposite direction clockwise.
Size and catalog numbers
These parameters of the ball bearing are necessary for purchase, since without these numbers it is very difficult to buy the right part suitable for your car.
The dimensions of the bearings varied depending on the year of manufacture of the car, so the selection of a bearing can be carried out based on the year of manufacture. auto.
Cars manufactured before 2001 with carburetor engines they have bearings of type 6302 front and 6202 rear.
Cars produced after 2001 with injection engines, have bearings type 6303 front and 6203 rear.
Catalog numbers (articles) and external dimensions
Modernization of the VAZ generator voltage regulator
- HUCO-130512
- Febi-17202
- Bosch-1197311028
- Hella-5DR 004 242-061
- Beru-0 190 005 004
- Standard voltage regulator (160r.)
- Voltage regulator from a foreign car for 14.5V.
- The photo shows a dismantled tablet with a foreign car's pH and a body with brushes.
- Because it is a little larger, it is not that easy to install. This is what a combined foreign-made 14.5V tablet looks like with our PH housing.
- And a standard pH and a 14.5V tablet assembled and ready for use.
- On a warm car, the voltage at the terminals is 14.4V
- With an average network load, the voltage was 14.2-14.3V
- When all devices were turned on, the generator voltage dropped to 14-14.1V and remained the same when the internal combustion engine warmed up to 90Co.
xn--2111-43da1a8c.xn--p1ai
Replacing bearings yourself
If the generator is repaired on its own, the main problems become:
- how to remove the front bearing of a generator - it is often rolled into the front cover housing, pressing in a new product becomes more difficult, since part of the housing is destroyed during dismantling;
- Removing the rear bearing - you need a puller with suitable dimensions.
However, if the generator starts to hum, you need to act quickly before the rotor completely jams.
Dismantling the generator
On some cars, the generator can be removed through the hood, on others, for example, VAZ 2112, you will need an overpass, pit or lift. The dismantling sequence is as follows:
- disconnecting the “–” terminal from the battery;
- loosening the tensioner nut;
- dismantling the alternator belt;
- disconnecting the terminals of the on-board system from the dismantled unit;
- removing engine protection;
- unscrewing the two mounting bolts from below;
- removing the generator from below.
After this, the repair continues on a table or in a vice. At this stage, the dimensions of the front and rear bearings of the auto generator are still unknown to the user if there is no manual.
Complete disassembly
Since the generator bearing can be checked for runout only after complete disassembly, it is necessary to follow the following sequence of actions:
- marking - using a marker, paint or colored nail polish to mark the relative positions of the casing, front cover and body;
- dismantling the pulley - the rotor is carefully blocked with a screwdriver from turning, the pulley is turned away with a key;
- removing the casing - it is usually fixed with latches that need to be unscrewed with a screwdriver to remove the specified part;
- dismantling the front cover - use a screwdriver to unscrew the screws.
Under the casing there is a voltage regulator, a diode bridge, brush clamps, and a capacitor. Before replacing the bearing, you should check the wear of the brushes, the performance of the diode bridge and the voltage relay in order to increase the next overhaul period.
Attention: The armature (rotor) is removed from the stator winding with the rear bearing mounted on the shaft, while the front one remains inside the corresponding cover.
Before replacing standard consumables, it is necessary to check the bearings:
- rear - use your fingers to turn the outer race, which should not emit any extraneous sounds when rotating and have no play;
- front - here, on the contrary, the inner race is rotated and the play is controlled when the bearing is rocked inside the seat with your fingers.
Manufacturers unanimously recommend replacing the front cover along with the bearing, especially if it is rolled inside the seat. In practice, to reduce the repair budget, the cover is left for further use, since it costs 150–300 rubles.
Front bearing
If the results of the previous test require replacement of the alternator front bearing, the old standard product is removed from the front cover:
- the bearing can be knocked out inside by placing the cover on the bricks with the outer side up;
- or secure the lid in a vice;
- or use a special puller.
In the presence of rolling, this fixing element is broken irrevocably.
After the owner has removed the worn-out consumable, a new bearing is mounted inside the front cover:
- the lid is turned over with the inside facing up;
- the seating surface is treated with sealant;
- a sleeve of suitable diameter is installed on the outer race;
- With light blows, drive the bearing into the seat until it stops;
- lubricate the balls between the races or fill the grease into special holes.
The bearing has been checked for runout and is ready for use; assembly is carried out in the reverse order.
Rear bearing
The rear generator bearing is replaced as follows:
- dismantling with your own hands - the jaws of the puller grip the outer race, and by rotating the central screw the bearing is pulled out of its seat;
- installation - the standard product is mounted on the shaft, a sleeve of a suitable diameter is installed on the inner race, after which its surface is tapped with a hammer.