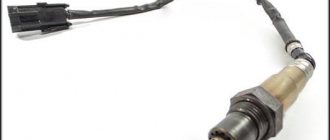
Oxygen sensor location
The oxygen sensor is located in the exhaust manifold
Before moving directly to identifying the signs, you need to know where it is located and what it is responsible for. A lambda probe is a car sensor that reads the amount of oxygen released from the exhaust gases and regulates the supply of the fuel mixture.
Often, car manufacturers choose the location in front of the catalyst. In this case, the sensor is located in the exhaust manifold . Some automotive critics believe that this location is not entirely correct, since the probe should be located directly in front of the catalyst.
Layout of the oxygen sensor in the exhaust system
Also, to refine the system, oxygen sensors with feedback can be installed and used. To do this, another lambda probe is installed after the catalyst, which is connected to the electronic control unit. This was done in order to more accurately read data from exhaust gases, regulate the fuel mixture and reduce fuel consumption.
Replacement and can it be turned off?
Replacing the oxygen sensor is quite simple, since it only requires disconnecting it from the power supply and unscrewing it from the exhaust manifold. But with the question of whether it is possible to drive with the sensor disabled, everything is much more complicated.
A switched off lambda probe means that the ECU in this parameter goes into emergency mode and the amount of fuel injected into the cylinders will fluctuate. So, the gasoline mixture will be either rich or lean, which will lead to unstable operation of the power unit and wear.
Diagram of the location of the oxygen sensor with feedback
Symptoms and error codes
So, let's look at the main symptoms of a faulty oxygen sensor on a 16-valve VAZ-2112 engine:
Design features of the oxygen sensor
It is worth noting that other sensors have the same reasons, so to get a more detailed answer, you need to connect to the engine’s electronic control unit and see exactly what errors popped up.
So, let's look at what errors are caused by a faulty lambda probe:
| Error P0130 | Invalid oxygen sensor signal 1 |
| Error P0131 | Low signal level of oxygen sensor 1 |
| Error P0132 | Crankshaft sensor 1 signal high |
| Error P0133 | Slow response of oxygen sensor 1 |
| Error P0134 | No signal from oxygen sensor 1 |
| Error P0135 | Oxygen sensor 1 heater malfunction |
| Error P0136 | Oxygen sensor 2 short to ground |
| Error P0137 | Low signal level of oxygen sensor 2 |
| Error P0138 | Oxygen sensor 2 signal high |
| Error P0140 | Oxygen sensor 2 break |
| Error P0141 | Oxygen sensor 2 heater malfunction |
| Error P1102 | Oxygen Sensor Heater Resistance Low |
| Error P1115 | Faulty oxygen sensor heating circuit |
Symptoms of malfunction
Where is it installed?
Based on the behavior of the car, you can easily determine that the lambda probe has become unusable:
- The car jerks while driving;
- The revolutions are floating;
- The catalyst is not working properly;
- Fuel consumption increases noticeably;
- Exhaust gases contain a large amount of toxins.
The operation of this sensor requires constant monitoring. According to the operating manual, the check is performed every 10 thousand kilometers traveled. But if the operating conditions of the car are difficult, you have to regularly drive in difficult conditions, or the engine is overloaded, then it is better to check it more often.
conclusions
There are few signs of a malfunction of the oxygen sensor on the 16-valve VAZ-2112 engines, and in order to be completely sure that the oxygen sensor is not working, you need to connect to the computer and look for errors. There is only one method for troubleshooting - replacing the sensor. You can do this yourself, since there is nothing complicated in the process.
Publication date: December 20, 2016. Category: Automotive equipment.
A lambda probe is an O2 concentration sensor (or, more simply, an oxygen sensor) that allows you to estimate the volume of unburned oxygen contained in the exhaust gases. These indicators are extremely important, since by maintaining certain proportions of fuel and air, the most efficient combustion of the air-fuel mixture occurs. The best ratio is 14.7 parts oxygen to 1 part gasoline. If this ratio is violated, the mixture will be lean or, conversely, enriched, which, in turn, will affect fuel consumption and engine power.
How to extend the service life of a recreation center
To extend the service life of the sensor, you will need to follow the following recommendations:
- Conduct a technical inspection of the vehicle on time;
- use only original spare parts for the car;
- do not allow the use of low-quality fuel mixture;
- Contact a car service if you find problems with engine operation.
You can change the oxygen sensor on a VAZ-2112 yourself without going to a car service center. Only original components must be used. If there are problems starting the engine, you should check the correct operation of the lambda probe.
Get chip tuning done by a trusted specialist with a certificate and the possibility of moneyback.
ADACT against removing a correctly functioning catalyst. Find out about the possible consequences for the car.
You cannot drive with a faulty oxygen sensor. The car loses dynamics, fuel consumption increases. Therefore, car owners change, clean, install decoys, or programmatically turn off the lambda probe (mute). Which way is better? We looked at the pros and cons of each.
Signs and causes of lambda probe malfunction
According to statistics, oxygen sensors fail gradually, so you can identify its malfunction if you pay attention to the following “symptoms” in time:
- The idle speed began to drop or “float”.
- The car jerks, and after starting the engine, popping noises uncharacteristic of the engine are heard.
- The engine power has decreased and when you press the gas pedal there is a slow response.
- The engine overheats greatly and fuel consumption has increased.
- The smell in the exhaust pipe has changed (exhaust gases have become more toxic).
As a result of a failed sensor, the quality of the fuel mixture entering the combustion chamber deteriorates, which disrupts the smooth operation of the engine. There can be many reasons for this:
- Incorrect operation of the filament circuit or reduced sensitivity of the sensor tip.
- Low-quality fuel with a high content of iron, lead, oil decay particles and other harmful inclusions. All these substances stick to the platinum electrodes, causing the sensor to malfunction.
- Problems with the lambda probe heating system. If the heating stops functioning as it should, the oxygen sensor will produce inaccurate data.
- Overheating of the regulator housing. This happens if the ignition timing is incorrectly set.
- Worn oil scraper rings. In this case, engine fluid enters the exhaust pipe, which affects the lambda probe.
- If the engine is started repeatedly.
- Using sealants (especially silicone) to install lambda probes.
- The compression level in the engine cylinders is impaired. In this case, the combustible mixture burns unevenly.
- Clogged engine petrol injectors.
If you notice that the lambda probe is not working, you should not ignore the symptoms, as otherwise you will cause yourself a lot of problems with your car. The fact is that most modern cars are equipped with an emergency locking unit, which can work at the most unfortunate moment. However, the impossibility of further movement is not the worst thing. If the sensor becomes depressurized, the injection system will fail and you will have to pay for expensive repairs to a more serious unit.
Therefore, it is recommended to periodically check the condition of the lambda probe. You can do this yourself.
Causes of failure
Before starting the test, it is necessary to determine the reasons why the sensor stopped working correctly.
- Coolant has leaked inside the device.
- Unsuitable cleaning agents were used to clean the body of the device.
- The gasoline you fill your car with contains large amounts of lead. A popular breakdown typical for cars of those owners who prefer cheap gas stations.
- A banal overheating of the heat-resistant sensor, which again occurs due to low-quality fuel.
Checking the oxygen sensor
Typically, diagnostics of a lambda probe is carried out using a voltmeter and an ohmmeter or a multimeter, which replaces both of these testers at once. To check the filament coil of the regulator, you need to disconnect pins 3 and 4 of the connector from the block (usually these are brown and white wires) and connect the ends of the tester to their clamps. If the resistance of the spiral is at least 5 ohms, then this is a good sign.
Also, checking the lambda probe with a multimeter allows you to find out the sensitivity of the tip of the oxygen sensor. To find out the thermoelectric parameters of the element, you need to turn on and warm up the engine to 70-80 degrees. After that:
- Raise the engine speed to 3000 and hold this value for 3 minutes to allow the sensor to warm up.
- Connect the negative probe of the tester (signal wire) to the ground of the car, and the second one to the output of the lambda probe.
- Check the tester readings, the data should vary from 0.2 to 1 V and update up to 10 times per second.
- Press the accelerator pedal sharply and release it; if the multimeter shows a value of 1 V, and then sharply drops to zero, then the lambda probe is ok. If the data on the tester does not jump when you press and release the pedal, and the readings are about 0.4 - 0.5 V, this indicates the need to replace the sensor.
If there is no voltage at all, then most likely the cause of the malfunction lies in the wiring, so use a multimeter to test all the wires that go from the ignition switch to the relay.
Healthy! To more accurately clarify the sensitivity characteristics of the lambda probe, you will need professional equipment - an oscilloscope.
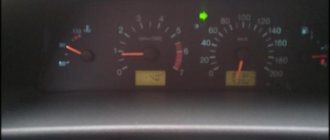
If your car is equipped with a “smart” on-board system, then pay attention to the “Check Engine” signal, which may display the following errors:
- 0130 - indicates that the sensor is producing an incorrect signal.
- 0131 – very weak sensor signal.
- 0133 – lambda responds slowly.
- 0134 – no response at all.
- 0135 – malfunction of the lambda heater.
- 0136 – the grounding of the second sensor is short-circuited.
- 0137 – the second sensor produces a very low signal.
- 0138 – the signal of the second lambda is too high.
- 0140 – probe breakage.
- 1102 - it is impossible to read the indicators, since the resistance of the element is too low or completely absent.
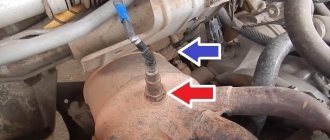
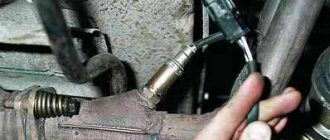
How to independently replace the device on a VAZ-2112
To replace a faulty controller, you will need to perform the following algorithm:
- Drive the car into a garage with a pit or onto a roadside overpass for ease of work.
- Turn off the engine and give it time to cool.
- Then you need to look under the bottom and find the oxygen sensor near the clutch.
- Next you need to disconnect the block with wires.
- Use a wrench to remove the oxygen sensor.
- Clean the threads and contacts using cleaning fluid.
- After this, use a wrench to secure the new measuring controller.
- Place the block with wires.
To check, you need to start the engine at idle speed. If there is no error on the dashboard and the readings are determined correctly, then everything was done correctly.
How to repair a lambda probe
Repairing a lambda probe with your own hands is quite simple; to do this, you need to determine in which particular unit the failure occurred.
If the problem is related to the circuit contacts, then first of all you need to find the break point and check whether the contacts have oxidized. The signal may simply not come from the control unit. Therefore, check the lambda power supply. If the element contacts have oxidized, they must be treated with WD40.
If a lot of carbon deposits have formed on the probe body, it may be necessary to clean all parts of the system. And here a natural question arises: how to rinse the lambda probe. The fact is that it is strictly prohibited to process platinum electrodes and ceramic rods with sandpaper. Therefore, it is necessary to use specialized products designed to dissolve rust.
To clean the sensor, follow these steps:
- Remove the lambda probe after heating its housing to 50 degrees.
- Remove the protective cap.
- Soak the sensor in phosphoric acid for 30 minutes (it will cope with even the most difficult deposits).
- Rinse the lambda in water, dry it and install the element back. Don't forget to lubricate the sensor threads with a special agent to create a complete seal (but don't use silicone sealant).
Since the cost of sensors ranges from 1000 - 3000 rubles per element, it is quite reasonable to try to repair the lambda probe yourself (see video below), and only then proceed to install a new element.
Correct probe replacement
Replacing a lambda probe on a VAZ 2112 requires the following actions:
- First, disconnect the probe wire from the electrical wiring. The procedure is carried out with the engine completely cooled and the ignition off. To replace an old device, you should purchase a sensor with the same markings as the previous one
Attention: when the engine is hot there is a danger of getting burned, so you should use thick cloth gloves and be careful
- The new probe is screwed in until it stops in order to create a tight seal.
- Connecting the electrical wiring
- We check the performance of the new oxygen sensor using an oscilloscope, and a voltmeter, as well as an ohmmeter, the engine temperature is not lower than 350 degrees, at this point the replacement of the VAZ 2112 lambda probe is completed
That's all, good luck in replacing and checking your sensor, and in addition we recommend video material on replacing it.
Add a commentVAZ 2112: crankshaft sensor - malfunctions and replacementReplacing the radiator sensor quickly and easily!VAZ 2109: sensors on the engine, their location and replacementVAZ 2110: injector sensors and their functions
Operating principle of the oxygen sensor (lambda probe)
The working surface of the sensor is a ceramic material coated with platinum.
The operating temperature of the sensor is 350 degrees Celsius and above. Therefore, before heating the lambda probe, during the first 5 minutes after starting the engine, the working mixture is adjusted according to the readings of other sensors of the engine power system. To speed up the heating of the sensor to operating temperature, an electric heater is installed in it.
The principle of operation of the sensor is as follows: exhaust gases cover the working surface of the lambda, which in turn reacts to the difference in oxygen levels in the exhaust gases and the environment. It then sends a signal to the ECU, which in turn regulates the mixture.
Method one
Involves cleaning the heating element from carbon deposits (used when a malfunction of the oxygen sensor heater occurs). To implement this method, it is necessary to provide access to the sensitive ceramic part of the device, which is hidden behind a protective cap. You can remove this cap using a thin file, with which you need to make cuts in the area of the base of the sensor. If it is not possible to completely dismantle the cap, then it is possible to make small windows about 5 mm in size. For further work, about 100 ml of orthophosphoric acid or rust converter is needed. When the protective cap has been completely removed, you will have to use argon welding to restore it to its seat.
The recovery procedure is performed according to the following algorithm:
- Pour 100 ml of phosphoric acid into a glass container.
- Immerse the ceramic sensor element in acid. Do not completely immerse the sensor in acid! After this, wait about 20 minutes for the acid to dissolve the soot.
- Remove the sensor and rinse it with running tap water and then allow it to dry.
Sometimes it takes up to eight hours to clean the sensor using this method, because if you don’t succeed in cleaning the soot the first time, then it makes sense to repeat the procedure two or more times, and you can use a brush to mechanically treat the surface. Instead of a brush, you can use a toothbrush.
Oxygen sensor errors
You can detect the presence of these errors by the yellow light on the check engine panel coming on (or it may not light up). You can read these errors either using the on-board computer or using computer diagnostics.
| Error P0130 | Invalid oxygen sensor signal 1 | ||
| Error P0131 | Low signal level of oxygen sensor 1 | ||
| Error P0132 | Crankshaft sensor 1 signal high | ||
| Error P0133 | Slow response of oxygen sensor 1 | ||
| Error P0134 | No signal from oxygen sensor 1 | ||
| Error P0135 | Oxygen sensor 1 heater malfunction | ||
| Error P0136 | Oxygen sensor 2 short to ground | ||
| Error P0137 | Low signal level of oxygen sensor 2 | ||
| Error P0138 | Oxygen sensor 2 signal high | ||
| Error P0140 | Oxygen sensor 2 break | ||
| Error P0141 | Oxygen sensor 2 heater malfunction | ||
| Error P1102 | Oxygen Sensor 2 Heater Resistance Low | ||
| Error P1115 | Faulty oxygen sensor 2 heating circuit | ||
Most often, errors associated with the oxygen sensor appear due to a malfunction of the heating circuit, as a result of which the sensor gives incorrect parameters.
In this case, you need to look for a broken wire or replace the sensor.
Why does P0134 occur?
There are not so many reasons that can lead to error P0134. It specifically indicates an incorrect signal being received from a particular sensor. Based on this, we can conclude that the causes of error P0134 are as follows:
Diagnostic equipment makes it easier to determine the cause of a problem. If, in addition to error P0134, the diagnostic tool reports the presence of error P0171, this indicates that the malfunction is associated with an open or short circuit. As you know, error P0171 indicates a lean mixture in the engine. It occurs together with error P0134 with the above-mentioned malfunctions, since the first oxygen sensor in the exhaust circuit is the control one for supplying the mixture. Accordingly, if it stops transmitting information, the electronic control unit will reduce the amount of fuel supplied, causing the air-fuel mixture to be lean - this is necessary to prevent possible breakdown of the catalyst.
It is worth noting that most often the P0134 problem is directly related to the failure of the sensor itself. In no more than 5% of cases, a malfunction occurs due to a short circuit, open circuit or oxidation of contacts.
Why does the lambda probe die?
We have already clarified above that the service life of the oxygen sensor is 80-160 t.km. You probably have a question: why is there such a variation in the resource, as much as 80 t.km? In fact, the life of the sensor depends on the conditions in which the car was operated:
- bad gasoline, the exhaust of which contains a lot of lead and iron, clogs the sensor electrodes after several fill-ups;
- poor condition of oil scraper rings and caps. Because of them, oil can get into the mixture, and with it into the exhaust system;
- due to clamped valves, pops are released into the exhaust system, which destroy the working surface of the sensor;
- due to an incorrect mixture, ignition timing, as a result of which the sensor overheats, crackling from the high temperature of the converter or catalyst.
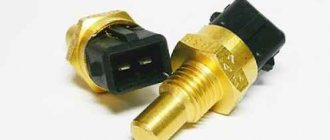
Oxygen sensor VAZ-2110
The main function of the LZ is to determine the amount of oxygen in the exhaust gases; based on the data received, the sensor sends a signal to the unit that controls the engine electronic system. In accordance with the lambda probe readings, the ECU adjusts the functioning of all elements of the fuel system and ignition, making the engine operate more optimally.
On a VAZ-2110 (2111, 2112) with an 8-valve engine, the oxygen sensor is located on the exhaust pipe of the muffler, in close proximity to its connection with the resonator. Since the lambda probe does not start working immediately, but only when the exhaust pipe warms up to 360 degrees, VAZ sensors are often equipped with a built-in electric heater; such LZs have four wires and a corresponding plug for connecting to the car’s electronic circuit.
The main manufacturers of VAZ oxygen sensors are Bosch and NGK, “Bosch” spare parts are considered universal, they are used not only on “tens” and “dvenashki”, but also on other VAZs, models of other brands, in particular on cars:
- Opel Omega /Vectra/ Astra/ Calibra with C20NE engine (you only need to change the plastic plug);
- VAZ 2108-2115;
- Chevrolet Niva;
- Gazelle Business with Cummins engine;
- UAZ Patriot.
The price of a BOSCH lambda probe with catalog number 0258006537 is on average from 1,500 to 2,000 rubles; you can buy a sensor in almost any auto store; you can often find advertisements for the sale of parts on the Internet.
Currently reading
Internet in cars and more: features of technology...
Coating a car with ceramics: what you need to know
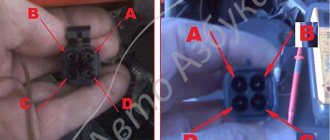
There are 4 wires of different colors suitable for the 4-pin LZ connector:
- black – signal;
- gray – mass;
- two white ones - for connecting an electric heater (the polarity of connecting the wires does not matter).
The BOSCH lambda probe is sold in original packaging, with a protective plastic cap; a special lubricant is applied to the threaded connection of the part to prevent sticking of the sensor.
Description of the oxygen sensor
Let's start with a description of the device. We invite you to familiarize yourself with its purpose, structure, and operating principle.
Purpose and location
The VAZ 2110 lambda probe largely influences the stable functioning of the engine, ensuring the normal operation of its parameters. This controller is an electronic device used to determine the amount of oxygen present in the exhaust gases. This is necessary in order to reduce the volume of harmful impurities and elements contained in exhaust gases. In order to ensure the required proportion of the air-fuel mixture, which affects the reduction in the concentration of impurities, air must be supplied to the engine in the required quantity.
Lambda probe installation location
This is not always achieved, and the reasons may be different. If the controller fails, the carbon monoxide content in the exhaust gases will be about 3-7%, while the standard value is 0.3%. As for the location, this sensor on a VAZ is installed on the exhaust pipe of the muffler, from below. The readings recorded by the lambda probe are transmitted to the motor control unit. And the ECU, focusing on them, adjusts the composition of the combustible mixture, thus setting the required time for the injection phase.
Design and principle of operation
The VAZ 2110 oxygen sensor consists of the following elements:
- steel body;
- insulator component, which is made from ceramics;
- O-ring with wiring and cuffs;
- a special case with holes for ventilation;
- ceramic tip;
- conductive contact;
- a special shield, which also has holes through which gases are released;
- filament coil.
The device is based on two electrodes - internal and external, the first is made of zirconium, and the second is made of platinum. The zirconium electrode is in direct contact with the exhaust gases, and the platinum electrode is in contact with the air. The values that the controller receives are based on the potential difference between these elements. To ensure optimal operation of the oxygen controller, the device must be heated to 300-400 degrees (video author - MotorState channel).
Why does the lambda probe break? Can the ECU firmware kill the lambda?
The temperature is quite high, it is achieved through the use of a special heating component, which is built into the structure of the lambda probe. When the engine starts, the control unit adjusts the composition of the combustible mixture based on the readings of other controllers, and not just the lambda probe. In particular, we are talking about mass air flow sensor, throttle opening sensor, antifreeze temperature in the system, etc. And the control unit begins to refer to the lambda probe readings only after the device has warmed up to operating temperature.
Kinds
The first “Ten” injection engines used standard oxygen controllers from the manufacturer Bosch. In 2004, when these car models began to be equipped with more modern injection systems, which were called January 7.2, Bosch M7.9.7, the cars began to be equipped with modernized versions of VAZ oxygen regulators. The latest version differs from the earlier one in that it is equipped with a ceramic heating element, thanks to which less electricity consumption is achieved.
But even this allowed the controller to warm up faster. Currently, Bosch produces seven different types of oxygen sensors with different powers - 12 and 18 W. It should be noted that these devices differ from each other, perhaps, in the values of energy consumption and the number of contacts. In all other respects they are identical.
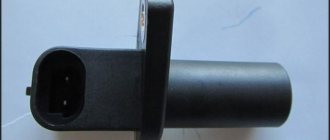
Description of the crankshaft sensor
So what is this controller and what is its purpose? Where can I find the device in order to replace it? What are the main signs of a device malfunction? We will give answers to these questions below.
Functions and purpose
On an engine with 8 or 16 valves, the DPKV is designed to perform not control options, but to implement phase synchronization for gasoline injection. Also, the crankshaft sensor on the VAZ 2110 transmits an impulse to ignite the air-fuel mixture in the combustion chambers of the power unit. Therefore, if the controller breaks down, this can lead to various vehicle systems not functioning coherently. This means that normal operation of the engine will be impossible.
VAZ 2112 crankshaft sensor
The VAZ 2110 crankshaft sensor itself is an inductive type device; this controller must respond to the passage of teeth on the master disk. This disk is mounted on the generator drive pulley, and the controller itself is installed next to it. There are 58 teeth on the pulley, between which there is a cavity the size of 2 teeth. This cavity allows synchronization with the top dead center of the engine pistons. The moment the depression passes the controller, a corresponding signal is sent to the engine control unit.
There are quite a few designs of devices of this type; the principle of their operation is based on a regulator such as the VAZ 2110 Hall sensor. In the latter case, the regulator also responds to a rotating shaft, but its operation is carried out as a result of the passage of a permanent magnet.
Where is?
If malfunctions are noticed in the operation of the engine, then before you begin to identify the breakdown and signs of malfunction, you need to find out where the regulator is located. Where is the crankshaft position sensor located on an 8- or 16-valve “ten”? If you open the hood, you will notice that the regulator can be found directly on the oil pump cover. As you can see, the location of the regulator is not particularly convenient. VAZ engineers thought through this point, thinking about the convenience of replacing the controller, so they equipped the DPKV with a long 80 cm wire.
Location of the DPKV under the hood of the car
Signs of trouble
If the controller located on the oil pump fails, the driver will not be able to start the engine. In the event of a breakdown, only replacing the regulator will solve the problem of the inability to start the motor. It should be noted that on 8- or 16-valve engines the problem of complete failure of the controller does not often occur; as practice shows, in most cases the problems accumulate.
So, what are the signs of a faulty DPKV:
- Reduced engine power when driving. When the driver presses hard on the gas, power loss may be felt. Note that in carburetor engines this can occur if the accelerator pump does not operate correctly.
- In some cases, engine detonation may occur, especially if it operates at high speeds. Sometimes this problem can be caused by the poor quality of the fuel used.
- It may be difficult to start the engine.
- Another sign of a malfunction that requires replacing the crankshaft sensor on the “ten” is increased gasoline consumption (the author of the video about replacing the crankshaft sensor on the domestic Lada is the IZO channel)))LENTA).
In general, failure of this controller can lead to unstable operation of the power unit. As for the reasons, they are usually due to manufacturing defects. In some cases, the regulator breaks due to contamination at the installation site.
Replacing the crankshaft position sensor on VAZ 2110, Kalina, Grant, Priora, 2112 and 2114
VAZ crankshaft sensor, DIY repair!!!(stas alekseev)
The crankshaft sensor is bad! do as I do