Replacing the rear brake cylinder on a VAZ 2101-2107
If the rear brake cylinder on a VAZ 2101-2107 begins to jam or perform its function ineffectively, it should be replaced with a new one. To do this we need the following tool:
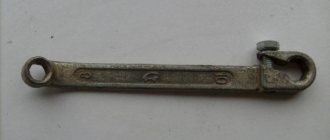
- Split wrench for unscrewing brake pipes
- Penetrating lubricant
- 10mm socket with ratchet or regular 10mm wrench
So, the first step is to perform some preparatory procedures, which are listed below:
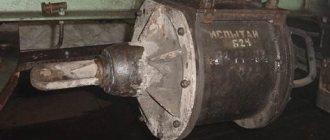
After this, the rear brake cylinder becomes free and its location is shown in the photo below:
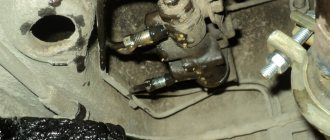
So, first you need to spray the brake pipe with penetrating lubricant, and then unscrew it:
After this, you need to unscrew the two bolts securing the cylinder, which are located on the reverse side:
The most convenient way to do this is with a socket and ratchet:
And now you can safely remove the VAZ 2101-2107 brake cylinder from the reverse side, as is clearly demonstrated in the photo below:
Next, we buy a new cylinder, the price of which for all classic models is about 300 rubles apiece. If you change a pair, you will have to buy two pieces and spend 600 rubles. Installation is carried out in reverse order.
If necessary, after replacement, bleed the brakes if there is air in the system.
zarulemvaz.ru
If you notice a brake fluid leak that appears on the inside of the rear wheels in the form of smudges, most likely the problem lies in the brake cylinder and it should be replaced. The reason could be a simple damage to the rubber cuffs. When sealing the brake pistons, a complete replacement of the brake cylinder is also required. Prepare a brake pipe wrench and new brake fluid. Ensure that your partner helps you.
To begin, slightly raise the car using a jack. On the side to be repaired, remove the wheel and brake drum to give yourself full access to the brake cylinder.
Cylinder replacement
- After the brake drum is removed, take some gasoline and wash the internal cavity to remove dirt and dust.
- After this, take a special wrench and unscrew the tube mounting fitting on the back of the brake flap. Plug the freed hole with a plug or any other plug, otherwise the brake fluid will leak out completely. If the fitting cannot be unscrewed, and it is stuck very firmly, then you will have to break it and subsequently replace the brake pipe with a new part.
- Then unscrew the two mounting bolts of the brake cylinder itself.
- Disengage the cylinder from the pads and remove it.
During the repair process, check the condition and quality of the rubber cuffs. As practice shows, replacing the cuffs has virtually no effect - brake fluid leaks do not stop. Therefore, if the cuffs are damaged, it is better to completely replace the mechanism with a new cylinder. Inspect the thickness of the brake pads. If necessary, replace them as well. It should be remembered that the pads should be replaced immediately in pairs for each side. All parts should be assembled in the reverse order of dismantling.
Rem-Vaz.ru
Replacing the rear wheel brake cylinder
EXECUTION ORDER
Removing the brake drum
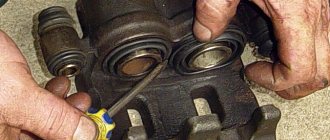
Using a screwdriver, we remove first one, then the other, lower parts of the brake pads from the support and move the pads down.
Using a “10” wrench (or a special “brake” wrench), unscrew the brake pipe fitting. To avoid loss of brake fluid, place a protective cap from the bleeder fitting on the end of the tube.
Using a 10mm socket, unscrew the two bolts securing the cylinder to the brake shield...
...and remove the cylinder. Install the cylinder in the reverse order of removal. After assembly (including installation of the brake drum), we bleed the brake system from the side of the replaced cylinder.
avtolyubiteli.com
We replace the working brake cylinder of the rear wheel of a VAZ 2107 car when a brake fluid leak is detected or the pistons are jammed. To perform the work of replacing the working brake cylinder of a VAZ 2107 car, you will need an assistant, as well as a special 10 mm wrench for brake pipes, a transparent vinyl tube of suitable diameter, a container for draining brake fluid, fresh brake fluid (see “Operating fluids used on VAZ cars 2107").
Removing the rear wheel brake wheel cylinder from a VAZ 2107 1. Prepare the VAZ 2107 for operations (see “Preparing the VAZ 2107 for maintenance and repair”). 2. Remove the brake drum from the VAZ 2107 car (see “Brake pads for the rear wheels of the VAZ 2107 car - replacement”). 3. We clean the bolts securing the working brake cylinder and the brake pipe fitting from dirt. We apply a penetrating lubricant with a rust converter to them.
Attention If the fitting is “stuck” to the tube and you cannot unscrew it, try (after performing step 6) to unscrew the working brake cylinder, holding the fitting with a special 10 mm wrench for brake pipes. With this method of removing the brake wheel cylinder, the brake pipe must be replaced.
5. To reduce brake fluid losses, place a protective cap on the end of the tube (from the brake cylinder bleeder fitting). 6. Using a 10 mm socket wrench, unscrew the two bolts securing the working brake cylinder and remove the working brake cylinder from the VAZ 2107 car.
8. Remove the rear wheel brake slave cylinder from the brake shield.
Installing the rear wheel brake wheel cylinder on a VAZ 2107 car 1. Install the brake wheel cylinder on a VAZ 2107 car in the reverse order.
Attention When installing the brake wheel cylinder stops into the pads, do not damage the rubber protective boots of the brake cylinder.
3. Before fixing the working brake cylinder with bolts to the brake shield, screw the tube fitting into the brake cylinder by hand. 4. We finally wrap the fitting.
.
vazikov.ru
Tuning of domestic cars usually ends with changes in the external appearance of the car or interior trim. You can especially often find tuning of a VAZ 2107 car. Tuning includes many different changes and additions, starting with the car's LED lighting and ending with an automatic engine start button.
You can replace all the factory light bulbs, install comfortable seats, install a new steering wheel, etc., but all this is done for the sake of comfort and standing out from the crowd. However, serious car enthusiasts must first think about the safety of their car.
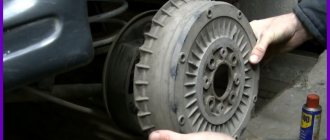
↑ Rear wheel brake drum
1 — bolts securing the drum to the axle shaft; 2 - threaded holes for installing bolts 1 when removing the drum
- Remove the brake drum by unscrewing the mounting bolts 1.
- Insert these bolts into technological holes 2 and tighten until the drum separates.
- Disconnect cable tip 15 from lever 18 of the manual drive of the shoes, remove the cotter pin, press pin 21 and remove the lever.
- Use pliers to disconnect the upper 2 and lower 7 tension springs.
- Having turned the cups of the support struts 17, remove them together with the struts, springs and lower cups; remove pads 8 and 16 and spacer bar 20.
- Disconnect the brake fluid supply tube from the wheel cylinder and plug the inlet holes of the cylinder and tube.
- Remove the wheel cylinder.
- When replacing the brake shield, remove the axle shaft as indicated in the “Rear Axle” chapter and disconnect the parking brake cable by unscrewing the two bolts securing it to the brake shield.
Brake system VAZ 2107
It's no secret that the safety systems provided for the VAZ 2107 have not undergone significant improvements since the first production of the car. There are no airbags or related electronics in such a car. Once you get your hands on such a car, the first thing you need to do is check the brakes. In fact, a car's safety systems are based on the car's braking performance.
Crash test
As crash tests of domestic cars show, it makes no sense to rely on the car body itself. A frontal or side collision with an obstacle already at a speed of 64 km/h will turn the “seven” into an accordion.
Thus, there is no space left for the driver or passengers. Despite all the “unsafety”, the VAZ 2107 is very popular among car owners. Fortunately, it is now not difficult to find spare parts for tuning domestically produced cars and you can modernize your car without any problems.
How to adjust the gap between the valve and the cylinder block?
- We use a probe with a thickness of 0.15 (mm). It should fit under the valve with a slight tension (neither strong nor weak). If the dipstick falls into the gap or, on the contrary, does not fit, then from this moment the adjustment of the valves on the VAZ 2105 begins.
- We loosen the lower lock nut with one key, and with the second key we turn the valve stroke screw (up or down, depending on the result of checking with the feeler gauge).
- Tighten the locknut without much fanaticism.
- We do a control check with a feeler gauge at 0.15 (mm).
I hope the instructions are clear and understandable.
Related material: Replacing engine oil and oil filter on Lada Priora. Which oil to choose and how often to change
Additional Information
After adjustment, we assemble all the engine elements into place (valve covers, timing belt cover, air filter housing).
We make a test drive and listen to the sound. At this point, independent maintenance of timing valves can be considered successfully completed.
Please note that the VAZ 2105 is a classic of the bygone Soviet automobile industry. The classic line also includes the VAZ 2101, VAZ 2102, VAZ 2103, VAZ 2104 and VAZ 2106. Starting with the VAZ 2107, cars use an injection system for preparing the combustible mixture
That is, seven is no longer a classic. The procedure for adjusting valves 2105, as well as 2101, 2102, 2103, 2104 and 2106, is completely the same. That is, the classics are configured according to the same principle.
Starting with the VAZ 2107, cars use an injection system for preparing the combustible mixture. That is, seven is no longer a classic. The procedure for adjusting valves 2105, as well as 2101, 2102, 2103, 2104 and 2106, is completely the same. That is, the classics are configured according to the same principle.
Starting from the VAZ 2107, you need to configure the timing in a different way. Valve adjustment on the VAZ 2107 is carried out at a more subtle level. Only a properly qualified car mechanic can handle this work. Without solid experience in handling vehicles, it’s better not to go into the timing belt of VAZs, starting with the seven. It’s easier to take the car to the nearest service station.
I hope the article on how to adjust valves on a VAZ 2105 was useful. Have smooth roads and fewer breakdowns.
- Necessary tool
- Signs of poor valve clearance
- Procedure for checking valve clearance
- Adjusting valve clearance
- Video on the topic: Do-it-yourself valve adjustment on a Zhiguli
A feature of VAZ cars belonging to the “Classic” category, namely the VAZ-2101-2107 model, is the use of power plants that are structurally very similar. The engines of these models differ mainly in some technical characteristics. Thanks to this, many perform maintenance and repair work themselves.
For stable operation of the power unit of these cars, periodic adjustment of the valves is required. It is worth noting that this operation for VAZ “Classic” engines is performed by adjusting the gap between the valve drive lever and the camshaft cam. Since this operation is performed in the same way for different models on the Classic, let’s consider the sequence of work using the example of one model - VAZ-2105
The adjustment can be carried out both on a cold engine and on a warm one; for this, a 0.15 or 0.20 mm probe is used, respectively.
But for more precise adjustment of the valves, work must be carried out on a cold engine.
The device of the "seven" brake mechanism
The system is designed for smooth or emergency stopping. As we have already determined, it is the main security system, and operation of the car is prohibited even if the slightest malfunction is detected.
In a classic braking system, the pedal is mounted on the same axis as the clutch pedal and is equipped with a return spring. This mechanism has a built-in sensor for turning on the rear brake light lamps.
Next comes the brake master cylinder. It is attached to the body in the engine compartment with two bolts and has working braking circuits for the front and rear wheels.
Now you can find vacuum boosters to reduce the effort applied to the pedal. The drive of such an amplifier is a fitting . It is mounted in the intake manifold, connected by a rubberized pipe. For reliability purposes, the front circuit has two fittings per wheel, and the rear circuit has one fitting.
Piston disc brakes are used on the front wheels. They are installed for greater braking efficiency, since a greater load is placed on the front wheels than on the rear ones.
The rear wheels are equipped with drum brakes. Structurally, they are much simpler than disk ones. As is known, their efficiency is extremely low, but is quite sufficient for rear-wheel drive vehicles. In addition, it is not profitable for the manufacturer to install more expensive disk mechanisms. A parking brake mechanism is also built into the rear wheel brakes.
An important mechanism of the system is hidden under the bottom of the car in the rear - this is the pressure drop regulator in the system. This mechanism distributes the pressure that is created during braking between the front and rear circuits.
Caliper device
Let's move on. The front axle mechanisms are disk ones, consisting of calipers with the main brake elements - pads, and brake discs.
A caliper is a body with cylinders made in it for the pistons. This model has two of them, one for each block. The support structure is shown in the figure.
The caliper pistons have the form of a glass, which is placed in their cylinders, but they can move along it. To prevent fluid leakage, the pistons are equipped with o-rings.
Pads are small metal plates onto which linings made of friction material are glued.
The brake disc is made of metal for better adhesion to the surface of the pads; its side surfaces are well processed so that there are no protrusions or shells on them.
Basic faults
The brake system itself is quite simple, but some of its elements require special attention. Main types of faults:
- The brake fluid leaks, resulting in a drop in pressure in the system. If a preliminary inspection does not find a leak, it is necessary to check the brake master cylinder. We bend the noise-insulating mat located under the brake pedal and inspect for streaks in the area of the rubber seal of the master cylinder. The presence of drips will indicate that the cause has been found and requires disassembling the cylinder and then replacing the cuff. If there is a vacuum booster, the brake master cylinder must be removed and inspected.
- When you release the brake pedal, the car drives sluggishly. Reason: the rear or front pads are jammed. Seized pads are identified by checking the heat of the corresponding wheel. We touch each disk - the hottest one will be jammed. In the case when these are the front wheels, you can, after removing the wheel, move the brake cylinder. If this fails, you will have to replace it with a new one. In the case of rear pads, the brake wheel cylinder will need to be replaced.
- When you press the pedal, braking does not occur, but it does when you press it several times in a row. This may indicate the presence of air in the system. The solution to the problem is to bleed the brakes to remove air.
- Problem with the handbrake. Most often this problem occurs in winter. It manifests itself in the fact that after a long period of parking, when the handbrake is released, the wheels remain locked. The reason is that the parking brake cable is frozen. During its operation, moisture gets there and freezes in winter. If the casing is severely damaged, it will have to be replaced.
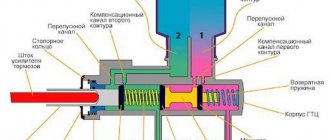
Design and principle of operation of the unit
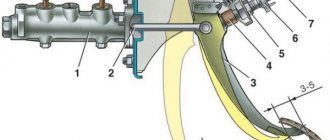
At first glance, the design of the master cylinder seems complex, since it consists of many small parts. A diagram and list of these elements will help you understand the device (the positions in the picture and in the list are the same):
- Die-cast metal housing for 2 working chambers.
- The washer is a retainer for the bypass fitting.
- A discharge fitting connected by a hose to the expansion tank.
- Sealing gasket of the fitting.
- Limit screw washer.
- The screw is a piston movement limiter.
- Return spring.
- Support cup.
- Compensation spring.
- Ring sealing the gap between the piston and the body - 4 pcs.
- Spacer ring.
- Piston servicing the circuit of the rear wheels;
- Intermediate washer.
- A piston operating on 2 circuits of the front wheels.
The main brake cylinder of the “seven” has 2 separate chambers and two pistons that push the fluid in different circuits.
At one end the cylinder body is closed with a metal plug, at the second there is a connecting flange. At the top of each chamber there are channels for connecting system pipes (screwed on threads) and discharging liquid into the expansion tank through fittings and pipes. Sealing collars (item 10) are installed in the piston grooves.
Both upper fittings of the GTZ are connected to one expansion tank
The GTZ operating algorithm looks like this:
- Initially, return springs hold the pistons near the front walls of the chambers. Moreover, the spacer rings rest against the limiting screws, the liquid from the tank fills the chambers through open channels.
- The driver presses the brake pedal and selects free play (3-6 mm), the pusher moves the first piston, the cuff closes the channel of the expansion tank.
- The working stroke begins - the front piston squeezes the liquid into the tubes and forces the second piston to move. The fluid pressure in all pipes increases equally, and the brake pads of the front and rear wheels are activated simultaneously.
The two lower bolts limit the stroke of the pistons inside the cylinder; springs push them back to their original position
When the driver releases the pedal, the springs return the pistons to their original position. If the pressure in the system rises above normal, some of the liquid will flow through the channels into the tank.
An increase in pressure to a critical level often occurs due to boiling of the liquid. While on a trip, an acquaintance of mine added counterfeit DOT 4 to the expansion tank of the “Seven”, which subsequently boiled. The result is partial brake failure and urgent repairs.
Replacing brake discs yourself
Replacing front discs
Replacing brake discs is necessary when its thickness is less than 9.5-11 millimeters. When the pads wear out, the pistons can come out of their seats and create misalignment. The second reason for replacement may be uneven wear and deep risks .
Such problems increase brake pad wear and reduce braking performance. In these cases, the disks must be replaced. Their timely replacement is the key to your safety.
Remove the wheel and caliper with brake pads. To do this, unscrew the two guide pins.
Next, remove the intermediate ring and the worn disc.
After this, the new disk is installed in the reverse order.
Replacing rear drums
Replacing the rear brake drum is more difficult than the front one, but it is quite doable on your own.
For this replacement, we also remove the wheel and unscrew the two guide pins.
Sometimes the drum gets stuck to the seat. Removing it becomes problematic. When removing, part of the side may break off. To disrupt it, there is the following method: start the engine, then engage first gear and, pressing the brakes, release the clutch. The disk breaks off.
Severe wear of the rubbing surface by the pads also complicates everything. To remove it, take a wooden block and a hammer. Without striking too hard, the drum should come off.
We remove it as soon as it starts to go away.
We inspect the brake drum and if there is serious damage, replace it with a new one.
In conclusion, it should be noted that it is enough to carry out regular checks and timely repairs of the entire brake system and you will not need to worry about the reliability and safety of your car.
The brake system on any car plays an important role, which is the safety of the driver and passengers. In this article, we will look at one of the mechanisms of this system - the front (working) brake cylinder, which provides braking to the front wheels when the brake pedal is pressed.
The product in question, or more precisely, the brake cylinder on a VAZ-2107 car, periodically wears out and becomes inoperative, just like many other parts. A faulty mechanism can cause an emergency on the road, so to prevent this from happening, the performance of this product should be periodically monitored. In this material we will find out where it is located, as well as the features of its replacement for the VAZ-2107 car.
Important points
When repairing the brake system of a VAZ 2107, you should remember several very important nuances. Without mentioning them, this article would be incomplete. So:
- On later VAZ 2107 models, spring washers began to be installed under the fastening bolts of the brake brackets. They are thin and very easy to lose when removing the bracket. To prevent this from happening, it is advisable to spread some newspaper or rag under the caliper. If the puck does pop out, it will be much easier to find it;
- If the driver does not plan to change the brake pads when replacing the caliper, then before removing them they should be marked with a marker or chalk so that they can be installed in the same place during reassembly. If you change the original location of the pads, they will become unusable much faster;
- If the driver decides to leave the caliper in place and plans to change only the brake pads, then he will have to buy not one, but two sets of pads, since these parts are always changed on two wheels, and not on one. If you leave old pads on one of the wheels, this will inevitably lead to rapid wear and new problems in the operation of the brake system;
So, replacing a brake caliper is not at all as difficult a task as it might seem at first glance. The main thing that the driver should remember when changing this part is its extreme importance. If a mistake is made when installing the caliper or pads, this does not bode well for either the driver or the car. It is for this reason that the article described in as much detail as possible all the nuances of installing a brake caliper. And it is strongly recommended to pay close attention to these nuances.
Source
Front cylinder location
The front brake cylinder is located on the front wheel hubs, next to the wheel rim. Each front wheel has two brake devices, which, when you press the pedal, press the pads against the brake disc on both sides, which ensures effective braking of the car. For clarity, below is a photo in which both devices are indicated by arrows.
After removing the front wheel of the seven, you can see the device data immediately behind it. Having found them, you need to make sure that they are in good working order, or rather, that they are faulty. After all, why change a working part?
When to change cylinders
The main and most common reason for loss of performance, which entails repair or replacement, is jamming of the brake device. If you notice constant braking of the car, a pull to the side when you release the steering wheel when driving in a straight line, or abnormal heating of one of the wheels after driving, perhaps one of the working cylinders has begun to jam. This happens quite often, since aggressive and improper operation, as well as the quality of parts, leads to such consequences. Jamming of the product can occur in any mode of operation - be it constant driving of the car, or its idle time in the parking lot. If at least one of the cylinders on the VAZ-2107 begins to jam, then you should immediately get to the nearest service station and have it repaired. But a service station is expensive, especially for owners of budget cars, so it’s easier to solve the problem yourself, and at home.
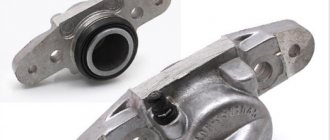
Replacement of the product may also be necessary if liquid begins to leak from under the sealing ring. The sealing ring (boot) is shown below in the photo.
If liquid begins to leak from under the rubber band, it means that this will soon lead to a malfunction of the device. You can avoid consequences by responding in a timely manner.
Replacing the front brake cylinder on a VAZ-2107
Replacement begins directly with the removal of the old mechanism. To do this, you need to jack up the front of the car, then unscrew and remove the wheel, and remove the brake caliper. Details of caliper removal can be found in the corresponding section of this website.
Further actions to replace the working mechanism should be carried out as follows:
- The caliper should be placed in a vice, but it is important not to clamp it too tightly. If you squeeze it, then part of the part may simply break off, as a result, replacing the caliper cannot be avoided.
- Once the caliper is removed and clamped in a vice, it is necessary to remove the steel brake pipe. This tube connects both parts of the mechanism. To remove the tube, you need to unscrew two nuts with a wrench. After unscrewing the nuts, you can remove the steel tube. The photo below shows the caliper in a vice, as well as the tube that needs to be removed.
- After this, you need to find a groove on the side in which the spring locking element is located. To remove the brake cylinder, you will need to press this lock with a screwdriver. The photo below shows the location of the groove with a red arrow.
- To remove the working device, you need to hold the spring mechanism with a screwdriver. After pressing the latch, it is necessary to strike the side of the working mechanism with a rubber hammer. You don’t need to hit it too hard, but be sure not to hit the caliper. If you hit the caliper, it may break off. The photo above shows how the working cylinder is struck with a hammer.
- If the product starts to move, then the process is in progress. To dismantle the part in question, you will need to use a long screwdriver or pry bar. The mount should be placed in the resulting hole between the caliper and the cylinder. Below is a photo of how it looks clearly.
- The second cylinder is removed in a similar way. After removing the devices, you can begin to directly replace them with new ones.
- To install a new product in place of a removed one, you must first press a special latch. When pressed, the mechanism must be installed in the guide grooves until this latch is activated.
If the new part will not be inserted into the guide grooves, you can take a file and remove a few millimeters of the metal layer. The main thing is not to overdo it, otherwise the part simply will not be fixed in the caliper.
This completes the replacement of the working cylinder on the VAZ-2107. When installing a new product, pay attention to the presence of a brake bleeder. If it is missing, then you should remove it from the old cylinder and screw it into the new device.
labavto.com
The brake master cylinder (MBC) is one of the main elements of the brake system, which determines how safe the vehicle will be used. The driver is obliged to ensure that it is in good condition. If malfunctions are detected, action must be taken immediately. Negligence and delay in repairs can lead to an accident. You can identify faults and repair the VAZ 2107 GTZ yourself.
GTZ: device and purpose
The VAZ 2107 is equipped with a hydraulic brake system consisting of two circuits. When one of the circuits fails, the other continues braking. This improves traffic safety. The master cylinder changes the pressure in the circuits depending on the position of the brake pedal. The GTZ is located on the rear wall of the engine compartment. It can be found under the expansion tank of two sections, which is filled with brake fluid (TF). It looks like an oblong cylinder with holes for connecting brake hoses.
The GTZ housing contains 2 pistons with sealing collars. They are located sequentially one after another. The first one moves due to the influence of the pedal pusher on it and serves the contour of the rear wheels. It forces a second piston to move, which acts on the two brake circuits of the front wheels. Springs that are located between the pistons return them to place when the driver releases the brake pedal.
Rear brake repair
With rear brakes on a penny, everything is not so simple, and the reason for this is the wear of the brake drum. This defect occurs often and it may happen that you install new pads and there are no brakes anyway, because even despite the new pads their thickness is not enough for braking. Accordingly, the handbrake does not hold either.
But the reason for the rear wheels not braking can also be the “sorcerer”, so you need to make sure that it is working.
If the brake cylinder is leaking, then it is necessary to replace the rubber seals; this is not difficult to do; it is not even necessary to remove the cylinder from the car.
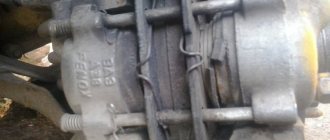
Rear brake cylinder
So what should you do with worn brake drums? Another option, and I use it quite often, is to make brake pads with my own hands, namely, rivet pads from a UAZ car onto the VAZ 2101 pads; they are somewhat longer, but the bending fits, and most importantly, they are somewhat thicker than the standard Zhiguli ones.
Which cylinder to install if replacing?
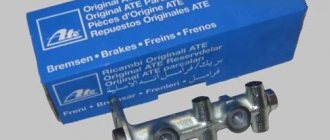
To avoid problems during operation, it is better to find the original Togliatti-made GTZ, catalog number 21013505008. But since the VAZ 2107 family of cars has not been produced for a long time, finding this spare part becomes difficult, especially in remote regions. An alternative is products from other manufacturers that have proven themselves well on the Russian market:
- ATE;
- "BelMag";
- "Basalt";
- LPR;
- Fenox.
Judging by the reviews of the owners of the “Seven” on thematic forums, defects most often come across among the products of the Phenox brand. Advice regarding the purchase of original spare parts: do not purchase them in markets and unverified stores; many counterfeits are sold at such points.
Original spare parts for the brake system in original packaging are becoming rare and are often counterfeited.
Defective spare parts were also found during the Soviet era. I remember an incident from childhood when my father took me to drive his first Zhiguli from a car dealership. We covered the 200 km journey all night, because the pads on the rear and front wheels spontaneously compressed and the rims became very hot. The reason was found out later - a defect in the factory master cylinder, which was replaced free of charge at the service station under warranty.