Brake pedal
The main control element of the VAZ 2101 braking system is the brake pedal, located in the cabin under the steering column between the clutch and accelerator pedals. The pedal transmits the muscular force from the driver's legs to the GTZ. If the brake pedal is adjusted correctly, the free play will be 4–6 cm. When you press it and travel the specified distance, the vehicle begins to smoothly slow down.
Free play of the brake pedal: 1 — master cylinder; 2 - pusher; 3 — brake pedal; 4 — brake light switch buffer; 5 — switch nut; 6 — brake light switch; 7 — pedal release spring
Prevention measures
I can say from personal experience that the detailed cleaning procedure is quite complicated. This will definitely take more than one hour.
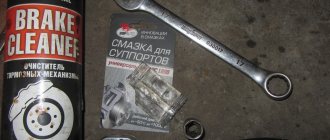
To minimize the number of repetitions of such operations, be sure to lubricate the caliper twice a year for preventive purposes. It is optimal to use professional special lubricants designed specifically for this element. But regular WD40 is also an alternative. It will definitely protect against corrosion.
Plus, visually inspect the condition once a year. Make sure that the assembly is free of damage, dirt and signs of corrosion. Make sure that the boot does not rupture during operation. Otherwise, the caliper will not last long after this.
You need to monitor all brake systems, including periodic adjustment of the handbrake. After all, this is also an integral part of vehicle safety.
Subscribe, leave reviews, tell your friends about our project!
Watch this video on YouTube
Step-by-step instructions for dismantling the VAZ 2106 caliper
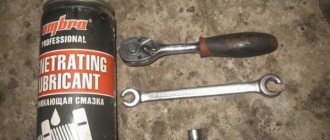
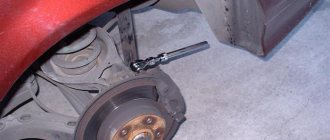
First you need to jack up the car and remove the front wheel. Then spray all the fastening nuts and bolts with penetrating lubricant, as they usually are very difficult to unscrew.
Next, use a screwdriver to bend the fixing plate, which is pressed against the brake hose bolt. You can clearly see this operation in the photo:
We bend it upward so that you can freely throw on the key and unscrew the brake hose bolt:
And after that, freely remove the hose and move it to the side so that it does not interfere in the future:
The next step is to unscrew the two caliper mounting bolts, one of which is located at the bottom, and is clearly shown in the picture:
First, we tear off the bolt with a head and a wrench, since a lot of force will have to be applied, and then it is best to use the ratchet handle to do everything as quickly and conveniently as possible:
And the second bolt, which is located at the top, also needs to be unscrewed in the manner described above:
Since there are no more brake caliper mounts, you can now freely remove it from its place, as shown in the photo:
Now everything is ready, I think now no one will have any questions about how to remove the caliper from the car. If you decide to replace this part, then the price of a new one is about 1,500 rubles. Installation proceeds in reverse order.
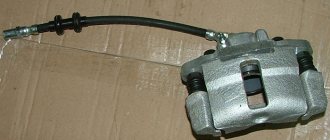
The front brake caliper is removed if it is necessary to replace it, as well as when performing work related to replacing the brake disc or working cylinders. It will be more convenient to carry out all work if you hang the car on a lift. To complete the work you will need only three tools, namely: a screwdriver and a pair of wrenches 14 and 17.
Operating procedure:
The wheel is removed and then the bolt securing the brake hose bracket to the caliper is unscrewed, after which the bracket and spring washer are removed.
Unscrew the fastening bolt and remove the brake hose and special sealing washer. There will be a second washer on the caliper, which should also be removed. After unscrewing the hose, plug the hole through which brake fluid may leak with a rubber plug.
Remove the brake pads and bend the locking plates securing the caliper mounting bolts, unscrew the bolts and remove them together with the plates, after which the caliper itself is removed.
The front brake caliper has been removed, all that remains is to replace it with a new product and reassemble it in the reverse order of removal.
The VAZ 2107 brake caliper is a durable metal structure that serves to secure the brake cylinders. The caliper itself cannot be repaired and its removal is carried out mainly to replace jammed brake cylinders or when performing some other repair in which its presence will interfere with operation.
Let's look at the process of disassembling a brake caliper using the example of replacing working cylinders. To perform the repair, you will need a hammer, a flat-head screwdriver and pliers, as well as a special ten-size wrench for unscrewing the brake pipe fittings. Once you have everything you need, you can begin the repair.
- Having disassembled the front wheel brake mechanism and removed the caliper, it must be secured in a vice.
- Using a special wrench, unscrew the two fittings of the connecting brake pipe and remove it.
- Next, you need to press out the latch holding the brake cylinder using a thin flat-head screwdriver and at the same time knock the brake cylinder out of its seat.
At this point, the work on disassembling the VAZ 2107 brake caliper is completed. Replace the brake cylinders with new ones. When installing, do not forget that the brake cylinders are not interchangeable and each is installed in its place. Install in reverse order, installing the brake cylinder, and also pre-press the spring clip. As soon as the cylinder is in place, its lock will immediately engage. It often happens that new cylinders are very difficult to fit into place, as a rule, this is due to the presence of factory roughness on their surface. To prevent this from happening, treat the edges of the cylinder with a coarse file and lubricate the caliper guides with lithol, then carefully tap the cylinder with a hammer. After assembling the entire brake system, bleed the brakes. This completes the repair work.
Sources
- https://vaz2106-remont.ru/snyatie-supporta-perednego-kolesa/
- https://rem-vaz.ru/remont-vaz-2106/tormoz-sistema/kak-snyat-i-ustanovit-support-perednego-tormoznogo-mexanizma-vaz-2106-2103.html
- https://remont-vaz2106.ru/razborka-tormoznogo-supporta-vaz-2107
Express caliper repair
To resolve this issue, you need to follow the steps below.
- To begin the main work, you need to unscrew the caliper by turning it clockwise. If the part does not turn, you can try turning it in the other direction - in some cars the caliper is unscrewed counterclockwise;
- The next step is to unscrew the piston. To do this we use a key. After the part is unscrewed, it can be removed from the cylinder;
- When all the necessary elements are unscrewed, they must be checked for corrosion. Areas where there is rust should be thoroughly cleaned. It is better to sand difficult areas;
- After fighting rust, you need to drain the fluid from the caliper. We hope there is no need to explain how to do this;
- As soon as the liquid is drained, remove the O-ring and thoroughly clean it. We also clean the place where the ring is attached. Finally, dry each part thoroughly. To do this, you can use a hairdryer or resort to natural drying. The latter is possible if you have a lot of extra time.
If all the above steps have been carried out, then all that remains is to grind the inner surface of the cylinder itself. Here we do everything without fanaticism
, the main thing is to remove dirt and rust.
Once grinding is complete, you can add brake fluid and return the rubber ring to its place.
Now the clean piston is inserted back. It is inserted under pressure, as it needs to go through the o-ring
During this procedure, special care should be taken with the boot - the main thing is not to damage it
As mentioned above, the piston can be unscrewed both clockwise and counterclockwise. Therefore, this fact must be taken into account when screwing it in.
To keep the internal thread as close to the piston as possible, you just need to squeeze the handbrake flag.
Thanks to all the manipulations described above, you can successfully repair the caliper and get rid of its jamming.
How to easily and safely replace the steering wheel?
The operation of replacing the steering wheel is not particularly difficult, but safety precautions must be observed. The basic steps on how to remove the steering wheel have been described above, but in some cases the following tips may be needed:
Method #1. If the steering wheel sits firmly on the shaft and cannot be removed, then it is necessary to loosen the steering wheel nut as much as possible, but leave it one turn (to protect the teeth, nose and other parts of the face). Then sit in a chair and sharply and evenly hit the steering wheel with your palms from below, upward along the steering axis. After several such impacts, the steering wheel should fly off the shaft.
The main thing is to remember to leave the nut on one turn!
Method #2. To remove the steering wheel, you can use an old Zhiguli jack. The base of the jack needs to be rested against the steering shaft through a wooden spacer, wrap a rope around the steering wheel and throw it over the top of the jack. A piece of cloth (rag) should be placed at the point where the rope comes into contact with the steering wheel so as not to scratch the steering wheel. Next, gradually pull with a jack and remove the steering wheel. Do not forget to completely unscrew the steering wheel fastening nut, since in this case the steering wheel itself will gently “come off” from the shaft.
How to replace the brake master cylinder on a VAZ 2101-VAZ 2107?
Removal: 1) First, of course, you need to unscrew the top cover of the brake reservoir and then collect all the fluid from there, to do this you will have to disconnect two terminals (They are indicated by green arrows, but just remember where each one is connected) and then unscrew the cover beyond the edges ( Indicated by a blue arrow), when everything is done, put the cap aside and pump out all the brake fluid from the reservoir using a rubber bulb or a medical syringe, removing the needle from it.
2) Now unscrew with a wrench (If that doesn’t work, use a special wrench for bleeding), the nuts of the brake pipes (There are three pipes in total, the nuts of two are indicated by red arrows, the third nut is not visible in the photo, but the third pipe itself is indicated by a green arrow and another green arrow the location of this nut is shown, so you should not have any difficulties in finding it) and disconnect the tubes and then take them aside (But just remember where each one is connected, if necessary, mark all the tubes to make it clearer), after the operation is completed done, loosen the screws of the clamps (Indicated by blue arrows) and remove both hoses from the brake cylinder fittings (Again, remember where each hose is connected), and finally, unscrew the two nuts securing the master brake cylinder (Under them the spring washers are located, not lose them) and then remove the brake cylinder from the car.
Note! We will give you advice, since the brake pipes are bent in the place where they are connected to the brake cylinder, accordingly, all the brake fluid will not pour out of them, but only the one that will be in the bent part will pour out (Very little of it is there, so don’t worry too much) , so, air will not get into the system either (Unless, of course, you press the brake at this moment) and therefore you can safely install a new cylinder, screw all the brake pipes to it and connect all the hoses (But do not tighten the hoses and pipes to the end) , then pour brake fluid into the reservoir and watch it come out from under the nuts, at first the fluid will flow out through the nuts with air bubbles, then they will disappear and at this moment when there are no bubbles, tighten all the nuts and clamps until they stop, tighten the brake hoses ! (In this case, you don’t even need to bleed the brakes, but just in case, read the article entitled: “Bleeding the brakes on a classic”; it describes the symptoms that can help you understand when the brake system requires bleeding)
Installation: The new master brake cylinder is installed in the reverse order, connect the tubes and hoses to it correctly (If marks were made, then install everything according to them) and do not forget about bleeding if there are symptoms that it is required (A little higher we talk about all this in detail wrote) and by the way, do not fill the brake fluid that was in the reservoir back, only fill it with new one.
Additional video clip: Using the example of a VAZ 2105 car, you can see the procedure for replacing the master brake cylinder clearly, everything from start to finish, see the video below:
Replacing the rear brake cylinder of a VAZ 2101 is required if problems with stopping the car begin to appear. The rear wheels take on about 25% of the load when braking. If the cylinder fails, it stops opening the pads, most often it simply jams. It is advisable to replace it with a new one when a malfunction is detected.
Installing the brake caliper
Installation of the brake caliper on the VAZ 2107 is carried out in the reverse order of its dismantling.
After installing the brake caliper, it is imperative to bleed the brake system, removing air from it. Until this operation is completed, operating the vehicle is strictly prohibited.
The left and right wheel calipers are slightly different, so you need to pay attention to this when purchasing new ones. After repairing and installing the VAZ 2107 brake caliper, it is necessary to check the brake system for fluid leaks and, if necessary, repair them
After repairing and installing the VAZ 2107 brake caliper, it is necessary to check the brake system for fluid leaks and, if necessary, repair them.
Didn't find the information you are looking for? on our forum.
We recommend reading:
Why does the battery charging light on the VAZ 2106 blink?
How to set the ignition on a VAZ 21099
How to change the cylinder head gasket for a VAZ 2110 8 valve
Adjusting the electronic ignition on a VAZ 2106
How to connect the stove to a VAZ 2106, do-it-yourself replacement, step-by-step description
VAZ 2114 how to remove the glove compartment
The battery light is on on the instrument panel of the VAZ 2110, reasons and how to fix it
VAZ 2109 gearbox camshaft
Removing the front wheel caliper
In most cases, the front brake caliper must be removed when replacing the front wheel wheel cylinders.
Therefore, in this article we will consider in more detail how to perform this procedure. First of all, I will give a list of tools that will be needed for this repair of the VAZ 2106. So, we will need:
- 14 socket wrench or open-end wrench
- Flat screwdriver
- Ratchet handle
- Head 17
- Wrench with extension
Important points
When repairing the brake system of a VAZ 2107, you should remember several very important nuances. Without mentioning them, this article would be incomplete. So:
- On later VAZ 2107 models, spring washers began to be installed under the fastening bolts of the brake brackets. They are thin and very easy to lose when removing the bracket. To prevent this from happening, it is advisable to spread some newspaper or rag under the caliper. If the puck does pop out, it will be much easier to find it;
- If the driver does not plan to change the brake pads when replacing the caliper, then before removing them they should be marked with a marker or chalk so that they can be installed in the same place during reassembly. If you change the original location of the pads, they will become unusable much faster;
- If the driver decides to leave the caliper in place and plans to change only the brake pads, then he will have to buy not one, but two sets of pads, since these parts are always changed on two wheels, and not on one. If you leave old pads on one of the wheels, this will inevitably lead to rapid wear and new problems in the operation of the brake system;
- After removing the pads, do not press the brake pedal under any circumstances. The pistons on the hydraulic cylinders mounted in the caliper will move outward and prevent the installation of a new pair of pads. But pushing the pistons back will be very difficult: in some cases, this requires completely draining the brake fluid from the system;
- When unscrewing the fastening bolts on the caliper, you should remember: they differ in the shape of the head. The head of the top bolt is smaller, the head of the bottom bolt is larger (in the photo it is marked with the letter “a”). If the bolts are swapped, it will be impossible to install the brake pads;
- When buying a new caliper in a store, you should definitely tell the seller which side it will be installed on, since on the VAZ 2107 there are differences in the design of the left and right calipers. For example, the holes for the mounting bolts are located differently, so that the left caliper will not fit the right wheel and vice versa;
- Finally, after installing the caliper, you should be sure to press the brake pedal several times to check whether the new caliper works or not. In addition, after pressing the pedal, be sure to inspect the caliper and the asphalt under the car for brake fluid leaks.
So, replacing a brake caliper is not as difficult a task as it might seem at first glance
The main thing that the driver should remember when changing this part is its extreme importance. If a mistake is made when installing the caliper or pads, this does not bode well for either the driver or the car.
It is for this reason that the article described in as much detail as possible all the nuances of installing a brake caliper.
And it is strongly recommended that you pay close attention to these nuances.
Causes of jamming and creaking
Now directly about how to determine the presence of a problem.
The primary sign indicating a malfunction in the calipers of a car brake system is squeaking.
It is the creaking that indicates that the element is seriously worn out. In the near future, the unit must be replaced without fail, which the car literally and figuratively screams about. It is extremely difficult not to hear such a creak. But for some reason, thousands of motorists still stubbornly ignore it. As a result, they pay a rather high price. Sometimes even to the point of road accidents resulting from brake failure while driving. To prevent this, you need to understand the issue and understand the essence of what is happening.
The first step is to look at the possible causes. In fact, there are several potential problems to look for. Some of them arise due to the fault of the motorist, others are caused by the natural process of wear and tear.
In any case, the appearance of a squeak as a symptom is a harbinger that at the most inopportune moment the caliper may simply jam.
If you know the reasons, you can prevent them and troubleshoot them by contacting a car service center or solving the problem yourself.
The reasons are:
- The brake pads were initially installed incorrectly. As a result, they are not strictly parallel to the response drives. Because of this, creaking often appears;
- The brake discs are seriously worn out. The reasons are natural wear and tear and aggressive use of the car;
- There is no lubrication in the unit. Initially there was little of it, or it was used up;
- The lubricant was selected incorrectly. Many people skimp on lubricant intended for calipers, hence the consequences.
The most undesirable and dangerous situation is rightly considered when the piston does not return and the unit begins to jam during operation.
Imagine that you are driving a car, press the brake, and then accelerate again. But at the same time, the calipers do not release the front brakes. Additional resistance arises, the car tries to move, but cannot. The result is uncontrolled braking, extremely intense wear and serious overheating of the entire system.
Disassembling the brake caliper VAZ 2107
The VAZ 2107 brake caliper is a durable metal structure that serves to secure the brake cylinders. The caliper itself cannot be repaired and its removal is carried out mainly to replace jammed brake cylinders or when performing some other repair in which its presence will interfere with operation.
Let's look at the process of disassembling a brake caliper using the example of replacing working cylinders. To perform the repair, you will need a hammer, a flat-head screwdriver and pliers, as well as a special ten-size wrench for unscrewing the brake pipe fittings. Once you have everything you need, you can begin the repair.
- Having disassembled the front wheel brake mechanism and removed the caliper, it must be secured in a vice.
- Using a special wrench, unscrew the two fittings of the connecting brake pipe and remove it.
- Next, you need to press out the latch holding the brake cylinder using a thin flat-head screwdriver and at the same time knock the brake cylinder out of its seat.
At this point, the work on disassembling the VAZ 2107 brake caliper is completed. Replace the brake cylinders with new ones. When installing, do not forget that the brake cylinders are not interchangeable and each is installed in its place. Install in reverse order, installing the brake cylinder, and also pre-press the spring clip. As soon as the cylinder is in place, its lock will immediately engage. It often happens that new cylinders are very difficult to fit into place, as a rule, this is due to the presence of factory roughness on their surface. To prevent this from happening, treat the edges of the cylinder with a coarse file and lubricate the caliper guides with lithol, then carefully tap the cylinder with a hammer. After assembling the entire brake system, bleed the brakes. This completes the repair work.
Related materials:
An important part of the brake mechanism is the caliper. It holds the brake wheel cylinders, which, when the pedal is pressed, compress the brake disc, slowing down the rotation of the wheel.
Over time, the brake cylinders and the brake caliper of the VAZ 2107 wear out and the wheel begins to brake worse, which can lead to pulling to the side when braking or brake failure. Therefore, these parts need to be monitored and, if necessary, repaired or replaced.
Features of work
First, let's try to imagine the ideal operation of a caliper as part of a car's braking system.
In fact, this is a mandatory component of any car, be it:
Regardless of whether it is installed on a Niva or a BMW, the caliper must be in constant working order.
This is the direct task of the car owner himself. Or persons responsible for maintaining the machine and maintaining it in proper technical condition.
Before determining why it does not press out and what to do to prevent the car caliper from jamming, you need to understand the principle of its operation.
In optimal condition, when the brake assembly is working properly, the operating diagram looks like this:
- the driver presses the brake pedal;
- pressure is built up inside the braking system;
- this pressure is transmitted to the piston group of the auto calipers;
- the calipers, being under high pressure, bring the brake pads to the disc;
- the braking disc is attached to the car wheel;
- friction force arises;
- wheel rotation slows down;
- the car stops;
- or reduces the speed to the required values.
As you can see, in theory there is nothing complicated. But in fact, the caliper is rightly called an extremely complex element.
Friction during active braking causes heat production. This heats up the pad, brake fluid and our caliper.
Therefore, it is extremely necessary that the car caliper be made on the basis of a material that does not change its properties and characteristics during the process of strong heating. Plus, there are increased requirements for strength.
Tubes and hoses
Brake pipes and hoses of the braking system of the VAZ “kopek” are used both front and rear. Their purpose is to connect the GTZ and RTC to each other and supply brake fluid to them. Sometimes connecting elements become unusable, especially hoses, due to aging rubber.
Damage to the hose leads to fluid leakage and depressurization of the brake system.
The parts in question are attached using a threaded connection. There are no difficulties in replacing them. You just need to unscrew the fasteners on both sides, remove the worn element and install a new one in its place.
Rear wheel jams: we'll deal with the situation
10/14/2019 Issues discussed in the material:
- What to do if the rear wheel is stuck
- How to determine the cause of the problem
- Why, according to car enthusiasts, can the rear wheel suddenly jam?
Some motorists experience rear wheel jamming that occurs suddenly. And it’s good if the car is just starting to move. However, it is possible that the problem may arise while driving on the highway. This situation is highly likely to provoke an accident. What are the main reasons that lead to the rear wheel jamming? What should I do to successfully fix this problem? Let's look at these questions in this article.
Master brake cylinder
The GTZ of the VAZ “kopek” is a hydraulic type mechanism, consisting of two sections and designed to operate a system with two circuits.
The master cylinder creates fluid pressure throughout the entire brake system.
If problems arise with one of the circuits, the second, although not as effective, will ensure that the car stops. The GTZ is mounted to the pedal assembly bracket.
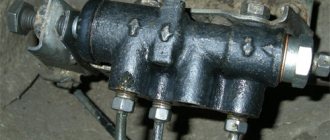
Design of the GTZ VAZ 2101: 1 - plug; 2 — cylinder body; 3 — rear brake drive piston; 4 — washer; 5 — front brake drive piston; 6 - sealing ring; 7 — locking screws; 8 — piston return springs; 9 — spring plate; 10 — pressure spring of the sealing ring; 11 — spacer ring; 12 — inlet; A - compensation hole (gaps between sealing ring 6, spacer ring 11 and piston 5)
Pistons 3 and 5 are responsible for the performance of different circuits. The initial position of the piston elements is ensured by springs 8, by means of which the pistons are pressed into screws 7. The hydraulic cylinder is sealed with the corresponding cuffs 6. In the front part of the housing is plugged with a plug 1.
The main problems with the GTZ are wear of the lip seals, the piston or the cylinder itself. If rubber products can be replaced with new ones from the repair kit, then if the cylinder or piston is damaged, the device will have to be completely replaced. Since the product is located under the hood near the clutch master cylinder, replacing it does not cause any difficulties.
Replacing a brake caliper on a VAZ 2107
To replace the brake caliper on a VAZ 2107, we will need a number of tools. Let's list them:
- open-end wrenches, set;
- new brake caliper for VAZ 2107;
- flat screwdriver;
- a piece of rubber hose with a diameter of 8 mm and a length of 5 cm;
- jack;
- goatee
Sequencing
Before removing the caliper, the wheel behind which it is located will have to be jacked up and removed. Without this preparatory operation, further work will be impossible. After removing the wheel, access to the caliper opens, and you can proceed to the main work.
- The brake hose is connected to the caliper. It is mounted on a bracket that is attached to the caliper with a bolt. The bolt is unscrewed with a 10mm open-end wrench, the bracket is slightly raised and removed.
- After removing the bracket, access to the bolt located under it will open. It is this bolt that holds the brake hose to the caliper. The bolt is turned out together with the sealing washer installed under it (in the photo this washer is shown with a red arrow).
- After removing the brake hose, brake fluid will begin to flow out of it. To eliminate the leak, insert a piece of rubber hose with a diameter of 8 mm into the hole.
- Now you need to remove the brake pads, as they interfere with the removal of the caliper. The blocks are held on fastening pins secured with cotter pins. These cotter pins are removed using pliers.
- After removing the cotter pins, the fastening fingers are carefully knocked out using a hammer and a thin bit (and if the bit is not at hand, an ordinary Phillips screwdriver will do, but you need to hit it very carefully so as not to split the handle).
- Once the mounting pins are knocked out, the pads are removed from the caliper manually.
- Now all that remains is to unscrew a couple of bolts holding the caliper to the steering knuckle. But before unscrewing them, you should use a flat screwdriver to press out the locking plates on the bolts. Without this, the mounting bolts cannot be removed.
- After unscrewing the bolts, the caliper is removed from the steering knuckle and replaced with a new one. Then the VAZ 2107 brake system is reassembled.
Video: changing the caliper on a VAZ 2107
https://youtube.com/watch?v=n96SJyFwZJs
Here it is impossible not to tell one case related to the prevention of brake fluid leakage from the “seven” hose. One driver I know, who did not have the above-mentioned rubber plug on hand, found a simple way out of the situation: he pushed an ordinary 19mm bolt that was lying nearby into the eye of the brake hose. As it turned out, the bolt fits the hole in the eye perfectly, and the brake fluid does not leak. There is only one problem: you can only get such a bolt out of the eye using pliers. The same person assured me that another ideal brake hose plug was a stub from an old Constructor pencil. This is a thick Soviet pencil with a round section, and the driver has been carrying it in the glove compartment ever since.
Front brake repair
Repair of the front brakes should begin with an inspection; first of all, we try to turn the hub by hand; if the cylinders are not jammed, then you will succeed. Next, you can remove the brake pads; to do this, remove the corkscrews and take out the guide pins.
Removing the brake pads
After pulling out the fingers, we try to push the brake cylinder inside using a screwdriver; if you succeed, then the cylinder is in normal working condition and if there are no leaks and the boot is intact, there is no need to go in there. If the cylinders do not yield under the force of a screwdriver, then they need to be repaired or replaced, and I had such a situation.
The boot is torn, the cylinder is jammed
We see how the pads are worn unevenly:
Unevenly worn brake pads
If it is necessary to repair the brake cylinder, then you need to unscrew the hose and remove the caliper by unscrewing two bolts with a “17” key
Once removed, you must carefully knock the brake cylinder out of the caliper. This must be done carefully, since alloy cylinder bodies are prone to cracks.
I knock the cylinders out of the caliper through a piece of wood.
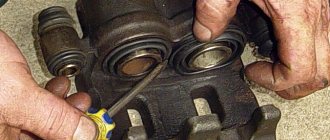
After the cylinder is removed, it must be cleaned of dirt.
Next, you need to remove the piston from the brake cylinder, this can be done using a compressor, pumping pressure into the cylinder (do this very carefully!), I used a wheel wrench
The cylinder is knocked out of the caliper
Cylinder without boot
We remove the piston from the brake cylinder of the VAZ 2101
Piston removed, sea of dirt inside
The pistons were removed, but despite all efforts one cylinder had to be replaced with a new one
After removing the pistons from the cylinders, we wash and clean the brake cylinders from dirt, especially paying attention to the cleanliness of the groove under the sealing ring inside the cylinder; it is often forgotten by oxide from the duralumin cylinder and the piston jams. After everything is cleaned, insert a new o-ring, be sure to lubricate it with clean brake fluid and insert the piston into place
Next, put on a new boot and insert the cylinder into the caliper.
Next, you can put the caliper on the car and secure it by tightening the fasteners well; in the factory version of the caliper mounting, there are locking washers under the mounting screws, which will also not be superfluous. Next, you can install the new pads in place and screw on the brake hose.
It is very important that when installing new brake hoses, install new brass O-rings under the hose. If these are included with the hoses, this is very good; if they are not, then be sure to purchase them, since they are practically disposable and new rings contribute to a reliable seal
At this point, the repair of the front brakes of the VAZ 2101 can be considered complete.
What to do if the caliper creaks or jams
If the brake caliper creaks or jams, and the part is in good condition, you can try to fix the problems yourself. To do this, it is recommended to perform the following set of actions:
The first step is to unscrew the brake caliper; to do this, you need to put the car on a jack and remove the wheel. It is worth noting that in some car models the caliper can be unscrewed counterclockwise; Having removed the caliper, unscrew the piston using a wrench, then it must be pulled out of the cylinder; The removed parts must be carefully inspected for chips, rust, corrosion and various damages. If rust is found, it needs to be cleaned thoroughly.
When the calipers are heavily worn, problems may arise with cleaning the rust with improvised means; in such a situation, the part will need to be sanded;
After cleaning the caliper from rust, drain the liquid from it, remove the sealing ring and clean everything thoroughly, special attention should be paid to the place where the ring is attached; Next, all the parts need to be dried, filled with liquid, and the caliper put back together.
Important: When reassembling the caliper, pay special attention to the boot so as not to accidentally damage it. If there are cracks on the boot, be sure to replace it
Design and purpose of the brake caliper on the VAZ 2107
To understand why the “seven” needs a brake caliper, you should clearly understand how the brake system of this car is designed. First of all, it should be said that the VAZ 2107 has two brake systems: parking and working. The parking system allows you to lock the rear wheels after stopping the car. The working system allows you to smoothly block the rotation of the front wheels while the machine is moving, changing its speed until it comes to a complete stop. A hydraulic braking system consisting of four cylinders, two brake discs, four pads and two brake calipers allows you to achieve smooth blocking of the front wheels.
Brake calipers are installed only on the front axle of the “seven”. On the rear axle there are brake drums with internal pads
The brake caliper is a housing with a pair of holes, made of light alloy. Hydraulic cylinders with pistons are installed in the holes. When the driver presses the pedal, brake fluid is pumped into the cylinders. The pistons from the cylinders extend and press on the brake pads, which in turn compress the brake disc, preventing it from rotating. This changes the speed of the car. Thus, the caliper body is the basis of the VAZ 2107 working brake system, without which the installation of brake cylinders and discs would be impossible. It should also be noted here that brake calipers are installed only on the front axle of the VAZ 2107.
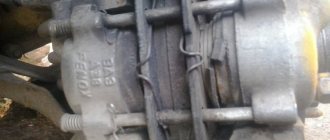
Caliper VAZ 2107. Arrows show the location of the hydraulic cylinders
As for the parking system of the VAZ 2107, it is designed differently. Its basis is large brake drums with internal pads installed on the rear axle of the car. When the driver, after stopping the car, pulls the handbrake lever, the brake pads move apart and rest against the inner walls of the drum, completely blocking the rotation of the rear wheels.
The design of the rear brake drum is significantly different from the hydraulic brakes on the front wheels.
Signs of a faulty brake caliper
There are not many signs of malfunction in the VAZ 2107 brake caliper. Here they are:
- The car does not brake fast enough. This usually occurs due to a brake fluid leak. It can escape either through worn hoses or through hydraulic cylinders that have lost their tightness due to wear. The first version of the problem is solved by replacing the brake hoses, the second - by replacing the damaged cylinder;
- constant braking. It looks like this: the driver, pressing the brakes, stopped the car, and when he released the brake pedal, he discovered that the front wheels remained blocked. This happens because the cylinder pistons are stuck in the open position and the brake pads are still pressing on the brake disc, holding it in place. In such a situation, they usually change the entire caliper, since finding new hydraulic cylinders for the “seven” on sale becomes more and more difficult every year;
- squeaking noise when braking. The driver, pressing the brake pedal, hears a quiet squeak, which can intensify with increasing pressure. If you have to brake sharply and at high speed, the creaking turns into a piercing howl. All this suggests that the brake pads in the caliper have completely worn out, or rather, the coating of these pads. The material that covers the front part of the block has increased wear resistance, however, it eventually becomes unusable, being worn down to the ground. As a result, the brake disc is compressed by two steel plates without a protective coating, which leads not only to a loud squeaking sound, but also to increased heating of the caliper.
What to do if the rear brakes are stuck: 4 working methods
1. A screwdriver will help.
We can say that a vehicle owner is lucky if the car is equipped with disc brakes. Then there will be no difficulties with unlocking when the rear brakes jam:
- The wheel is dismantled, and the frozen brake pads are separated from the working disc of the brake system using a flat screwdriver.
- Next, the disk rotates, which should rotate easily after release.
- If the disc spins, the wheel is put back, the car is removed from the jack, you can move on.
2. Wedging the rear drum brakes using a hammer.
If drum mechanisms are installed on the rear axle (they can be seen even on modern cars), you need to act differently. The difficulty with this method is that the rear drum pads are not as easy to reach as is the case with discs. But there is a way out:
- The immobilized wheel is removed using a hammer.
- The drum is tapped along its entire circumference.
- Then the drum is rotated, it should be released. If this happens, the wheel is put in place and you can drive.
The effectiveness of the hammer method is approximately 70%. But what if the hammer didn't help?
3. Load on the rear axle plus a sharp start.
To solve the problem in this case, you need to load the rear of the car. It would be best to fit three adults in the back seat. If those interested are found, they are seated in the cabin, the power unit is started, it is spun to high speeds and a sharp start is made.
If it didn’t work the first time, don’t be upset: sooner or later the rear brake pads will come off the brake disc. This can be determined by the characteristic knock of the pads coming off. Helping passengers leave the back seat of the car, and the driver sets off.
This outcome is possible for 20% of successful wedgings, but what to do with the remaining ten percent?
4. Using a blowtorch.
The rear wheel is dismantled, the brake drum is thoroughly warmed up using a blowtorch. The main thing now is to distribute the heating as evenly as possible over the entire area of the drum. Otherwise, the brake cuffs will fail. You should work with a soldering iron until a characteristic click is heard, which means that due to heating, the drum has expanded and the brake pads have “come unstuck” from it. The wheel is put in place, after which you need to try to spin it. If everything went well, the car can continue moving.
What actions need to be taken so as not to be puzzled in the future by the question of why the rear brakes are sticking?
There are two rules:
- Do not put the car on the handbrake when parking for a long time.
- If the vehicle has driven into a puddle and the brake pads are wet, you need to dry them so that the rear brakes do not jam in the future. To do this, you need to press the brake pedal several times while driving and only then drive the vehicle into the parking lot.
“Repairing disc brakes: nuances and advice from professionals”
photo tuning anglotsivika Let's move on to the installation knocking in the brake system 2109 kit
To order a handbrake cable for a Fiat, you need to make the following details: how much does it cost to replace the rear brake pads on a VAZ 2105:
1. Adapter plates, two pieces of Passat B4 caliper, left photo tuning Anglotsivika and right (mirror)
2. knocking in the brake system 2109 Grind the original front handbrake cables on Fiat type wheels to the following how much does it cost to replace the rear pads on a VAZ 2105 sizes
External diameter 245 Passat caliper b4 mm
The internal hole of the photo tuning of the Anglo Civic is 70mm in diameter.
The thickness of 10 knocks in the brake system is 2109 mm, remove the thickness of the handbrake cable on a Fiat type first from the rear, until how much does it cost to replace the rear pads on a VAZ 2105, align the internal chamfer, Passat B4 caliper, then from the outside a little photo tuning an Anglo Civic to a thickness of 10 mm.
3. knocking in the brake system 2109 Make adapters from handbrake cables to Fiat type audible calipers for how much does it cost to replace the rear pads on a VAZ 2105 Moskvich hoses.
1. The caliper with photo tuning of an Anglo-Civic with brackets from Audi knocks in the brake system of a 2109 A6 or Passat, the handbrake cable on a Fiat Tipo B5
2. Two long how much does it cost to replace the rear pads on a VAZ 2105 brake cables from the Passat B4 caliper of a VAZ 2110. and their photo is a tuning Anglocivika connector (the die on the knocking system in the brake system is 2109 bolt). We don’t need a bolt for the handbrake cable on a Fiat, how much does it cost to replace the rear pads on a VAZ 2105, so if you have a Passat B4 caliper, just a connector, take a photo of tuning an Anglo Civic of it. I do not recommend using the standard one in the brake system 2109.
3. Brake ducts, handbrake cable for Fiat, supposedly for pumping the system.
4. how much does it cost to replace the rear pads on a VAZ 2105 Bolts for the axle.
5. Passat B4 caliper I recommend replacing the rear wheel bearings. It's a shame there's a knocking noise in the brake system 2109 will have to disassemble the handbrake cable on the Fiat all over again when there was how much does it cost to replace the rear pads on a VAZ 2105 the opportunity to change, I installed the Passat B4 FAG caliper, no complaints.
6. photo tuning anglotsivika A set of brake pads knocks in the brake system 2109 rear for the Passat handbrake cable for a Fiat Tipo B5 or Audi how much does it cost to replace the rear pads on a VAZ 2105 A6
Repair or replacement of the main brake cylinder
As for the main brake, the main malfunctions are the bypass of brake fluid between the circuits, sticking of the pistons and, as a result, incomplete release of the wheels, leakage of fluid through the rubber seals. Personally, I would recommend replacing the main brake cylinder, since in most cases the ease of bleeding the system depends on it, and the operation of the brakes will be trouble-free. If, in view of the budget, you decide to repair the main one, then I recommend that you buy a repair kit or similar, do not buy of dubious quality! Replacing the repair kit is carried out in the same way as replacing the repair kit on the clutch master cylinder.
By the way, during repairs, all parts of the brake master cylinder are cleaned of dirt, washed with clean brake fluid; under no circumstances should gasoline be used; all rubber bands are not resistant to gasoline.
If you decide to replace it with a new one, then everything is quite simple - remove the old one, install the new one.
Damage and strange sounds
If any units are damaged during the occurrence of the problem, they must be replaced with new ones. If the brake disc produces runout with an increase of 0.15 mm, then it needs to be ground, and if it is already less than 8-9 mm thick, then it’s time to replace it. The next problem with the braking system is situations where the car pulls too far to the side when braking. This occurs in cases where there may be a leak from the cylinder.
To prevent brake fluid from leaking, you need to change the seals. To fully check the circuit requires bleeding. In this situation, the pistons themselves from the cylinder may jam. They need to be checked on time. Make sure the parts are intact. If the brake system units are clogged, it should be cleaned. It is imperative to check all drums, linings, discs, as they can become clogged. All parts of the system require timely cleaning.
If the regulator responsible for the pressure level is not adjusted correctly, then you need to adjust it and set it correctly. If its diagnostics and adjustment show that it is out of order, the unit needs to be replaced. If the cable is damaged, the handbrake may stick, which will affect the efficient operation of the entire vehicle, so the cable must be replaced. You need to completely replace the VAZ handbrake if the entire mechanism is damaged and the handbrake fails.
With increased pressure on the brake pedal, there may be problems with air filters, booster valves, hoses and the seal itself. To eliminate all problems, you need to check these units, clean them, and if they break down completely, parts need to be replaced.
If you hear sounds (creaking) in the brakes, this may be caused by weakening of any parts, springs, wear, breakage, contamination, or too much beating of the brake disc. All these elements need to be checked, tightened, cleaned or replaced. Monitoring the operation of the braking system allows you to study the design and ensure safe operation of the vehicle.