Any driver knows that the braking system is a guarantee of safety and it is foolish to neglect it when it needs urgent repairs. In this article we will look at such an important event as replacing the piston of the front and rear brake calipers, we will analyze the peculiarities of their operation, their design, the main malfunctions and their symptoms.
The pistons of the brake cylinders are jammed, what should I do?
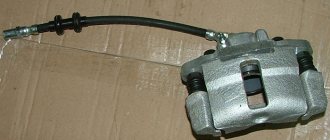
Welcome! Brake cylinders - thanks to them, braking is carried out, and without the pistons that are in them, these cylinders will not work at all, so if a piston fails, then you have to go to a car store and buy a new brake cylinder, because driving without brakes is scary and even more dangerous , but not in all cases the pistons stop working forever, sometimes they can be revived, and we will write in detail about how to do this in this article.
Note! To work, you will need to stock up on: A jack to lift any side of the car, as well as a wheel wrench and you may also have to stock up on bricks, and you may also need a basic set of wrenches and sockets!
Summary:
How to understand that the pistons of the brake cylinder are not working? Let us answer this question before we move on to the repair of pistons, namely inoperative (That is, the pistons do not move in the cylinder), the pistons are recognized if they do not move at all and stand in one place, as a result of which the car, namely the brakes, begins a number of problems occur, that is, the car cannot drive normally because it constantly slows down even though you don’t press the brake pedal at all, or it may be that the car will drive but it will brake much worse than it should, in general, let’s figure it out Why do these cylinder pistons fail?
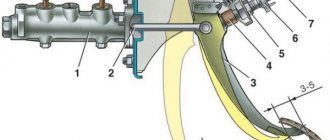
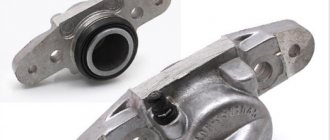
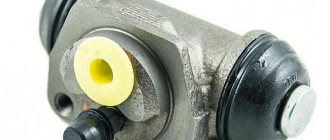
From time to time, the sealing ring (indicated in the photo below by an arrow) that fits the piston in a circle either wears out, or micro cracks form in it through which dirt begins to get into the piston itself, where the lubricant is located, and as a result the piston becomes unusable.
And also, the piston can simply sour in the brake caliper, and this can happen because of our roads, which in winter are mostly sprinkled with sand and salt, and the brake system is located in the very bottom of the car and therefore is subject to heavy braking. and in general, when moving, all this salt flies which little by little brings the situation to the point where the piston simply rusts, otherwise it simply sours, and therefore it will then be very difficult to move it from its place and thus it stops moving and therefore stops working.
By the way, you can very easily understand if your piston is somehow soured, if your car’s fuel consumption on the highway increases, and also if the car, as already mentioned earlier, starts to drive worse, and also if you notice that In neutral gear, the car began to slow down a little, this can also be understood if the car begins to skid on a winter road from braking, all this indicates that your piston has stopped working.
DIY caliper repair
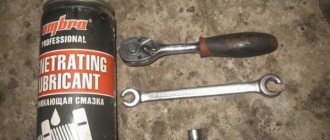
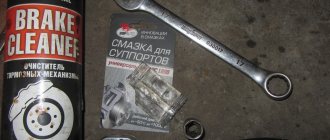
With the end of the cold weather, patience also ended. I couldn’t stand the smell of burnt dust, the whistle and stench of overheated pads from jammed caliper cylinders and the “nodding” when stopping, so we bought everything we needed and went to my father-in-law’s garage (I did the front and back with a break of a week). Unfortunately, there are no photographs, because I was very passionate about the process. What you need: 1. Rem. sets of calipers 2. Brake fluid Castrol DOT-4 1 3. Construction gloves 2 pairs 50 rubles, rubber gloves 4. GOI paste 5. A lot of unnecessary lint-free rags. 6. Plumbing thread. 7. Half a 5 liter bottle 8. Rust converter 9. Medical dropper 10. Medical syringe 20 cc
The first step was to disassemble the problematic right rear caliper. 1. Jack up and remove the wheel. 2. Remove the handbrake mechanism. To do this, we bend and pull out the spring (although I am not small in caliber, I am also not a master of sports in arm wrestling, I was able to do this with my fingers to my surprise), then unscrew the bolt securing the swing and disconnect the cable (I immediately discovered the reason for the handbrake freezing in winter - a torn boot on a cable, this still needs to be sorted out, not sold separately, only assembled with a cable, will have to be farmed). 3. Next, loosen the bolt securing the hose to the caliper body (after removing the caliper, this will be more difficult to do). 4. Next, we unscrew the bolt that secures the caliper and fold it back, helping ourselves with a screwdriver and swear words, because the pads are jammed by the cylinder. We remove it from the guide and see the reason - a torn boot on the cylinder. 6. Place a 5-liter bottle sawn in half under the scene of action to avoid clogging everything with brake fluid. 5. Next, you can try to unscrew the brake cylinder with pliers, inserting it into the groove for the special device counterclockwise (or with a mythical special device that could not be found in the city), but I did it easier - I drove my father-in-law into the car, he started it and, progressively, without quickly pressing the brake pedal has been pressed out by a cylinder from the caliper body, but it is still under the boot. 6. Next, unscrew the bolt securing the hose and try not to lose the two copper sealing washers. We wrap the bolt with plumbing thread and insert it into the coupling with a hose to prevent brake fluid leakage. PS It is better to remove the pads with the springs and put them in a secluded place so as not to lose the latter, it will be very difficult to then look for steel wire to make the springs. 7. Now we have the caliper with the almost disconnected cylinder at our disposal, we can work on it. We take a screwdriver with a small, non-sharp tip and look for a locking open ring above the boot, pry up the end and carefully remove it. Then we remove the stuck boot and cylinder. Next, the cause of the jamming was visible - the internal cradle where the edges of the boot are inserted, as well as the edges of the hole for the piston, as well as part of the piston, are covered with corrosion. There is nothing to do, we begin a long, stubborn and inconvenient cleaning of corrosion using rags, rubber gloves, a rust converter and in non-working places (not the cylinder and not the hole under its walls) - with a screwdriver to remove the converted corrosion. Next, we thoroughly rinse everything with the old drained brake fluid and wipe it off. It's time for the top hat. We rub the rags with GOI paste, firmly clamp the cylinder in a vice and begin polishing the surface free of corrosion. After some time, the cylinder shone like a cat's bells and became much smoother. We change the sealing collar in the caliper body (the old one seemed to be good, well, since we took it apart...), lubricating it on all sides with red grease from the repair kit (the Chinese Germans are great - they put enough grease and 2 types, red and yellow, red as times for internal parts). We lubricate the cylinder itself and the boot with it on all sides. We put the boot on the cylinder (just throw it on), insert the cylinder into the caliper, take the pliers and begin to twist the cylinder into the body clockwise with moderate dosing of pressure and rotation. We are approaching the end of the year - carefully use a screwdriver to tuck the edge of the boot into the groove, take the open ring and no less carefully place it in the groove where the edges of the boot have just been pushed. Apply yellow grease to the caliper fixing bolts and reassemble in reverse order. 8. Afterwards, repeat the operation on the left caliper. 9. After completing the repair of the calipers, it is necessary to bleed the brake system to remove all the air. With the help of my father-in-law, we pump all the wheels one by one (even the front ones, which I only got to in a week). To do this, remove the cap from the bleeder fitting, place the key on the 8th ring side, and put a hose on top with a rubber band from the dropper (fits perfectly). On command, the Father-in-law pumps up the pressure with the brake pedal until it becomes stiff, and holds his foot in this position. At this moment I open the fitting with a key, bleed air and liquid and control the air outlet through the transparent dropper hose. As soon as the brake pedal goes to the floor, he commands, I close the fitting, after which he releases the pedal. Next, we repeat the operation, and every 2 such times we run to add brake fluid to the reservoir so that more than a quarter does not go away, as recommended. We repeat until liquid comes out without air, make another control pass, and tighten the fitting. We carry out the operation on all 4 wheels in turn from the closest to the farthest wheel from the place where the hose is disconnected. After the operation was completed, it was already evening. But you need to check it. I sit down, drive out onto the alley of the garage cooperative, accelerate to 20, press the pedal, it’s soft (It brakes well, but there is a treacherous idle to the point where it starts to grip confidently. The cylinder doesn’t jam, there’s no stink, it doesn’t bite. A profit is made, but and I got an inconvenience in the form of a soft pedal (I thought about the air in the system, but after the second pumping after repairing the front calipers, which I will write about later, the situation remained the same).
This concluded the first day of the struggle. Since I did everything carefully and slowly, and for the first time, it took about 6 hours. To be continued.
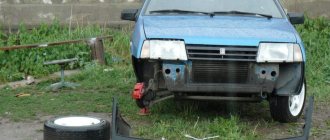
Continuation. I drove for a week with the “new brakes”, gradually got used to it, but still anticipating the return of the old harsh, upsetting ones, I planned Sunday to work on the front pair of calipers. Started. 1. Jacked it up and removed the wheel
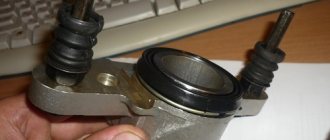
front caliper, top view
2. Loosen bolt 1 in the assembled state with a 10mm head 3. Remove the cap, then use a 8mm L-shaped hexagon (the set was purchased a long time ago, because it’s unlikely to be unscrewed with an ordinary bit from a screwdriver), feel for the groove of the sleeve and unscrew it (it was unscrewed without problems because earlier after replacing the pads, everything was lubricated with lithol - of course it’s not high-temperature shit, but it did its job). 4. Next you will have to unscrew bolt 2 completely. Do not lose the 2 copper washers of the gasket. 5. We plug the hose coupling with a bolt wrapped in plumbing thread, tilt the caliper and remove it from the lower guide. It will not work without disconnecting the hose, because it is short. 6. Return the hose to its place, tighten the bolt, and hold the caliper in your hand. 7. The father-in-law starts the car, carefully progressively presses the brake so that the cylinder comes out of the caliper body. 8. The cylinder comes out, unscrew bolt 2, equip it with plumbing thread, and lock the hose coupling. 9. Now you can work. Unlike the rear caliper, the front caliper does not have a ring that pushes the boot apart; it can be removed without effort. The cylinder itself does not have grooves for screwing in/unscrewing; it moves on its own without threads. As a result, we see the following: On the caliper
Inside the caliper
Corrosion in the groove for the boot 1 (the boot was torn), corrosion on the walls of the hole along which the cylinder 2 moves, and a worn cuff 3.
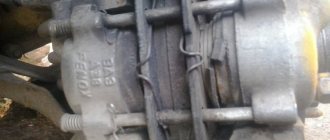
The cylinder itself is in good condition, slight corrosion in the groove for the boot 1 and on the body itself 2
front brake cylinder
I treat corrosion with a rust converter. I clean the groove for the boot (non-working surface) with a screwdriver suitable for the width of the tip, and wash it with old brake fluid. I polish the cylinder body with a rag coated with GOI paste until the corrosion spots are reduced to a minimum. I am changing the guide boots from the repair belt. kit, lubricating them with yellow grease (the Chinese Germans squeezed a second bag of yellow grease into the front repair kit, unlike the rear one there is only one). I clean and treat the corrosion in places 1 and 2 in the caliper body, wash it with the old brake fluid, change the sealing collar 3, having previously lubricated it with red grease from the belt. set. Lubricate the cylinder boot and the cylinder itself with red grease. Next we assemble: In order not to repeat my mistake (I wanted to insert the cylinder as in the back, first - then put on the boot - it didn’t work - in the end I ran to squeeze it out again through the hose) put the boot on the end of the cylinder (number 2 in the photo), tuck the boot into the groove carefully so as not to jump off the cylinder and slowly move the cylinder inside. Next, without much effort, resting your fingers on the edge of the cylinder, we gently press it into the caliper body without distortion. Profit. PS. Don't forget that the brake hose is still short, so we lubricate the guide and bushing with yellow grease from the belt. kit and install the caliper in place, tighten the bushing, then connect hose 2 from the first photo into place (do not forget about the copper washers). Then we do the same on the left side. Upon completion, we bleed the brake system through fitting 3 in the first photo (all the same with spare parts from the dropper, as in the first part of the post). PPS Unfortunately, it won’t be possible to bleed the rear wheels from the pit, well, this is the design, everything is closed with levers, so you still have to remove the wheels one by one. The procedure, like the back part, took a leisurely 6 hours. After bleeding the system, I go for a check. The whistle disappeared, but the brake was still soft. Air? who knows, they are not professionals, of course, but they have pumped up more than one car, this has never happened. The soured cylinder is no longer soured and has a greater stroke than before, which is responsible for the greater useless stroke of the brake pedal? Logical, but idk. In general, now this is mystery No. 1.
How to turn an inoperative brake cylinder piston into a functional one?
1) At the very beginning of the operation, you will need to remove the wheel from the car.
Note! By the way, when you remove the wheel from the car, try to spin it while it is in the air; if it slows down, then some piston has actually become unusable!
2) After your wheel is removed, immediately remove the caliper from the car after it in order to get out the brake piston that is not working. (For information on how to remove the brake caliper on front-wheel drive cars, see the article: “Replacing the brake caliper on a VAZ 2109”, and for information on how to remove this caliper on a classic, see “this article”)
Why is it better to carry out repairs in a specialized company?
When repairing a brake caliper yourself, you may encounter unexpected problems. Sometimes the piston jams so much that it is difficult to remove it yourself, and a suitable tool may not be at hand. The piston must be changed carefully so as not to damage the inner surface of the caliper and the piston itself. If you are not careful, brake fluid may leak and air may enter the system.
You can save yourself from these problems if you contact a company that specializes in diagnosing, repairing and rebuilding brake calipers. The presence of the necessary equipment and work experience guarantees fast and high-quality repair of calipers. In addition, during diagnostics, specialists will assess the general condition of the brake system, identify possible problems and eliminate them.
WHEN REPLACING THE PADS, I DETECTED A JAMMED PISTON. I'll tell you what I did.
It was necessary to replace the brake pads a long time ago, but I decided to replace them when an unpleasant grinding noise began to appear when braking. Since it was a business trip, I bought new pads during the day and postponed the replacement until the evening, before an early trip back.
So, I began the usual and fairly simple procedure of replacing the pads on an old “two-wheeler”. I quickly removed the wheel, halved the caliper, pulled out the remaining pads (the friction linings were gone), all that was left was to press the brake cylinder into its original position.
And at this moment, the whole process stopped. The piston jammed in the maximum position and did not want to return to its place. Since the pads were worn less than the “minimum”, the piston had a very small stroke, one might say did not move in the cylinder, and naturally everything began to rust and sour.
Why does the brake caliper squeak and jam?
Secondary causes of jamming:
- the pads are not installed correctly initially, so they begin to creak;
- discs are worn out by 70–80 percent - due to aggressive driving style or natural reasons;
- the lubricant is incorrectly selected or is missing;
- Dirt and moisture got inside the mechanism.
One of the main reasons why a mechanism creaks or jams is overheating. Friction during active braking causes heat production. This causes high loads not only on the pads, but also on the presser itself. Therefore, at least conscientious manufacturers try to make it from the most durable material.
About diagnostics and scheduled maintenance
To prevent this kind of repair work from turning into a kind of regular ritual, it is necessary to regularly diagnose the entire brake system and monitor the cleanliness of each individual part.
Timely diagnosis
allows you to avoid not only jamming of the caliper, but also premature, uneven wear of the brake pad and overheating of the brake discs. All this makes it possible to maintain the serviceability of the brakes and be calm on the road.
Once a year, it is best to carry out a detailed check of the caliper piston and boot.
– it must be without any damage. The surface of the caliper, its piston and other parts should be free of rust and serious contamination.
For prevention, you can treat the surface of the caliper with WD-40 once every 6 months.
The information presented here is a list of actions to take in cases where the brake caliper is stuck and the braking system begins to lose its original effectiveness.
Symptoms of a problem
- oily spots on the visible or inner side of the wheel, which indicates a leak of DOT fluid, a decrease in its level in the expansion tank;
- unexpected, spontaneous pulling of the car to the side after braking - while the wheels are normally inflated and the suspension is fully operational;
- a grinding sound after releasing the brake pedal is the main sign of a situation where the piston is pressed in and does not return to its original position;
- The discs overheat greatly and give off an unpleasant burnt smell - even after driving with relatively infrequent braking.
Front caliper jammed
If the front brake caliper is stuck, this is often due to an aggressive driving style. This can be explained by the design difference of modern cars, where the brakes are applied faster at the front. Therefore, the burden here is incredible. Many cars are equipped with a pressure regulator or “sorcerer”. During heavy braking, it blocks fluid access, but only to the rear axle. The front axle continues to work and heat up.
However, if the rear caliper is equipped with a handbrake system, which is provided on some modifications, the likelihood of breakdowns and the rate of wear also increases.
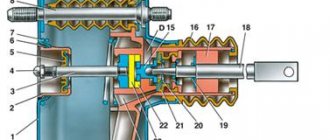
The design of this brake element
There are two types of disc calipers - front and rear, their design and repair method are slightly different, but their main elements are the same:
- The housing in which the piston (cylinder) is mounted.
- Bypass valve.
- Sealing ring.
- Piston (cylinder).
- Cylinder boot.
- Retaining ring.
- Frame.
- Pressure bar.
- Pads.
- Guide boot.
- Guides.
- 14. Fastening bolt.
- Brake hose.
The difference between the rear disc caliper is the presence of a parking brake.
Therefore, the piston (4) has a special thread through which it is screwed onto the parking brake rod (1). Thanks to this, it can operate under the influence of two drives - mechanical (parking) and hydraulic.
What to do if the caliper is stuck on the road
The first thing that is recommended is to give the elements half an hour to cool down. Then identify the problem wheel by conducting an effective test. You need to drive 20–30 meters, stop and touch all four disks with your finger through the provided holes. If the part is hot, it is this particular wheel that jams. It is removed, the car is first placed on a jack.
Cold water will help to quickly cool the elements, but you can water it on a surface that has already partially cooled. Otherwise, the disk will simply blow apart due to strong temperature changes.
If the handbrake cable jams, the inner or outer braid is most likely damaged. It is possible that the return spring has weakened and needs to be replaced with a new one. Also, both return brackets often become dirty. In this case, they must be cleaned of rust and treated with VD-40.
But what to do if sometimes you don’t have time for all this. Then the only way remains is to hit the return bracket with a hammer so that the cable returns to its original position. You can drive further, but just don’t use the handbrake again until it is repaired.
If the piston itself is jammed, a hammer can also quickly solve the problem. You need to tap it carefully, through a wooden spacer, throughout the entire mechanism. If the pads do not wedge, try inserting a screwdriver between the pad and the disc. Finally, the surest, but most dangerous way is to squeeze the hose with a clamp. But you must drive extremely carefully, without brakes.
If the brakes rattle
This type of brake has pressure springs or floating calipers.
They are responsible for securing the pads to the caliper body. The reason for their failure is metal fatigue or poor quality. As a result, they lose their elasticity and stop pressing the pads against the body. Because of this, the pads rattle at the slightest passage of irregularities and may come into uneven contact with the disc, which will lead to the appearance of a shoulder or grooves on it. Also in this case, the staples themselves may rattle.
What should you do when your brake calipers or pads rattle? If it is not possible to replace them, then you should try to loosen them with your own hands using pliers to make them more rigid. To do this, you need to pull them out of their seats, unclench them and insert them into place, after which they will stop rattling for a while.
Consequences
When the bracket wedges, the block remains pressed. This causes the discs to become very hot and the shoes to burn. If the speed of movement is high, and the degree of constriction is maximum, then it’s red-hot. It is obvious that braking efficiency drops sharply, the linings and disc become washed out and lose their properties.
After several heating and cooling procedures, the disks are sure to become deformed. After pressing the pedal, you will feel a beating, and you will not be able to brake at all. You will have to replace the repair kit, but the troubles will not end there, because the cause of the malfunction is in the caliper. If the hub begins to heat up, then the bearing will crumble and the CV joint will be destroyed.
Repair kit
Replacing a caliper is a drastic measure; often you can limit yourself to repairing and replacing its components. Basically, the standard repair kit includes rubber elements:
- cuffs,
- anthers,
- protective rubber bands of the fitting,
- piston sealing rings.
But depending on the necessary repairs, they may include:
- retaining rings,
- clamping brackets,
- guides,
- directly the pistons themselves.
Thanks to the repair kit, you can significantly save and improve the operation of this brake system unit.
Prevention measures
Maintenance of the caliper must be carried out every time the pads are replaced, every two years. It is during this period that the lubricant loses its original properties. In Russian conditions, the timing of the inspection activity must be significantly reduced, and an inspection must be carried out in case of any extraneous sounds, the vehicle slipping and other signs of damage to the mechanism listed above.
The large loads to which the clamp is subjected require the use of special lubricants. Poor-quality compounds quickly harden and are destroyed by water or aggressive brake fluid. You need to use only high-temperature lubricant, with minimal dripping characteristics, moisture-resistant and not susceptible to chemicals. In addition, the correct lubricant must be compatible with plastic and rubber parts. A special type of lubricant is used for the fingers—the elements that guide the mechanism’s brackets.