Replacing the master brake cylinder
It often happens that the brake fluid begins to leak, although all the brake cylinders are normal, and the hoses and tubes are also in order.
In this case, it is necessary to check the seat of the reservoir and the brake master cylinder itself. If a leak occurs, it will most likely have to be replaced with a new one, and in this article we will look at a detailed description of how to perform this repair. The first thing you need to do is decide on the tool you will need for this job:
- ratchet handle;
- socket head 17;
- special split wrench for unscrewing brake pipes by 10 mm.
Procedure for replacing the master brake cylinder of VAZ 2110-2112 - photo report
The first step is to open the hood of the car and unscrew the brake reservoir cap:
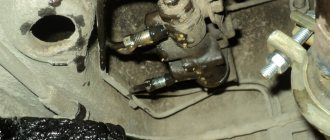
Then you can use a syringe to pump out the brake fluid so that it does not spill when removing the cylinder. After this, use a split wrench to unscrew all the tubes, as shown in the photo below:
After this, it is necessary to move the tubes to the side so that they do not interfere with further work:
Now all that remains is to unscrew the two nuts securing the main brake cylinder of the VAZ 2110-2112, as will be clearly shown on one side in the photograph below:
And remove it from the studs when everything is unscrewed.
At the end of the work, you can buy a new cylinder, the price of which is about 1000 rubles, and we install it in its original place. We fill the brake fluid into the reservoir and bleed it, that is, we expel the air from the system. More on this in future articles.
Source
Main causes of malfunction
The VAZ 2110 caliper is structurally an element that holds the brake pads and is responsible for the degree of their pressure on the brake discs. It is also responsible for uniform wear of the brake pads and guarantees the driver reliable braking in extreme situations.
Thus, the importance of the caliper in the operation of the car is difficult to overestimate.
If by this time you have a completely reasonable question, what can happen to the caliper on a VAZ 2110 (2112), we will be happy to answer you. The main cause of malfunctions is “acidification” of the moving elements, coating them with an oxide film, clogging due to the destruction of protective boots or the use of improper lubricant, namely:
- acidification of the main piston mechanism;
- acidification of guides.
A clear sign of problems that the caliper can cause on VAZ cars is uneven wear of the brake pads and an increased braking distance. In this case, the VAZ pads must be changed, and the caliper mechanism itself must be subjected to comprehensive diagnostics:
- check the condition of the piston, its degree of freedom, the presence of moisture, metal oxide, oxide formations and build-ups, the condition of the protective boots;
- Similarly, check the condition of the guides, make sure that there are no uncharacteristic scuffs, abrasions or deformations of the rod on the surface.
We must also not forget about regularly replacing the brake fluid in the system. This should be done approximately every 40 thousand km. mileage of VAZ-2110.
Since brake fluid is hygroscopic, it easily absorbs moisture, thereby oxidizing the piston mechanism and causing it to fail. The piston stroke becomes difficult and uneven wear of the brake pads and wheel wedge occurs.
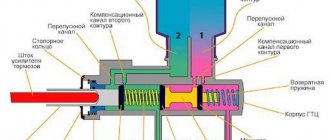
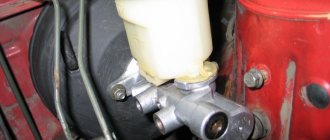
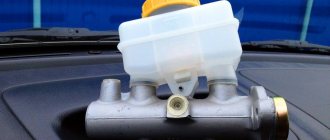
Main brake cylinder VAZ 2110
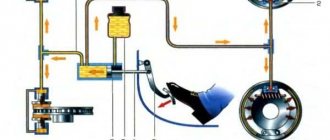
The GTZ is the main part of the brake system; when you press the brake pedal, it distributes the brake fluid through the lines to the calipers and creates the necessary pressure to compress the brake pads.
Below are signs that indicate the need to replace the brake master cylinder.
Signs of a malfunction of the GTZ:
- Traces of brake fluid leaking through the O-rings are noticeable;
- The force on the brake pedal disappears and when you press the pedal, the car does not brake;
- The pedal does not engage due to the jamming of the GTZ rod;
With these signs, it is not recommended to delay replacing the gas turbine engine.
General provisions of the system
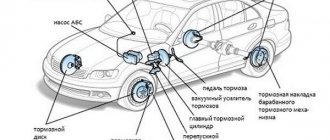
The brake system of the VAZ 2112 is distinguished by reliability and high efficiency, which is made taking into account modern technological components. The pressure regulator performs an important function by ensuring uniform distribution of fluid pressure in all elements. The front mechanisms are disk, with automatic clearance adjustment, the rear ones are drum type. The parking brake is of a manual type and is driven by the rear wheels.
Components of the brake unit
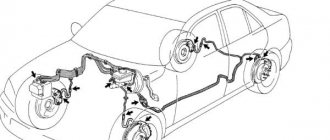
The modern brake system of the VAZ 2112, the scheme of which is also used in the VAZ 2110 and VAZ 2111 models, includes:
- master brake cylinder
- tank
- vacuum booster
- pedal
- pressure regulator
- drive lever
- front and rear wheel mechanisms
- pipelines and flexible hoses
It is important to note that, despite the high reliability and structural safety, this most important automotive component must be constantly monitored, promptly replacing worn pads, system tightness, purging, checking the integrity of the tank and pipelines.
Comprehensive check of the performance of the brake mechanism
When choosing a service station, you should give preference exclusively to trusted companies that have a high level of technical equipment and a good reputation. It is here that the brake system of the VAZ 2112, malfunctions of which can lead to big troubles on the road, can be thoroughly checked. During computer diagnostics, a detailed report on the condition of components and mechanisms will be presented, as well as recommendations for repair and further operation will be given.
Features of using a vacuum brake booster
Considering the good speed characteristics of the VAZ 2112 model in comparison with the “classics”, a vacuum brake booster, designed taking into account modern requirements, is very important. Transmitting a smooth force, it makes it possible to very effectively influence the mechanisms of the rear and front wheels, thanks to which the unit accurately responds even to small pedal forces. Thanks to such a braking system for the VAZ 2112, the design and reliable operating principle of which has already been proven by time, is widely used in other models of the VAZ line.
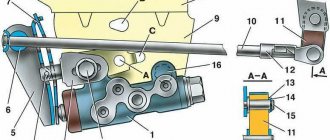
Rear brake pressure regulator
This unit is firmly secured with two bolts to the rear body bracket, and has a special adjustment. The system works as follows: when you press the brake pedal, the liquid acts on the piston, pushing it outward. When the system comes into balance, the valve, by closing, isolates the rear cylinders from the main brake cylinder, thus preventing the growth of excessive pressure on the wheel building. As a result, braking is smooth, since the force is the same on all 4 wheels. If the load on the rear axle increases due to heavy weight, then the traction of the wheels with the road increases, and the regulator provides more pressure in the wheel cylinders and vice versa. You should periodically check the tightness of the regulator seal rings, as brake fluid may leak here.
- brake pressure regulator;
- brake pressure regulator mounting bolts;
- pressure regulator drive lever bracket;
- pin;
- brake pressure regulator drive lever;
- brake pressure regulator drive lever axis;
- lever spring;
- body bracket;
- brake pressure regulator mounting bracket;
- elastic pressure regulator drive lever;
- earring;
- earring bracket;
- washer;
- retaining ring;
- bracket pin;
- A, B, C - holes
Features of front and rear brake mechanisms
The front units are made in the form of steel discs, which are clamped with special pads and include a wheel cylinder and a caliper, which are tightened with strong and durable bolts. Special rubber covers are inserted between the fingers of the pads, and the inner pad has a built-in indicator for monitoring the degree of wear, which promptly informs about the need to replace the unit. The brake cylinders are equipped with a device for automatically maintaining the gap between the drum and the shoes. The brake system of the VAZ 2112, malfunctions of which also include gradual wear of the brake linings, should be periodically checked in a specialized center.
The main thing is constant monitoring and timely replacement of worn-out mechanisms!
In conclusion, it should be said that timely replacement of friction linings, brake fluid, as well as bleeding of the brakes allows you to have complete confidence in the reliability of this unit. So in this regard, you should strictly follow the recommendations set out in the vehicle’s operational passport, which will prevent emergency situations.
By and large, the rear brake cylinders on the VAZ 2110-2112 last quite a long time and do not have to be changed so often. And the main reason may be the passage of brake fluid through the rubber bands of the pistons, which push the pads apart when the pedal is pressed.
Symptoms may or may not be obvious:
- The obvious ones include the failure of the pedal when braking and a sharp drop in the fluid level in the tank
- Gradual decrease in brake fluid level and “raw” traces of it under the rear wheel drum
You can make the replacement yourself, but you need to have the following tool on hand:
- 10 mm head
- Ratchet or crank
- Special wrench for loosening brake pipes
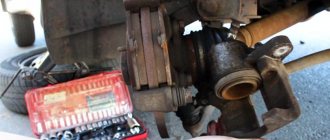
To get to the cylinder itself, the first thing you will need to do is remove the rear drum of the VAZ 2110.
Consequences of brake fluid leakage from the GTZ
When brake fluid leaks from the master cylinder, brake fluid can get onto various parts of the car. As you know, TZ is quite chemically active and often damages other parts of the car.
For example, when liquid leaks, it can fall on the vacuum booster membrane, which will soon lead to its rupture and, as a result, air leakage from the receiver, and of course, replacement of the vacuum booster itself.
VUT membrane rupture
Also, when brake fluid leaks, it gets into part of the engine compartment, behind the steering rack, and causes great damage to the paintwork.
Replacement without bleeding the brake system
Below are instructions that allow you to replace the GTZ without bleeding the brake system and without a large loss of brake fluid. To carry out repairs, you need to prepare the necessary tools and DOT-4 brake fluid.
When replacing, it is necessary to dismantle the brake fluid reservoir from the old GTZ; when dismantling it, breakdowns of the tank occur; it is recommended that when replacing the GTZ, you also purchase a new TJ reservoir.
Required tool:
Step-by-step instruction
- We unscrew the cap of the brake fluid reservoir and use a syringe to pump out the brake fluid into a previously prepared container;
- Using a ratchet with a 17mm head, unscrew the 2 nuts securing the GTZ to the vacuum booster and pull the GTZ towards you;
- We remove the tank from the GTZ (if you haven’t bought a new one). We install the reservoir on the new GTZ, lubricating the rubber seals with brake fluid;
- We install the new GTZ on the vacuum booster and fix it;
- We insert the brake fluid fittings into the GTZ, but do not tighten them;
- Fill the TJ tank up to half;
- We wait for brake fluid to flow out of the holes into which the brake pipe fittings are screwed;
- Then we twist and tighten the fittings of the TJ tubes;
- Add brake fluid between the MIN and MAX marks and close the cap;
The replacement process is complete. With this replacement, bleeding the brake system is not required.
Source
Some tips
- If you start having problems with the brakes, first of all you need to carry out an external inspection of the vehicle: check the fluid level in the reservoir, make sure that the front/rear cylinders are not leaking. There should not even be stains of brake fluid in the brake hydraulics.
- “Brake fluid” must be filled with the same brand; it is recommended to completely replace the brake fluid at least once every two years.
- If faults are identified in the gas turbine engine, and it has already served for at least a year, it is more advisable to replace it completely than to repair it. The same can be said about the rear working cylinders.
- Before changing the turbocharger, the brake fluid should be removed from it; this operation is usually done using a syringe.
- Usually a leak in the master cylinder is not visible, but if there is any suspicion that this part is faulty, you should remove the main cylinder - there will be traces of leaks at the rear, and this indicates its faulty condition.
- If, during an external inspection, cracks were found on the brake hoses, it is better not to take risks and immediately replace the defective parts.
Didn't find the information you are looking for? on our forum.
We recommend reading:
Which gasoline is better for VAZ 2114
Air leakage through injectors symptoms of VAZ 2114. Possible malfunctions, cleaning and adjustment
Vibration in the cabin when idling VAZ 2114 injector causes
Repair of the underbody of a VAZ 2107
VAZ 2114 injector boils, reasons
Error p1602 vaz 2114 how to fix
What is an ESD for a VAZ or an ECU for a VAZ 2114
Master cylinder, slave and clutch VAZ 2101. Replacement and repair, fluid pumping
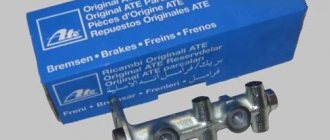
Which master brake cylinder is better for the VAZ-2110
The main brake cylinder of the VAZ-2110 can be repaired, but not always.
Currently, many companies produce analogues of the VAZ-2110 GTZ. Most of them are a higher quality product than recommended by the manufacturer.
Products from Fenox or Kraft are in great demand.
For aesthetes, we can recommend a product from Bosch, which costs three times more. In addition, many manufacturers produce parts with or without a tank.
Troubleshooting possible replacement problems
There are relatively few difficulties when replacing brake pads. As a rule, they are associated with souring of bolts due to rust. The drum elements that are most susceptible to corrosion are the mounting pins. In case of possible difficulties, the drum is removed along with the rear wheel hub, and when unscrewing the studs, it is allowed to use a penetrating lubricant such as WD-40
However, when working with brake mechanisms, lubricants should be used extremely carefully, avoiding their contact with the working surface of the pads or disc (in the case of the front wheels). Otherwise, the efficiency of the brakes may be significantly reduced, up to severe slipping between the working surfaces of the pad and drum linings or disc
To summarize, we can note the ease of replacing brake pads on a VAZ-2110. The procedure does not require special skills or tools; it can be done in an ordinary garage without any particular difficulties. Knowing the order of operations when replacing allows you to complete this procedure quickly and efficiently.
Home →
Maintenance and Repair →
Determination of breakdowns of the GTZ VAZ-2110
You can determine the faulty part yourself; to do this, you just need to know what to look for:
- Leaks in the brake fluid on the vacuum booster at the junction with the main brake cylinder indicate that the cuff in the cylinder is worn out.
Leaks on the vacuum booster indicate wear on the seal in the cylinder.
In any case, you need to determine for yourself whether it’s worth bothering with disassembling the GTZ and repairing it or immediately installing a new part.
Is it worth buying a repair kit and is it profitable?
Buying a repair kit can save the money spent several times, but it will increase the time costs.
Based on the cost of the GTZ at 1,000 rubles, you need to think carefully about whether it is worth disassembling the brake cylinder for such a sum. Repair kits can be incomplete or complete . In any case, you need to purchase a complete one, since no one will measure the forces on the return springs.
You can also repair the brake master cylinder yourself.
An attempt to save money will result in a long procedure of disassembling, washing and drying all parts. When washing, you need to make sure that no gasoline or oil gets on the rubber parts, as this can damage them.
Therefore, the use of a repair kit can only be justified in the following cases:
- The assembled part is not available for sale.
- Inability to allocate 1,000 rubles for a purchase.
- The desire to understand the brake system with your own hands from beginning to end.
In other cases, it is better to immediately install the assembled part.
Tools that will be needed during the replacement process
To replace the brake cylinder you will need a tool.
Before starting any repair work, you should prepare thoroughly. Replacing the brake master cylinder is no exception. To replace this part you will need:
- Set of keys. Having a variety of sockets and socket wrenches will be a huge advantage.
- Screwdriver Set.
- Round nose pliers will help when changing cuffs.
- Special “brake” wrench for 10.
In addition, during the replacement process, brake fluid will spill out, which is generally advisable to replace with new one. DOT-4 brake fluid is suitable for the VAZ-2110.
The process of removing the old part
In order to remove the brake master cylinder, you need to open the hood and do the following:
- To get to the part, you will first have to remove the sound insulation. You should not try to tear it off, as it is secured with bolts. Therefore, you should arm yourself with a screwdriver and unscrew all the fasteners. If the sound insulation is not removed after this, it means that not all fasteners have been unscrewed. If you pull the element, it can be damaged. After this, you can start replacing.
Why is the rear brake mechanism acting up?
The hydraulic drive built into the VAZ-2110 combines in its internal design a booster and a dual-circuit pressure controller designed to control the rear brakes. If the rear cylinder is not working correctly, problems can provoke and create an emergency situation at any time when the vehicle is moving along the roadway. To prevent this from happening, the part should be repaired in a timely manner.
There is nothing surprising in replacing an old type of rear brake cylinder (RBC) with a new one; nothing lasts forever. Auto parts stores offer car enthusiasts the opportunity to purchase parts from the best manufacturers that will last a long time and guarantee safety on the road.
Bleeding the brakes after replacement, should I do it or not?
After the procedure for replacing the brake master cylinder, some inexperienced car owners do not consider it necessary to pump the brakes. If you neglect this procedure, the brakes may fail at the most crucial moment.
It is necessary to bleed the brake system . This procedure is simple, although two people must be involved. The pumping procedure is as follows:
- We need to pump up the brakes. To do this, the pedal is pressed several times, after which it is held down.
- At this time, you need to partially unscrew the brake pipe fitting on one wheel.
- This should remove air from the system. Periodically, an assistant should pump the brakes by pressing the pedal. This procedure must be repeated until fluid sprays out of the tube when you press the brake pedal.
We pump the brakes on each wheel one by one.
This procedure is repeated on each of the four wheels of the car . Before bleeding the brakes on each wheel, you need to add brake fluid to the reservoir. Only after bleeding the brakes can you go out on the road without fear that the brakes will fail at the most inopportune moment.