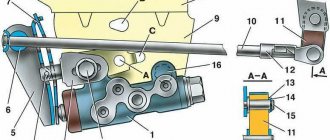
Front brake mechanism of VAZ 2110 car
For road safety, the serviceability of the front, rear and hand brakes is of great importance. The brake system of the VAZ 2110 car has a diagonal separation of circuits, which increases reliability and safety when driving a car. If one circuit fails, another effectively replaces it.
Main causes of malfunction
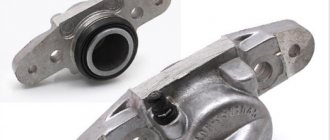
The VAZ 2110 caliper is structurally an element that holds the brake pads and is responsible for the degree of their pressure on the brake discs. It is also responsible for uniform wear of the brake pads and guarantees the driver reliable braking in extreme situations. Thus, the importance of the caliper in the operation of the car is difficult to overestimate.
If by this time you have a completely reasonable question, what can happen to the caliper on a VAZ 2110 (2112), we will be happy to answer you. The main cause of malfunctions is “acidification” of the moving elements, coating them with an oxide film, clogging due to the destruction of protective boots or the use of improper lubricant, namely:
- acidification of the main piston mechanism;
- acidification of guides.
Piston mechanism and caliper guides VAZ 2110
A clear sign of problems that the caliper can cause on VAZ cars is uneven wear of the brake pads and an increased braking distance. In this case, the VAZ pads must be changed, and the caliper mechanism itself must be subjected to comprehensive diagnostics:
- check the condition of the piston, its degree of freedom, the presence of moisture, metal oxide, oxide formations and build-ups, the condition of the protective boots;
- Similarly, check the condition of the guides, make sure that there are no uncharacteristic scuffs, abrasions or deformations of the rod on the surface.
We must also not forget about regularly replacing the brake fluid in the system. This should be done approximately every 40 thousand km. mileage of VAZ-2110.
Since brake fluid is hygroscopic, it easily absorbs moisture, thereby oxidizing the piston mechanism and causing it to fail. The piston stroke becomes difficult and uneven wear of the brake pads and wheel wedge occurs.
Please note that the repair kit offered in stores for self-service of VAZ 2110 (2112) calipers contains special lubricant for both the main piston and the guides. The use of Lithol or graphite lubricant leads to swelling of the protective shock absorbers and further souring of the guides. This kind of repair is unlikely to benefit your car.
Repair
The first rule: if you don’t want further troubles, especially when one of the wheels jams, never repair only one caliper, always both together!
To sort through, repair or replace individual parts, and possibly completely change the unit if it turns out that there is nothing left to repair, you need to follow the following algorithm:
- Remove the ring securing the cover, and then the cover itself;
- To avoid damaging anything, place a piece of wood or a rag between the caliper and the piston, then remove the piston. Also watch your fingers - parts of the mechanism can press them;
- After removal, pay attention to the piston and cylinder. If you find any damage on them, then the entire assembly needs to be replaced;
- If everything is fine, using a wooden or possibly a plastic tool, remove the piston seal from the caliper cylinder;
- If you have a PD51 model, you need to squeeze out the bushing, remove the covers protecting from dust on both sides;
- All elements should be washed with a liquid intended specifically for cleaning brake mechanisms;
- You probably purchased a repair kit. From this, “push” a new seal onto the piston, then place it in the cylinder. This must be done without using brute force, otherwise the brake mechanism may subsequently jam;
- Install the piston dust cover - a new one, from the repair kit;
- The bushings must be lubricated with silicone grease, which is also included in the repair kit, then installed in the corresponding holes;
- Install the dust covers in their proper places;
- Before installing the caliper on the car, replace the copper gaskets on the hose connection.
The front brakes can now be completely reassembled. A prerequisite after repair is to bleed the brakes.
VAZ-2110 caliper maintenance and repairs
It is mandatory to service the VAZ caliper after each replacement of brake pads, as well as in the event of a forced inspection due to its malfunction, for which it is first necessary to check the condition of all rubber elements, shock absorbers and anthers. It is also imperative to replace the grease for the caliper guides. You need a good synthetic based silicone lubricant that can withstand high temperatures.
If you had to buy a repair kit, it contains such lubricant, all the necessary gaskets, new guides and a piston. The price of such pleasure will cost you about 500 rubles. Buying a new VAZ-2110 (2112) caliper, depending on the store and region of Russia, will cost from 1000 to 1500 rubles.
To remove the piston from its seat, it is necessary to create the appropriate force using an air compressor (pistons are repaired one at a time, the stroke of the second is blocked, for example, by a wooden block). With the same success, when removing the product from the car, you can press the brake pedal without disconnecting the VAZ 2112 caliper from the brake hose. It is advisable to use a rubber adapter in order to absorb the sharp impact of the freely moving piston and its “shot”.
VAZ 2110 caliper repair
The piston is pushed back using a special clamp. In this case, the boot should be bent to compensate for excess air pressure. The hole for the piston and for the guides are cleaned and washed with carburetor cleaning fluid, all gaskets, boots and seats are also thoroughly lubricated.
The main malfunction of the front wheel brake cylinders on the VAZ 2110-2112 can be considered their jamming, as a result of which, even when the brake pedal is released, the cylinder does not immediately return to its original position. Also, problems with the passage of brake fluid from under the rubber are possible, which is also not normal.
To replace this part yourself, you will need the following tool:
- 13 mm socket head
- Ratchet handle and crank
- Hex bit or similar bit for 10
- Socket wrench 13
- Special split wrench for brake pipes and hoses
How to repair a brake caliper
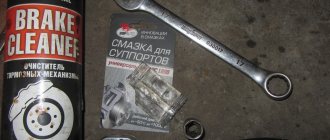
For repair you will need:
- Jack and wheel wrench.
- A set of keys, a clamp and a couple of screwdrivers.
- Rags and degreaser.
- Repair kit for caliper repair, high-temperature grease for calipers.
- Liter of brake fluid
- New copper washers for brake hoses
- Drill or screwdriver, set of brushes.
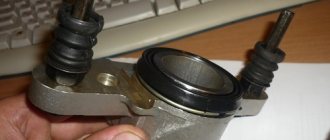
First, let's jack up the car and remove the wheel, and then we will need to remove the caliper and disassemble it. Details of the process in the photo.
To remove the caliper, you need to press in the piston, open the lid of the brake fluid reservoir to make the process easier, then insert a large screwdriver between the caliper and the pads, after which you need to pull the screwdriver towards you.
When the pads are released, unscrew the two bolts at the top and bottom of the caliper guides.
Remove the retaining ring from the caliper boot.
Then remove the boot. Since I did it myself at the service center, I had a compressor with which I pressed out the piston.
I advise you to place a rag in the caliper and then carefully, smoothly and slowly press the brake pedal. After the piston came out to clamp the brake hose so that a lot of fluid did not escape, I used a clamp for this purpose.
We unscrew the brake hose from the caliper and carry the caliper in a vice.
We fix the caliper in a vice.
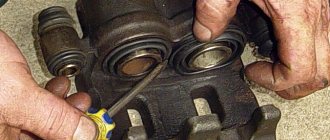
Use a screwdriver to pry the o-ring off the cylinder and remove it.
Since caliper repair is a unit repair, and quality repair of a unit is 70 percent clean, I decided to clean it of dirt. To do this, I took a set of drill brushes and a screwdriver. You can also use brake cleaner.
We clean the caliper carefully, do not under any circumstances clean the working surface of the cylinder!
After cleaning, wash all parts in degreaser and dry.
Next, install a new piston seal.
Lubricate everything with a special lubricant or paste. (Or just brake fluid).
And carefully insert the piston, aligning it with both hands and pressing it in.
Do not hammer the piston with a hammer or anything else. There is a high probability of damaging the seal and all the work will be in vain.
And the boot retaining ring.
We install the caliper in place and bleed the brakes.
For a logical conclusion, I put a rubber ring from the nozzle on the grease fitting so that the threads do not become clogged with dirt.
Source
Procedure for replacing the front brake cylinder on a VAZ 2110-2112
To show the entire repair process more clearly, watch the video I recorded for this topic:
Video instruction
The video was made using the example of a VAZ 2110 car and is equally suitable for both 2111 and 2112. The only way the car parts may differ externally is the brake discs: ventilated or not, as well as their sizes.
Photo report
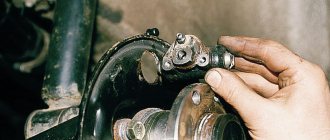
First of all, we will need to remove the front wheel of the car, after first lifting the car with a jack. After this, using a hexagon, you need to unscrew the two bolts securing the caliper bracket.
Now you can remove the bracket and remove the pads:
Then you can rip off the brake hose with a wrench, but you don’t have to unscrew it completely.
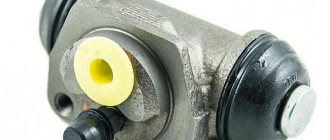
Which cylinder is best to buy for replacement?
Rear brake cylinder from Kraft.
If you definitely decide for yourself that you will not go to a service station for repairs, then the spare part necessary for repairs will need to be purchased at a car store. Since spare parts for domestic cars are inexpensive, there will be no problems when purchasing.
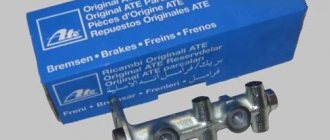
When purchasing, you can buy both the original, which has the article number 21050-3502040-00, and a “non-original” from another company. Unlike spare parts for foreign cars, where the original spare part is always better, the situation with spare parts for VAZ is the opposite. It often happens that non-original spare parts turn out to be of higher quality than the original.
Procedure for replacing the front brake cylinder on a VAZ 2110-2112
To show the entire repair process more clearly, watch the video I recorded for this topic:
Video instruction
The video was made using the example of a VAZ 2110 car and is equally suitable for both 2111 and 2112. The only way the car parts may differ externally is the brake discs: ventilated or not, as well as their sizes.
Photo report
First of all, we will need to remove the front wheel of the car, after first lifting the car with a jack. After this, using a hexagon, you need to unscrew the two bolts securing the caliper bracket.
Now you can remove the bracket and remove the pads:
Then you can rip off the brake hose with a wrench, but you don’t have to unscrew it completely.
Next, we unscrew two more bolts securing the cylinder to the caliper, having previously bent the two locking plates under them using a screwdriver.
And we move the cylinder to the side, since nothing else holds it.
The hose can now be unscrewed completely by turning the brake cylinder itself several times counterclockwise.
A new front one costs about 500 rubles, so this price is quite acceptable. But the assembled caliper already costs about 2,000 rubles, which is already significant if you suddenly have to change the entire assembly. Installation of this part occurs in the reverse order.
Have you ever wondered what exactly your safety on the road depends on? You can, of course, refer to other road users or the condition of the roads. But it will be much more relevant to talk about the technical side of the issue. The hero of our today's article on the VAZ 2110 is the caliper.
An incredibly simple mechanism in design and operation, at the same time it is an extremely important part of your VAZ car. A properly functioning caliper can give you those precious few meters of braking distance in reserve, which can protect you from a terrible disaster or damage to your vehicle.
Not every motorist knows how to properly monitor and maintain the brake mechanism, has a vague idea of how to dismantle it and, perhaps, will generally look at his interlocutor with a blank look when mentioning a certain VAZ caliper. But servicing this element of the brake system is quite simple and does not require much effort.
On the road you should not rely on the Almighty. Therefore, if you feel that something is wrong with the braking distance of the car, it is better to take the initiative into your own hands. Arm yourself with a modest arsenal of locksmith tools, consisting of a small number of open-end and socket wrenches, as well as a certain amount of theoretical knowledge - get down to business.
Installation
Installation of the new element is carried out in the reverse order. Before installation, you need to thoroughly clean the brake mechanism from dirt using sandpaper. Degrease the seat with white spirit.
So, first you need to open the hood and add brake fluid to the maximum level. It is not recommended to mix different classes of products. Cars of the “tenth” family are filled with RosDot-4 class fluid. Please note that during pumping the level in the tank will drop. As soon as it drops 1.5 centimeters, you need to top it up again. Next we need an assistant. He will press the brake pedal at your command. So, unscrew the cap from the bleeder fitting and put the hose on it. We put its second end into a plastic bottle. We give the command to the assistant. He must press the pedal 5 times and at the last stage press it “to the floor”. At this time, you will observe how aired liquid flows out of the fitting.
Main causes of malfunction
The VAZ 2110 caliper is structurally an element that holds the brake pads and is responsible for the degree of their pressure on the brake discs. It is also responsible for uniform wear of the brake pads and guarantees the driver reliable braking in extreme situations. Thus, the importance of the caliper in the operation of the car is difficult to overestimate.
If by this time you have a completely reasonable question, what can happen to the caliper on a VAZ 2110 (2112), we will be happy to answer you. The main cause of malfunctions is “acidification” of the moving elements, coating them with an oxide film, clogging due to the destruction of protective boots or the use of improper lubricant, namely:
- acidification of the main piston mechanism;
- acidification of guides.
A clear sign of problems that the caliper can cause on VAZ cars is uneven wear of the brake pads and an increased braking distance. In this case, the VAZ pads must be changed, and the caliper mechanism itself must be subjected to comprehensive diagnostics:
- check the condition of the piston, its degree of freedom, the presence of moisture, metal oxide, oxide formations and build-ups, the condition of the protective boots;
- Similarly, check the condition of the guides, make sure that there are no uncharacteristic scuffs, abrasions or deformations of the rod on the surface.
We must also not forget about regularly replacing the brake fluid in the system. This should be done approximately every 40 thousand km. mileage of VAZ-2110.
Since brake fluid is hygroscopic, it easily absorbs moisture, thereby oxidizing the piston mechanism and causing it to fail. The piston stroke becomes difficult and uneven wear of the brake pads and wheel wedge occurs.
Do-it-yourself dismantling of the caliper on a VAZ-2110
The very simple design of the product and the triviality of the process of dismantling it allow even a novice motorist to carry out repairs and maintenance. If you carefully follow the recommendations below, you are unlikely to encounter difficulties at any stage of the process. You will save a lot of money spent on a trip to a service station, and a considerable amount of time, because the service time is comparable to the time required to travel to the workshop.
The sequence for dismantling the product is as follows:
- The first step is to jack up the car and remove the wheel. To be on the safe side, it can then be placed under the bottom of the car in case the jack fails;
- On a VAZ 2112, the caliper is attached to the bracket using two M17 bolts, which you should unscrew. Penetrating lubricant may be needed to strip the bolts;
- If you need to replace the VAZ caliper or carry out a comprehensive repair, unscrew the product from the brake hose. You seal the hose tip and you can begin further disassembling the product.
VAZ-2110 caliper maintenance and repairs
It is mandatory to service the VAZ caliper after each replacement of brake pads, as well as in the event of a forced inspection due to its malfunction, for which it is first necessary to check the condition of all rubber elements, shock absorbers and anthers. It is also imperative to replace the grease for the caliper guides. You need a good synthetic based silicone lubricant that can withstand high temperatures.
To remove the piston from its seat, it is necessary to create the appropriate force using an air compressor (pistons are repaired one at a time, the stroke of the second is blocked, for example, by a wooden block). With the same success, when removing the product from the car, you can press the brake pedal without disconnecting the VAZ 2112 caliper from the brake hose. It is advisable to use a rubber adapter in order to absorb the sharp impact of the freely moving piston and its “shot”.
The piston is pushed back using a special clamp. In this case, the boot should be bent to compensate for excess air pressure. The hole for the piston and for the guides are cleaned and washed with carburetor cleaning fluid, all gaskets, boots and seats are also thoroughly lubricated.