Print this article Font size 16
Before we talk about replacing the device, you should first understand its essence. What is this master brake cylinder?
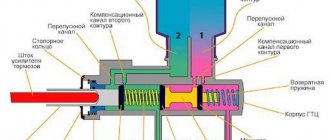
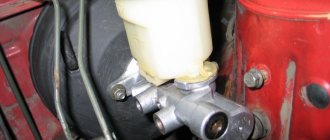
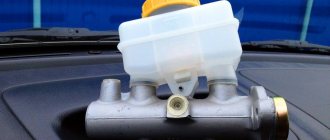
This is a very important element of the car's braking system. Its main task is to convert the force applied to the brake pedal into pressure within the braking system.
Most often, a malfunction of the gas turbine engine can be determined by several signs:
- Depressurization of the device;
- Breakage of seals;
- Deterioration in braking performance.
Replacing the master and working brake cylinders on VAZ cars
The effectiveness of a car's brakes depends on the condition of all its elements, and if there are any signs of malfunction in the brake system, repairs must be made.
Replacing a brake cylinder is a simple job, but extremely important; driving with faulty brakes is strictly prohibited. Diagnostics and repair of the brake system (TS) must be carried out in a timely manner; traffic safety depends on the serviceability of the brakes.
Which brake brake should I choose?
The modern market is full of different types of rear brake cylinders, so when buying this element, it is not easy to make a choice. Numerous reviews on the Internet will help us with this. Having studied the content on this topic, we came to the following conclusion: By and large, all brake cylinders in the same price category have the same quality, but the rear brake cylinder from ATE turned out to be the highest quality and most desirable. Our Basalt, which is one of the best domestic manufacturers of these products, does not lag behind.
It’s only recently that I started making quality products. The Belarusian company fenox, whose products are, to put it mildly, “unreliable,” even wanted to buy it, but they couldn’t buy it. The products also perform well.
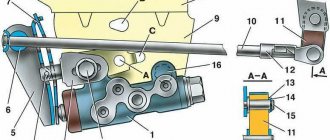
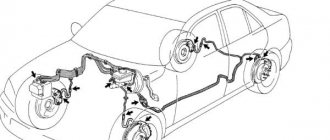
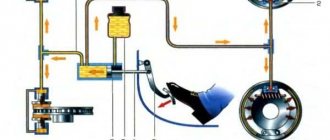
The device of the VAZ brake system
The brake system of Togliatti-made cars is quite simple; the vehicle consists of the following main parts:
- pedals, which are pressed to achieve braking;
- brake master cylinder (MBC), it transmits the force of pressing the pedal through hydraulics to the working cylinders, respectively, to the wheels. GTZ VAZ - dual-circuit, the circuits are divided to transmit fluid pressure to the front and rear wheels;
- a vacuum booster that makes it easier to press the pedal;
- tubes that connect the elements of the vehicle;
- brake working cylinders (RTC);
- pads (drums) and discs;
- brake distributor (pressure regulator).
When you press the brake pedal, the piston in the brake fluid compressor compresses the brake fluid and transmits its pressure to the brake pedal. The pistons of the working cylinders are expanded under the influence of hydraulics, moving the pads towards the discs or drums. The movement of the wheels slows down, and thus the car slows down.
Symptoms of a GTZ malfunction
When the device fails, the driver may notice the following signs:
- Reduced efficiency when braking.
- Depressurization of the brake system.
- Wear of seals.
You can check the performance of the master cylinder in a simple way - with the engine off, you need to hold down the brake pedal. After this, the VAZ 2114 should be started, leaving your foot on the pedal. If it fails, then the system is working properly. In another case, diagnostics and sometimes restoration of the tightness of the connection are required. Of course, you can use a repair kit, but then the parts will wear unevenly. The best solution would be to completely replace the unit.
IMPORTANT! Malfunctions of the master cylinder can also negatively affect the operation of the power plant. This manifests itself in a decrease in dynamics, fluid leaks, and also in a decrease in acceleration. In this case, experienced motorists clamp the vacuum hose while the engine is running. If after this there are signs, then it is necessary to change the brake booster.
Malfunctions occurring in the brakes
From time to time, various malfunctions occur in the vehicle, and the working and master cylinders also often fail. The following breakdowns occur at the RTC:
- the piston gets stuck in one of the positions;
- the inner surface wears out;
- The sealing cuffs fail (tear or swell).
The main sign of a faulty condition is the appearance of smudges (leaks) of brake fluid (FL) from the RTC. If the pads are worn down to bare metal, the pistons in the RTC extend too far, and as a result, the brake fluid may leak and the brakes will fail.
In the GTZ, the piston can also jam, the internal cavity of the mechanism can wear out or rust, and the cuffs can leak. Symptoms of a GTZ malfunction are as follows:
- when braking, the brake pedal (BP) “fails”, the effectiveness of pressing disappears, this usually happens when there is a small leak from the turbocharger;
- braking occurs at the very end of the pedal stroke, and you have to press the PT several times to brake;
- there are no brakes on the front or rear wheels, this happens if one of the GTZ circuits does not work.
You cannot drive with faulty working and master brake cylinders; the parts should be replaced immediately.
FAULTS
Symptoms of a malfunctioning TTS:
- The brake fluid leaves the reservoir;
- The rear drum is wet, fluid leakage is noticeable;
- The braking efficiency has disappeared, the pedal “takes” at the very end of the stroke, sometimes not from the first stroke.
Reasons for inoperability:
- Natural wear and tear;
- The cuffs are corroded due to mixing different types of brake fluid;
- Poor quality of the part;
- The pistons were squeezed out due to severe wear on the pads.
It happens that the pistons inside the housing become jammed. If this happens with the pistons spread apart, the car begins to constantly slow down and the drum overheats. You cannot drive with such a defect; the car must be urgently repaired.
There is one nuance that is worth focusing on. Often, when bleeding the brakes, technicians try to unscrew the bleeder fitting on the cylinder and break off. Even WD-40 doesn't help. This happens due to the fact that over time, the “pumping” begins to boil in the ZTC body. Therefore, before bleeding the brakes, you should have a supply of new replacement parts.
There is also a tricky way that will help you avoid breaking off the fitting. Before unscrewing, you must carefully (do not break the fitting with a hammer!), but thoroughly tap the housing around the bleeder fitting and try to move it out of place.
After this, without using much effort, we try to weaken the “pumping”. Doesn't work? Then tap again. Most likely, patience will be rewarded, and problems associated with unscheduled cylinder replacement will not arise.
Replacing the master brake cylinder
Replacing the GTZ on VAZ classic cars (2101-07) is not difficult; you can do this work yourself. To perform such an operation you will need the following tool:
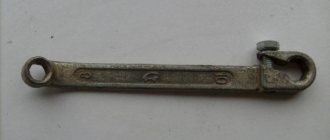
- 10mm wrench (or special bleeder wrench);
- Phillips screwdriver;
- combination wrench for 13 (you can additionally use a head with a knob and a ratchet for convenience).
It is not necessary to use a pit or a lift to perform the work; replacement can be done outside in dry weather or in the garage. The work should be performed in the following sequence:
- unscrew the three brake pipes from the bottom of the device (key for ten);
- loosen the clamps of the two hoses (at the bottom of the GTZ), pull off the hoses;
- unscrew the two nuts securing the GTZ to the vacuum booster (you need a 13mm wrench or a socket with a wrench);
- We dismantle the part, install the new gas turbine unit in place, and reassemble it.
After the operation, you should add fluid to the vehicle reservoir, then be sure to bleed the brakes well.
The process of replacing the turbocharger and brake fluid
When the tools, new mechanism and fluid are prepared, you can begin dismantling the old VAZ 2114 spare part:
- The first step is to disconnect the negative terminal from the battery. Replacing the master cylinder involves completely removing the old brake fluid - this is best done with a syringe;
The brake fluid level sensor must be removed - Next you need to unscrew the tubes. It is recommended to support them with a rag to prevent any remaining liquid from getting onto other parts of the car;
- In mating, if the thread does not yield, apply lubricant to the master cylinder connection and leave for 2 minutes. After this, you can remove the thread with the 10th key;
Advice! When assembling the system, motorists often confuse brake pipes. To make your work easier, it is recommended to sign them with a marker. This applies to any parts in the VAZ 2114 car.
- Once the threads have been removed, dismantling the main unit can begin. Using the “18” socket, you need to remove the nuts that attach the main cylinder to the amplifier;
Unscrew the marked fasteners - The next step is to replace the cylinder along with the tank (the entire assembly must be replaced). After this, all parts must be returned to their places. Also, do not forget about new fluid, which should be poured into the tank. The replacement takes place quite quickly if two people are involved in installing the tank. The assistant’s task is as follows: he presses the corresponding pedal until the remaining liquid comes out of the system holes.
By unscrewing the nuts, the cylinder can be removed along with the tank
The vacuum booster may also need to be replaced. In this case, remove the fitting and turn the main unit to the side. After this, you need to unscrew the hose and go into the interior of the VAZ 2114 car, where the pin locking bracket is located. After removing all the fasteners, you can install a new fluid pressure booster.
Replacing brake cylinder 2114
The work of replacing the GTZ on VAZ 2108-15 models is carried out approximately the same way, there are only some design differences.
We make the replacement as follows (using the example of the VAZ-2114):
- Unscrew the four tubes on the sides (two on the left and two on the right). It is better to use a special pipe wrench; you can roll up the edges of the nuts with an open-end wrench;
- unscrew two thirteen nuts securing the GTZ to the “vacuum”;
- We remove the old spare part and install a new one, not forgetting to bleed the brakes at the end of the work. At this point, the replacement of cylinder 2114 can be considered complete.
If in the GTZ 2114 the inner surface of the cylinder itself is not yet worn out, you can replace the insides of the mechanism by installing a new repair kit. The repair kit consists of four cuffs:
- three cuffs are the same, they are the same as on models 2101-07;
- one o-ring 2108.
Changing the repair kit is very simple:
- pour the liquid out of the GTZ;
- dismantle the plastic tank;
- unscrew the front stopper (made in the form of a plug);
- we take out all the contents (pistons, o-rings, springs), change the cuffs, and install the entire mechanism in the reverse order. Nothing should be mixed up here, otherwise the unit being repaired will not work.
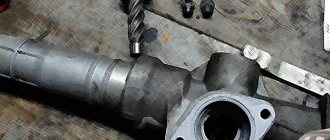
Repairing the GTZ on VAZ models is not always advisable - if the mirror surface inside the mechanism is worn out, replacing the brake cylinder repair kit will not solve the problem, the GTZ will also leak. Most often, on VAZ cars, the entire master brake cylinder is replaced - a new assembled part costs around one thousand rubles, and the repair turns out to be unjustified.
Lada 2114 2012 - self-repair
Comments 7
Participate in the discussion can only registered users.
Like brake fluid, tell me =) There is a difference between taking a cheap one and yet one that is more expensive.
This is a very abstract question. You can't feel the difference with your feet. I only took it because of the brand. And her color is not the same as everyone else's. Definitely not a fake.
This is why I asked Mish, the front brake hoses were changed and at that moment we bought the fluid from the common people (turtle-antifreeze synthesis), the fluid was replaced not so long ago, but became dark. It was bought in a hurry without any problems, the main thing is that Dot4, but The manufacturer makes no difference. Now I’m thinking of changing the hoses in a circle and filling in something more solid.
This one doesn't seem to get dark. Most likely your new one is mixed with the old one. Buy Castrol. Bleed the entire system and everything will be ok
Replacing brake cylinder 2107
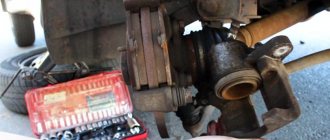
If the replacement operation on a VAZ classic is not performed on a car lift, it is more convenient to do the work sequentially - first on one side, then on the other side of the rear wheel. To perform the work, the vehicle must be placed on a level surface, then proceed as follows:
- We turn off the engine, set the car to speed, and put chocks under the front wheels. Don’t forget to fully release the handbrake;
- loosen the wheel nuts of the rear wheel, jack up the car and remove the wheel;
- To prevent the car from going anywhere, it is advisable to place a “tragus” next to the jack;
- remove the brake drum - use a 12 mm combination wrench to unscrew the two guides;
- the drum usually comes off tightly, so it should be tapped from behind with a hammer through a piece of wood. You cannot hit the part with an iron hammer; the drum can split;
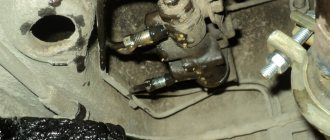
- unscrew the brake pipe from behind the cylinder, also 2 ten bolts securing the RTC itself;
- pull out the cylinder, freeing it from the pads;
- We install the part prepared for replacement (it is important to get the pads into the slots on the RTC pistons, we fasten all the removed parts in their places;
After the work has been done, it is necessary to top up the fuel injection system reservoir and bleed the brakes.
Replacing the brake cylinder VAZ 2109
The RTC on the rear axle of the 2109 wheels is changed according to the same principle as on the VAZ classic; the wheel and drum are also removed, the tube and two cylinder fastenings are unscrewed with a ten key. It often happens that the tube and RTC bolts on the support disk boil; to remove them carefully, you need to spray the connections with WD-40, and wait 15-20 minutes before unscrewing. The brake pipe nut will be easier to unscrew if you gently tap the metal around it with a hammer. When tapping, it is important not to break the bleeder fitting.
Replacing brake cylinder 2109 is not a difficult task, and many drivers can do this work themselves.
Required Tools
In order to replace the brake cylinder you will need the following tools:
- wheel wrench;
- jack;
- WD-40;
- socket wrench 10;
- a device for unscrewing fittings if necessary;
- metal brush;
- rags;
- pliers;
- a screwdriver or pin for tensioning the springs.
Before starting all types of work, be sure to provide a place for laying out all spare parts; when removing them, it is advisable to remember the sequence and methods of removing them. This will make the reverse process much easier. In addition, before such a procedure, it is advisable to stock up on a set of brake pads, because they still need to be changed every year depending on the intensity of driving. And besides, they don't cost that much. So, having everything listed in our arsenal, let's get to work.
Replacing the front brake cylinder
The following calipers are installed on the front wheels of VAZ cars:
- in a VAZ classic car, two front brake cylinders (FTC) are attached to the caliper brackets;
- on VAZ 2108-15 models, one PTC is installed on each side of the front axle.
Replacing the front cylinder 2109 is not difficult, it is also easy to do yourself:
- we put the car on a flat area (the work can be done without a pit and a lift), we put tackles under the rear wheels;
- jack up the car, take off the front wheel;
- unscrew the two caliper fasteners with a hexagon;
- loosen the brake hose nut;
- bend the locking washers on the upper and lower bolts, unscrew the cylinder fastenings to the caliper bracket
- we move the PTC to the side along with the bracket;
- disconnect the cylinder from the bracket, then from the hose so that the brake fluid does not leak; after disconnecting the PTC, it is better to immediately direct the hose upward;
- we install another, new spare part, and perform the assembly.
What is a brake cylinder and what is its working principle?
The brake cylinder is one of the main elements of the brake system. The rear brake cylinder body is made of alloy. Do not confuse the rear brake cylinder with the master cylinder. The main brake cylinder is designed to convert brake fluid pressure into fluid pressure, and the rear brake cylinder on the wheel is designed to convert brake fluid pressure into brake pressure on the pad. In other words, the rear brake cylinder presses on the pads, thereby stopping the car.
Replacing the brake cylinder cuff
If desired, on VAZ cars you can not change the entire rear working cylinders, but only replace the cuffs. To do this, you need to disassemble the RTC - remove the pistons and spring, remove the old cuffs from the pistons and install new ones. It is advisable to repair the RTC only if the cylinders did not last long, but they began to leak. The thing is that on VAZ cars the RTCs are very inexpensive, it is advisable to change the rear cylinders as a whole - replacing the cuffs is often unjustified.
Correct repair kit for VAZ 2114
Why is it correct, how can a repair kit be wrong? Maybe. Manufacturers of rubber products often assemble sets of gaskets, seals and cuffs according to a principle that only they understand. So, a repair kit for a brake cylinder can contain a dozen plugs, seals and other rubber bands that have nothing to do with the cylinder. And although their price is relatively low, there is still no point in buying a bunch of rubbish for the sake of a few cuffs.
The repair kit for the VAZ 2114 costs about 40 rubles, and includes:
- three pieces of o-rings with index 2101-350-2051;
- brake seal 2108 3505033r.
If the working surface of the cylinder is in order and has no corrosion or severe scratches, then the replacement takes place within half an hour along with bleeding the brakes.
Leveling up
After replacing any cylinder in the vehicle, it is necessary to bleed the brakes. Bleeding on any car always begins with the furthest wheel from the GTZ. On all VAZ cars, first of all, they start pumping the brakes from the rear right wheel, then move to the rear left, right front, and the front left wheel is pumped last. If the brake pedal takes at the very end or is hard, bleeding should be repeated, the work should be done according to the same scheme again.
Lada 2114 No comments › Logbook › Replacing the GTZ VAZ 2114
I have one problem here. Namely. In traffic jams. especially at ambient temperatures above 20*C, the brake pedal became soft. And not all the time, but somehow spontaneously. You're stuck in a traffic jam. Once you start, you stop, everything seems ok. The car is slowing down. And during the next braking, the pedal goes almost to the floor. The first time I almost didn’t catch up with the car. The jeep was kind of expensive, but in a panic I didn’t even remember the details. It all happened on the street. Mayakovsky at the traffic light in front of Ave. Cosmonauts. Locals know that there is a slight descent towards the avenue. So here it is. I’m standing there, not touching anyone. Cork. The light turned green. I need to turn right, towards the street. Artinskaya. Let's get moving. I had almost entered the avenue, and then those driving ahead began to slow down. Me too, accordingly. And suddenly the pedal goes to the floor. Fortunately, the speed is low, and I always try to keep my distance. The handbrake saved the day. I stopped and tried to pump the pedal, to no avail. We started moving, and oh, the brakes appeared, and most importantly, there were no more failures until work. I came to work. First of all, I checked the tightness of the entire system, there were no leaks anywhere, everything was dry, like in the Sahara. In the evening, a little afraid, I got home. I read the forums. On one I found a suggestion that the reason for this behavior of the GTZ could be its bypass. Apparently, somewhere, something inside is flowing without creating the proper pressure. And somehow I calmed down and rode with such a malfunction for as much as 2 months. I confess, this is impossible, but there was no time at all. And even with a soft pedal, if you pressed it to the floor, the car still slowed down. And then the day came when I was finally going to change the GTZ. I went to the store in the morning and bought: - GTZ VAZ 21080-3505006-00 with a tank Price 1050 rubles—Brake fluid Castrol Brake Fluid DOT4 Price 420 rubles
Fortunately, I have experience, I’ve already changed it on 2 machines. Remove and put on for 20 minutes. The biggest problem is pumping. But my brother and I dealt with this problem in an hour. By the way, here is a reminder in what sequence you need to bleed the brakes: 1) rear right2) front left3) rear left4) front right
Thanks everyone and good luck
Price: 1,470 ₽ Mileage: 42,000 km
Like 48 Subscribe
Some tips
- If you start having problems with the brakes, first of all you need to carry out an external inspection of the vehicle: check the fluid level in the reservoir, make sure that the front/rear cylinders are not leaking. There should not even be stains of brake fluid in the brake hydraulics.
- “Brake fluid” must be filled with the same brand; it is recommended to completely replace the brake fluid at least once every two years.
- If faults are identified in the gas turbine engine, and it has already served for at least a year, it is more advisable to replace it completely than to repair it. The same can be said about the rear working cylinders.
- Before changing the turbocharger, the brake fluid should be removed from it; this operation is usually done using a syringe.
- Usually a leak in the master cylinder is not visible, but if there is any suspicion that this part is faulty, you should remove the main cylinder - there will be traces of leaks at the rear, and this indicates its faulty condition.
- If, during an external inspection, cracks were found on the brake hoses, it is better not to take risks and immediately replace the defective parts.
Didn't find the information you are looking for? on our forum.
Expert advice
- Before installing the parts, it is advisable to wipe them with alcohol and wipe them with a rag.
- It is undesirable to allow parts to come into contact with fuels and lubricants, as they corrode the seals.
- After replacing the turbocharger, it is imperative to bleed the hydraulic brakes, since without bleeding the system, air will remain in it, which will negatively affect the operation of the car.
- If the O-rings are in good condition, they should still be replaced during removal.
The most common cause of failure of the turbocharger is brake fluid leakage. In order to find and eliminate it in a timely manner, it is necessary to periodically monitor the joint of the brake cylinder.