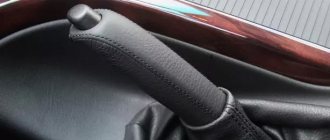
Adjusting the handbrake cable on the LADA “Granta”
To carry out the work, access to the cable from the bottom is necessary, so the adjustment of the Grant handbrake cable after replacement is carried out while the muffler heat shield has not yet been put in place. Next you should do the following:
- lower the handbrake lever all the way;
- loosen the locknut on the adjusting device (if it is tightened);
- screw the adjusting nut onto the cable shank until the latter is tensioned;
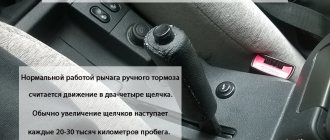
- make sure that the free play of the lever in the cabin is from 2 to 4 clicks;
- if necessary, adjust the cable tension;
- tighten the locknut while holding the adjusting nut with a wrench;
- Install a muffler heat shield.
When the handbrake cable is adjusted, you can check the car while driving.
The parking (hand) brake in a car is one of the important parts of the safety system. In extreme situations or during traffic accidents, the handbrake can save the health and even the life of the driver, passengers or pedestrians. This is why the handbrake system must always be maintained in perfect condition and ensure that the parking brake is always in full working order.
To do this, you should regularly tighten it, or, more precisely, adjust it, because there are cases when, for the purpose of adjustment, sometimes it is necessary not only to tighten, but also to loosen the handbrake. It is necessary to test the parking brake of the Lada Grant (VAZ-2190) for proper and uninterrupted operation when there are even the slightest complaints about its functioning.
adjustment + photo and video
Incorrect operation of the handbrake can cause an accident or some other serious incident.
Introduction
For example, even with the simplest job of replacing a broken tire, you must put the car on the handbrake, otherwise you risk “putting” the car on the bumper as a result of the car “driving” forward. And this is not the worst thing that can happen! You may cause yourself serious physical harm.
Toyota BB was dropped on the asphalt
The same Toyota
Classic fell off the jack
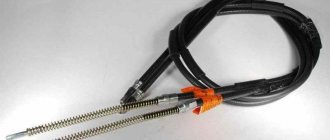
A necessary tool for tightening the handbrake.
Head 8 for ratchet
Set of keys for 13
Partner (preferably the coolest car mechanic)
- Two keys for 13. It is advisable that one of them be a socket.
- Head 8.
- A partner, but you can do without him. The truth is it’s more difficult without him.
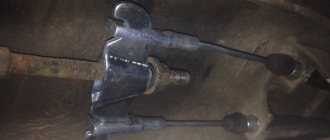
The principle of adjusting the handbrake
- Fully lower the handbrake lever in the cabin.
Lower the handbrake handle
Remove the muffler from its mounting to the body
Using a ratchet, unscrew the 4 bolts securing the protection of the handbrake adjustment mechanism (protective screen).
Remove and set aside the protective screen
Next, you can either remove the protective screen, but it seems to me that it is easier to move it forward behind the muffler, which will free up space that is enough for free work.
The mechanism looks like this
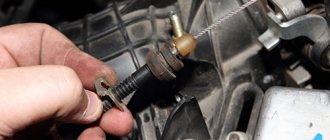
Loosen the first nut with a 13mm wrench.
By tightening the adjusting nut, tighten the handbrake cable that comes out of the passenger compartment. Ask a partner to check the stroke of the lever handle, or check it yourself. As soon as the handbrake moves 3-4 clicks, tighten the lock nut. Before the final stage of work, it is necessary to check the functionality of the brake mechanism. To do this, hang the rear wheels and watch how they rotate with the hand brake off. They also check how the wheels grip when the handbrake is raised. Next, return the protective screen to its place, screw it onto the seats and put rubber fasteners on the resonator.
Handbrake adjustment video
The principle of operation of the handbrake on Grant
Why does it need to be tightened frequently?
This is the peculiarity of the mechanism, which is why you often have to tighten the handbrake. Plus low-quality spare parts from the beginning, and a design that has not changed since the time of Tsar Pea!
How a properly configured handbrake should work
The handbrake movement in a Lada Granta car should be no more than 6 clicks from the moment it is raised. It is possible to increase the handbrake stroke to 8 clicks, but it is not recommended.
It shouldn’t be like this (the brakes don’t grab the rear wheels)
Ideally, of course, 3-4 clicks. With this setting of the handbrake, you will have a reserve of movement when the cable weakens and the wheels begin to grip later.
If you experience a situation where the handbrake is “pulled out” to its fullest extent, but the wheels do not grab, then the following reasons are possible:
- rear brake pads are worn out;
- the handbrake cable is broken or stretched/
You can fully check the correct operation of the handbrake on a hill at 23 degrees. With the handbrake lever fully raised, the car should stand still in a disengaged gear.
Lada Granta: repair, operation, tuning and maintenance
Perhaps checking the brakes of any car is the key to your safety. In my opinion, the car’s brakes need to be prevented and checked at least once every two weeks , this will make your ride comfortable and safe, which is the most important thing, but now we will talk about the brakes of the Lada Granta. So let's get started!
Take the jack in your hands, lift the rear of the car with it and remove the wheel. Then remove the brake drum and unscrew the guide pins.
Next, we loosen the handbrake cable and remove the cotter pin that holds the block, after all, pull out the lever, then remove both springs, the upper one and definitely the lower one, and then remove the blocks.
Under no circumstances should brake fluid leak. Disconnect the brake fluid supply pipe to the wheel cylinder and plug the pipe. By carrying out this procedure, you will block the access of brake fluid to the outside. Afterwards, remove the brake cylinder, we have already done the main thing. Now we put everything back in order.
First the pads, then the upper tension spring and install the lower tension spring, and of course, don’t forget to put the handbrake cable on the lever! Install the brake drum, it is advisable to clean it and lubricate it with special lubricant. It's called graphite.
After cleaning, we put it in place, then the most basic procedure is bleeding the brakes.
Bleeding the brakes.
For this you will need a partner. One person will sit in the car and press the brake 5-6 times until it hits the floor. And the second one needs to sit near the brake disc.
The second one, who sits near the brake disc, takes the key and begins to loosen the brake fluid release screw.
When you unscrew, the second one should begin to press the brake pedal; when the pedal rises, the screw will need to be tightened. And so 5-6 times.
As a result, air will escape. This will then lead to the release of brake fluid. Please note that when the liquid pours, it should be free of bubbles. When the procedure is completed, put the wheel in place.
Press the brake pedal again 2 times and try to spin the wheel, if the brake drum clings a little to the pads, everything is fine! As soon as we have pumped the front brake, we move along the diagonal to the rear brake pad, and do the same thing.
As soon as you have pumped the rear brake, you will need to switch to the front one, also diagonally, and do everything the same as we did; as soon as you have pumped the front brakes, you will need to switch to the last pumping of the rear brake.
All we can say is that we are almost done with the brakes. Next we tighten the handbrake. Use a special wrench to tighten the handbrake.
Keys are sold in all auto parts stores, so you should not have any difficulties buying a key.
That's all, I wish you good luck and stop breaking your brakes!
‹ Possible malfunctions Up Replacing brake fluid ›
Source: https://GrantaRemont.ru/content/proverka-i-regulirovka-tormozov
How to tighten the handbrake on a Grant
Step 1. It is necessary to install the car on a pit or overpass, since the adjustment unit is located under the bottom of the car.
Step 2. Determine the current travel of the parking brake lever - raise the lever all the way up and count the clicks. If there are only 2 clicks or less, then it is necessary to lengthen the drive; if there are more than 4 clicks, then shorten it.
Step 3. Raise the parking brake lever 2-3 clicks.
Step 4. Remove the cushions from the additional muffler brackets (position 1).
Step 5. Using a socket wrench, remove the four nuts that secure the shield (item 2).
Step 6. Pull the additional muffler away from the bottom, place a wooden block under it and remove the protective shield.
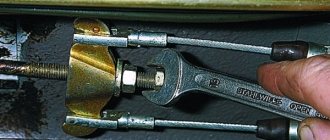
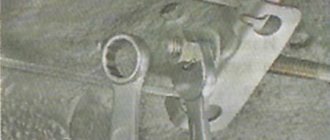
Step 7. Hold the adjusting nut with one wrench at “13” and loosen the locknut.
Step 8. We adjust the length of the drive using the adjusting nut. When turning it, the length of the drive is shortened and the handbrake is tightened; when turned away, the length increases (if you need to loosen the handbrake on a Lada Granta).
Step 9. During the adjustment process, we periodically check the handbrake movement.
Step 10. After adjusting the lever travel, you need to hang up the rear of the car and check that the wheels rotate easily when the handbrake is released and that they are securely fixed when the handbrake lever is raised.
Step 11. If the brake pads are working correctly, you can check the adjuster and secure the protective shield and additional muffler in place.
Removing elements of the Lada Granta parking brake system
Tools:
- Ratchet wrench
- 10 mm high head
- 13 mm head
- Open-end wrench 10 mm
- Open-end wrench 13 mm
- 7 mm straight box spanner
- Jack
- Wheel key
- Adjustable stands
- Hammer medium
- Mounting blade
- Medium flat screwdriver
- Electric drill
- Tap M4-M6
- Rod (or knob for end attachment)
- Medium Phillips screwdriver
Parts and consumables:
- Metal pipe: length 300 mm, diameter 15-16 mm
- Aerosol lubricant type WD-40
Notes:
Replace the parking brake cables if they are broken, pulled out, or stuck inside the sheaths, and when adjusting the parking brake cannot keep the vehicle stationary on a slope of up to 23% inclusive. Remove the parking brake lever to replace it or to replace the lever linkage. The cables should be replaced simultaneously - left and right. Carry out the work on an inspection ditch or overpass. The operations for replacing the cables are similar, only when replacing the right cable you do not need to remove the heat shield of the fuel tank.
Removing the parking brake cables
1. Remove the rear heat shield for the auxiliary muffler and remove the locknut and adjusting nut from the parking brake linkage as described in this article.
2. Remove the cable equalizer from the parking brake lever rod.
3. Remove the front cable ends from the equalizer and remove it.
4. Then remove the end of the left cable sheath from the bracket.
5. Disconnect the left rear cable end from the parking brake lever as described in this article.
6. Remove the end of the cable from the hole in the brake shield.
7. Using a 10 mm wrench, unscrew the nut and remove the bracket securing the cable sheath to the rear suspension beam.
8. Remove the cable sheath from the holder on the rear suspension beam mounting bracket.
9. Using a screwdriver, bend the cable mounting bracket on the body and remove the cable from the bracket.
10. Remove the fuel tank heat shield (to remove the left cable) as described in this article.
11. Remove the cable from the holder on the body.
12. Pull the left parking brake cable out from behind the fuel line shield.
13. Install the cables in the following order: mount one of the cables in reverse order and insert its front end into the cable equalizer.
14. Insert the parking brake lever rod into the hole in the equalizer and tighten the adjusting nut several turns.
Note:
To install another cable, we recommend making a device from a metal tube about 300 mm long and a hole with a diameter of 15-16 mm. At one end of the tube, drill a hole and cut a thread in it for a screw (M4-M6).
15. Secure the cable in the holders on the body and the rear suspension beam mounting bracket.
16. Place the tube onto the rear end of the cable and secure the cable sheath to the end with a screw.
17. Use a rod (you can use a wrench from a set of socket heads) to press on the tip of the cable, compressing its spring. In this case, the front end of the cable will come out of the sheath and can be inserted into the equalizer.
18. Carry out further installation of the cable in the reverse order.
19. After replacing the cables, adjust the parking brake.
Removing the parking brake lever
1. To remove the parking brake lever, remove the locknut and adjusting nut from the parking brake lever rod as described in this article.
2. Remove the cable equalizer from the parking brake lever rod (see above).
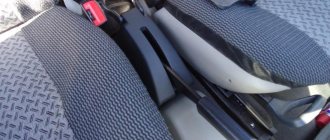
3. Inside the car, use a Phillips screwdriver to unscrew the three self-tapping screws and remove the parking brake lever trim.
4. Using a Phillips screwdriver, unscrew the self-tapping screw and remove the parking brake warning switch.
5. Disconnect the wiring harness from the parking brake warning switch.
6. Using a 13 mm socket, remove the two bolts securing the parking brake lever bracket to the floor tunnel.
7. Remove the parking brake warning switch bracket.
Causes of malfunction and their elimination
As a rule, the reasons why the handbrake does not work are quite simple and do not require long or expensive repairs:
- torn cable. One of the common causes is a broken cable on the handbrake or under the car. The problem is solved by simply replacing the cable;
- jammed cable. Due to damage to the sheath in which the cable moves, it may become jammed, preventing you from using the handbrake. And the cable itself consists of many steel strands, which, if damaged, can also prevent proper operation. The solution is to replace the cable;
- dirty brakes. If dust, dirt, ice or reagents that are sprinkled on roads in winter get on the pads, this can cause the brakes to not work properly. The solution is to press the brake pedal several times smoothly while the car is moving. Thanks to friction, the pads will be cleaned;
- incorrect adjustment. It may happen that the cable system is not adjusted properly, the bolt is not tightened correctly, or the length of the cables is incorrectly selected. The solution is to adjust the system and correct tension of the cables;
- pad wear. The pads are subject to abrasion during operation. Every time you apply the brakes, the pads gradually become unusable. The solution is to replace the pads;
- oil in the pads. Oil or brake fluid leaks can cause the car to not hold up with the handbrake. The most important thing in this case is to identify the cause of the leak - it could be the rear axle seal or the brake cylinder. The solution is to eliminate the leak and clean the pads. If the pads are very oily, replace them.
New Lada: Stalls when the revs are reduced, when starting off when cold.
Adjusting the parking brake (handbrake).LADA Granta – Fun – watch video
4 years ago
In the video I will show you how to change the front pads, brake discs and calipers yourself.
2 weeks ago
The dealer sold the damaged car as if it were new Prices for the Lada Kalina Cross on Avto.ru – https://goo.gl/BRZ31U – My website – https://avtokriminalist.ru/ – Offer a car for review – The Lada Kalina car was purchased a year ago from an official dealer.
A year later, the owner decided to sell the car and found out that under the guise of a new car, a car dealership had sold him a damaged and repaired car. Comprehensive vehicle inspection and diagnostics. Checking the body, engine and mileage.
Autocriminalist Maxim Shelkov – Car diagnostics before purchase – Checking the car with a visit to the car – Selection of a car to order – Examination of license plates: VIN, body, frame, engine – Checking car documents
4 weeks ago
All details about the car for subscribers: https://www.youtube.com/watch?v=wMgCGHoCqLM Win a car with tuning - https://l.tinkoff.ru/academegcar Management competition “Leaders of Russia”: https://leaders of Russia .rf Many thanks to Boryan and Fedya from LOW CARS MEET, an insider from this filming will soon be released on their channel: https://www.youtube.
com/channel/UCDcdwoIrn2M1mwfEz0NCODg Music: Clams Casino – All I Need What So Not – Touched GooMar – Moscow DROELOE – BACKBONE (feat. Nevve) Hucci – Vision (feat. Dom Sebastian) iBenji & Moon-Sun – Horny devianprod. – drowninginthissea For advertising and cooperation issues: My stream channel: https://www.
youtube.com/c/AcademeGDailyStream Instagram: https://instagram.com/academeg Vkontakte: https://vk.com/AcademeG AcademeG true original groups: https://vk.com/academeg_reviews Ftaroy channel: https:// www.youtube.com/user/AcademeG2ndCH Souvenirs Academeg Store: https://vk.cc/5UNsQJ Auto chemical goods A-PROVED: https://a-proved.
ru #ZIL600SIL #porsche
9 months ago
How to make the car interior quieter https://www.youtube.com/watch?v=wbmNTwACDE8 Oil additive tests https://www.youtube.com/watch?v=fVCxsP71BII My 2nd channel https://www.youtube. com/channel/UC6rJlbPrc07AnG4BYlciPoA Excellent DVR https://ali.pub/204pb1 Continuation of this video https://www.youtube.com/watch?v=Uu1YUAAxRsY
2 years ago
Adjusting the handbrake cable on a VAZ 2114-2115 Since the rear drums and pads tend to wear out, over time the effectiveness of the handbrake decreases and you have to tighten it more and more.
Ultimately, even with the lever at maximum tension, the rear wheels do not lock to the required moment, and you need to resort to adjusting the mechanism. To perform this work on a VAZ 2114-2115 you will need only two 13mm wrenches, one can be a regular one, and the second is convenient to use a ratchet, since there is quite a bit of space for turning the nut.
So, it is most convenient to perform this work in a pit, or with the rear of the car strongly raised with a jack. The first step is to find the adjustment mechanism itself. It is located under the bottom of the car closer to its rear: Now, while holding one nut with a wrench, the second must be tightened until the handbrake efficiency becomes normal.
Some owners check the operation while driving by lifting the lever and making sure that the wheels are completely locked.
3 years ago
Video for those who are planning to buy a Grant with low (or high) mileage and what it looks like after 2 years of operation and 33,000 km. Due to numerous requests and questions about the learnable flip key and temperature indicator - I took it here https://rd-lab.shop
1 month ago
AUTOLIFE HACKS. tips for motorists Download
Self-adjusting hand brake
If you have prepared everything you need to make the adjustment, you can proceed. To begin, make it possible to work under the machine by placing it above the inspection hole. If there is none, use a jack to raise the rear of the car. Next, follow the instructions in which we will tell you how to tighten the handbrake on a Grant to get a result no worse than that of a service station master. So, the process of setting the optimal cable tension is as follows:
To tighten the handbrake cables, you must place the car above the inspection hole
- First, climb inside the vehicle to set the parking brake lever to its full operating position - this will allow you to determine what the result of the adjustment should be. If the lever rises by less than two clicks, then measures should be taken to increase the length of the drive. Although most often it is necessary to shorten it, since due to wear of the pads and stretching of the cable, the number of clicks only increases over time. It is necessary to lengthen the drive only after installing new brake pads.
- Fully lower the handbrake lever and move under the car to remove the cushions from the brackets of the additional muffler.
- Next, using a socket wrench, unscrew the four nuts that hold the protective shield in place.
- Now prepare a wooden block to place it between the muffler pipe and the bottom (you will have to pull it back for this) - this way you can remove the protective screen, which will free up space for work.
- Use a 13mm wrench to loosen the locknut while holding the adjusting nut with a second wrench.
- In order to tighten the handbrake drive, screw in the adjusting nut, and to lengthen it, on the contrary, this nut should be unscrewed. When tightening, it is necessary to check the travel of the handbrake lever.
This is how the Lada Granta's handbrake is adjusted, but the work does not end there. After all, it is necessary to check whether the result meets the current requirements. To do this, you need to lift the car using a lift or hang its rear wheels using a jack. Now, use your hand to turn each wheel and make sure that when the handbrake lever is lowered, the wheels rotate freely. If this is the case and the lever stroke is 2–4 turns, then you have adjusted the handbrake drive on the Lada Grant correctly.
The final stage of the adjustment work consists of installing all the removed parts in the reverse order, after which the parking brake system must be tested under road conditions. To do this, find a suitable section of road with a slope of 23% (or an overpass) and put the car on the handbrake. If the car does not move spontaneously, you can be proud of the result of your work.
And finally, I would like to note that the problem with a non-working hand brake is not always solved by simply tightening the drive. Over time, the cable loses its ability to perform its function due to critical stretching, wear or damage. After all, he has to work in aggressive conditions under the bottom of the vehicle. In such cases, the only solution is to replace the parking brake cable.
How to change the hand brake linkage of a VAZ
So, first, let’s figure out how to replace the handbrake cable on a VAZ 2114 and a VAZ 2115 (the cars are almost the same). We will need:
- wrenches;
- screwdrivers;
- hammer, wooden block;
- penetrating lubricant;
- wheel supports.
We begin repair work if there is an inspection hole.
- First, lower the assembly lever in the cabin.
- Next, at the bottom, loosen the adjusting nut, as well as the lock nut. Unscrew and remove these nuts.
- Having loosened the fastenings of the rear wheels, as well as placing stops under the front ones, we lift the rear part of the car with a jack. We remove the wheels.
- After removing the studs from the brake pads, we knock down the brake drums using a hammer and a wooden block.
- Next, having dismantled the brake pad and unscrewed the bolt on it, you can finally disconnect the end of the handbrake rod from it - each rod from each unit.
- At the rear of each brake unit, we pull out the cable drive in the shell, then remove the shell.
- This releases our treasured part; all that remains is to pull it out of all the fasteners under the body. Then you can install the new one in reverse order.
The handbrake cable on a VAZ 2109 is replaced in the same way. When changing the cable on a VAZ 2110, we also follow the instructions given, but at the same time you will have to unfasten the interfering muffler, or rather, its end part, and then lower it. Otherwise there are no changes. To replace the handbrake cable on a Niva VAZ 2123, we follow the instructions given above, however, before releasing the rods from the wheel brake assemblies, you will have to unscrew the nuts securing the wheel guards.
The same applies to replacing a defective handbrake cable on a Gazelle. There, in the same way, you will have to unscrew two nuts in order to pull the rod removed from the pads out of the wheel guard.
True, on some modifications of the VAZ, the defective part is attached to the underbody using a threaded connection. Then you need to unscrew the nut. By the way, we must first treat all threaded connections with an aerosol-type penetrating lubricant.
What to do with the “manual” assembly of foreign cars
Now let’s discuss the procedure as applied to popular foreign cars. To replace the cable on a Mitsubishi Lancer 10 we will need:
- hammer, wooden block;
- wrenches, screwdrivers;
- wheel chocks;
- penetrating aerosol lubricant.
Also read about replacing the timing chain on an Opel Corse and replacing the license plate light bulb on a Nissan Qashqai. The peculiarity of this car is that part of the assembly, unlike the VAZ, runs inside the cabin. Therefore, the actions here are as follows.
- We unscrew the armrest fastenings, and then remove the armrest.
- We dismantle the rear seat - this is done easily. Then unscrew the handbrake linkage.
- Next, loosen the bolts of the rear wheels, install wheel chocks under the front wheels, and lift the rear of the car using a jack.
- Remove the rear wheels. While in the inspection hole, unscrew the fastening of the part on the rear beam.
- Remove the brake drums using a hammer and a piece of wood.
- We unfasten the brake pads, and then disconnect the ends of the treasured part from them.
- We pull the defective unit into the cabin and disconnect it from the parking system lever.
- We pull the new spare part through and fasten it in the reverse order.
Replacing a broken handbrake cable on a Hyundai Accent is done in much the same way. This car will also have to remove the rear seat.
Interestingly, the German Volkswagen Golf has a similar parking system design. However, to replace the handbrake cable, say, in a Golf 6, you do not need to remove the rear seat. The rods of the wheel mechanisms exit under the bottom through the muffler tunnel. After disconnecting from the equalizer, you just need to pull them down. The handbrake cable of the Volkswagen Passat B4 is replaced in the same way, since the unit here is designed following the example of the Golf.
How to adjust the handbrake on a Lada Granta
Adjusting the handbrake on the Grant is quite simple, you just need to carefully follow the instructions:
- We park the car on a pit or overpass;
- Fully lower the parking brake lever;
- Remove the cushion from the bracket of the additional muffler and unscrew the four nuts that secure the protective screen
- We move the protective screen in the direction of travel of the car
- Hold the adjusting nut with one wrench set to “13” and loosen the locknut
- We adjust the length of the drive using the adjusting nut. When screwing it in, the length of the drive is shortened, and when turned away it increases (during the adjustment process, we periodically check the handbrake stroke);
- If you have achieved the desired result, you can lock the adjusting nut and fasten the protective screen and additional muffler in place.
A necessary tool for tightening the handbrake.
- Two keys for 13. It is advisable that one of them be a socket.
- Head 8.
- A partner, but you can do without him. The truth is it’s more difficult without him.
The principle of adjusting the handbrake
- Fully lower the handbrake lever in the cabin.
- Place the car on a pit or lift it on a lift. Some car owners manage to adjust the handbrake “from the curb” - but this is inconvenient and dangerous.
- Find the resonator from the bottom of the car and remove it from the rubber brackets.
- Using a ratchet, unscrew the 4 bolts securing the protection of the handbrake adjustment mechanism (protective screen).
- Next, you can either remove the protective screen, but it seems to me that it is easier to move it forward behind the muffler, which will free up space that is enough for free work.
- Loosen the first nut with a 13mm wrench.
- By tightening the adjusting nut, tighten the handbrake cable that comes out of the passenger compartment.
- Ask a partner to check the stroke of the lever handle, or check it yourself.
- As soon as the handbrake moves 3-4 clicks, tighten the lock nut.
- Before the final stage of work, it is necessary to check the functionality of the brake mechanism. To do this, hang the rear wheels and watch how they rotate with the hand brake off. They also check how the wheels grip when the handbrake is raised.
- Next, return the protective screen to its place, screw it onto the seats and put rubber fasteners on the resonator.
How to change the handbrake cable on a LADA Granta
Replacing the handbrake cable on a LADA Granta is first done as follows:
- install the car on a viewing hole or lift;
- lower the handbrake lever all the way;
- loosen the tension on the handbrake cable by releasing the adjusting bolt;
- unscrew the pins holding the brake drum and guiding the wheel disc during installation;
- if necessary, use a metal brush to clean the place where the brake drum fits on the hub;
- treat the drum landing area with WD-40;
- press the drum from its seat, evenly screwing the M8 bolts into the threaded holes;
Attention: to prevent the pistons from coming out of the brake cylinders, do not press the brake pedal with the drum removed
- disconnect the thermal shield of the muffler, opening access to the handbrake cable;
- remove the muffler and resonator from the cushions, lowering the exhaust system down;
- Using a 13mm wrench, unscrew the locknut and the handbrake adjusting nut; remove the equalizer from the rod;
- remove the end of the parking brake cable from the equalizer;
- pull out the end of the cable sheath from the bracket on the body;
- Use pliers to bend the cable fastening brackets;
- Using a screwdriver, move the parking brake drive lever forward in the brake mechanism and remove the cable end from it;
- loosen the nut holding the cable on the rear axle beam;
- pull the cable out of the holder;
- remove the cable from the bracket on the body;
- remove the Grant handbrake cable from the brake shield.
Then the cable must also be removed from the other wheel. Installing a new parking brake cable is done in the reverse order. Now you know how to change the handbrake cable on a Grant. But after installing the new cable, it is necessary to adjust the hand brake drive.
Design and location of the hand brake cable for the LADA Granta
The purpose of the LADA Granta handbrake cable is to transmit force from the lever in the cabin to the rear brake pads. It is enclosed in a multi-layer protective shell and has tips for attaching to the handbrake lever and the rear wheel brake drive. The adjusting nut on the cable allows you to adjust the length of the drive, and the return spring returns the system to its original state after lowering the drive lever. The handbrake cable is located under the bottom of the car and is partially covered by the muffler thermal shield.
Causes and signs of failure
The main reason why you have to change the handbrake cable of the LADA Granta is mechanical wear. The constant forces to which the cable is subjected eventually lead to its deformation (stretching) or rupture. The cause of cable breakage can also be wheel bolts of non-standard length, which catch and fray the steel threads of the cable. Signs that the parking brake cable needs to be replaced:
- the cable stretches or breaks, as a result the handbrake lever rises all the way without effort and “does not hold” the car;
- the cable jams in the braid, the pads do not release the brakes, the brake drum heats up when moving.
When a cable jams in the braid, you can try to lubricate it and, if the cause is not frayed threads, the problem may disappear. In all other cases, it is necessary to replace the Grant hand brake cable.
Advice: do not try to “save” the handbrake, using it as little as possible. If the cable moves infrequently in the sheath, it will eventually jam and break.
What is needed to replace the handbrake cable of the LADA Granta
To change the handbrake cable, you need access to the bottom of the car. Therefore, work must be carried out on a lift or inspection pit. In the latter case, you will additionally need a jack. In addition, you need the following tools and materials:
- wheel wrench;
- keys for 10, 12, 13;
- 2 bolts M8x60 mm;
- pliers;
- flat screwdriver;
- WD-40;
- metal brush;
- handbrake cable for LADA Granta.
How to adjust the handbrake on a Lada Granta
Adjusting the handbrake on the Grant is quite simple, you just need to carefully follow the instructions:
- We park the car on a pit or overpass;
- Fully lower the parking brake lever;
- Remove the cushion from the bracket of the additional muffler and unscrew the four nuts that secure the protective screen
- We move the protective screen in the direction of travel of the car
- Hold the adjusting nut with one wrench set to “13” and loosen the locknut
- We adjust the length of the drive using the adjusting nut. When screwing it in, the length of the drive is shortened, and when turned away it increases (during the adjustment process, we periodically check the handbrake stroke);
- If you have achieved the desired result, you can lock the adjusting nut and fasten the protective screen and additional muffler in place.
Source
Adjusting and replacing parts of the Lada Granta parking brake
Page 1 of 2 A
properly adjusted vehicle parking brake should hold the vehicle on a 23˚ incline. The full travel of the parking brake lever should be from 2 to 4 clicks of the lever device.
To adjust the parking brake, place the car on a viewing hole or lift and lower the hand brake lever.
| rice. 1 |
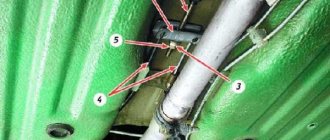
Using a 10mm socket, unscrew the four nuts securing the protective heat shield of the additional muffler.
Remove the rubber cushion from the front mounting bracket for the additional muffler.
We move the protective screen forward so that there is access to the brake adjustment unit.
| rice. 2 |
Use a 13mm wrench to hold the adjusting nut of the cable end and use a 13mm wrench to unscrew the locknut.
To tighten the cable, turn the adjusting nut clockwise.
Check the travel of the parking brake lever. When the parking brake is released, the rear wheels should rotate easily.
Replacing parking brake cables
| rice. 3 |
We replace the parking brake cables when they are pulled out or when they break or become stuck inside the sheaths.
Unscrew the locknut and adjusting nut from the lever rod as described above.
| Remove the cable equalizer from the parking brake lever rod | We take out the cable ends from the equalizer and remove it |
| Remove the end of the cable sheath from the bracket | We disconnect the cable end from the parking brake lever (article - Replacing the brake pads of a Lada Granta car) |
| We remove the cable tip from the hole in the brake shield | Using a 10mm wrench, unscrew the nut and remove the bracket securing the cable sheath to the rear suspension beam |
| We remove the cable sheath from the holder on the rear suspension beam mounting bracket | Use a screwdriver to bend the cable mounting bracket on the body and remove the cable from the bracket |
| Remove the fuel tank heat shield. Remove the cable from the holder on the body | We remove the parking brake cable from behind the protective screen of the fuel lines |
Installation of cables
We install one cable in the reverse order and insert it into the cable equalizer.
| rice. 15 |
We insert the parking brake lever rod into the hole in the equalizer and tighten the adjusting nut several turns.
| rice. 16 |
To facilitate the installation of the second cable, you can make a device from a metal tube 30 cm long and a hole with a diameter of 15 - 16 mm (Fig. 16). At one end of the tube we drill a hole and cut a thread for a screw (M4 - M6).
We secure the cable in the holders on the body and the rear suspension beam mounting bracket.
| We put the tube on the rear end of the cable and fix the cable sheath on the end with a screw | We press the rod on the tip of the cable, compressing its spring |
In this case, the front end of the cable will come out of the sheath and can be inserted into the equalizer.
We perform further installation of the cable in the reverse order. Then we adjust the parking brake as described above.
Source: https://avtomechanic.ru/lada-granta/tormoza-lada-granta/remont-stoyanochnogo-tormoza-lada-granta