Replacing the crankshaft is usually part of an engine overhaul. However, unlike many other components you can simply remove around the engine block, removing, machining and installing the crankshaft requires a special procedure. Since you are replacing or rebuilding the crankshaft, plan to install a new set of bearings as well. With the engine out of the car and the remaining components off the block, you are ready to work on the crankshaft.
Removing the crankshaft
Purpose
The crankshaft pulley is designed to:
- reduce the amplitude of vibration of the crankshaft when it resonates. Actually, for the same purpose, craftsmen make a lightweight crankshaft;
- reduce noise from engine operation;
- rotate the mechanisms involved in the operation of the engine. This is accomplished using a gear and a belt drive;
- the damper also transmits pulses corresponding to the number of crankshaft revolutions to the on-board computer.
The check must be carried out in two stages: a visual check and a check with a multimeter. These two methods will help you accurately determine whether the sensor is working or not.
Visual inspection
It is necessary to look at the sensor and assess its condition; there should be no debris or various shavings on the metal part of the sensor.
Remove the connector from the sensor and assess the condition of the contacts. The connector should be free of moisture and rust.
Crankshaft faults
Let's look at typical crankshaft faults:
- crankshaft seal leaks;
- “oil starvation” of working surfaces;
- mechanical damage to crankshafts;
- natural physical wear and tear;
- abnormal increased physical wear and tear.
As a rule, the first thing motorists encounter is oil leakage from rubber seals (crankshaft seals). This is a widespread problem on used engines. A leaking oil seal requires replacement. In some cases, replacing the oil with a more viscous one will help stop the leak for a while.
Crankshaft oil seal requiring replacement
For crankshafts, as for other engine parts, “oil starvation” is the most dangerous. The cause may be a broken oil pump, a clogged oil supply channel, or low engine oil level. This leads to increased bearing friction and heating of the elements. Continued operation of the engine in this mode will lead to its overheating, complete seizure and major repairs. A “wedge” while running can lead to critical damage to the shaft or other engine components.
Water and fuel getting into the oil change its chemical composition. composition and degree of viscosity. The reason may be significant wear of the cylinder-piston group, damaged gasket structure, microcracks in the engine block or cylinder head.
Damage to the connecting rod journal due to lack of lubrication
Over time, the journals and bearings wear out, the permissible clearance increases, crankshaft play appears, this leads to an increase in vibrations, and the engine begins to “knock.” The characteristic engine knock is a critical signal. When it appears, you must stop driving and immediately contact a car service center. If the crankshaft is unbalanced or improperly mounted, increased, abnormal wear on the contact surfaces may occur.
Replacing the crankshaft
So how do you remove the crankshaft? This will require complete disassembly of the engine. To replace you need:
- standard set of tools;
- torque wrench;
- crankshaft clamp MR 1-233.
Removal of the crankshaft can be performed after dismantling the engine and installing it on a repair stand, timing components, engine equipment, cylinder head, connecting rods and pistons.
Scheme of assembly and installation of the crankshaft Skoda OCTAVIA TDI 1996-2002 in the engine block 1,9,1315,17 - mounting bolts, 3 - flange, front pressure, 4 - bearing shell, 5 - chain sprocket, 6 - crankshaft shaft, 7 — bearing shell, 8 — crankshaft half rings, 10 — bearing cap, 11 — mounting pin, 12 — sensor wheel, 2 — sealing ring (oil seal), 14 — flywheel and drive disk, 16 — intermediate plate, 18 — sealing gasket (with oil seal).
Front SC
We recommend starting with the front one, since this oil seal is the easiest to replace. Even a car owner without much experience can handle it. Once you learn how to change it, you will most likely be able to replace the rear crankshaft oil seal yourself. But it is better to act according to the circumstances.
Retrieving an element
The steps for replacing the front oil seal are as follows:
- Remove the protective cover located on the timing belt;
- Remove your engine protection. You will have to get under the bottom and unscrew the corresponding fasteners;
- Set the piston of the first cylinder to top dead center on the compression stroke;
- Slightly loosen the timing belt tension, after which it can be easily removed;
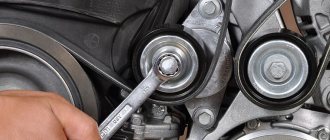
- Remove the front right wheel;
- Remove the generator drive belt, and also do not forget to remove the pulley;
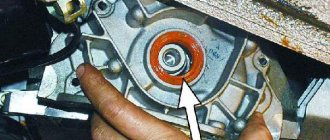
- Now we dismantle the fasteners of the crankshaft pulley and take it out. Here you will need to first remove the key;
Front SC
- Be sure to drain the engine oil from the system. To do this, prepare an appropriate container in advance. If you plan to refill the oil, be sure to keep the container clean and dry;
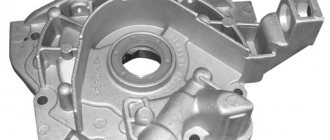
- Remove the oil pump. It is on this that the desired crankshaft oil seal is located;
- To remove the SC, you will need a flathead screwdriver;
- At the same time, check the condition of the oil filter. Replace it if necessary;
- Having dismantled the old front crankshaft oil seal, you can now install a new one in its place;
- Installation of the SC is carried out with a 27 mm nozzle or head;
- Assembly of the unit is carried out exactly in the reverse order.
Since replacing the AC requires serious dismantling work, it is not superfluous to simultaneously check the condition of other units, replace the oil, filter or other parts.
Features of work
The crankshaft position sensor of the VAZ 2110 operates on the inductive principle. The crankshaft pulley is a gear with 58 total teeth. The place of two teeth on the control disk is occupied by a recess, which makes it possible to synchronize the rotation of the crankshaft with the control point of the piston stroke of the first cylinder of the internal combustion engine. As the pulley rotates, the sensor reads the passage of the teeth and at the point where the notch passes, the controller transmits a signal to the ECU.
The ECU, receiving numbers about the location of the crankshaft, issues a signal regarding the order of fuel supply to each cylinder and the formation of a spark.
The crankshaft sensor is installed on a VAZ 2110, with a motor of 8 and 16 valves, on the cover of the oil supply pump near the crankshaft drive disc. Structurally, tracking devices have different layouts, but the principle of operation of the element is based on the design of the Hall element, which reacts to the passage of a permanent magnet.
Crankshaft repair
Repairing or replacing a crankshaft is a labor-intensive process. As a rule, it requires almost complete disassembly of the engine, inspection and troubleshooting of all its components and mechanisms. The crankshaft is removed and axial runout is measured. In case of acceptable wear, the surfaces of the crankshaft journals and connecting rods are ground to fit the repair dimensions of the bearings. The bed with workings is also subject to mechanical processing with “one installation” on a special machine. Boring the crankshaft allows you to install the liner of the next repair size.
Groove of the crankshaft bed
Grinding the crankshaft
Neck sizes have repair tolerances. Simply grinding the crankshaft will not help if the wear or damage is too severe. The crankshaft is not a cheap part, and if we are talking, for example, about large-sized agricultural machinery, the amount will be impressive. Even heavily worn friction surfaces can be restored. The thickness of the excavation is compensated by surfacing using submerged arc welding, plasma spraying of hard alloys, thermal gas spraying, etc. Then the crankshaft is ground and “brought” to the required repair dimensions. This is a technologically complex process, it is better to entrust it to specialists.
Automated gas-thermal spraying of crankshaft journals and balancers
High-quality restoration and grinding of the crankshaft can ensure 100% of its service life. It should be taken into account that with an increase in the repair size, the crankshaft may move from its factory seat. Precise installation of the crankshaft with a selection of bearings will be required. A crankshaft with critical damage or axial bending will have to be replaced.
How to check the crankshaft? Experienced motorists can detect the characteristic knocking sound of the crankshaft by ear using a medical stethoscope. During scheduled maintenance, you can remove the pan, visually inspect the crankshaft for cracks and chips, and use a feeler gauge to check the gaps between the half rings.
Measuring axial displacements of the crankshaft using a feeler gauge
Set of measuring steel probe plates
An increased content of metal shavings in the filter and pan indicates wear of the friction pairs. In such cases, it is urgent to find the reason for the formation of such chips.
The diameter of the crankshaft journals can be measured with a regular micrometer. The parameters of unbalance, runout and axial play of crankshafts are determined using special indicators. To do this, you need to either place the shaft on a special stand or machine, or install an indicator with a magnetic stand on the engine block. The measurement is performed while rotating.
A stand with an installed dial indicator for measuring crankshaft runout
Dial indicator mounted on the engine block
To determine the gap between the crankshaft journals and the bearings, a calibrated plastic wire and a paper template with a special scale are used. The method is quite simple and accessible. A piece of wire is placed on the degreased surface of the crankshaft journal. To fix it, you can use a small amount of thick lubricant. The journal is then covered with a bearing and a cap. The covers are tightened, the wire inside is crushed on the plane of the neck (threaded connections must be tightened with a torque wrench). Unscrew the bolts and remove the cover. Next, it remains to measure the width of the flattened strip with a template. The value will correspond to a fairly accurate gap value.
Measuring the gaps between the journal and the bearing using a calibrated wire and a template