Home / Terms
VAZ-2107 cars, over the years of their production, were equipped with both carburetor and, subsequently, injection engines. Therefore, the electrical circuits for supplying voltage to the electric motor of the engine cooling system fan differ from each other.
On injection
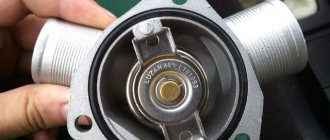
on VAZ-2107 engines, a two-contact fan sensor, which is located in the upper pipe, when the coolant temperature rises above that for which it is designed, it must send a signal to the computer. The electronic control unit, having analyzed the signal, turns on the fan through a relay.
Therefore, the search for reasons for the fan not turning on begins by removing the connector from the sensor with the ignition on. If the fan itself is working properly, then it should work. By inserting a load in the form of a light bulb into the connector terminals, the fan should stop. Thus, you check the electrical circuit of the fan motor. In this case, it will be fine, but the fan sensor will have to be replaced. However, it should be noted that there are also substandard sensors on sale, which, when installed on the engine, will also not work.
If, after removing the connector from the sensor, the fan does not work, then its functionality must be checked by connecting it directly to the battery. There are only two options for the experiment. If the fan is working, then you will have to check the functionality of the fuse that protects this circuit, the fan relay and the ECU. And if the fan does not work, then you will have to check the condition of its brushes for wear.
On carburetor engines
car VAZ-2107, there will be no ECU in the electrical circuit for turning on the fan, and some “sevens” don’t even have a fan turn-on relay. Therefore, it is much easier to find the reason why the fan does not turn on, and many drivers of VAZ-2107 cars can cope with this.
The VAZ 2107 is equipped with an electric radiator cooling fan. It automatically turns on when the coolant heats up to 90 degrees and under normal conditions ensures a stable engine temperature regardless of air temperature and driving mode.
But there is one problem. Sometimes the relay (sensor) for turning on the fan breaks and the radiator fan of the VAZ 2107
won't start. As a result, the engine overheats and the matter, at best, is limited to boiling and leakage of coolant, and at worst, a major engine overhaul. To avoid problems, you can improve the design by organizing forced cooling of the radiator. There are two ways to do this: mechanical and electrical.
Mechanical forced cooling of the VAZ 2107 radiator
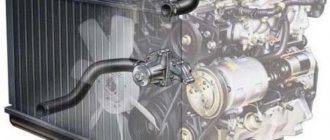
On older VAZ models, the radiator was cooled using an impeller mounted on the water pump rotor. This solution ensured constant airflow to the radiator when the engine was running. Considering that the design of the VAZ 2107 differs little from its “predecessors”, installing such an impeller will not be difficult.
The advantage of this solution is reliability. Forced mechanical airflow of the radiator ensures that the car does not boil while sitting in a traffic jam on a hot day. But at the same time, the efficiency of blowing at low speeds is reduced in comparison with electric blowing. In winter, another disadvantage of forced cooling appears - a cold engine is additionally blown by a fan, which slightly slows down its warming up. The fact that the fan blows on the radiator on a cold engine does not in any way affect the warm-up speed provided the thermostat is working. The fact is that before the engine warms up, the coolant circulates through a small circuit, bypassing the radiator.
The mechanical drive of the VAZ 2107 cooling fan can be improved
:
- Install a diffuser that directs the air flow through the radiator honeycombs. This will improve cooling efficiency.
- Move the radiator a little back, closer to the impeller. To do this, you can tilt its upper part, using rigid steel strips for fastening. The slats must be calculated so that the distance between the radiator and the impeller is approximately 2040 mm.
This way you can protect your car from overheating.
Electric radiator cooling fan (forced)
To prevent a breakdown of the VAZ 2107 fan sensor from causing problems, you can organize forced cooling without replacing the standard electric fan with an impeller mounted on the pump pulley. To do this, it is enough to ensure that the fan is turned on with a button. You will need the following parts and materials:
You will also need a new fan sensor if the old one is faulty. Serviceability can be checked with an ohmmeter or continuity tester. If the fan does not turn on when the lower part of the radiator heats up, it must be replaced.
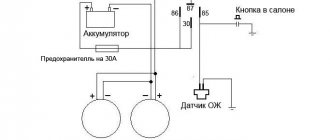
First you need to reduce the current passing through the contacts of the thermal relay that controls the fan. To do this, the VAZ 2107 fan switching circuit must be changed so that it is powered not directly from the sensor, but through an additional relay. In this case, the contacts of the fan sensor (thermal relay) will not burn out, and if the additional relay fails, it will be much easier to replace the latter.
It is also necessary to connect the fan switch button so that when turned on, it duplicates the sensor, supplying voltage to the relay coil when turned on. In this case, if the sensor breaks down, you can manually turn on the VAZ cooling fan and protect the engine from overheating.
Pump replacement, preparation
Oddly enough, installing a new pump will not cost you much. Before starting work, prepare:
- a set of keys;
- new antifreeze;
- the pump itself;
- screwdriver;
- sealant;
- deep container to drain the antifreeze.
It is up to you to decide which pump to buy; it is recommended to buy a factory-made AvtoVAZ one. The original part is more wear-resistant than its plastic counterparts, which can fall apart at the most inopportune moment. Experienced car enthusiasts recommend taking a closer look at the companies Luzar, Nepu and ABRO.
Improving the cooling system with an electric fan
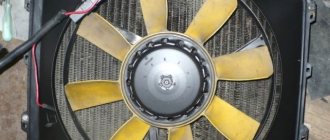
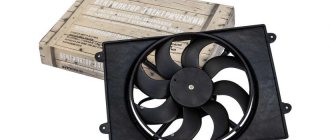
To improve cooling, you can replace the standard VAZ 2107 cooling fan with a more powerful and advanced one. Fans from Viburnum or Priora are suitable for this purpose. The eight-blade fan is especially effective, providing particularly strong air flow.
It is worth considering that the cooling system of the VAZ 2107 was initially designed for efficient operation. If it fails, the reason lies not in an ineffective standard battery, but in clogged radiator cells or a lack of coolant in the system. Therefore, if the engine overheats while the fan is running, it is worth checking the coolant level and cleaning the radiator honeycombs (or replacing it).
This article will talk in detail about the VAZ 2107 forced-air fan. Two types of this design can be distinguished - electrical and mechanical. Any owner of a 7 begins to regret that in the summer, in a traffic jam, his fan switch suddenly fails. After such an incident, as a rule, they begin to think about improving the design. And modernization can be done in several ways.
Button for forced fan activation - installation on Zhiguli.
Forced fan activation is a system that fans of the Soviet automobile industry are forced to use in their cars. The fact is that the electric fan is usually switched on to cool the engine automatically, using a special temperature sensor installed at the base of the radiator.
Over time, due to loose connections and leakage of coolant, the sensor becomes sour and may not work. As a result, the engine may overheat.
In connection with the above, you can display a button for forced fan activation in the cabin. This is done quite simply:
- Take two wires, one end is connected in parallel to the terminals of the fan switch sensor, and the other to the button.
- We insulate everything well with electrical tape.
- We place the button in a convenient place in the cabin.
- Let's turn it on... Hurray! We have forced fan activation.
This system will also be useful in traffic jams: we can proactively turn on the fan so as not to overheat.
Method one - forced mechanical cooling
Perhaps you can call it that. Remember the first VAZ 2101-2107 cars, which did not use electric fans. In them, the radiator was blown through an impeller screwed to the pump rotor. The exact same fan can be installed on a VAZ 2107 injector. The design of the cooling system is not much different.
But we must immediately mention some of the features of this design. The fact is that even in winter the radiator will be blown by air flow. This reduces the engine temperature, so the cabin can be quite cool. It’s good in the summer - the engine is always cooled, the fan is constantly running, the antifreeze does not boil.
But make two more small improvements and summer operation will be just a fairy tale:
- Place a plastic diffuser that will direct the air beam into the radiator honeycombs.
- The upper part of the radiator needs to be installed a little closer to the impeller blades. Fasteners should be made using small strips of hard metal. Try to ensure that the distance from the surface of the radiator to the impeller is in the range of 2-4 cm.
These are the little tricks that will help you improve the cooling of the VAZ 2107 engine. The price of the issue is literally meager - no more than 80 rubles (that’s how much the impeller costs).
Method two - electric
If you have a new car, an injector and an electric fan are installed, is it worth spoiling it with a forced impeller? It would be somewhat more reasonable to leave the electric fan, but make a backup way to turn it on using a button. Purchase several items and materials from the store:
- New sensor (if the old one has become unusable).
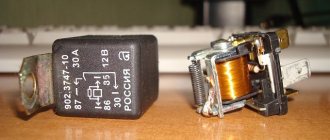
- Electromagnetic relay with normally open contacts.
- Red wire with a cross section of 0.75 square meters. mm.
- A button for installation in the dashboard of a VAZ 2107 (preferably backlit).
- Heat shrink insulation.
- Female connectors and relay socket.
The connection diagram is shown in the photo. First of all, turn off the fan and change the sensor for turning it on. Then you assemble the circuit.
Please note that newer vehicles use sensors that can handle very high currents. But despite this, they still burn out. Sudden loads still quickly damage it. What to do? There is only one way out - to reduce the current at the sensor terminals. To do this, introduce an electromagnetic relay into the circuit. Now the chance of sensor failure is reduced. But the chance of relay failure becomes higher. True, it will be easier to change it.
Install a button to force the fan on in the dashboard and stretch two wires from it - one can be connected directly to ground, and the second to the sensor output. It turns out that your button and sensor contacts are connected in parallel. Therefore, if the sensor fails, you can turn on the electromagnetic relay with a button.
Carburetor sevens
In these cars, the control system for turning on the electric fan is very simple. It can even be called analog. The entire circuit consists of the simplest form of the following elements:
- Electric fan motor.
- Power sensor.
- Wiring.
That's it, there is nothing else, you need to look for breakdowns only in these parts of the structure. In 70% of cases the sensor fails, in 5% the electric fan fails, in 20% the electrical wiring is to blame.
To diagnose a car, I recommend using a fairly cheap solution: install it once and use it always.
But some cars use a slightly more advanced circuit, which includes an electromagnetic relay. With its help, it is possible to remove high currents from the sensor. This increases the resource of the device.
Some drivers who are not used to trusting automation install a regular button parallel to the sensor (and sometimes instead of it). Such a scheme has a right to exist, but the driver himself must be extremely careful in order to notice the temperature rise in time and turn on the electric fan.
Method three - perfect fans
To improve the cooling of the VAZ 2107, you can use more modern ones instead of a standard electric fan. Those that are installed on cars of the Kalina and Priora models are perfect. An electric fan with eight blades will work especially well. The air flow from it will be much stronger, therefore, the radiator honeycombs will cool down faster.
You can even get carried away with the issue of improving cooling and install two such fans. But does this make sense? It would be better then to completely clean the cooling system from the inside, replace all the pipes, and install a pump with an improved impeller. And finally, change the radiator. This will be much more effective than making a huge “collective farm” around the radiator.
All the main electrical circuits and modifications for connecting the liquid cooling fan (CO) in VAZ cars of various models are provided. What is the essence of VO’s work? An electric motor with an impeller on a shaft is installed inside a rectangular metal frame, with which it is attached to the back of the radiator. When voltage (12 V) is applied to the contacts of the drive, it begins to work, rotating the blades and creating a directed stream of air, which, in fact, cools the antifreeze or antifreeze.
If the cooling fan does not work, do not rush to contact a car service. You can determine the cause of the malfunction yourself. Moreover, for this it is not at all necessary to have special skills - just study the reference material from the site
and follow the instructions to check/replace it.
Controller diagnostics
To diagnose the controller, you will need a calibrated thermometer that can operate at the boiling point of water. The diagnostic procedure is carried out as follows:
- Often the sensor facing the inside of the radiator should be placed in water.
- Next, the tester probes are connected to the controller contacts, and they are adjusted to ensure there is no resistance.
- When the liquid begins to heat up, the resistance disappears at approximately 87-92 degrees. If so, then the controller is healthy and will work as expected.
Fan connection 2108, 2109, 21099
Until 1998, on cars with the old mounting fuse block 17.3722 (finger type fuses), relay 113.3747 was included in the fan circuit. After 1998 there is no such relay.
Also, before 1998, the TM-108 switching sensor was used (the closing temperature of its contacts is 99±3ºС, the opening temperature is 94±3ºС), after 1998 the TM-108-10 with similar temperature ranges or its analogues from different manufacturers. The TM-108 sensor only works in conjunction with a relay; the TM-108-10, reinforced for high current, can work both with and without a relay.
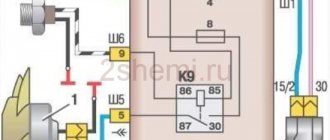
Scheme for switching on the engine cooling fan on a VAZ 2109 with mounting block 17.3722
- Fan motor
- Motor start sensor
- Mounting block
- Ignition switch
K9 - Relay for turning on the fan motor. A - To terminal “30” of the generator
Scheme for switching on the engine cooling fan on a VAZ 2109 with mounting block 2114-3722010-60
- Fan motor
- Sensor 66.3710 for turning on the electric motor
- Mounting block
A - To terminal “30” of the generator
Switch failure
After the fuse, we check the power button. Power from the unit comes to the yellow-blue wire, as already mentioned, and if there is voltage on it, then we check the heater switch.
We take a piece of wire, connect one end to the yellow-blue one and touch the other terminals one by one; if the motor starts working when both terminals are touched, then the switch is working. If the engine does not work in one of the positions, then a conclusion is made that the switch is faulty, but for an accurate assessment you need to check the resistance.
Connecting the VAZ 2107 stove button is shown in the photo.
If there is no voltage at both terminals, the VAZ 2107 heater button needs to be replaced. To do this, pry it up with a screwdriver and pull out the button. We take out the chips from the old button and connect the new one one by one.
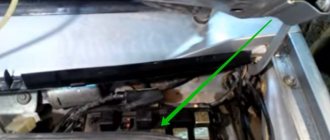
Where is the fan relay located?
4 – electric fan relay; 5 – electric fuel pump relay; 6 – main relay (ignition relay).
Attention: the order of the relays and fuses can be arbitrary, we are guided by the color of the wires. Therefore, we find a relay from which comes a thin pink with a black stripe wire coming from the main relay (pin 85*) (not to be confused with the thin, red with a black stripe wire coming from the controller) and a thick power white with a black stripe wire (pin 87) (white and pink wires we need), this is the fan relay.
The engine runs at one speed
In this case, it may be a malfunction of the button, a burnt-out resistance, or a motor malfunction (break of one winding). If the button is working properly, and the stove fan only works at high speed, then the first thing you need to check is the ballast resistance. It is checked in the same way as a fuse; if it breaks, measure it.
On the “seven”, you can only check it by removing the stove body, since it is located inside the body. In earlier models it is located under the dashboard in the middle, a little closer to the driver.
If the cooling fan does not work
To drive the fan, a DC electric motor with excitation from permanent magnets ME-272 or similar is installed. Technical data of the electric fan and fan switch sensor:
- Rated rotation speed of the electric motor shaft with impeller, 2500 – 2800 rpm.
- Electric motor current consumption, 14 A
- Sensor contact closure temperature, 82±2 degrees.
- Sensor contact opening temperature, 87±2 degrees.
The cooling system fan may not turn on due to:
- electric drive malfunctions;
- blown fuse;
- faulty thermostat;
- a failed thermal sensor for turning on the cooler;
- faulty VO relay;
- broken electrical wiring;
- faulty expansion tank plug.
To check the VAZ fan electric motor itself, we apply 12 V voltage from the battery to its terminals - a working motor will work. If the problem is with the fan, you can try to repair it. The problem is usually the brushes or bearings. But it happens that the electric motor fails due to a short circuit or break in the windings. In such cases, it is better to replace the entire drive.
The BO fuse is located in the mounting block of the car's engine compartment and is designated F7 (20 A). The test is carried out using a car tester turned on in probe mode.
- In a car with a carburetor engine,
you need to check the sensor - turn on the ignition and short-circuit the two wires going to the sensor. The fan should turn on. If this does not happen, the problem is definitely not with the sensor. - For injection cars,
it is necessary to warm up the engine to operating temperature and disconnect the sensor connector, disconnecting it from the vehicle’s on-board network. In this case, the controller must start the fan in emergency mode. The electronic unit perceives this as a failure in the cooling system and forces the fan drive to operate in constant mode. If the drive starts, the sensor is faulty.
Instructions for removing and replacing the sensor
The regulator, which should be in the engine compartment, tends to periodically fail. Accordingly, it will be useful for the owner of the “Seven” to know how to dismantle and install a new controller.
To remove and install the DV, perform the following steps:
- First of all, it is necessary to de-energize the on-board network of the machine. To do this, remove the negative terminal from the battery.
- Next, remove the distribution tank cap, as well as the radiator cap, so as not to create high pressure in the system.
- It is necessary to place a container under the radiator into which the coolant will be drained. Unscrew the radiator tap and drain the antifreeze into a basin or other container.
- After these steps, you need to disconnect the wires from the controller. Then take a 30mm wrench and unscrew the regulator itself using the large nut. Now you can dismantle the device. When removing, be especially careful; the iron o-ring on the regulator must not be lost under any circumstances. Having done this, you can begin installing the new device. During installation, do not forget that immediately before installation, the contact points between the controller and the radiator must be lubricated with sealant. In this case, the sealant must be high-temperature; this process is carried out dry. Using a sealant can prevent coolant leakage.
- After installing the controller, you can tighten the cap on the radiator. Then the assembly is carried out in the reverse order - the previously drained antifreeze is poured in, and the negative terminal of the battery is installed in place. To be sure that the system is working, warm up the engine and wait until the fan turns on. It would also be a good idea to rid the cooling system lines of air pockets. Our resource provides instructions for replacing antifreeze in the “Seven”. If you have any questions, it will help you figure it out, the article is at this link.
Replacing an electric fan in a car
- We park the car on a flat surface and immobilize it with the parking brake.
- Open the hood and disconnect the negative terminal.
- Using a 10mm wrench, unscrew the fastenings of the air filter housing.
- Using a screwdriver, loosen the air duct clamp on the air flow sensor and remove the corrugation.
- We unscrew the screws securing the cover of the air filter housing and remove the filter element.
- Using a size 8 wrench, unscrew the air intake mount and remove it.
- Using a 10mm wrench, then an 8mm wrench, unscrew the nuts securing the fan casing around the perimeter (6 pieces in total).
- Disconnect the wire block on the fan connector.
- Carefully remove the fan casing along with the drive.
- Using a 10mm wrench, unscrew the 3 bolts holding the electric motor to the casing.
- We put a new one in its place.
- We install the structure in place, fix it, and connect the connector.
- We carry out further installation in the reverse order.
Control circuit modernization
The cooling fan on the top ten turns on at a temperature of 100-105°C, while the normal operating temperature of the engine is 85-90°C, so the fan turns on when the engine overheats, which naturally has a negative effect.
This problem can be solved in two ways: adjust the switch-on temperature in the “brains” or make a button. We'll focus on the second one. Turning on the fan from the button is very convenient: if you get into a traffic jam, turn it on, drive out, turn it off, and no overheating occurs.
A button for selecting the fan operating mode was installed in the cabin (always off, constantly on, automatically turned on via a sensor) - this “tuning” is not mandatory, but will be a very useful addition.
There will be a large current at relay contacts 87, 30, on the wire from the battery to the fuse and the fan ground, and therefore we must use wires there with a cross-section of at least 2 mm, otherwise the thinner wire will not withstand it and will burn out.