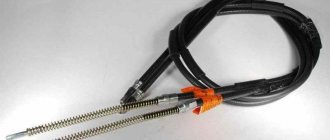
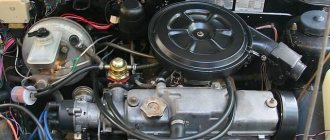
Hi all. I haven’t written about a car in a magazine for a long time; I haven’t had time to create an entry. Back in the summer, I came to the conclusion that the generator somehow gave little charge, the battery began to fail, replaced the battery, then I came to the Auto League for a relay regulator, where an acquaintance suggested a 3-level regulator instead of the standard one, I read a lot about it on the drive, but it didn’t work I got around to ordering it from the manufacturer’s website, but then it was in stock, so I bought this electric miracle.
According to the instructions supplied with the product, I installed the product by dismantling the original regulator and installing a new one, the procedure is not complicated at all, I performed it without removing the genes, because the place allows.
I installed everything and started trying, I was pleased with the result, without load 14.9-15.1 - at maximum voltage,
A three-level voltage regulator VAZ 2114 is required primarily for operating the vehicle in harsh conditions. Unlike conventional devices of this type, which are installed on generators, these have the ability to adjust the output voltage from minimum to maximum. But let's look at the design and device in more detail. But it’s worth starting with a review of the standard voltage regulator. And this is a device that allows you to stabilize the power supply to the excitation winding.
How does a voltage regulator work?
In terms of its design, the three-level voltage regulator VAZ 2114 is a relay with a transistor circuit and resistances connected to it, which, in turn, are connected to the exciting winding on the generator stator.
The principle of its operation is as follows - during its operation, the generator produces current with an unstable, intermittent voltage, the use of which directly in the on-board network could lead to malfunctions and even breakdowns of electronic equipment. In order to eliminate these surges and maintain the voltage produced by the generator at the same level, a stabilizer regulator is needed.
So, when generating too high a voltage, the device includes additional resistors in the circuit, which lower the voltage to the desired level. Otherwise (when the voltage is too low), the stabilizer turns off all resistance in the circuit, and the voltage produced by the generator increases.
Speaking about the operation of the stabilizer, one should also take into account the fact that all these adjustment voltage fluctuations occur at a high frequency, as a result of which the total voltage in the on-board network remains virtually unchanged.
In simple terms, the voltage regulator of the VAZ 2114 generator is responsible for:
- activation of the electric generator;
- control of the current supplied by the generator;
- maintaining the voltage supplied to the on-board network at a stable level.
For the regulator mounted on the 14th model, the standard operating parameters are a nominal voltage of 14.5 volts and a nominal current of 5 amperes.
Generator failure - how to determine?
A breakdown of the generator entails big troubles - electrical appliances may fail and the battery life will be reduced. So, if the voltage regulator relay fails, the generator may produce a voltage greater than required. This can cause problems in the correct readings of electrical appliances, as well as in the operation of the car's lighting.
To independently check the functionality of the generator, you will need a tester and an assistant. First of all, insert the key into the ignition and start the car. The battery light on the dashboard should illuminate to indicate a low charge or an open circuit. It is necessary to warm up the car to operating temperature and turn on all possible devices in it.
Then take a tester and check the voltage at the battery terminals. During this time, your partner should keep their foot on the gas pedal and maintain 3000–3500 rpm of the engine. The voltage on the tester in a VAZ 2114 car with a normal working generator should be at least 12–13 Volts. If the voltage is less, it is necessary to proceed with a detailed check of the device. Urgent repairs are also required if the current is greater than 14.7 Volts. This applies not only to the VAZ 2114, but also to other passenger cars.
When checking the operation of the generator, you need to listen to its sound. The presence of a characteristic hum or noise from belt friction indicates wear of its bearing, in which case a complete repair of the device is necessary. Also, quite often the ground contact on the car’s generator turns out to be poor, because the wire is located quite low in the VAZ 2114. During rainy weather, water gets on it, which causes oxidation of the contact terminal.
Another reason for low voltage may be a tight or sufficiently worn alternator belt. As a result, the generator may not turn the required number of revolutions to maintain normal power supply. In this case, it is necessary to tighten it or replace it. The work of tightening or replacing the alternator belt will not take much of your time, and also does not require specific technical skills.
Signs of regulator malfunction
Sometimes during the operation of a car it happens that the stabilizer fails. Signs of this may include frequent fluctuations and sudden surges in voltage in the vehicle network, problems with electrical appliances and rapid discharge of the battery. If you notice one or more of the above signs, then the relay regulator of the VAZ 2114 generator should be tested using a multimeter.
You can do this as follows:
- Set the tester to measure DC voltage with a limit of 20 volts.
- Measure the voltage readings at the battery terminals with the engine turned off (the result should be from 12.5 to 13 volts).
- Start the engine and measure the voltage at the terminals again (now it should be between 14 and 14.5 volts).
- Without turning off the engine, turn on the high beam, heater and heated glass (other powerful consumers can also be used). Measure the voltage on the battery a third time. The voltage readings should be in the range of 13.2-13.9 volts - this will mean that the stabilizer is fixed. Otherwise, the device will have to be dismantled and replaced.
Traveling in a car with a faulty generator regulator is not profitable and even unsafe, as this can lead to increased fuel consumption, breakdowns in the on-board network, and even a car fire.
You can check the correct operation of the regulator without using a multimeter, with the device removed. To do this, you need to connect its “ground” terminal to the negative of the battery, and connect contacts B and C to the positive. After this, you should take a 3-watt car lamp and connect it to the graphite brushes of the regulator. If the latter is working properly, the lamp will light up.
In some cases, you can go even further and check the trigger threshold. To do this, the regulator should be connected as mentioned above, but between its positive terminals and the plus of the battery, connect a pair of AA batteries in parallel in order to increase the voltage in the network to 16 volts. If the regulator is working correctly, it will interrupt the power supply and the light bulb connected to its brushes will not light up.
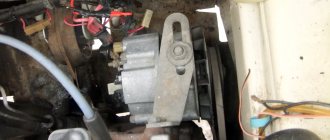
Generator
The generator is designed to generate electricity, which is so necessary for the stable operation of the vehicle's electrical equipment. Additionally, it performs the function of recharging the battery - with a discharged battery it will be impossible to start the engine. For the VAZ 2114 model, the nominal voltage of the electrical circuit is considered to be 12 Volts, but taking into account all consumers (lighting, ignition system, instruments, stove motor, windshield wiper motor, etc.) it should always be higher. Therefore, the voltage in the electrical circuit can range from 13.2 to 14.7 Volts. To maintain it at the required value, a regulator is installed in the generator circuit. Moreover, this device is present in any car, and not just on the 2114 model.
How to replace a voltage regulator
If during the test it turns out that the regulator is faulty, then you should replace it with a new one of a similar model as quickly as possible.
This should be done as follows:
- Disconnect both terminals from the battery.
- Disconnect the block with wires connected to terminal “D” of the generator.
- Remove the rubber cap from the “positive” terminal, using a 13mm wrench, unscrew the nut securing the bundle of wires to the stud.
- Remove the wires from the pin contact.
- Open the 3 plastic clips on the lid.
- Using a flathead screwdriver or narrow blade, remove the cover.
- Using a Phillips screwdriver, unscrew the 2 screws securing the regulator.
- Disconnect the wires leading to the device.
- Remove the regulator housing along with the graphite brushes.
Installing a new voltage regulator should be done in the same order, but in reverse order.
When installing a new regulator, be sure to clean all its contact surfaces and check the tightness of the contacts. Otherwise, failures and incorrect operation of the device may occur.
Finishing the conversation about the voltage regulator, I would like to remind you once again that at the first sign of a malfunction of the device, you should replace it with a new one, since otherwise there is not only a risk of failure of the on-board electronics or increased fuel consumption, but also the likelihood of a short circuit with further fire cars.
Checking the functionality of the regulator
When diagnosing the generator voltage regulator, it is necessary to determine what breakdowns may be revealed during inspection (in order to avoid further malfunctions and effectively carry out preventive procedures).
Malfunctions while driving the car
- The light on the panel and other light sensors do not light up.
- The battery is low/overcharged and the regulator button is dark/bright.
The breakdowns can be as simple as a loose belt, a burnt-out relay, or worn out brushes.
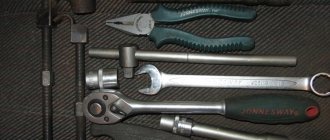
To check the device you will need the following tools:
- sets of keys and screwdrivers;
- various testers;
- lamp 12 Volt 3 Watt;
- wires for connection;
- regulating current sources.
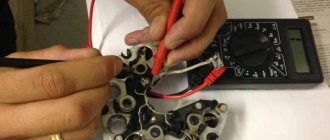
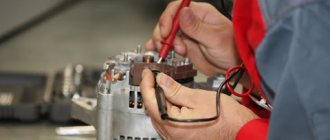
Checking the voltage regulator of the VAZ 2114 generator is carried out together with brush holders in order to immediately check the entire mechanism. You should carefully examine the condition of the brushes, their fragility, mobility, and length.
Check without removal. Using a voltmeter, we measure voltage readings. The optimal result is 13.5 - 14.2 V. If the data does not correspond to the norm, then there is a high probability of mechanism failure.
Before checking the voltage regulator and removing it from the car, you need to make sure that the fault lies in it and not in other components of the generator. How can I check this?
The first test option is diagnostics with the engine running using a voltmeter
What should be done? Start the engine and check the indicator light; if it does not go out and flashes brightly, it means there are problems in the generator. After a few minutes, when the engine increases speed and creates maximum conditions for the network load, we connect the meter and set 3500 rpm. Less than 13 Volts - the battery is completely discharged, when more - the regulator on the car needs to be replaced.
When you hear unusual noise from the unit, it means the bearings have failed, resulting in the drive belt being too tight. To adjust it, you need to turn off the ignition and release it. The deflection when pressed should not be less than two centimeters.
The second option is to check the mechanism on a stand
Before placing the electrical unit on the stand, you need to visually assess the condition of the brushes and slip rings of the commutator. Rings must be clean and dry. At the output, the current indicator gives at least 13 Volts, and the rotor speed is 6000 min-1. After 10 minutes of generator operation, the power output force can be measured. For a working unit, the indicators vary within 80 A.
If the indicator is less than normal, you need to look for faults in the starter windings or generator valves. If the indicators are not within the acceptable values, then we need to change the brush holder.
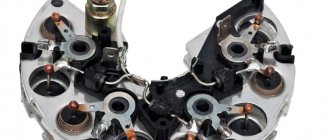
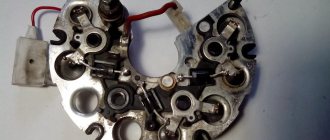
There are three valves with a red mark that provide a positive charge on the housing, they are located in the same plate of the rectifier block. Three more mechanisms have a negative charge, indicated by a black mark, connecting to ground.
Third option - check the serviceability of the winding and diodes
The multimeter shows the level of winding resistance; if there are malfunctions, there may be no indicators (break), or they will differ significantly from the norm - 4.5 Ohms. To fix the problem, the correct solution would be to replace or rewind the product.
Where is the main relay located on the VAZ 2114?
The main relay or ignition relay is responsible for operating the starter and starting the power unit. It adjusts the voltage for starting the motor and protects the trigger mechanism in case of increased voltage in the circuit.
Thanks to its operation, it is sometimes possible to use the car when the battery charge is insufficient. The relay protects the ignition switch contacts from melting and burning after starting the engine.
The main relay on the VAZ 2114 is located in the cabin, under the panel, to the left of the steering wheel behind the decorative cover. To see the part, you need to remove this plastic cover. Some owners manage to get it out without removing the element, but doing so is inconvenient. This is possible with precise knowledge of the installation location of the part and skill. Beginning repairmen should not do this. In some cases, access to an electrical component may require removal of the instrument panel. This depends on the year of manufacture of the car or changes made to its design by the previous owner, which is often found on domestic cars.
Signs of a relay malfunction
The part often fails over time. It is initially of poor quality. Therefore, its service life may be short. Symptoms that indicate a faulty relay include:
- Difficulty starting the engine or inability to start the engine. These problems can be either constant or recurring. In this case, the battery is serviceable and charged;
- The heater works intermittently. The intensity of its work may change unexpectedly or it may stop functioning for a while. Sometimes the stove refuses to turn on at all;
- Windshield wipers and heated windows do not work well. The wipers and heating may operate intermittently or not turn on at all.
How to check the ignition relay?
There are several ways to make sure that the relay has burned out. You can do this on your own. Sometimes it is enough to remove it and see the melted or broken parts. It may crack or develop other visible defects.
After a long drive, the transmission can become very hot. This indicates its malfunction or low power.
The main relay for this model is designed for a current of 70 Amps. But perhaps the part has less power or there are many additionally installed consumers on the car. You can check this by disconnecting several of the devices.
If after this the element stops heating, then its power is too low. It is necessary to buy a part of a similar design, but designed for a higher current.
You can check the functionality of the ignition relay with a multimeter. To do this, set it to voltmeter mode. They need to measure the voltage on the starter winding and the output of this part. If voltage is present, the element is working.
You can test the part with a multimeter in ohmmeter mode. Measurements are carried out in a similar way. The value on the device screen is completely unimportant. The presence of any indications indicates the serviceability of the relay. If there is no indication, it needs to be replaced.
You only need to buy a similar element designed for this car model. Defective products are often found on sale. Therefore, if after installing a new relay the problem does not disappear, you should check this part again. All the previously mentioned methods are suitable for this. In the case discussed above, it is necessary to purchase an electrical component of slightly higher power. Most likely it will be from another car. Therefore, for selection you need to take the old relay with you. If, after replacing the element and if it is known to be in good working order, problems with starting the engine or the heater persist, you should look for another reason. It is a good idea to test all the wiring of the machine. It could rot or fray over time. Other parts of the car may also be to blame for the malfunction. If self-diagnosis of electrical equipment is difficult, you need to contact an electrician at a car service center.
Source
Mounting block 2114-3722010-18
Circuit breakers
- Headlight cleaners (when turned on)
- Headlight wiper relay (contacts)
- Headlight washer activation valve
- Turn Signals and Relays - Hazard Light Interrupter (in Hazard Mode)
- Hazard warning lamp
- Tail lights (brake lights)
- Interior lighting
- Rear window heating element
- Relay (contacts) for turning on the heated rear window
- Socket for portable lamp
- Cigarette lighter
- Engine cooling fan electric motor and its activation relay (contacts)
- Sound signal and relay for its activation
- Power windows for front doors
- Power window relay
- Headlight cleaners (in operating mode)
- Relay for turning on headlight cleaners (coil)
- Heater fan motor - heater fuse
- Window washer motor
- Rear window wiper motor
- Rear window washer timing relay
- Windshield and rear window washer activation valves
- Relay (winding) for turning on the electric fan of the engine cooling system
- Relay (coil) for turning on the rear window heating
- Rear window heating indicator lamp
- Glove compartment lamp
- Left fog lamp
- Right fog lamp
- License plate lights
- Engine compartment lamp
- Instrument lighting lamps
- External lighting indicator lamp
- Heater lever illumination display
- Cigarette lighter lamp
- Left headlight (side light)
- Left rear light (side light)
- Right headlight (side light)
- Right rear light (side light)
- Left headlight (high beam)
- Indicator lamp for high beam headlights
- Turn Signals and Relays - Turn Signal and Hazard Light Interrupter (in Turn Signal Mode)
- Turn signal indicator lamp
- Rear lights (reversing lights)
- Gearmotor and windshield wiper activation relay
- Generator field winding (when starting the engine)
- Brake fluid level warning lamp
- Oil pressure warning lamp
- Carburetor choke warning lamp
- Parking brake warning lamp
- Signal lamp "STOP"
- Coolant temperature gauge
- Fuel level indicator with reserve warning lamp
- Voltmeter
- Headlight wiper relay
- Relay-breaker for direction indicators and hazard warning lights
- Windshield wiper relay
- Lamp health monitoring relay
- Power window relay
- Horn relay
- Heated rear window relay
- High beam relay
- Low beam relay
Mounting block 2114-3722010-60
Circuit breakers
- Fuse for fog lights VAZ 2114, 2115 - rear fog light lamps and rear fog light indicator lamp
- Direction indicators
- Relay-breaker for direction indicators and hazard warning lights (in hazard warning mode)
- Hazard warning lamp
- Front interior lamp
- Central interior lamp
- Luggage compartment lamp
- Ignition switch illumination lamp
- Engine control lamp
- Brake lamps
- Trip computer (if installed)
- Portable lamp connection socket
- Rear window heating relay (contacts)
- Rear window heating element
- Sound signal
- Horn relay
- Cooling fan motor
- Fan fuse
- Electric windows
- Power window relay (contacts)
- Heater motor
- Heater fuse
- Windshield washer motor
- Electric motors for headlight cleaners (in operating mode)
- Cigarette lighter
- Glove compartment lamp
- Rear window heating relay (winding)
- Fuse for fog lamps VAZ 2114, 2115 - Right fog lamp
- Fuse for fog lamps VAZ 2114, 2115 - Left fog lamp
- Side light lamps on the left side
- Side light indicator lamp
- License plate lamps
- Engine compartment lamp
- Instrument lighting switch
- Fuse for backlight lamps of switches, instruments, cigarette lighter, ashtray, heater control levers
- Side light lamps on starboard side
- Left headlight (high beam). High beam indicator lamp
- Direction indicators
- Relay-breaker for direction indicators and hazard warning lights (in turn indication mode)
- Reversing lamps
- Lamp health monitoring relay
- On-board control system display unit
- Instrument cluster
- Low oil pressure warning lamp
- Parking brake indicator lamp (brake lights)
- Brake fluid level indicator lamp
- Low battery indicator lamp
- Trip computer (if installed)
- Generator field winding (in engine starting mode)
- Headlight wiper relay
- Relay-breaker for direction indicators and hazard warning lights
- Windshield wiper relay
- Relay for monitoring the health of brake lamps and side lights
- Power window relay
- Horn relay
- Heated rear window relay
- High beam relay
- Low beam relay
Source
Generator check
You can't do this without the help of another person. We ask a friend to get behind the wheel, start the engine and use the gas pedal to raise the speed to 3000-3500. In this case, the high beam headlights, rear window defroster + heater must be turned on. We use a tester to check the battery and the supplied voltage, which should be around 13.2-13.6 volts. If the readings are lower, then the reason is a break or short circuit in the generator windings or their oxidation. If in this case you turn off the lights and other consumers, the voltage charge level should return to the values specified above. Also, the alternator belt may be loose, the diode bridge has oxidized, or the alternator brushes may be worn out. When replacing brushes, do not forget about their holders.
If oxidized wires or slip rings are to blame, then we clean or wipe with ordinary gasoline. We tighten a stretched belt, and replace a torn belt. Instead of faulty rectifier units and voltage regulator, we install new spare parts of the same brands and parameters. Increased noise during operation indicates wear of the generator bearing. It is cheaper to simply replace such a bearing. A faulty diode bridge is indicated by its melted components.